Using the System Action Center 
You use the System | Administration | System Action Center to create and manage rules that specify when system notifications are triggered and where they are sent. Triggered notifications always appear in the Notification Center, available under the  in the main toolbar. You can also configure notifications with both email and Slack actions to send messages to specified recipients, including both those defined in the System | Configurations | Recipients page and those you specify manually on demand.
System notifications help you keep tabs on important system events in the following categories:
-
Case Management – Get notifications when cases are assigned, closed, escalated, created, updated, or have a score that meets or exceeds a specified threshold.
-
Cluster Health – Find out proactively when either the Data Analyzer (DA) or Data Lake (DL) cluster's health is in the red state.
-
Connector Monitoring – Get notifications when specified connectors haven't sent data over a given time interval so you can address issues in real time.
-
Device Sensor Monitoring – Get notifications for different device sensor health issues (for example, no data or heartbeats).
-
Data Storage Capacity – Find out when your data storage is reaching either its soft or hard cap.
-
Disk Capacity – Get notified when root disk usage is reaching its limit.
-
NFS Data Sink Capacity – Get notifications when an NFS Data Sink's storage is reaching either its soft or hard cap.
The following additional system notifications are available as part of an Early Access Program and may not be available in your version of the Stellar Cyber Platform. Contact your account manager to inquire about taking part in an Early Access Program.
-
Scheduled Report Monitoring – Get notifications when a scheduled report fails.
-
Server Sensor Monitoring – Get notifications when server sensors experience a change in status, stop sending data, or stop sending heartbeats.
-
User Modifications – Get notifications for a wide variety of events related to user accounts and RBAC policies.
Refer to Best Practices for the System Action Center for guidance on ways you can use the System Action Center effectively in your organization.
See the following sections for details on working with the System Action Center:
Required Privileges
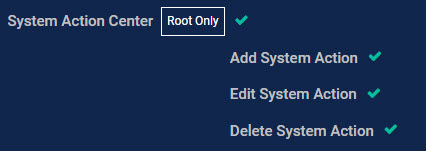
The System Action Center is only available to accounts with both Root scope and the System | Administration | System Action Center privilege assigned to their profile in theSystem | Role-Based Access Control page. By default, this includes only the Super Admin role. The necessary privileges in the Role-Based Access Control page are shown below:
Working with the System Action Center Page
The System Action Center lists each of the defined system action rules in a standard Stellar Cyber table, as shown below.
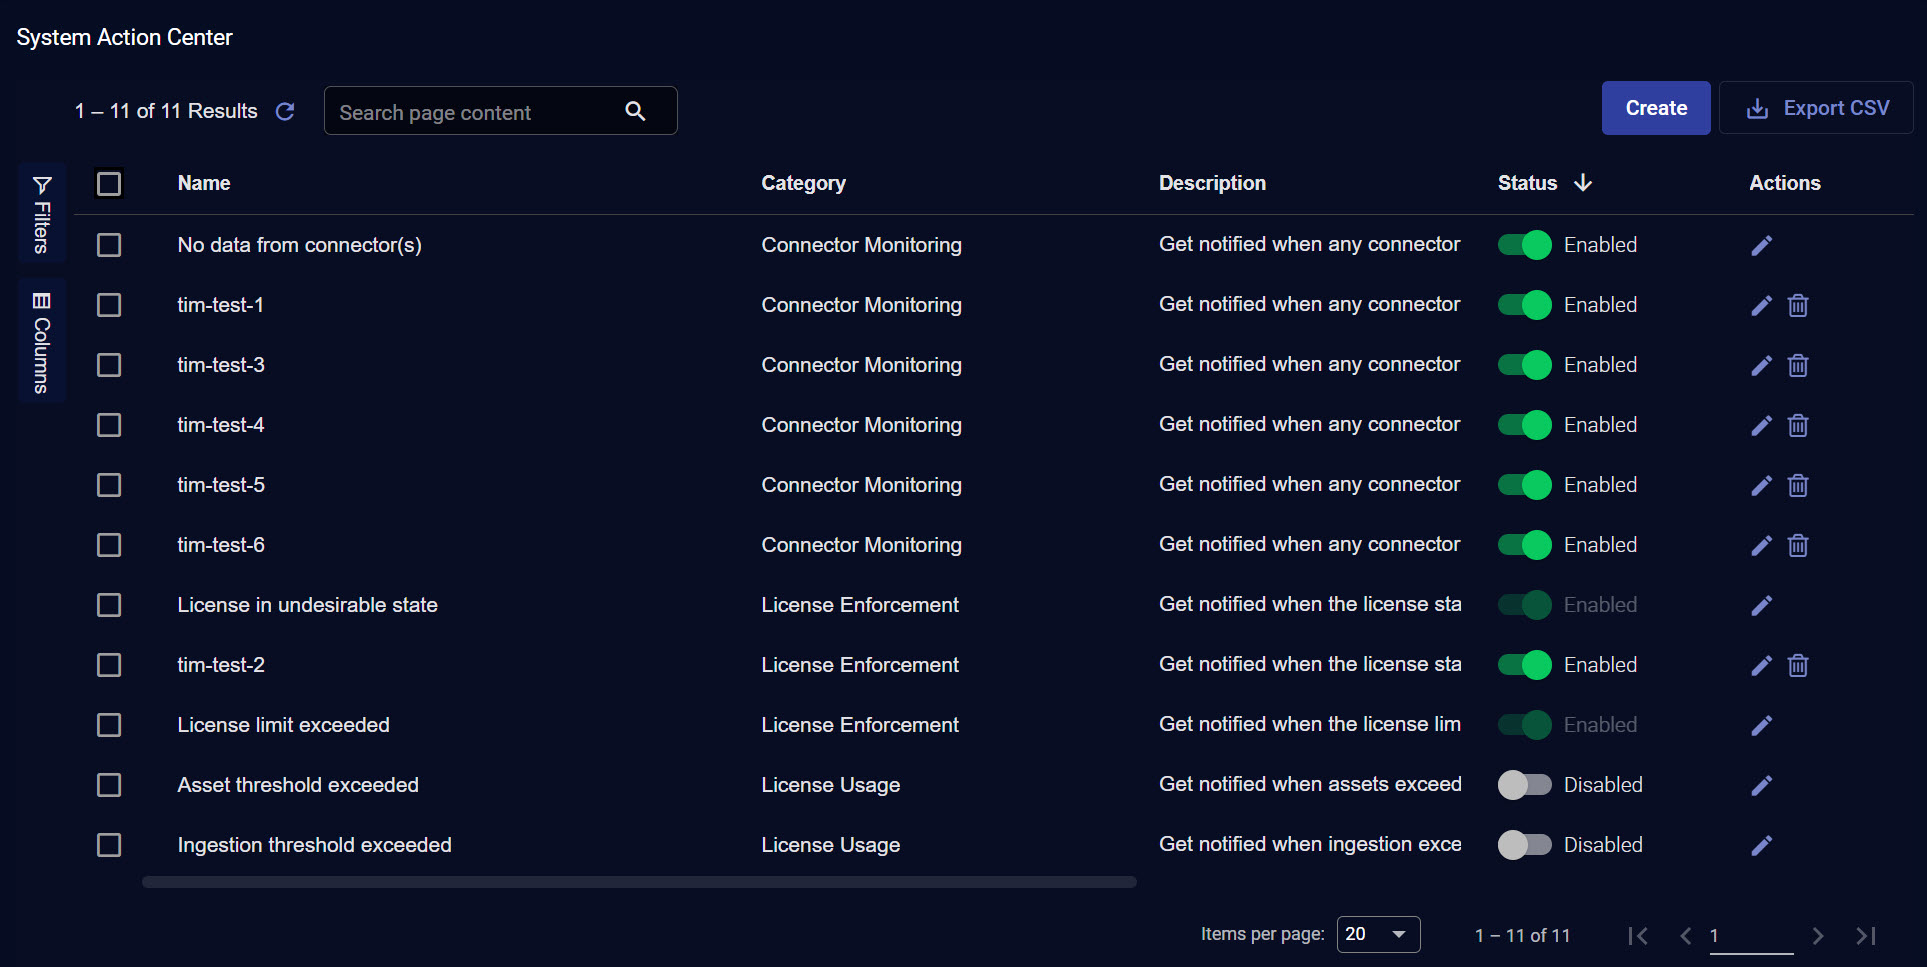
The rules listed in the System Action Center are not affected by the Tenants filter in the main toolbar at the top of the display. All rules are shown.
Available System Action Rules
The table below summarizes the available System Action Rules. Further details on each rule type are provided later in the topic.
Some of the rules in the table are only available as part of an Early Access Program and may not appear in your version of the Stellar Cyber Platform. Contact your account manager to inquire about taking part in an Early Access Program.
|
Category |
Name |
Description |
Default |
|---|---|---|---|
| Case Management | Case assigned | Notify user a case has been assigned to them. | Disabled |
| Case Management | Case closed | Notify user that a case has been closed. | Disabled |
| Case Management | Case escalated | Notify user that a case has been escalated. | Disabled |
| Case Management | Case meets threshold | Notify users a case has met a desired notification threshold. | Disabled |
| Case Management | Case updated | Notify user that a case has been updated to 'In Progress' status. | Enabled |
| Case Management | New case created | Notify users of a new case has been created. | Disabled |
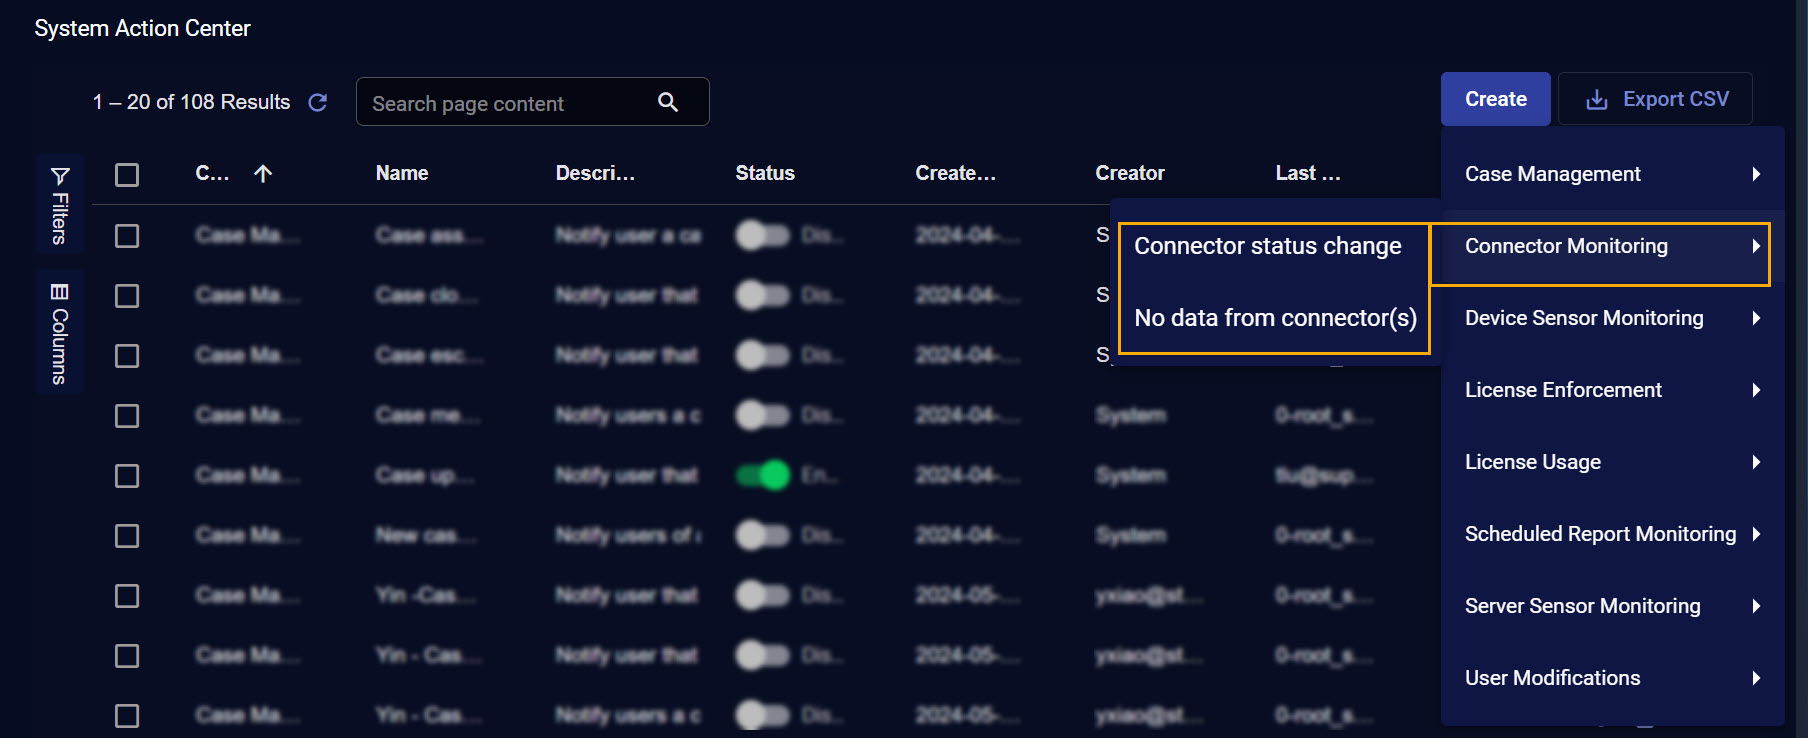
| Connector Monitoring | No data from connector(s) | Get notified when any connector doesn't send data within a set amount of time. | Enabled |
| Connector Monitoring | Connector status change | Get notified when the health status of any connector changes from healthy to unhealthy. | Enabled |
| Device Sensor Monitoring | No heartbeat from device sensor(s) | Get notified when any device sensor doesn't send heartbeat within a set amount of time. | Disabled |
| Device Sensor Monitoring | No data from device sensor(s) | Get notified when any device sensor doesn't send data within a set amount of time. | Disabled |
| Device Sensor Monitoring | Device sensor ingestion change | Get notified when any device sensor ingestion changes unexpectedly. | Disabled |
| Device Sensor Monitoring | Device sensor status change | Get notified when the health status of any device sensor changes to unhealthy. | Disabled |
| Device Sensor Monitoring | Device sensor feedback | Get notified when any Device sensor sends a supported feedback message (for example, when a sensor has been upgraded). | Disabled |
| Scheduled Report Monitoring | Scheduled report failed | Get notified whenever a scheduled report fails to execute successfully. | Disabled |
| Server Sensor Monitoring | No data from server sensor(s) | Get notified when any server sensor doesn't send data within a set amount of time. | Disabled |
| Server Sensor Monitoring | No heartbeat from server sensor(s) | Get notified when any server sensor doesn't send heartbeat within a set amount of time. | Disabled |
| Server Sensor Monitoring | Server sensor status change | Get notified when the health status of any server sensor changes to unhealthy. | Disabled |
| User Modifications | Account lockout triggered | Get notified whenever any user's account is locked due to login failures. | Disabled |
| User Modifications | Account password change | Get notified whenever any password policy is changed. | Disabled |
| User Modifications | New RBAC profile created | Get notified whenever a new RBAC profile is created. | Disabled |
| User Modifications | New user created | Get notified when a new user is created. | Disabled |
| User Modifications | RBAC profile deleted | Get notified whenever an RBAC profile is deleted. | Disabled |
| User Modifications | User RBAC privilege escalation | Get notified whenever a user's privilege profile is escalated. | Disabled |
| User Modifications | User deleted | Get notified when a user is deleted from the platform. | Disabled |
| User Modifications | User has disabled 2FA | Get notified whenever a user disabled 2FA. | Disabled |
System Action Center Fields
The System Action Center lists the defined notification rules with the following information:
-
Name – The name assigned to the rule when it was created.
-
Category – Rules are available in the following categories – Case Management,
-
Type – Each category of rule has multiple rule types available.
-
Tenant – The tenant to whom the notification rule belongs.
-
Description – Either the standard description of the rule provided by Stellar Cyber, or the description provided when the rule was created.
-
Creator – The user account that created the rule.
-
Status – Rules can be either Enabled or Disabled using the toggle in this column.
Changes to a rule's status require a few minutes to take effect. During this time, for example, you may still receive notifications for a rule you have disabled.
-
Edit and Delete icons.
-
Clone – When you check a rule's box, a new Clone button appears that lets you make a copy of the selected rule for editing. This is useful when you want to create a new rule that is very similar to an existing rule.
When you clone a Case Management rule, Stellar Cyber automatically disables the Send to case assignee option to help prevent duplicate emails.
In addition, the System Action Center supports standard Stellar Cyber table functionality:
-
Sort on column headers.
-
Click the "hamburger" menu available in a column header to pin, autosize, or reset columns.
-
Use the collapsible Filters tab to control what's displayed in the table.
-
Use the collapsible Columns tab to add/remove columns from the table.
-
Export the table in CSV format.
Creating New System Notification Rules
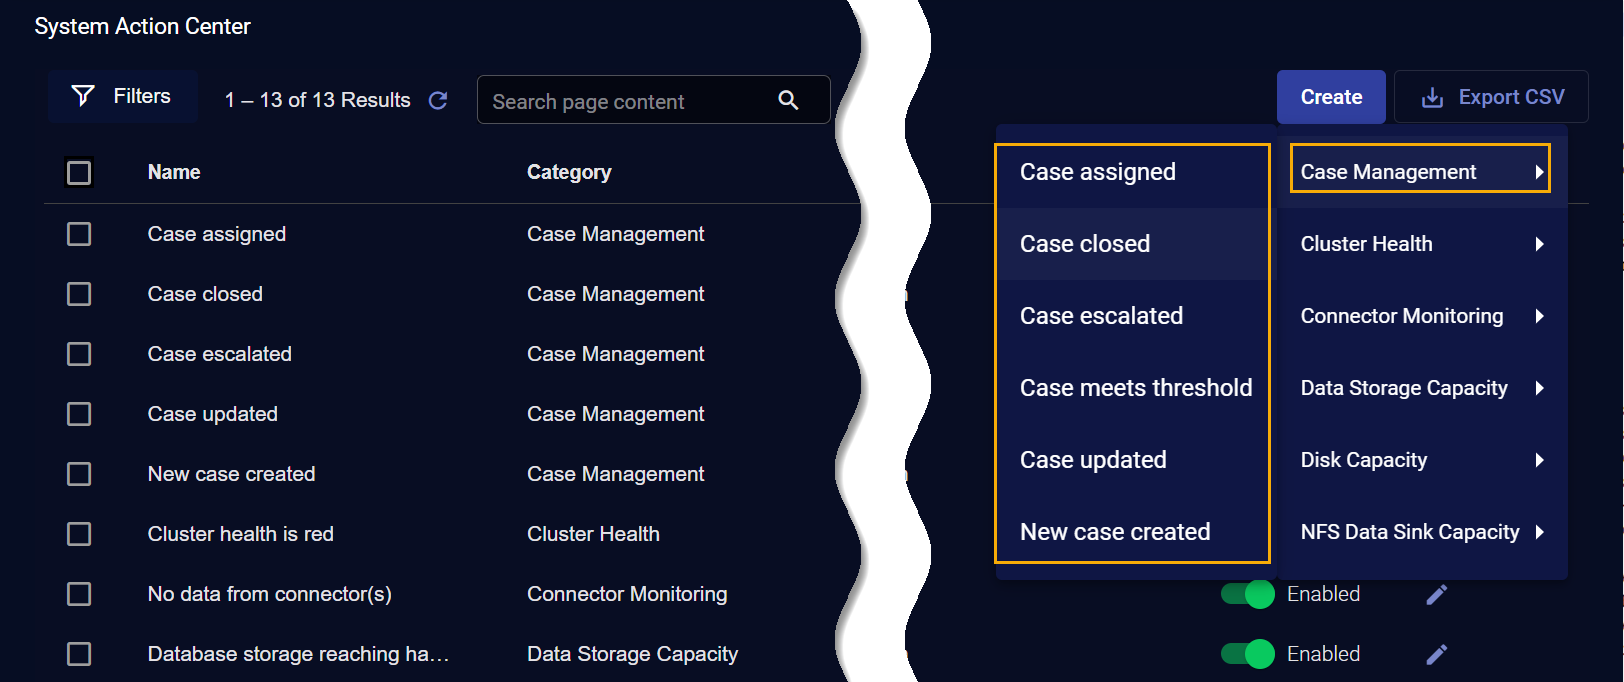
You create a new system notification rule by clicking the Create button at the top of the System Action Center, selecting the category and type of rule you want to create from the menu that appears, and following the wizard's prompts. Alternatively, if you want to use an existing rule as a template for a new one, you can check the box for the source rule in the list and click the Clone button to create an editable copy.
Click the headings below for specific instructions on the type of rule you want to create:
About System Notification Actions
When you create a new system notification rule using the instructions in the sections below, you always have the option of configuring actions for the rule. The System Action Center supports the following action types:
-
Email – Email actions send emails to specified recipients, including both those defined in the System | Configurations | Recipients page and those you type into the wizard manually.
-
Slack – Slack actions send Slack messages to specified channels or recipients using the URL for an incoming webhook that you create in the Slack API. You can select a Slack recipient defined in the System | Configurations | Recipients page or type in the URL for the incoming webhook manually.
Email and Slack messages both include a summary of the event that triggered the notification and a link back to the Stellar Cyber platform to a location that makes sense based on the type of notification that was generated. You can configure a rule with any combination of email and Slack messages, including multiple destinations.
In addition to performing any custom actions you configure, triggered notifications also always appear in the Notification Center, available under the icon in the main toolbar.
The contents of email and Slack messages are not yet configurable.
Creating a Case Management Notification Rule
Case Management rules notify you when specified case-related events take place. You can create rules that notify you when the following events related to cases take place:
-
Case assigned
-
Case closed
-
Case escalated
-
Case meets threshold
-
Case updated
-
New case created
The mechanics for creating a case management notification rule are mostly the same regardless of the specific type of rule you are creating. The differences are summarized in the procedure below:
-
Click the Create button at the top of the System Action Center and select Case Management from the dropdown that appears.
-
Select the type of Case Management notification rule you want to create.
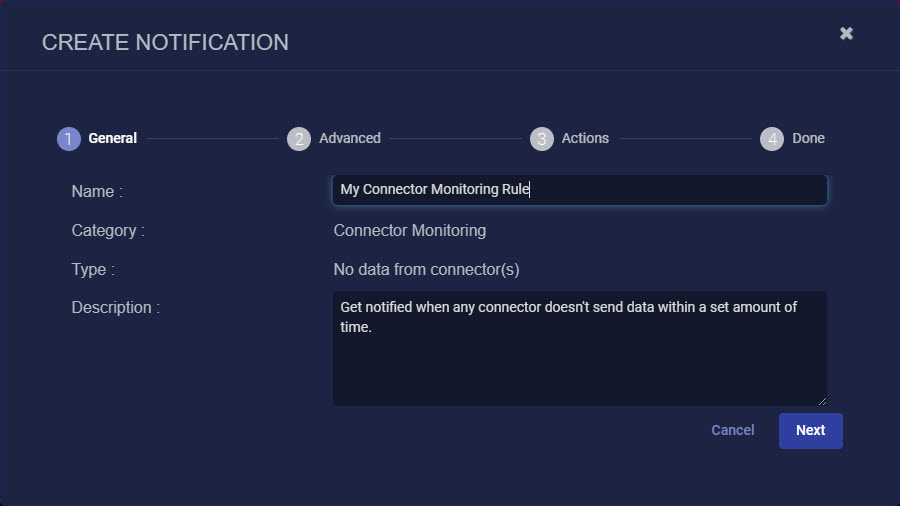
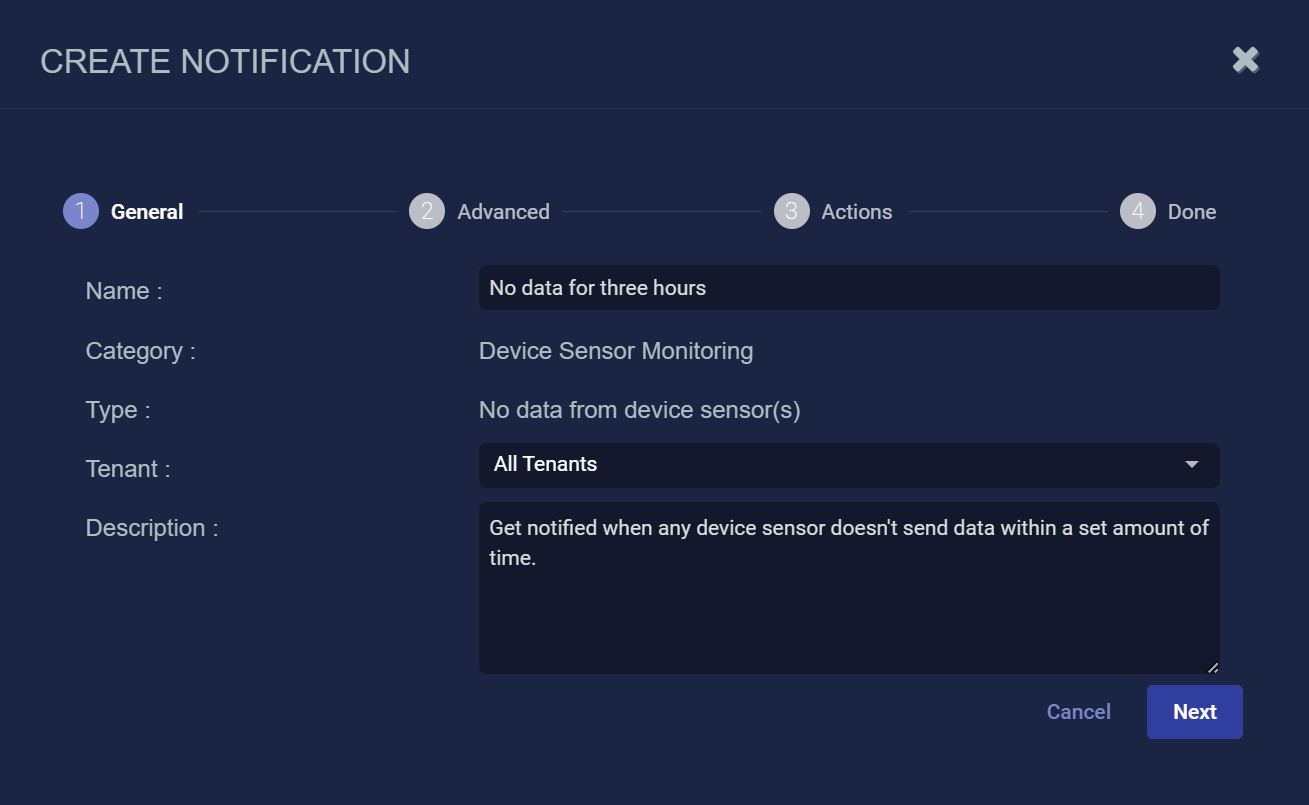
The Create Notification wizard starts with the Category set to Case Management and the Type set to the rule type you selected.
-
Supply a name for your notification rule in the Name field.
-
Select the Tenant to which the rule applies. By default, All Tenants are selected. Click anywhere in the Tenant field to display a pick list including all tenants available on the system where you can select the tenant to which this rule applies.
-
You can either accept the system-provided Description or supply your own. The description supplied here appears in the System Action Center's table of rules.
-
Click Next.
-
Use the Advanced step to specify details related to the type of case management rule you selected. The options are different for each rule type and are summarized in the table below:
Case Management Rule Type Description
Configuration Options Case assigned Generates a notification when a case's Assigned to field in the Case Details page changes.
Check the Send to case assignee box to send an email notification to the case's assignee. This email is sent in addition to any other email or Slack actions you specify in the Actions step. Case closed Generates a notification when a case's Status is changed to Resolved in the in the Case Details page.
Case escalated Generates a notification when a case's Status is changed to Escalatedin the in the Case Details page.
Case meets threshold Generates a notification when a case's score meets a threshold you specify.
Use the Score Threshold option to specify the case score at which this notification is generated. Case updated Generates a notification any time an update is made to a case.
Check the Send to case assignee box to send an email notification to the case's assignee. This email is sent in addition to any other email or Slack actions you specify in the Actions step.
New case created Generates a notification when a new case is created.
Use the Score Threshold option to set a minimum score threshold at which new case notifications generate notifications. This lets you tune the noise level for the rule; a higher minimum threshold generates fewer notifications. -
Click Next when you are ready to continue.
-
Use the Actions step to specify how this rule notifies you when it is triggered:
-
All rules have In Platform enabled so that triggered instances appear in the Notification Center.
-
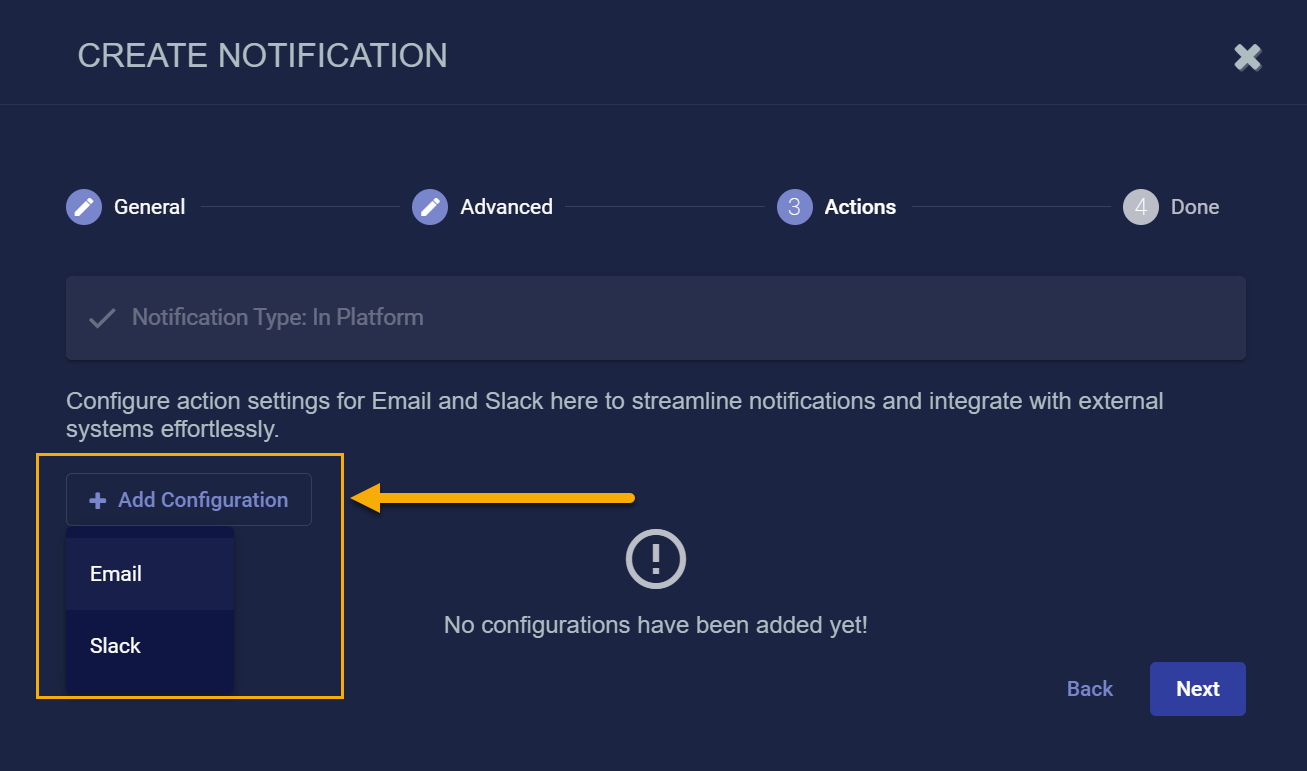
Click the Add Configuration button and choose whether to add an Email or Slack action, as illustrated below.
-
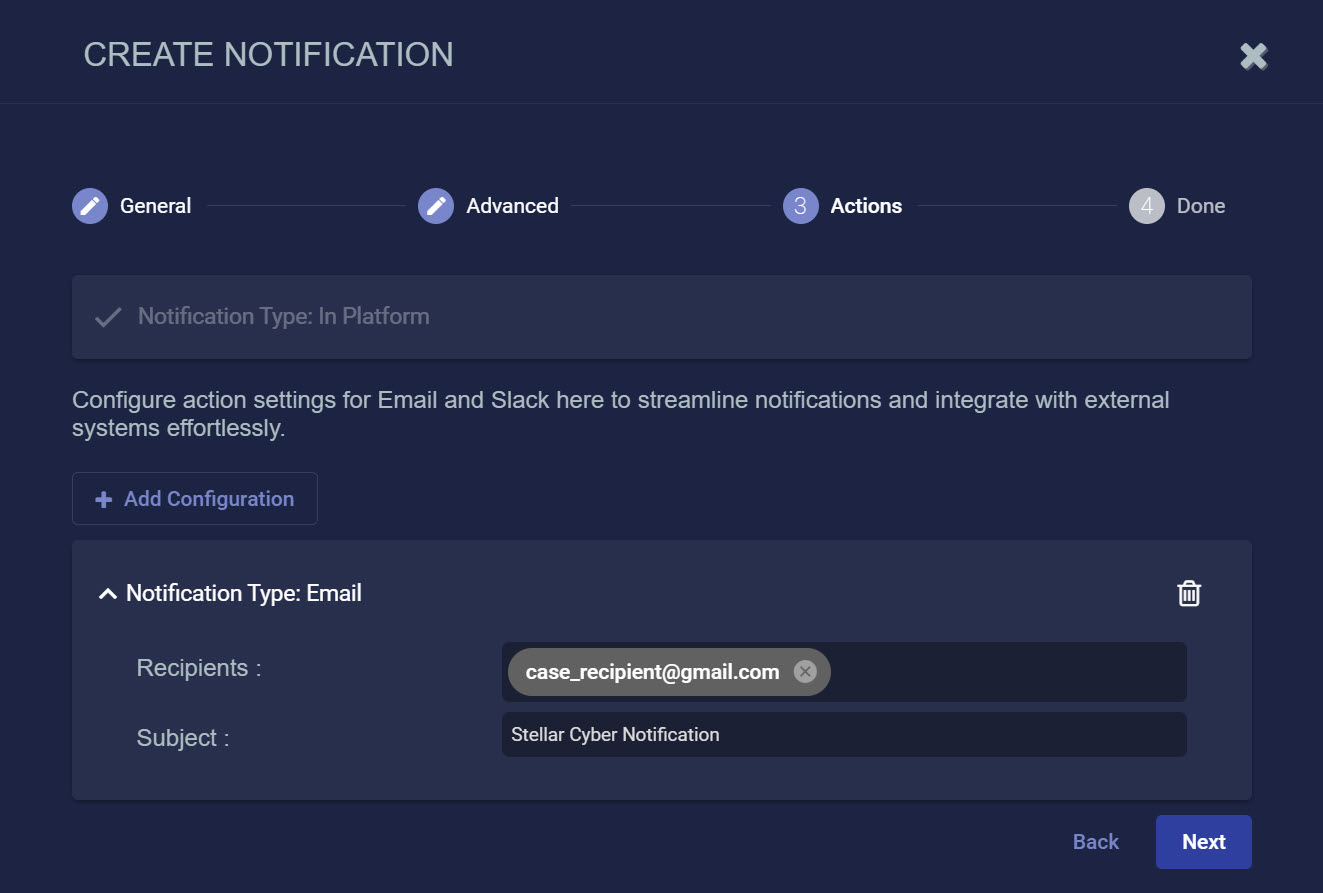
Set the following options for an Email action in the Notification Type: Email section:
-
Use the Recipients field to specify who will receive a notification email when the rule is triggered. Click to display a pick list containing all email recipients configured in the System | Configurations | Recipients page. If you want to send an email to someone who is not already configured in the Recipients page, you can also type addresses in manually.
-
Use the Subject field to specify the subject line of the email. If you want to use different subject lines for different recipients, you can click the Add Configuration button and add a second Email notification with a different subject line and set of addressees.
The figure below shows a configured Email notification:
-
-
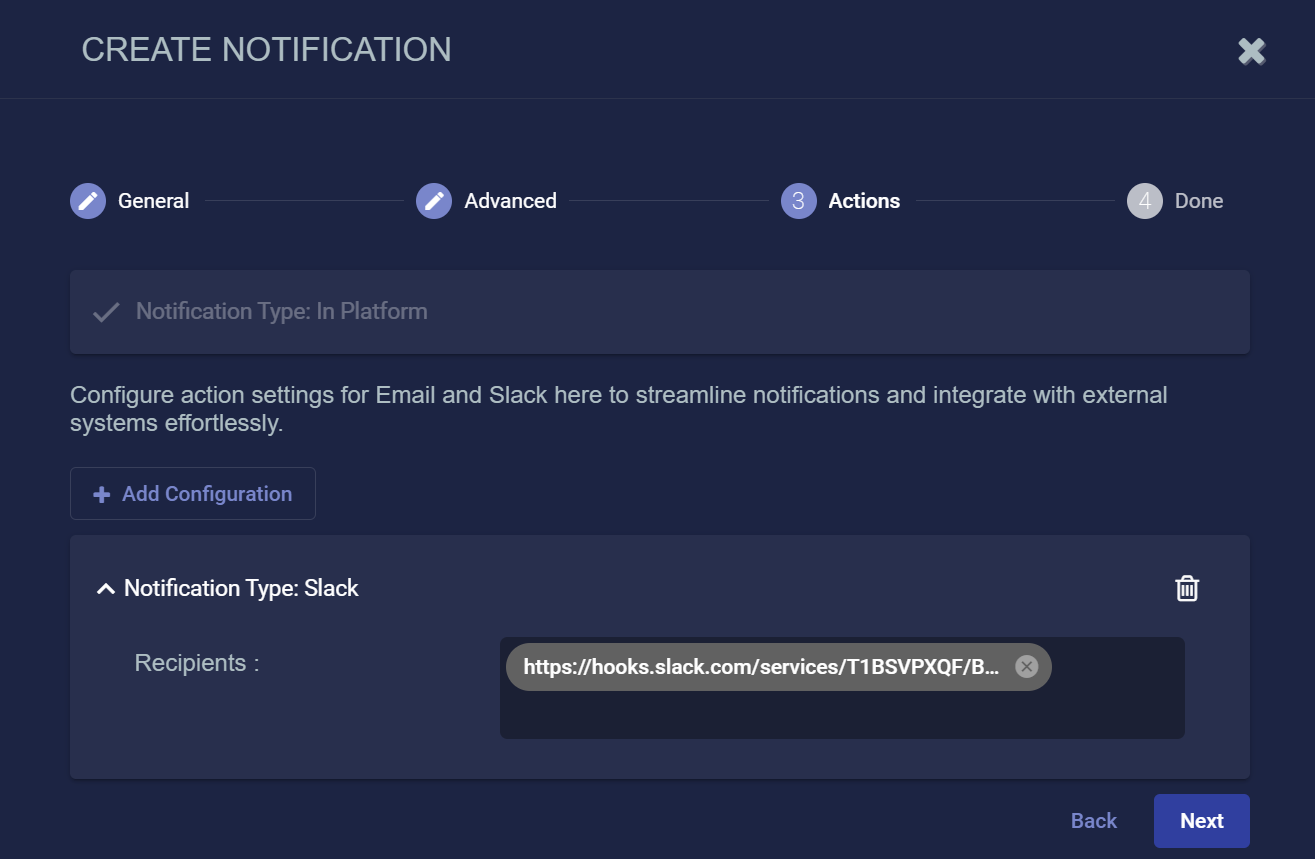
Set the following options for a Slack action in the Notification Type: Slack section:
-
Use the Recipients field to specify the Slack channel or user that will receive a message when the rule is triggered.
You can click to display a pick list containing all Slack recipients configured in the System | Configurations | Recipients page. You can also manually type in the URL for an incoming webhook that you create in the Slack API.
The figure below shows a configured Slack notification:
Email and Slack messages both include a summary of the event that triggered the notification and a link back to the Stellar Cyber platform to a location that makes sense based on the type of notification that was generated. You can configure a rule with any combination of email and Slack messages, including multiple destinations.
-
-
-
Click Next and review the settings for your notification rule. Use the Back button to go back and correct anything that's not quite right. When you are satisfied, click Submit to add your rule to the list.
The rule appears in the System Action Center's list and is automatically Enabled.
Links in Case Notification Emails
Notification emails sent from the System Action Center for Case Management events include a link to the case in the user interface. Refer to Ensuring that Links In System Action Center Emails Work Correctly for important configuration instructions to ensure that these links work correctly.
Preventing Duplicate Case Notification Emails
If you configure multiple Case assigned rules, you can prevent duplicate emails by make sure that only one of them has the Send to case assignee option enabled. Stellar Cyber helps you with this by disabling the option in cloned Case Management rules.
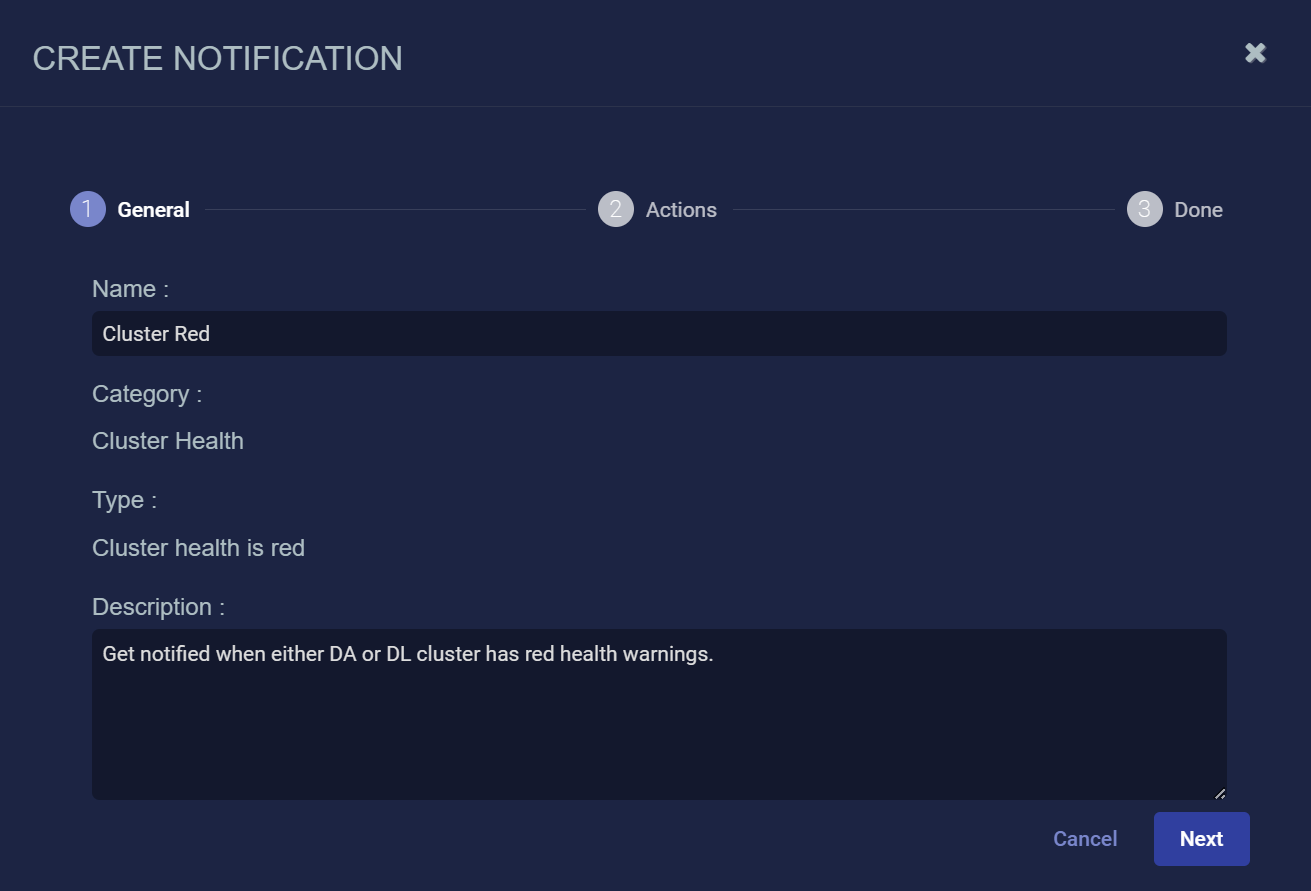
 Creating a Cluster Health Notification Rule
Cluster Health Notification rules notify you when the health for either the DA or DL cluster enters the red warning state.
You can keep track of Cluster health in the Visualize | Predefined | System Status page.
Use the following procedure to create a Cluster Health Notification rule:
-
Click the Create button at the top of the System Action Center and select Cluster Health | Cluster health is red from the dropdown that appears.
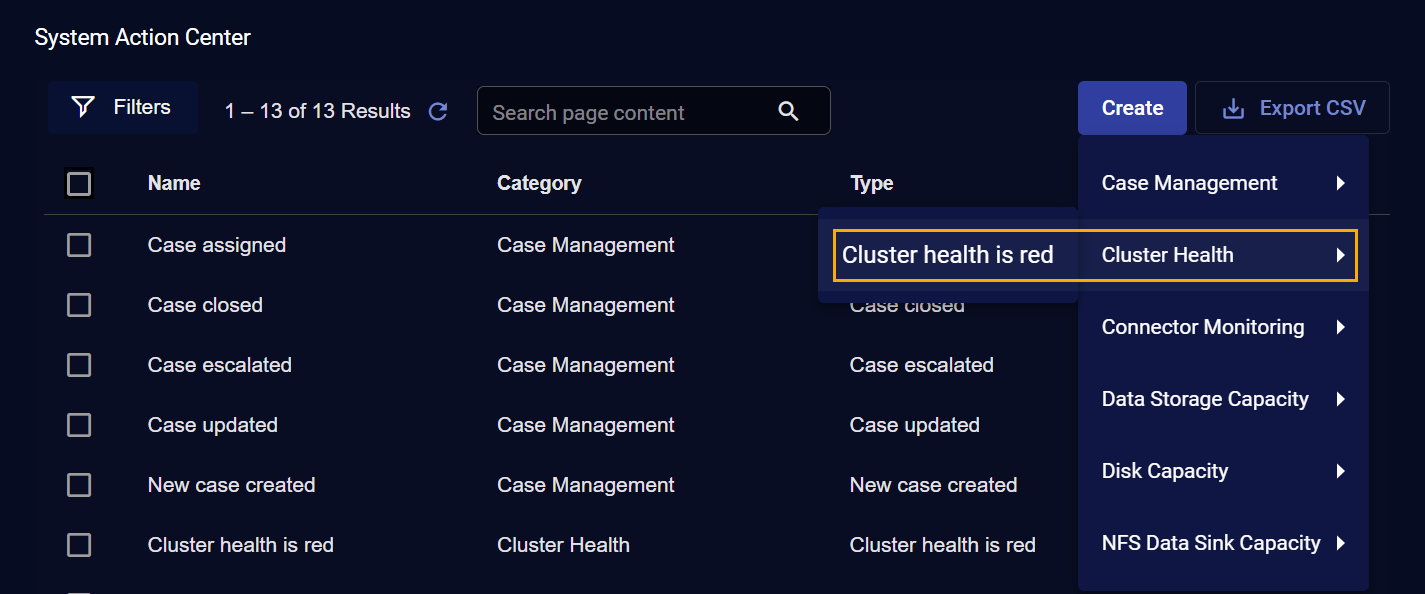
The Create Notification wizard starts with the Category set to Cluster Health and the Type set to Cluster health is red.
-
Supply a name for your notification rule in the Name field.
-
Select the Tenant to which the rule applies. By default, All Tenants are selected. Click anywhere in the Tenant field to display a pick list including all tenants available on the system where you can select the tenant to which this rule applies.
-
You can either accept the system-provided Description or supply your own. The description supplied here appears in the System Action Center's table of rules.
-
Click Next.
-
Use the Actions step to specify how this rule notifies you when it is triggered:
-
All rules have In Platform enabled so that triggered instances appear in the Notification Center.
-
Click the Add Configuration button and choose whether to add an Email or Slack action, as illustrated below.
-
Set the following options for an Email action in the Notification Type: Email section:
-
Use the Recipients field to specify who will receive a notification email when the rule is triggered. Click to display a pick list containing all email recipients configured in the System | Configurations | Recipients page. If you want to send an email to someone who is not already configured in the Recipients page, you can also type addresses in manually.
-
Use the Subject field to specify the subject line of the email. If you want to use different subject lines for different recipients, you can click the Add Configuration button and add a second Email notification with a different subject line and set of addressees.
The figure below shows a configured Email notification:
-
-
Set the following options for a Slack action in the Notification Type: Slack section:
-
Use the Recipients field to specify the Slack channel or user that will receive a message when the rule is triggered.
You can click to display a pick list containing all Slack recipients configured in the System | Configurations | Recipients page. You can also manually type in the URL for an incoming webhook that you create in the Slack API.
The figure below shows a configured Slack notification:
Email and Slack messages both include a summary of the event that triggered the notification and a link back to the Stellar Cyber platform to a location that makes sense based on the type of notification that was generated. You can configure a rule with any combination of email and Slack messages, including multiple destinations.
-
-
-
Click Next and review the settings for your notification rule. Use the Back button to go back and correct anything that's not quite right. When you are satisfied, click Submit to add your rule to the list.
The rule appears in the System Action Center's list and is automatically Enabled.
Connector Monitoring rules help you keep tabs on the status of your connectors. You can create the following types of Connector Monitoring rules:
-
Connector status change – Get notified when the status of a connector changes from healthy to one of the unhealthy states (Error, Warning, or Unavailable). New notifications are sent every five minutes for this rule type.
-
No data from connector(s) – Get notified when specified connectors have not sent traffic over the time interval you configure.
Use the following procedure to create a Connector Monitoring rule:
-
Click the Create button at the top of the System Action Center and select Connector Monitoring from the dropdown that appears.
-
Select the type of Connector Monitoring rule you want to create.
The Create Notification wizard starts with the Category set to Connector Monitoring and the Type set to the rule type you selected.
-
Supply a name for your notification rule in the Name field.
-
Select the Tenant to which the rule applies. By default, All Tenants are selected. Click anywhere in the Tenant field to display a pick list including all tenants available on the system where you can select the tenant to which this rule applies.
-
You can either accept the system-provided Description or supply your own. The description supplied here appears in the System Action Center's table of rules.
-
Click Next.
-
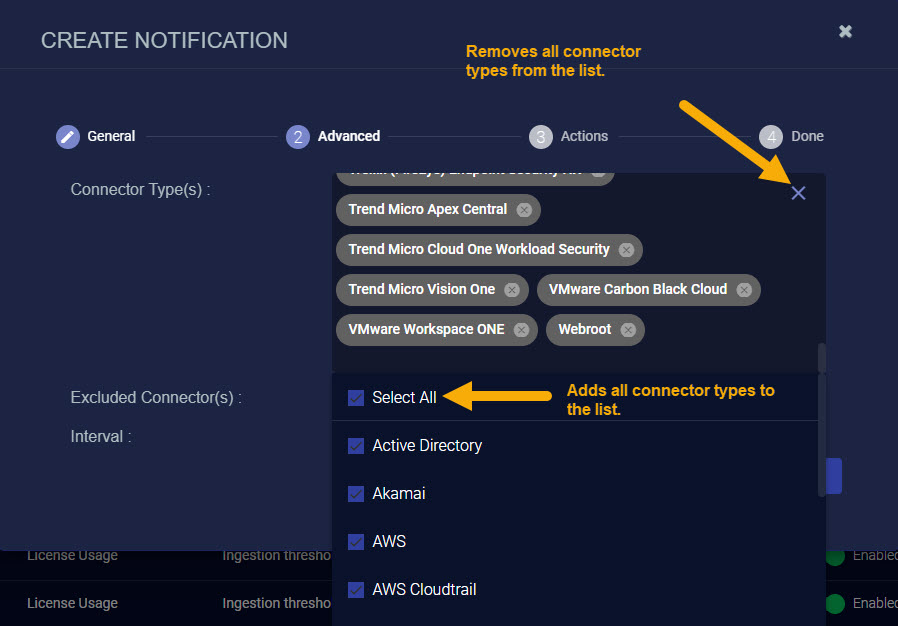
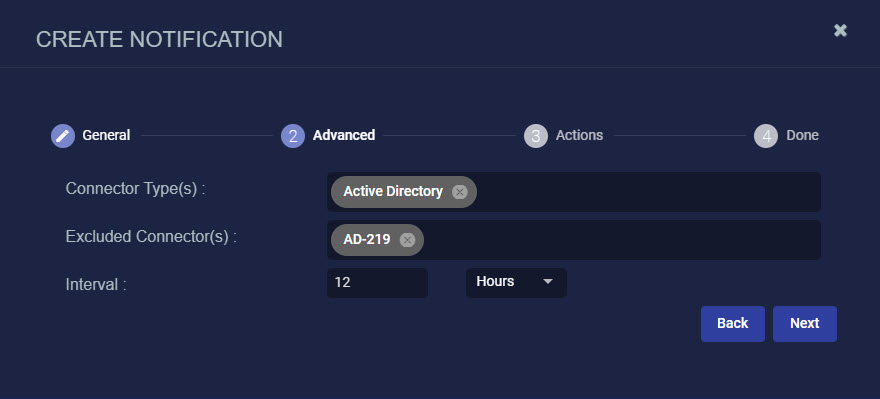
Use the Connector Type(s) field to specify the types of connectors for this rule.
By default, all connector types are selected. You can remove a specific connector type by clicking the x in its entry in the field. You can also click anywhere in the field to display a pick list (shown below) that lets you check the boxes for the connector types you want to include in the rule. The pick list also includes a Select All option that lets you add all connector types back to the list if, for example, you removed all of them using the x at the upper right of the Connector Type(s) field.
-
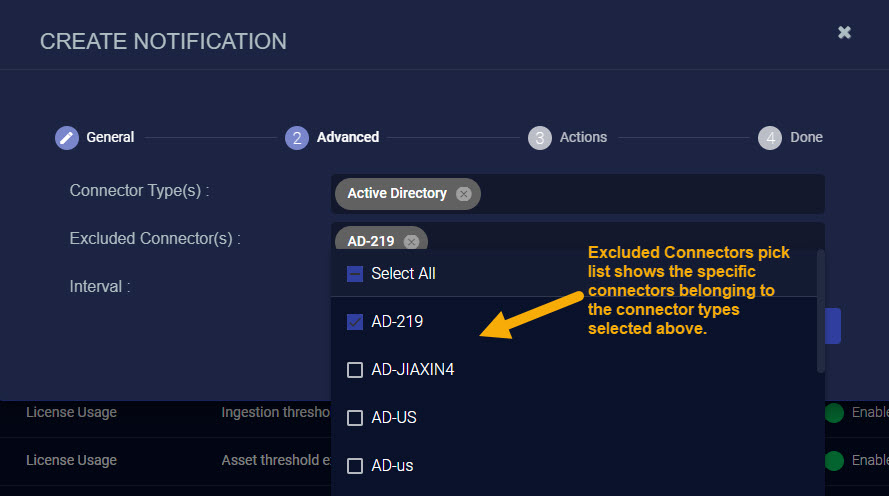
The entries in the Connector Type(s) field are broad types of connectors and not specific connectors themselves. You use the Excluded Connector(s) field to exclude specific connectors from the types selected in the Connector Type(s) field from the inactivity rule. The Excluded Connector(s) pick list shows you just the specific connectors belonging to the Types that are part of the rule you are creating.
For example, in the figure below, we have only selected the Active Directory connector type. As you can see, the Excluded Connector(s) pick list shows us all of the specific Active Directory connectors defined on the system. You can use the pick list to check the boxes of any specific connectors you want to exclude from inactivity notifications in this rule.
-
For a No data from connector(s) rule, you can use the Interval fields to specify the time window for the rule. You may be concerned if some connectors have not sent data in a manner of minutes, while others may not give you cause for concern over a period of days. The Interval controls let you specify both the units (Minutes, Hours, or Days) and the size of the time window. For example, we have specified an interval of two hours in the figure below:
-
Click Next when you are ready to continue.
-
Use the Actions step to specify how this rule notifies you when it is triggered:
-
All rules have In Platform enabled so that triggered instances appear in the Notification Center.
-
Click the Add Configuration button and choose whether to add an Email or Slack action, as illustrated below.
-
Set the following options for an Email action in the Notification Type: Email section:
-
Use the Recipients field to specify who will receive a notification email when the rule is triggered. Click to display a pick list containing all email recipients configured in the System | Configurations | Recipients page. If you want to send an email to someone who is not already configured in the Recipients page, you can also type addresses in manually.
-
Use the Subject field to specify the subject line of the email. If you want to use different subject lines for different recipients, you can click the Add Configuration button and add a second Email notification with a different subject line and set of addressees.
The figure below shows a configured Email notification:
-
-
Set the following options for a Slack action in the Notification Type: Slack section:
-
Use the Recipients field to specify the Slack channel or user that will receive a message when the rule is triggered.
You can click to display a pick list containing all Slack recipients configured in the System | Configurations | Recipients page. You can also manually type in the URL for an incoming webhook that you create in the Slack API.
The figure below shows a configured Slack notification:
Email and Slack messages both include a summary of the event that triggered the notification and a link back to the Stellar Cyber platform to a location that makes sense based on the type of notification that was generated. You can configure a rule with any combination of email and Slack messages, including multiple destinations.
-
-
-
Click Next and review the settings for your notification rule. Use the Back button to go back and correct anything that's not quite right. When you are satisfied, click Submit to add your rule to the list.
The rule appears in the System Action Center's list and is automatically Enabled.
Creating a Device Sensor Monitoring Rule
Device Sensor Monitoring rules help you monitor the health of your device sensors, notifying you when they are either offline or haven't sent data within a specified amount of time.
Device Sensor Monitoring rules only work for device sensors. They are not supported for Server Sensors (agents).
You can create the following types of Device Sensor Monitoring rules:
-
Device sensor feedback –This rule is triggered when the feedback from a Device Sensor indicates that it has been upgraded. Stellar Cyber checks every five minutes for changes in upgrade feedback.
-
Device sensor ingestion change – This rule is triggered when a Device Sensor's daily ingestion deviates more than a specified percentage from its average daily ingestion over the last seven days. Stellar Cyber compares these values once per day at 03:00 AM UTC.
-
Device sensor status change – This rule is triggered when a Device Sensor's status is either yellow or red, as defined below. A new notification is generated every five minutes the sensor remains in one of these states. You can investigate further in the Sensor list.
-
Yellow – At least one warning condition is affecting the sensor.
Click here to see the possible warning conditions:
-
Sensor disk usage exceeds 90%
-
Sensor CPU usage exceeds 99%
-
Sensor feedback contains a
config mismatcherror message -
Sensor has not updated its status in at least five minutes
-
Sensor feedback shows a failure to apply a profile with the Tenable Nessus feature enabled to a sensor running version 4.3.3 or lower (Tenable Nessus support was introduced in 4.3.4)
-
Sensor feedback contains at least one
warningmessage
-
-
Red – At least one danger condition is affecting the sensor.
Click there to see the possible danger conditions:
-
Sensor has an invalid Engine ID (
engid) -
Sensor has a conflicting Engine ID (
engid) -
Sensor configuration is out of sync (either the
ver_sentdoes not match receivedver_ackor one of the two messages is missing) -
Sensor memory usage exceeds 95%
-
Sensor feedback contains a
config failuremessage -
Sensor feedback shows at least one failure during the application of a new sensor profile.
The exception to this is a failure to apply a modular sensor profile with the Tenable Nessus feature enabled to a sensor running 4.3.3 or lower. Those failures are reported as warnings and only display the yellow LED, as described above.
-
These first three rules are available as part of an Early Access Program and may not be available in your version of the Stellar Cyber Platform. Contact your account manager to inquire about taking part in an Early Access Program.
-
-
No data from device sensor(s) – This rule is triggered when a sensor has not sent a record with traffic within a specified interval.
-
No heartbeat from device sensor(s) – This rule is triggered when Stellar Cyber has not received a heartbeat message from a sensor within a specified interval.
Notice that the No data and No heartbeat rules monitor for different types of inactivity. When a No data from device sensor(s) notification is generated, Stellar Cyber may still have contact with the affected sensor but is not receiving records with traffic. In the case of the No heartbeat from device sensor(s) notification, Stellar Cyber is not receiving heartbeats from affected sensors and has not had contact within the specified monitoring interval.
For all rule types, you can also specify a Mute Interval that specifies a window within which a repeated instance of the same notification will not be generated.
. Use the following procedure to create a Device Sensor Monitoring rule:
-
Click the Create button at the top of the System Action Center and select Device Sensor Monitoring from the dropdown that appears.

-
Select the type of rule you want to create. See the start of this section for a description of the rule types.
The Create Notification wizard starts with the Category set to Device Sensor Monitoring and the Type set to the selected rule type.
-
Supply a name for your notification rule in the Name field.
-
Select the Tenant to which the rule applies. By default, All Tenants are selected. Click anywhere in the Tenant) field to display a pick list including all tenants available on the system where you can select the tenant to which this rule applies.
-
You can either accept the system-provided Description or supply your own. The description supplied here appears in the System Action Center's table of rules.
-
Click Next.
-
Set Advanced options for the rule, as described below:
-
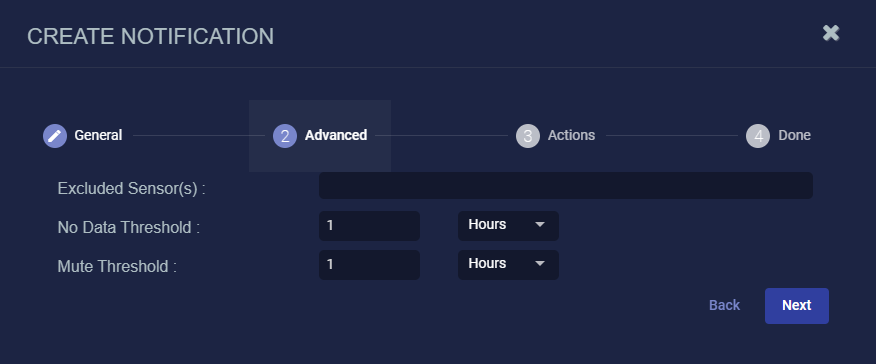
All rules include the Excluded Sensors option, with a dropdown that lets you exclude specified sensors from monitoring. The list includes all sensors available to the tenant selected in the first step of the wizard.
-
Some of the rules include additional options, as summarized in the table below:
Device Sensor Monitoring Rule Type Advanced Options Description
Default Value
Device sensor ingestion change Ingestion Change Percent Specify the percentage differential in daily ingestion (up or down) from the average of the previous seven days at which this rule is triggered.
20%
No data from device sensor(s) No Data Threshold Specify the amount of time that can pass without a device sensor sending a record with traffic before this rule is triggered.
1 hour
Mute Threshold Use these options to temporarily silence notifications from the rule for a specified amount of time. Once the rule is triggered, no new notifications will be generated from the same rule until the Mute Threshold has passed.
Stellar Cyber still monitors the rule for signs of activity from the sensor until the mute threshold passes and restarts the monitoring interval if they are detected. A new alert is only generated when the Mute Threshold is passed if no activity has been seen during the monitoring interval.
1 hour
No heartbeat from device sensor(s) No Heartbeat Threshold Specify the amount of time that can pass without a device sensor sending a heartbeat before this rule is triggered.
4 hours
Mute Threshold Use these options to temporarily silence notifications from the rule for a specified amount of time. Once the rule is triggered, no new notifications will be generated from the same rule until the Mute Threshold has passed.
Stellar Cyber still monitors the rule for heartbeats from the sensor until the mute threshold passes and restarts the monitoring interval if they are detected. A new alert is only generated when the Mute Threshold is passed if no heartbeats have been seen during the monitoring interval.
24 hours
The image below shows the Advanced step for a No data from device sensor(s) rule:
-
-
Use the Actions step to specify how this rule notifies you when it is triggered:
-
All rules have In Platform enabled so that triggered instances appear in the Notification Center.
-
Click the Add Configuration button and choose whether to add an Email or Slack action, as illustrated below.
-
Set the following options for an Email action in the Notification Type: Email section:
-
Use the Recipients field to specify who will receive a notification email when the rule is triggered. Click to display a pick list containing all email recipients configured in the System | Configurations | Recipients page. If you want to send an email to someone who is not already configured in the Recipients page, you can also type addresses in manually.
-
Use the Subject field to specify the subject line of the email. If you want to use different subject lines for different recipients, you can click the Add Configuration button and add a second Email notification with a different subject line and set of addressees.
The figure below shows a configured Email notification:
-
-
Set the following options for a Slack action in the Notification Type: Slack section:
-
Use the Recipients field to specify the Slack channel or user that will receive a message when the rule is triggered.
You can click to display a pick list containing all Slack recipients configured in the System | Configurations | Recipients page. You can also manually type in the URL for an incoming webhook that you create in the Slack API.
The figure below shows a configured Slack notification:
Email and Slack messages both include a summary of the event that triggered the notification and a link back to the Stellar Cyber platform to a location that makes sense based on the type of notification that was generated. You can configure a rule with any combination of email and Slack messages, including multiple destinations.
-
-
-
Click Next and review the settings for your notification rule. Use the Back button to go back and correct anything that's not quite right. When you are satisfied, click Submit to add your rule to the list.
The rule appears in the System Action Center's list and is automatically Enabled.
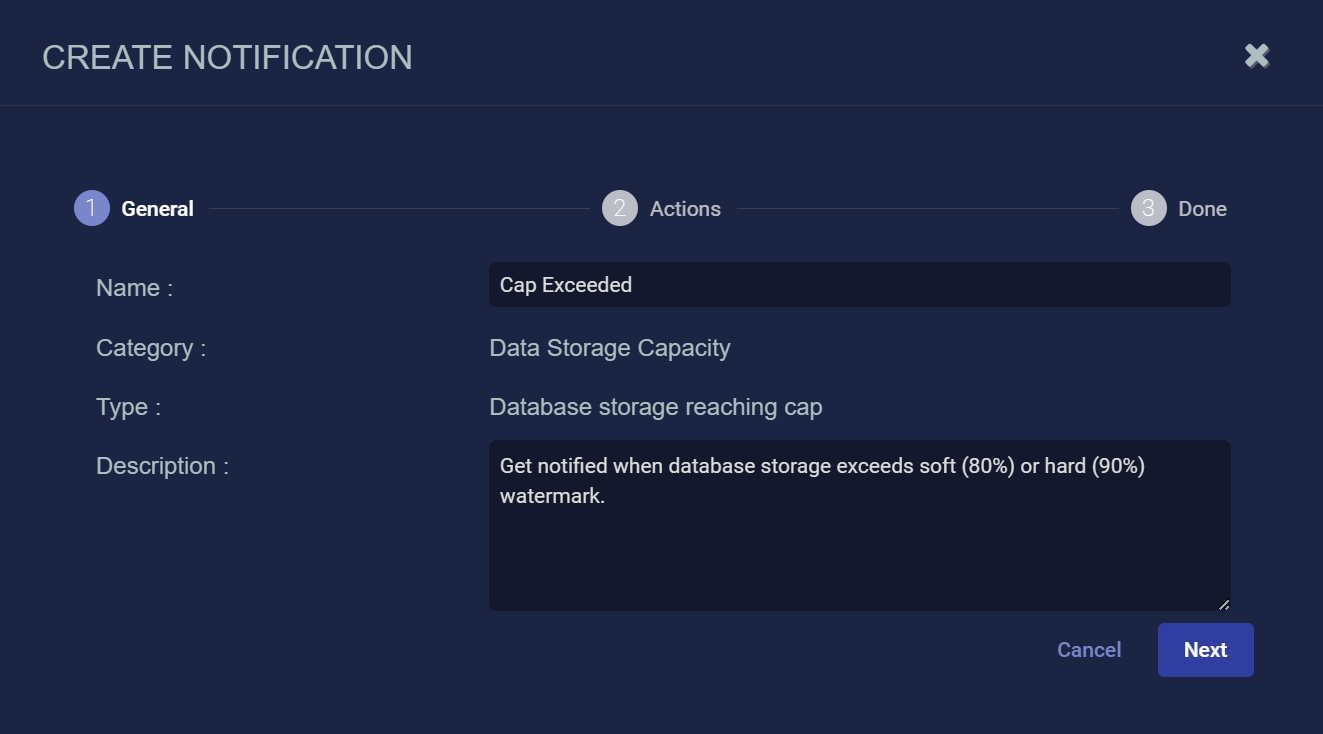
Creating a Data Storage Capacity Notification Rule
Data Storage Capacity rules notify you when the percentage of database storage used reaches either the soft cap (80% used) or the hard cap (90%), measured over a five-minute interval.
You can keep track of Data Lake health in the Data Lake panel of the Visualize | Predefined | System Status page.
Use the following procedure to create a Data Storage Capacity notification rule:
-
Click the Create button at the top of the System Action Center and select Data Storage Capacity | Database storage reaching cap from the dropdown that appears.
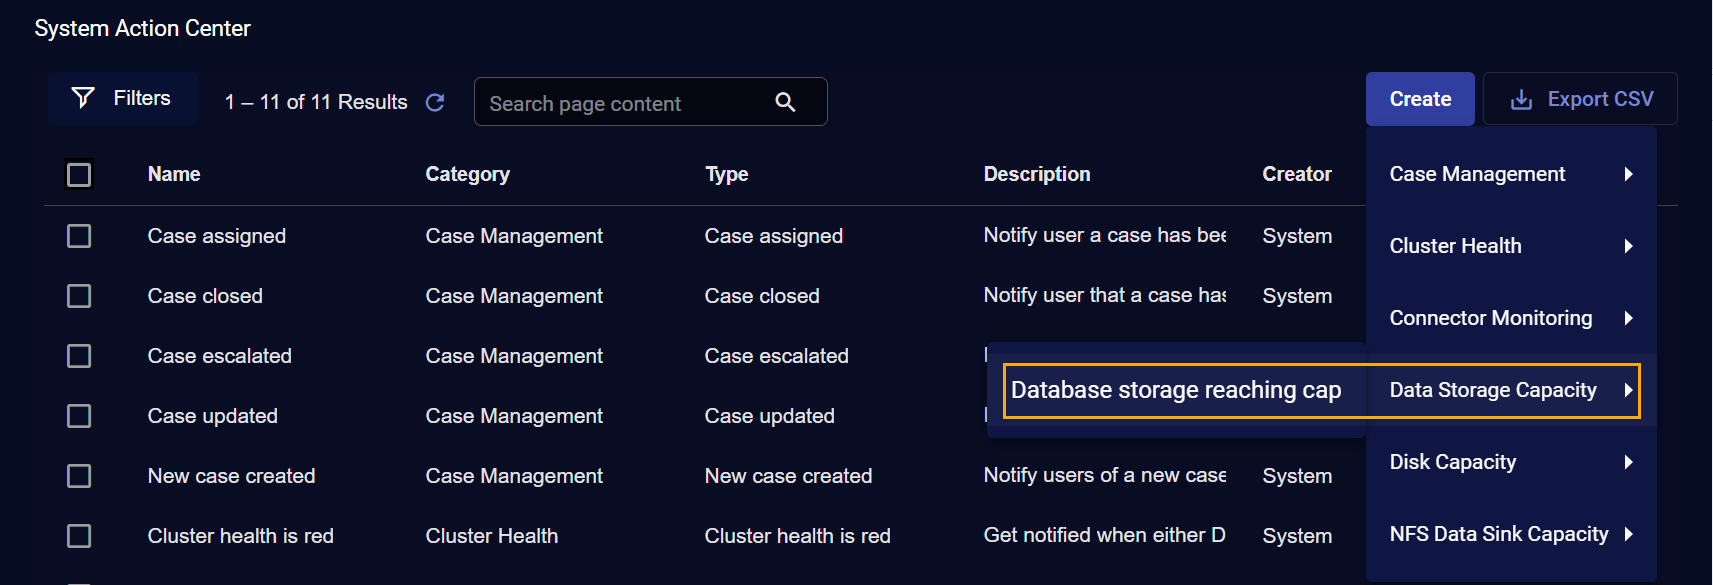
The Create Notification wizard starts with the Category set to Data Storage Capacity and the Type set to Database storage reaching cap.
-
Supply a name for your notification rule in the Name field.
-
You can either accept the system-provided Description or supply your own. The description supplied here appears in the System Action Center's table of rules.
-
Click Next.
-
Use the Actions step to specify how this rule notifies you when it is triggered:
-
All rules have In Platform enabled so that triggered instances appear in the Notification Center.
-
Click the Add Configuration button and choose whether to add an Email or Slack action, as illustrated below.
-
Set the following options for an Email action in the Notification Type: Email section:
-
Use the Recipients field to specify who will receive a notification email when the rule is triggered. Click to display a pick list containing all email recipients configured in the System | Configurations | Recipients page. If you want to send an email to someone who is not already configured in the Recipients page, you can also type addresses in manually.
-
Use the Subject field to specify the subject line of the email. If you want to use different subject lines for different recipients, you can click the Add Configuration button and add a second Email notification with a different subject line and set of addressees.
The figure below shows a configured Email notification:
-
-
Set the following options for a Slack action in the Notification Type: Slack section:
-
Use the Recipients field to specify the Slack channel or user that will receive a message when the rule is triggered.
You can click to display a pick list containing all Slack recipients configured in the System | Configurations | Recipients page. You can also manually type in the URL for an incoming webhook that you create in the Slack API.
The figure below shows a configured Slack notification:
Email and Slack messages both include a summary of the event that triggered the notification and a link back to the Stellar Cyber platform to a location that makes sense based on the type of notification that was generated. You can configure a rule with any combination of email and Slack messages, including multiple destinations.
-
-
-
Click Next and review the settings for your notification rule. Use the Back button to go back and correct anything that's not quite right. When you are satisfied, click Submit to add your rule to the list.
The rule appears in the System Action Center's list and is automatically Enabled.
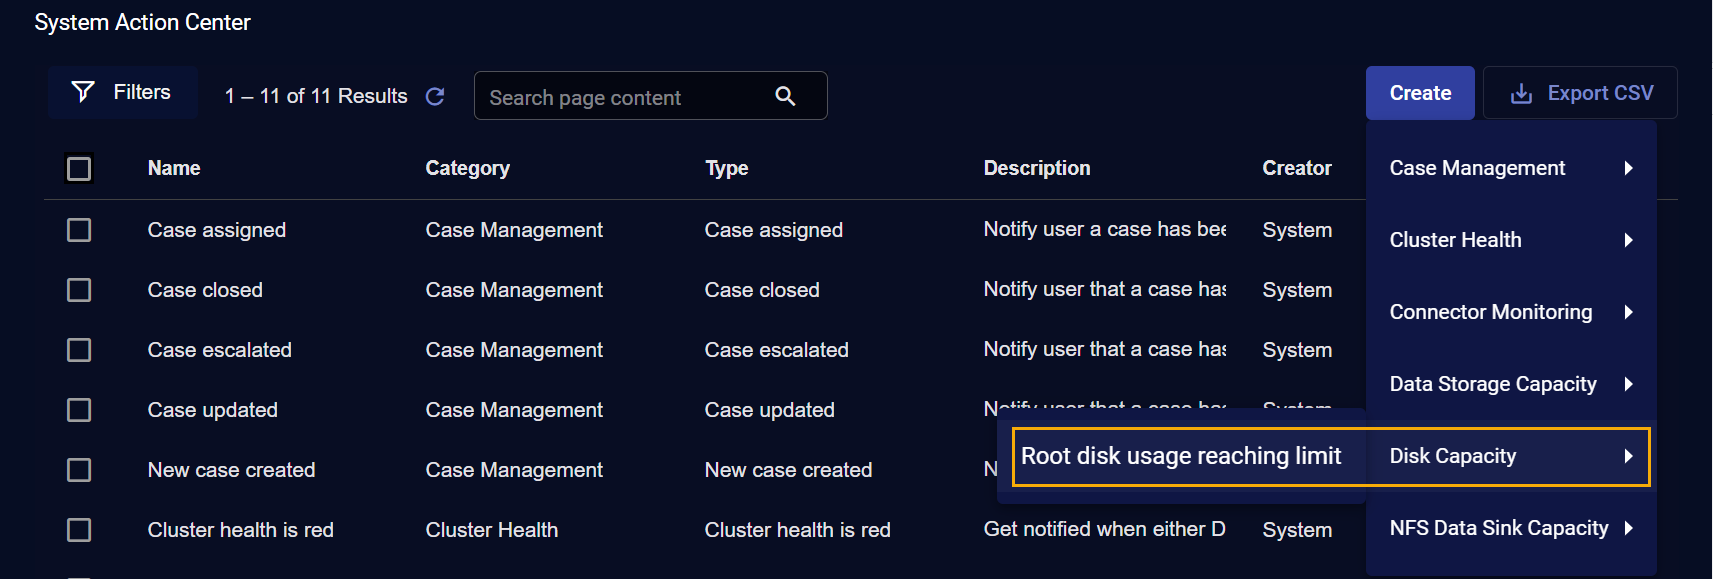
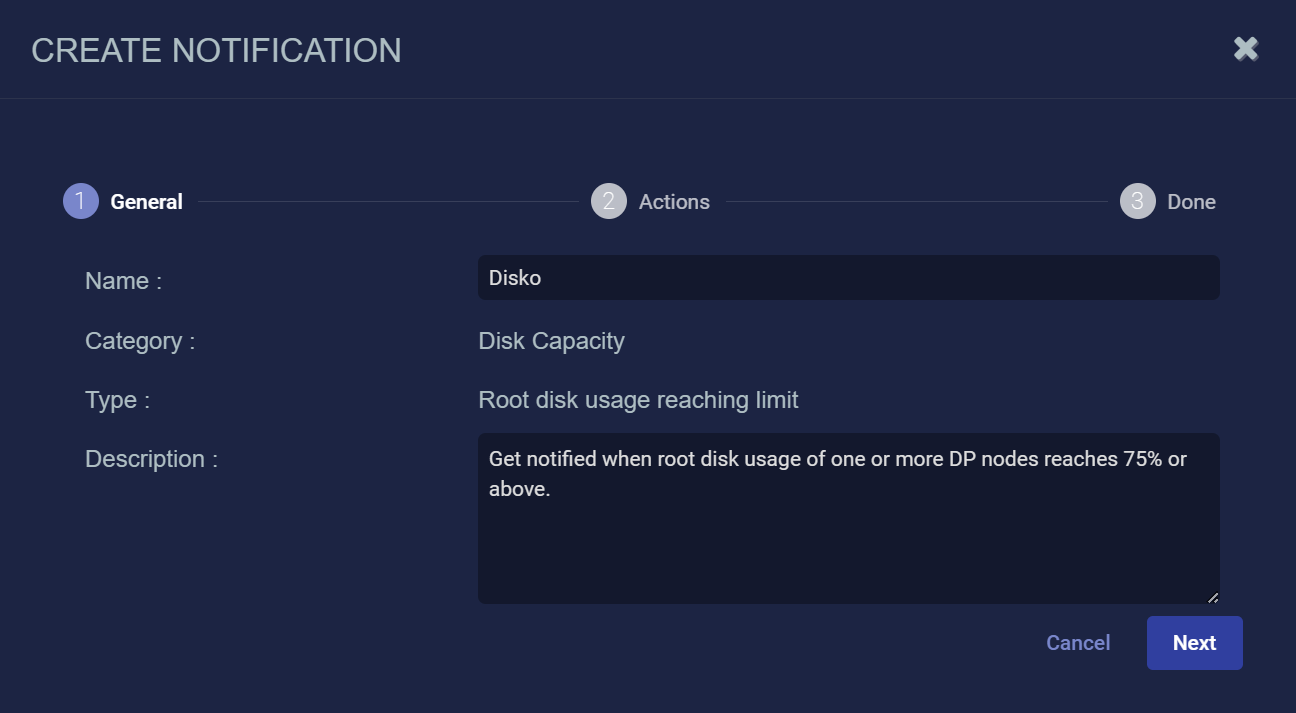
Creating a Disk Capacity Notification Rule
Disk Capacity rules notify you when the disk usage of one or more DP nodes has reached 75% of the available total, measured over a five-minute interval.
You can keep track of disk usage in the Data Analyzer and Data Lake panels of the Visualize | Predefined | System Status page.
Use the following procedure to create a Disk Capacity Notification rule:
-
Click the Create button at the top of the System Action Center and select Disk Capacity | Root disk usage reaching limit from the dropdown that appears.
-
The Create Notification wizard starts with the Category set to Disk Capacity and the Type set to Root disk usage reaching limit.
-
Supply a name for your notification rule in the Name field.
-
You can either accept the system-provided Description or supply your own. The description supplied here appears in the System Action Center's table of rules.
-
Click Next.
-
Use the Actions step to specify how this rule notifies you when it is triggered:
-
All rules have In Platform enabled so that triggered instances appear in the Notification Center.
-
Click the Add Configuration button and choose whether to add an Email or Slack action, as illustrated below.
-
Set the following options for an Email action in the Notification Type: Email section:
-
Use the Recipients field to specify who will receive a notification email when the rule is triggered. Click to display a pick list containing all email recipients configured in the System | Configurations | Recipients page. If you want to send an email to someone who is not already configured in the Recipients page, you can also type addresses in manually.
-
Use the Subject field to specify the subject line of the email. If you want to use different subject lines for different recipients, you can click the Add Configuration button and add a second Email notification with a different subject line and set of addressees.
The figure below shows a configured Email notification:
-
-
Set the following options for a Slack action in the Notification Type: Slack section:
-
Use the Recipients field to specify the Slack channel or user that will receive a message when the rule is triggered.
You can click to display a pick list containing all Slack recipients configured in the System | Configurations | Recipients page. You can also manually type in the URL for an incoming webhook that you create in the Slack API.
The figure below shows a configured Slack notification:
Email and Slack messages both include a summary of the event that triggered the notification and a link back to the Stellar Cyber platform to a location that makes sense based on the type of notification that was generated. You can configure a rule with any combination of email and Slack messages, including multiple destinations.
-
-
-
Click Next and review the settings for your notification rule. Use the Back button to go back and correct anything that's not quite right. When you are satisfied, click Submit to add your rule to the list.
The rule appears in the System Action Center's list and is automatically Enabled.
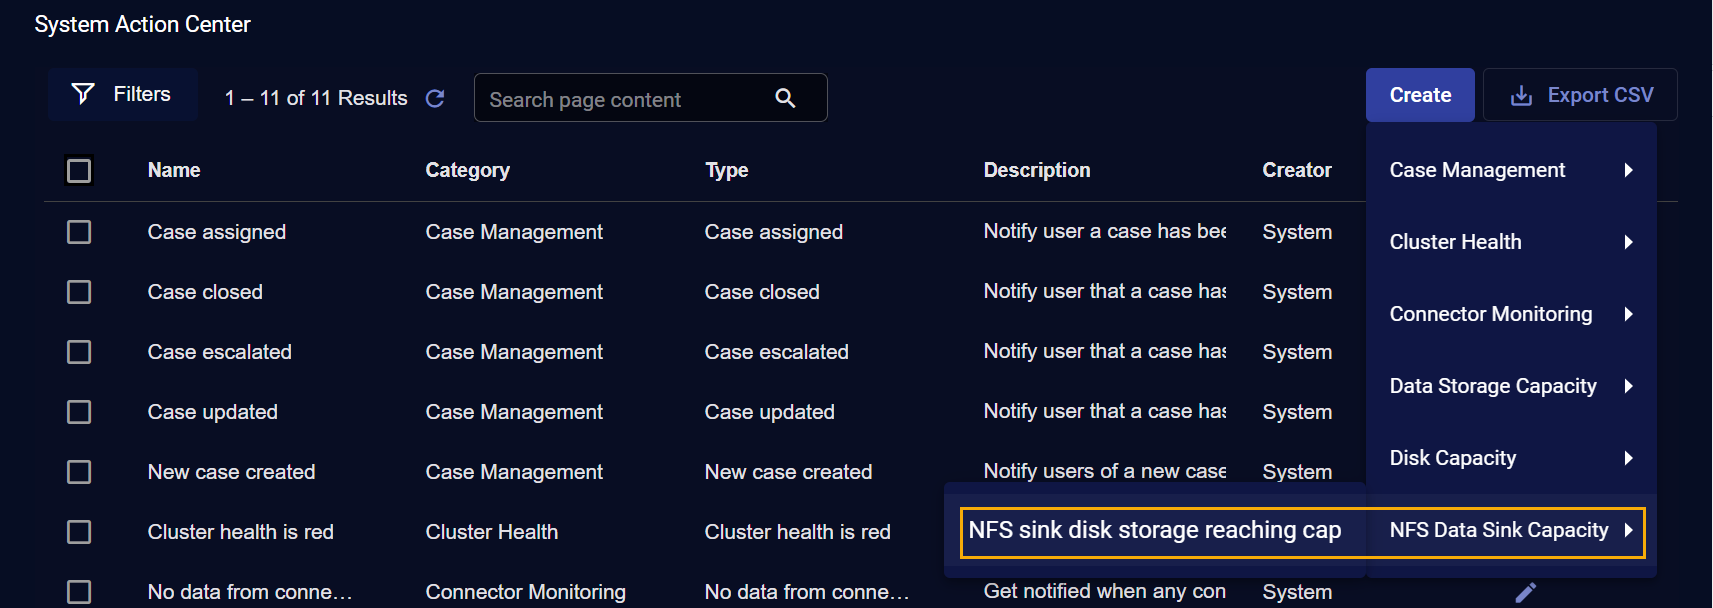
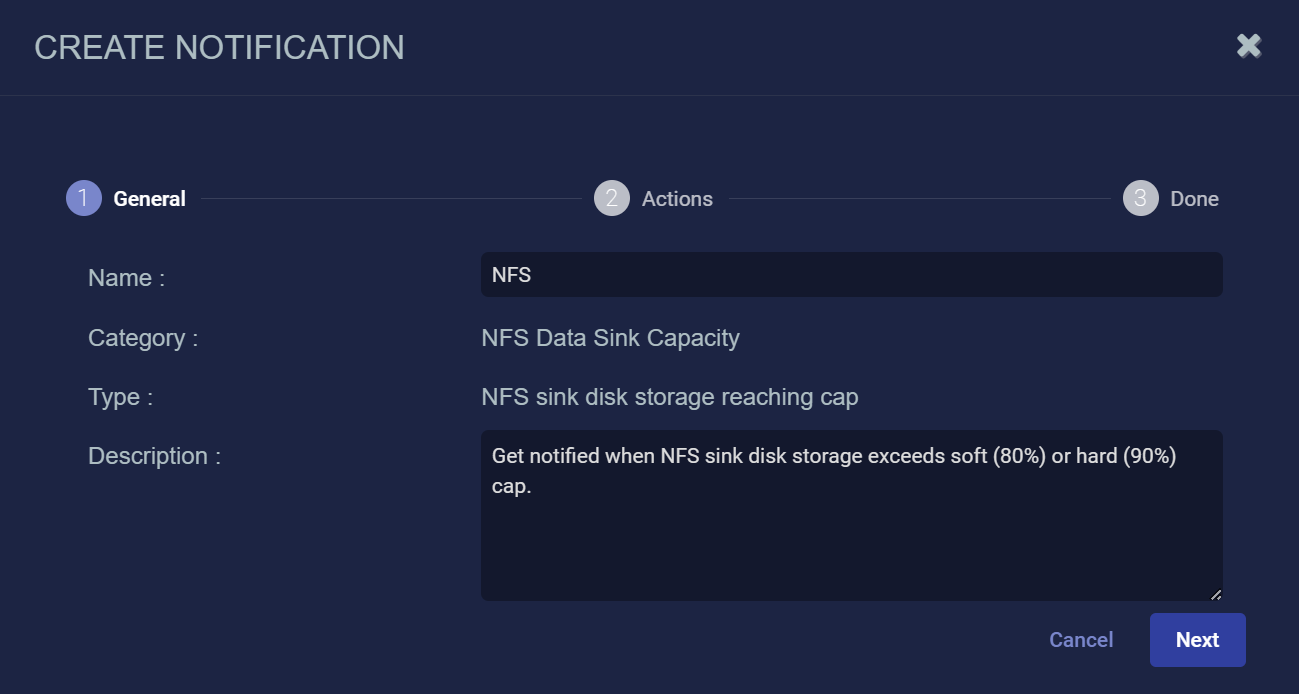
Creating an NFS Data Sink Capacity Notification Rule
NFS Data Sink Capacity Notification rules notify you when the percentage of NFS Data Sink capacity used reaches either the soft cap (80% used) or the hard cap (90%), measured over a five-minute interval.
Refer to Adding an NFS Data Sink (Deprecated) for more information on NFS data sinks and the System | Data Processor | Data Sinks page for an overview of their health.
Use the following procedure to create an NFS Data Sink Capacity Notification rule:
-
Click the Create button at the top of the System Action Center and select NFS Data Sink Capacity | NFS sink disk storage reaching cap from the dropdown that appears.
-
The Create Notification wizard starts with the Category set to NFS Data Sink Capacity and the Type set to NFS sink disk storage reaching cap.
-
Supply a name for your notification rule in the Name field.
-
You can either accept the system-provided Description or supply your own. The description supplied here appears in the System Action Center's table of rules.
-
Click Next.
-
Use the Actions step to specify how this rule notifies you when it is triggered:
-
All rules have In Platform enabled so that triggered instances appear in the Notification Center.
-
Click the Add Configuration button and choose whether to add an Email or Slack action, as illustrated below.
-
Set the following options for an Email action in the Notification Type: Email section:
-
Use the Recipients field to specify who will receive a notification email when the rule is triggered. Click to display a pick list containing all email recipients configured in the System | Configurations | Recipients page. If you want to send an email to someone who is not already configured in the Recipients page, you can also type addresses in manually.
-
Use the Subject field to specify the subject line of the email. If you want to use different subject lines for different recipients, you can click the Add Configuration button and add a second Email notification with a different subject line and set of addressees.
The figure below shows a configured Email notification:
-
-
Set the following options for a Slack action in the Notification Type: Slack section:
-
Use the Recipients field to specify the Slack channel or user that will receive a message when the rule is triggered.
You can click to display a pick list containing all Slack recipients configured in the System | Configurations | Recipients page. You can also manually type in the URL for an incoming webhook that you create in the Slack API.
The figure below shows a configured Slack notification:
Email and Slack messages both include a summary of the event that triggered the notification and a link back to the Stellar Cyber platform to a location that makes sense based on the type of notification that was generated. You can configure a rule with any combination of email and Slack messages, including multiple destinations.
-
-
-
Click Next and review the settings for your notification rule. Use the Back button to go back and correct anything that's not quite right. When you are satisfied, click Submit to add your rule to the list.
The rule appears in the System Action Center's list and is automatically Enabled.
Creating a Scheduled Report Monitoring Rule
Scheduled Report Monitoring rules are available as part of an Early Access Program and may not be available in your version of the Stellar Cyber Platform. Contact your account manager to inquire about taking part in an Early Access Program.
Scheduled Report Monitoring rules can notify you when a scheduled report has failed, helping you investigate report generation issues in real time. Scheduled Report Monitoring rules check for failed reports every five minutes.
. Use the following procedure to create a Scheduled Report Monitoring rule:
-
Click the Create button at the top of the System Action Center and select Scheduled Report Monitoring | Scheduled report failed from the dropdown that appears.
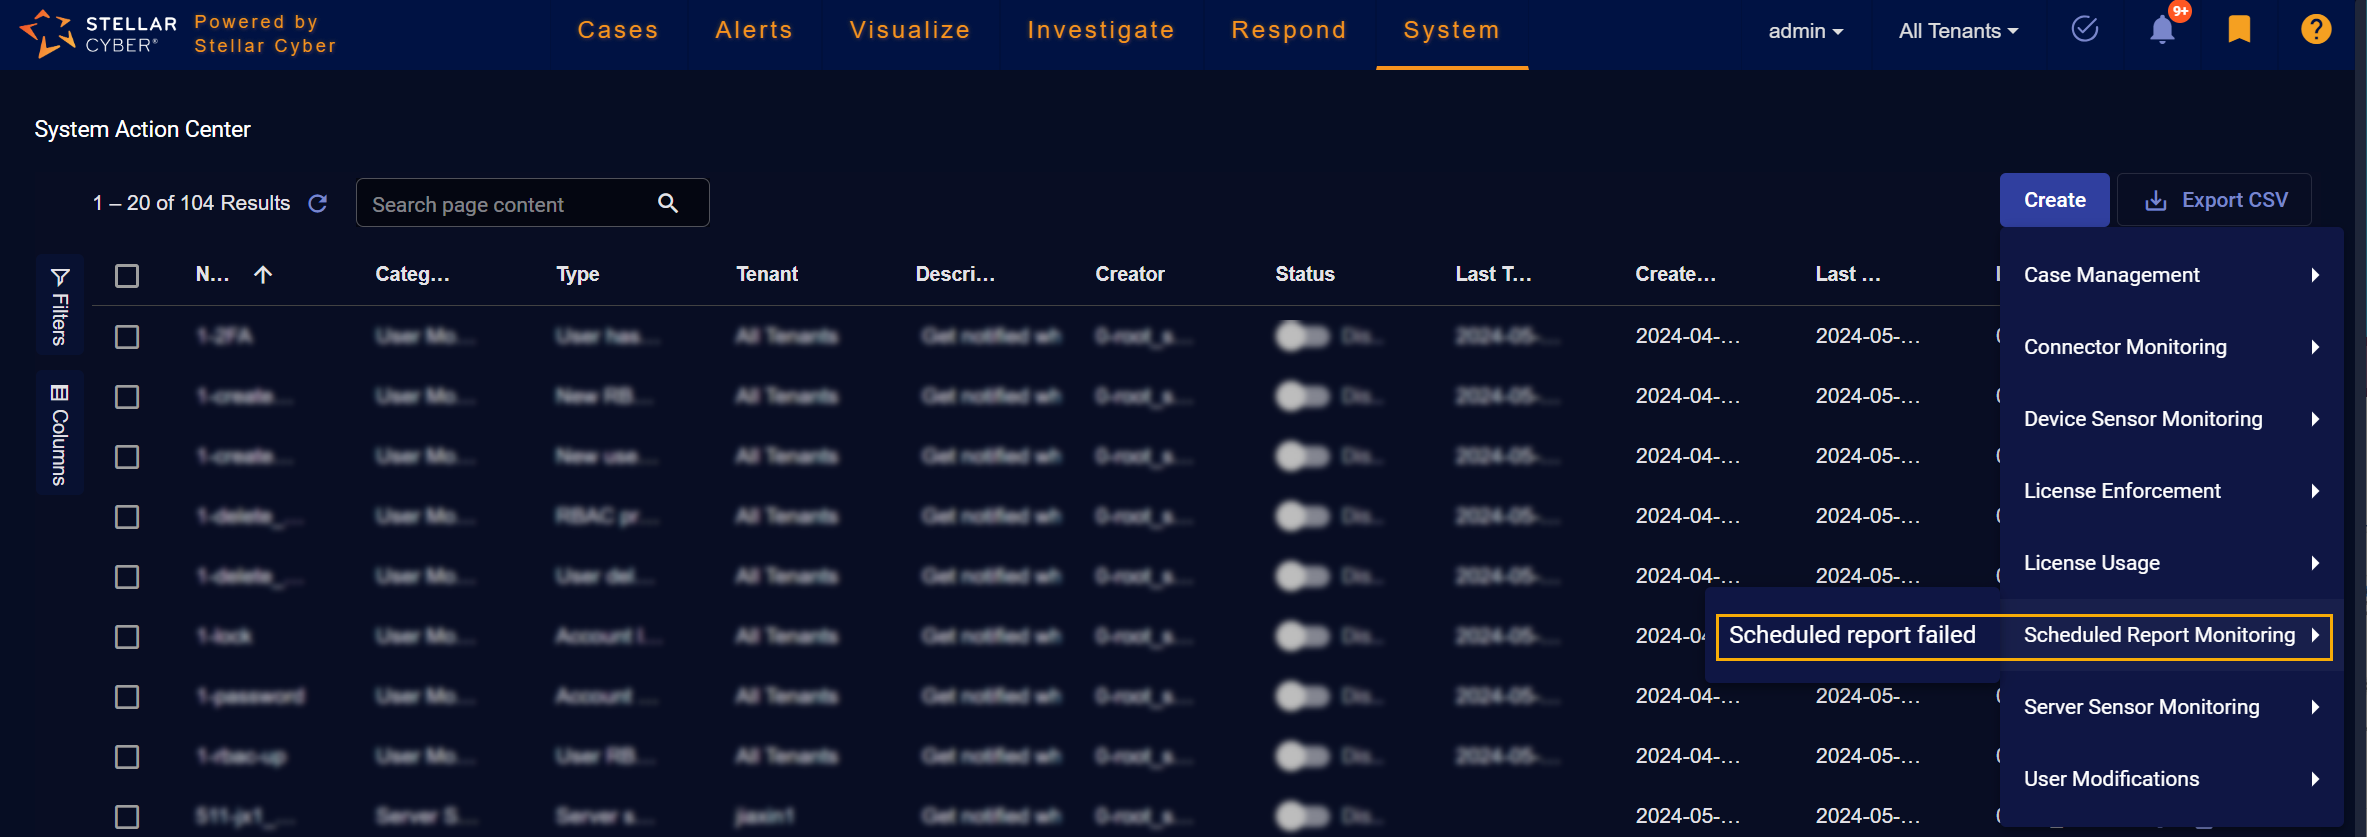
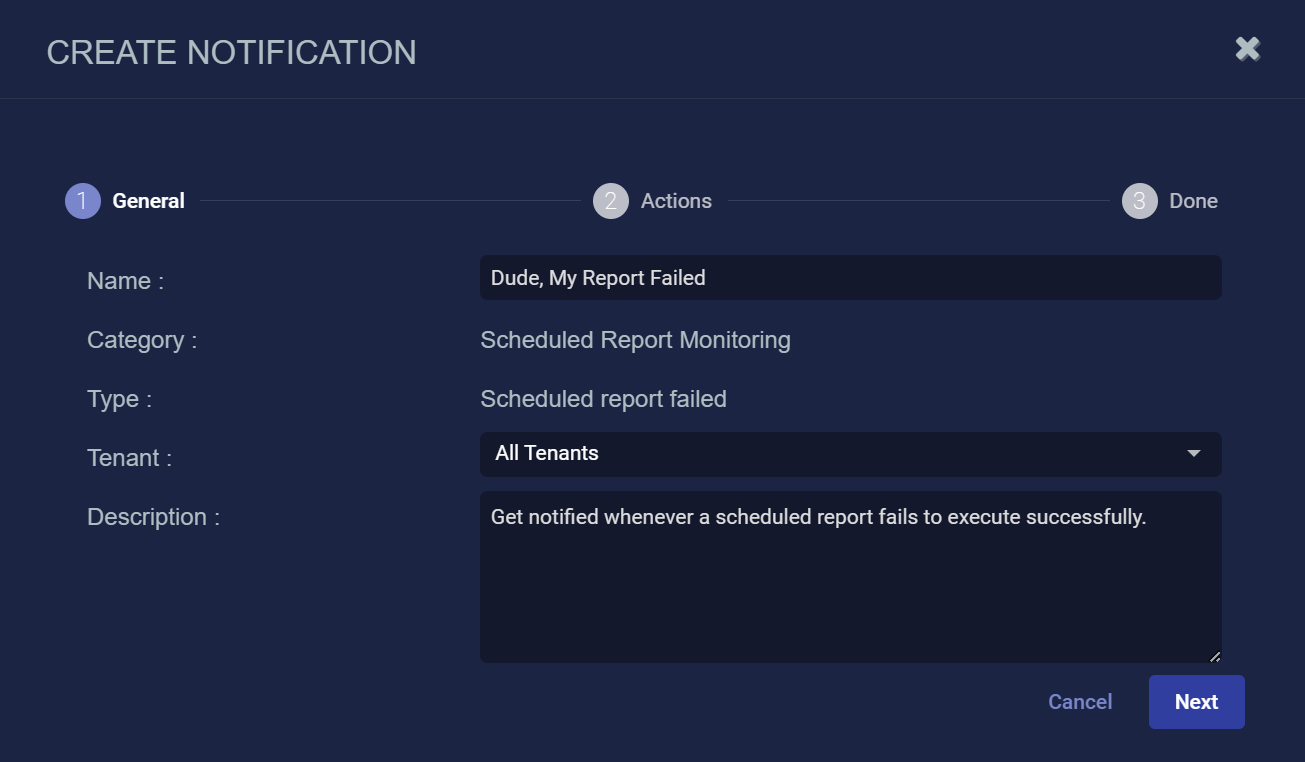
The Create Notification wizard starts with the Category set to Scheduled Report Monitoring and the Type set to Scheduled report failed.
-
Supply a name for your notification rule in the Name field.
-
Select the Tenant to which the rule applies. By default, All Tenants are selected. Click anywhere in the Tenant) field to display a pick list including all tenants available on the system where you can select the tenant to which this rule applies.
-
You can either accept the system-provided Description or supply your own. The description supplied here appears in the System Action Center's table of rules.
-
Click Next.
-
Use the Actions step to specify how this rule notifies you when it is triggered:
-
All rules have In Platform enabled so that triggered instances appear in the Notification Center.
-
Click the Add Configuration button and choose whether to add an Email or Slack action, as illustrated below.
-
Set the following options for an Email action in the Notification Type: Email section:
-
Use the Recipients field to specify who will receive a notification email when the rule is triggered. Click to display a pick list containing all email recipients configured in the System | Configurations | Recipients page. If you want to send an email to someone who is not already configured in the Recipients page, you can also type addresses in manually.
-
Use the Subject field to specify the subject line of the email. If you want to use different subject lines for different recipients, you can click the Add Configuration button and add a second Email notification with a different subject line and set of addressees.
The figure below shows a configured Email notification:
-
-
Set the following options for a Slack action in the Notification Type: Slack section:
-
Use the Recipients field to specify the Slack channel or user that will receive a message when the rule is triggered.
You can click to display a pick list containing all Slack recipients configured in the System | Configurations | Recipients page. You can also manually type in the URL for an incoming webhook that you create in the Slack API.
The figure below shows a configured Slack notification:
Email and Slack messages both include a summary of the event that triggered the notification and a link back to the Stellar Cyber platform to a location that makes sense based on the type of notification that was generated. You can configure a rule with any combination of email and Slack messages, including multiple destinations.
-
-
-
Click Next and review the settings for your notification rule. Use the Back button to go back and correct anything that's not quite right. When you are satisfied, click Submit to add your rule to the list.
The rule appears in the System Action Center's list and is automatically Enabled.
Creating a Server Sensor Monitoring Rule
Server Sensor Monitoring rules are available as part of an Early Access Program and may not be available in your version of the Stellar Cyber Platform. Contact your account manager to inquire about taking part in an Early Access Program.
Serve Sensor Monitoring rules help you monitor the health of your Server Sensors, notifying you when they are either offline or haven't sent data within a specified amount of time.
Server Sensor Monitoring rules only work for server sensors. They are not supported for Device Sensors (dedicated sensors).
You can create the following types of Server Sensor Monitoring rules:
-
No data from server sensor(s) – This rule is triggered when a server sensor has not sent a record with traffic within a specified interval.
-
No heartbeat from server sensor(s) – This rule is triggered when Stellar Cyber has not received a heartbeat message from a server sensor within a specified interval.
Notice that these rules are monitoring for different types of inactivity. When a No data from server sensor(s) notification is generated, Stellar Cyber may still have contact with the affected Server Sensor but is not receiving records with traffic. In the case of the No heartbeat from server sensor(s) notification, Stellar Cyber is not receiving heartbeats from affected Server Sensors and has not had contact within the specified monitoring interval.
For both the No data and No heartbeat rules, you can also specify a Mute Interval that specifies a window within which a repeated instance of the same notification will not be generated.
-
Server sensor status change – This rule is triggered when a Server Sensor's status is either yellow or red, as defined below. A new notification is generated every five minutes the sensor remains in one of these states. You can investigate further in the Sensor list.
-
Yellow – At least one warning condition is affecting the sensor.
Click here to see the possible warning conditions:
-
Sensor disk usage exceeds 90%
-
Sensor CPU usage exceeds 99%
-
Sensor feedback contains a
config mismatcherror message -
Sensor has not updated its status in at least five minutes
-
Sensor feedback shows a failure to apply a profile with the Tenable Nessus feature enabled to a sensor running version 4.3.3 or lower (Tenable Nessus support was introduced in 4.3.4)
-
Sensor feedback contains at least one
warningmessage
-
-
Red – At least one danger condition is affecting the sensor.
Click there to see the possible danger conditions:
-
Sensor has an invalid Engine ID (
engid) -
Sensor has a conflicting Engine ID (
engid) -
Sensor configuration is out of sync (either the
ver_sentdoes not match receivedver_ackor one of the two messages is missing) -
Sensor memory usage exceeds 95%
-
Sensor feedback contains a
config failuremessage -
Sensor feedback shows at least one failure during the application of a new sensor profile.
The exception to this is a failure to apply a modular sensor profile with the Tenable Nessus feature enabled to a sensor running 4.3.3 or lower. Those failures are reported as warnings and only display the yellow LED, as described above.
-
-
. Use the following procedure to create a Server Sensor Monitoring rule:
-
Click the Create button at the top of the System Action Center and select Server Sensor Monitoring from the dropdown that appears.

-
Select the type of rule you want to create. See the start of this section for a description of the rule types.
The Create Notification wizard starts with the Category set to Server Sensor Monitoring and the Type set to the selected rule type.
-
Supply a name for your notification rule in the Name field.
-
Select the Tenant to which the rule applies. By default, All Tenants are selected. Click anywhere in the Tenant) field to display a pick list including all tenants available on the system where you can select the tenant to which this rule applies.
-
You can either accept the system-provided Description or supply your own. The description supplied here appears in the System Action Center's table of rules.
-
Click Next.
-
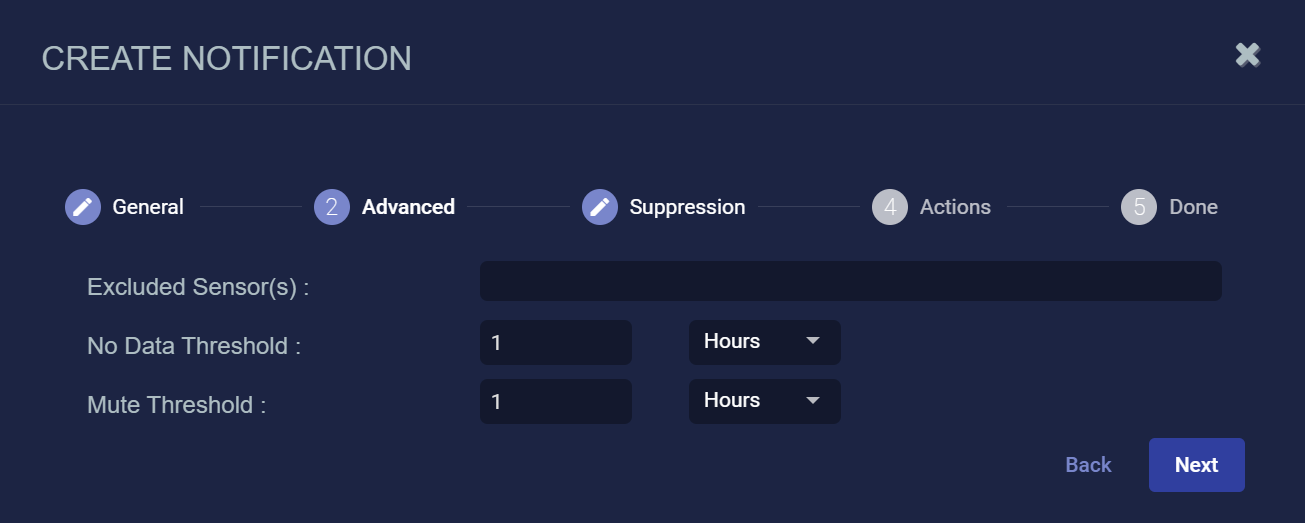
Set Advanced options for the rule, as described below:
Set Advanced options for the rule, as described below:
-
All rules include the Excluded Sensors option, with a dropdown that lets you exclude specified sensors from monitoring. The list includes all sensors available to the tenant selected in the first step of the wizard.
-
Some of the rules include additional options, as summarized in the table below:
Server Sensor Monitoring Rule Type Advanced Options Description
Default Value
No data from server sensor(s) No Data Threshold Specify the amount of time that can pass without a server sensor sending a record with traffic before this rule is triggered.
1 hour
Mute Threshold Use these options to temporarily silence notifications from the rule for a specified amount of time. Once the rule is triggered, no new notifications will be generated from the same rule until the Mute Threshold has passed.
Stellar Cyber still monitors the rule for signs of activity from the sensor until the mute threshold passes and restarts the monitoring interval if they are detected. A new alert is only generated when the Mute Threshold is passed if no activity has been seen during the monitoring interval.
1 hour
No heartbeat from server sensor(s) No Heartbeat Threshold Specify the amount of time that can pass without a server sensor sending a heartbeat before this rule is triggered.
4 hours
Mute Threshold Use these options to temporarily silence notifications from the rule for a specified amount of time. Once the rule is triggered, no new notifications will be generated from the same rule until the Mute Threshold has passed.
Stellar Cyber still monitors the rule for heartbeats from the sensor until the mute threshold passes and restarts the monitoring interval if they are detected. A new alert is only generated when the Mute Threshold is passed if no heartbeats have been seen during the monitoring interval.
24 hours
The image below shows the Advanced step for a No data from server sensor(s) rule:
-
-
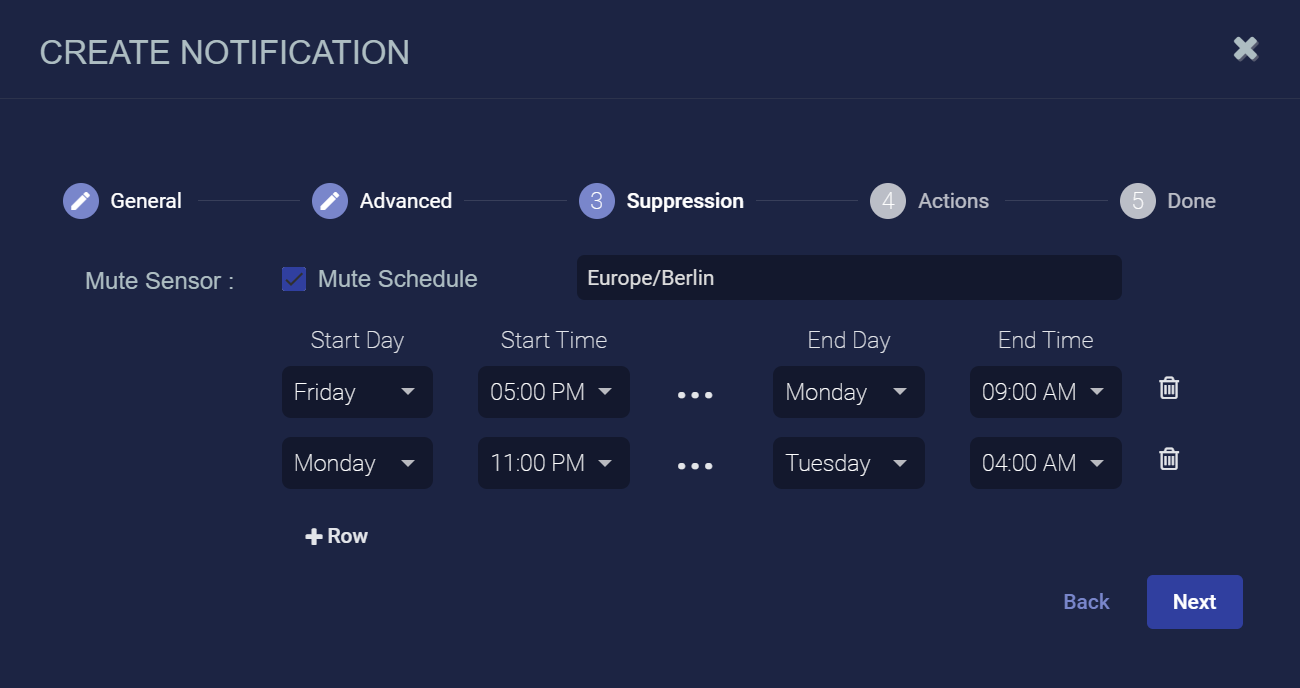
Use the Suppression step to set up a schedule of times during which notifications from the rule will not be displayed in the Notification Center or sent to configured recipients. This can be handy for suppressing notifications from sensors that you know are normally not seeing any data during specific hours.
The times you configure for the Suppression schedule are specified in browser time.
-
Use the Mute Schedule checkbox to enable or disable suppression for the rule. When Mute Schedule is checked, you can set up a schedule as follows:
-
Select a time zone for the schedule from the dropdown. By default, the time zone is set to your browser's time zone.
-
Use the Start Day/Time and End Day/Time fields to specify a window of time during which notifications from the rule are not sent.
-
Use the + Row button to add an additional row to the schedule. Each row creates a new window of time during which notifications from the rule are not sent.
The figure below shows a sample Suppression schedule configured to exclude notifications during weekends and late evenings on Monday nights to Tuesday mornings:
-
-
Use the Actions step to specify how this rule notifies you when it is triggered:
-
All rules have In Platform enabled so that triggered instances appear in the Notification Center.
-
Click the Add Configuration button and choose whether to add an Email or Slack action, as illustrated below.
-
Set the following options for an Email action in the Notification Type: Email section:
-
Use the Recipients field to specify who will receive a notification email when the rule is triggered. Click to display a pick list containing all email recipients configured in the System | Configurations | Recipients page. If you want to send an email to someone who is not already configured in the Recipients page, you can also type addresses in manually.
-
Use the Subject field to specify the subject line of the email. If you want to use different subject lines for different recipients, you can click the Add Configuration button and add a second Email notification with a different subject line and set of addressees.
The figure below shows a configured Email notification:
-
-
Set the following options for a Slack action in the Notification Type: Slack section:
-
Use the Recipients field to specify the Slack channel or user that will receive a message when the rule is triggered.
You can click to display a pick list containing all Slack recipients configured in the System | Configurations | Recipients page. You can also manually type in the URL for an incoming webhook that you create in the Slack API.
The figure below shows a configured Slack notification:
Email and Slack messages both include a summary of the event that triggered the notification and a link back to the Stellar Cyber platform to a location that makes sense based on the type of notification that was generated. You can configure a rule with any combination of email and Slack messages, including multiple destinations.
-
-
-
Click Next and review the settings for your notification rule. Use the Back button to go back and correct anything that's not quite right. When you are satisfied, click Submit to add your rule to the list.
The rule appears in the System Action Center's list and is automatically Enabled.
Creating a User Modifications Rule
User Modification rules are available as part of an Early Access Program and may not be available in your version of the Stellar Cyber Platform. Contact your account manager to inquire about taking part in an Early Access Program.
User Modification rules help you monitor a wide variety of changes and events related to user accounts, giving you a powerful audit trail for identity management.
You can create the following types of User Modification rules:
-
Account lockout triggered – This rule is triggered when a user's account is locked out due to excessive failed login attempts.
-
Account password change – This rule is triggered when an account's password has been changed.
-
New RBAC profile created – This rule is triggered when a new RBAC profile is created.
-
New user created – This rule is triggered when a new user account is created.
-
RBAC profile deleted – This rule is triggered when an RBAC profile is deleted.
-
User RBAC privilege escalation – This rule is triggered when the a user's RBAC profile is changed to one with increased capabilities in the platform (for example, from User to Platform Admin).
-
User deleted – This rule is triggered when a user account is deleted.
-
User has disabled 2FA – This rule is triggered when two-factor authentication is disabled for a user account.
For all User Modification rules, new notifications are sent every five minutes.
. Use the following procedure to create a User Modifications rule:
-
Click the Create button at the top of the System Action Center and select User Modifications from the dropdown that appears.
-
Select the type of rule you want to create. See the start of this section for a description of the available rule types.
The Create Notification wizard starts with the Category set to User Modifications and the Type set to the selected rule type.
-
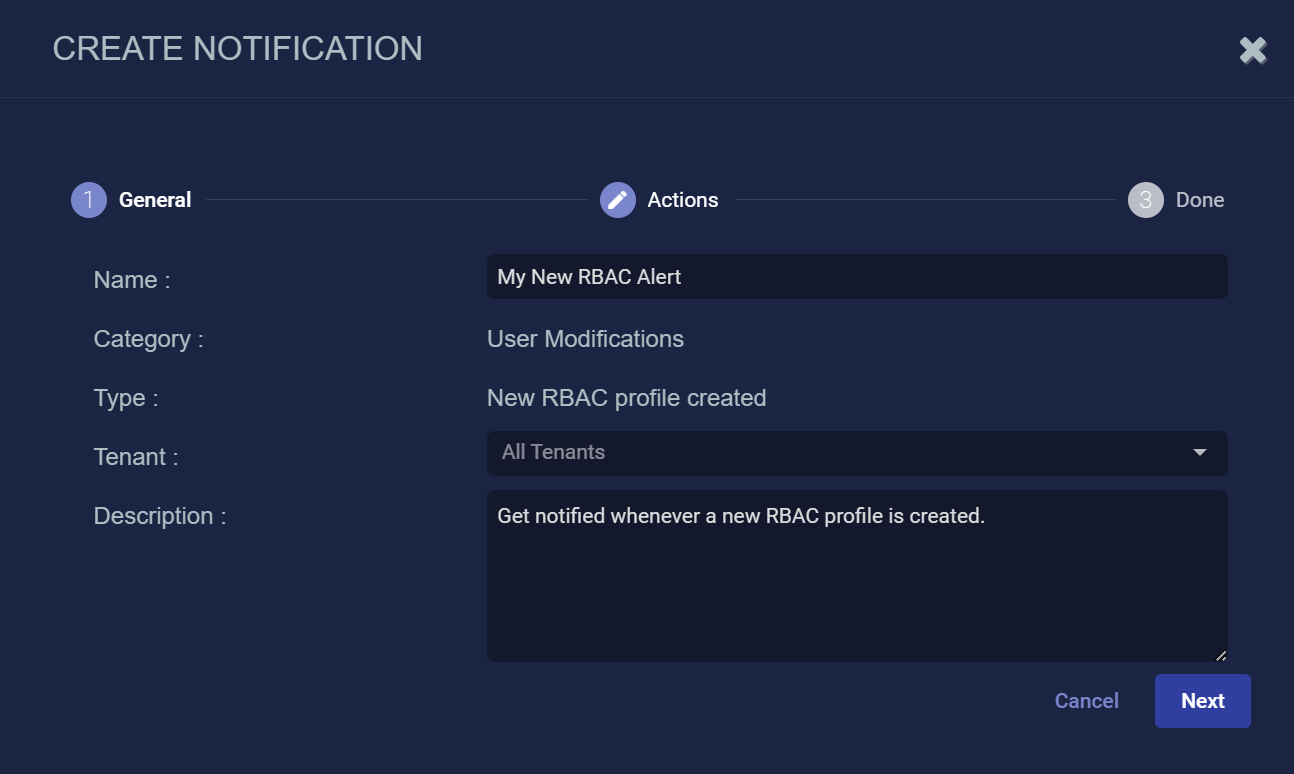
Supply a name for your notification rule in the Name field.
-
Select the Tenant to which the rule applies. By default, All Tenants are selected. Click anywhere in the Tenant) field to display a pick list including all tenants available on the system where you can select the tenant to which this rule applies.
-
You can either accept the system-provided Description or supply your own. The description supplied here appears in the System Action Center's table of rules.
-
Click Next.
-
Use the Actions step to specify how this rule notifies you when it is triggered:
-
All rules have In Platform enabled so that triggered instances appear in the Notification Center.
-
Click the Add Configuration button and choose whether to add an Email or Slack action, as illustrated below.
-
Set the following options for an Email action in the Notification Type: Email section:
-
Use the Recipients field to specify who will receive a notification email when the rule is triggered. Click to display a pick list containing all email recipients configured in the System | Configurations | Recipients page. If you want to send an email to someone who is not already configured in the Recipients page, you can also type addresses in manually.
-
Use the Subject field to specify the subject line of the email. If you want to use different subject lines for different recipients, you can click the Add Configuration button and add a second Email notification with a different subject line and set of addressees.
The figure below shows a configured Email notification:
-
-
Set the following options for a Slack action in the Notification Type: Slack section:
-
Use the Recipients field to specify the Slack channel or user that will receive a message when the rule is triggered.
You can click to display a pick list containing all Slack recipients configured in the System | Configurations | Recipients page. You can also manually type in the URL for an incoming webhook that you create in the Slack API.
The figure below shows a configured Slack notification:
Email and Slack messages both include a summary of the event that triggered the notification and a link back to the Stellar Cyber platform to a location that makes sense based on the type of notification that was generated. You can configure a rule with any combination of email and Slack messages, including multiple destinations.
-
-
-
Click Next and review the settings for your notification rule. Use the Back button to go back and correct anything that's not quite right. When you are satisfied, click Submit to add your rule to the list.
The rule appears in the System Action Center's list and is automatically Enabled.
Ensuring that Links In System Action Center Emails Work Correctly 
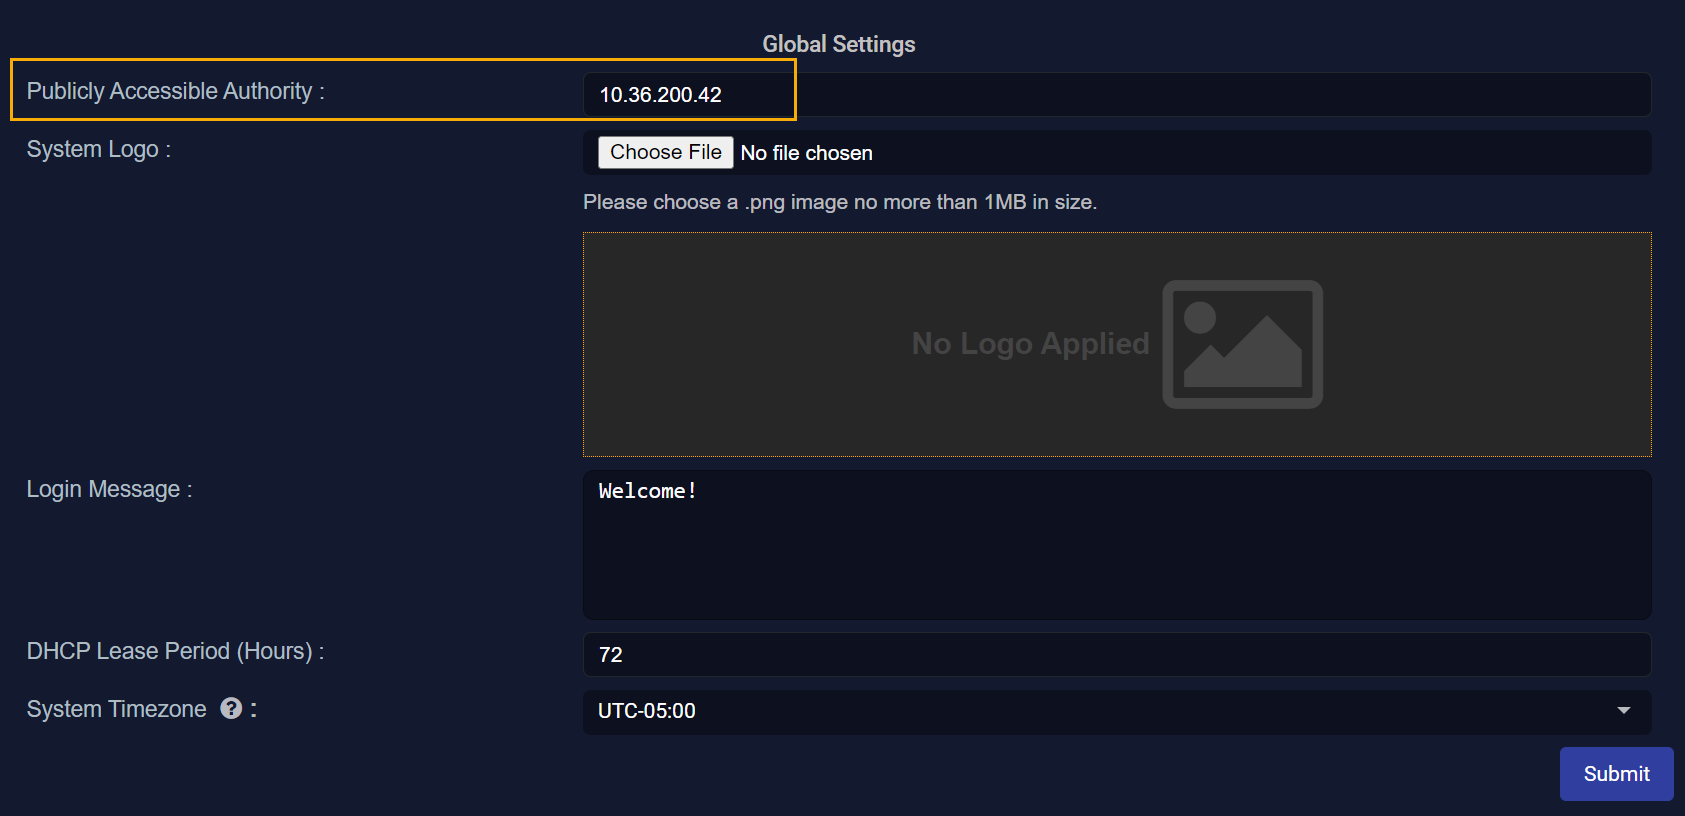
Notification emails sent from the System Action Center for Case Management events include a link to the corresponding case in the user interface. In order for these links to work correctly, you must specify the Stellar Cyber DP's publicly accessible IP address in either the CLI or using the Publicly Accessible Authority option in the Global Settings section of the System | Settings page.
Using the System | Settings Page
-
Navigate to the System | Settings page and scroll down to Global Settings.
-
Enter the public IP address of the Stellar Cyber DP in the Publicly Accessible Authority field. This is the same IP address users enter in their browser to access the Stellar Cyber user interface. You only need to enter the IP address. For example:
-
Click Submit to apply your settings.
