Configuring Remote SSH Host Connectors
Scripts run via SSH on remote hosts (targets).
Connector Overview: Remote SSH Host
Capabilities
-
Collect: No
-
Respond: Yes
-
Native Alerts Mapped: No
-
Runs on: DP or Sensor
-
Interval: N/A
Collected Data
N/A
Domain
|
https://<Hostname>:<Port> where <Hostname> and <Port> are variables from the configuration of this connector |
Response Actions
|
Action |
Required Fields |
|---|---|
|
N/A (always enabled) |
Third Party Native Alert Integration Details
N/A
Required Credentials
-
Hostname, Port, Username, and Password
Let us know if you find the above overview useful.
Adding the Connector in Stellar Cyber
To add a new remote SSH host connector in Stellar Cyber:
-
Log in to Stellar Cyber.
-
Click System | Integration | Connectors. The Connector Overview appears.
-
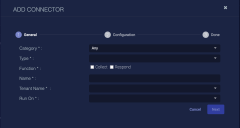
Click Create. The General tab of the Add Connector screen appears. The information on this tab cannot be changed after you add the connector.
The asterisk (*) indicates a required field.
-
Choose Remote Host from the Category drop-down.
-
Choose SSH Host from the Type drop-down.
-
For this connector, the supported Function is Respond, which is enabled already.
-
Enter a Name.
Notes:- This field does not accept multibyte characters.
- It is recommended that you follow a naming convention such as tenantname-connectortype.
-
Choose a Tenant Name. The Interflow records created by this connector include this tenant name.
-
Choose the device on which to run the connector.
-
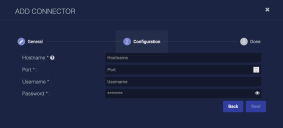
Click Next. The Configuration tab appears.
-
Enter the Hostname.
Do include https in the Hostname.
-
Enter the Port.
-
Enter the Username to log in to the SSH host.
-
Enter the Password.
The password should not include non-ASCII special characters.
-
Click Next. The final confirmation tab appears.
-
Click Submit.
The asterisk (*) indicates a required field.
The remote host is immediately added.


