Configuring Object-Level Sharing and Access Control
Object-Level Sharing and Access Control ![]() enables you to assign granular access permissions to user-created objects in the Stellar Cyber Platform. This feature lets you control which users can view (read-only) or edit (read/write) shared content. In this release, Object-Level Sharing and Access Control applies to custom dashboards.
enables you to assign granular access permissions to user-created objects in the Stellar Cyber Platform. This feature lets you control which users can view (read-only) or edit (read/write) shared content. In this release, Object-Level Sharing and Access Control applies to custom dashboards.
This feature enhances collaboration and security by letting you share objects selectively within your organization while maintaining control over who can modify or redistribute them. It also helps protect proprietary or sensitive configurations by restricting access to authorized users only.
If you are a root user with Super Admin privileges, you can configure the default sharing permissions globally in System | Settings and sharing permissions individually for each custom dashboard.
Global Default Access Settings
Global default access settings define how access control lists (ACLs) behave for all new or existing custom dashboards that do not have specific sharing rules applied.
To configure the global settings:
-
Navigate to System | ORGANIZATION MANAGEMENT | Settings.
-
Locate the Object-ACL (Access Control List) Settings section.
-
Select the default sharing mode:
Default Deny – Only the object owner has access to the object unless additional users are explicitly granted permissions.
Default Allow – All users with appropriate role-based access control (RBAC) privileges have Reader access to all objects unless otherwise specified.
When upgrading to version 6.2, Stellar Cyber defaults to Default Allow to preserve existing access behavior. You can switch to Default Deny to enforce stricter data and configuration security.
Dashboards created or modified after changing this setting inherit the new default behavior unless explicitly configured otherwise.
Users with Super Admin privileges in RBAC can bypass all object-level access controls. This ensures that administrators with full system authority retain access to all user-created objects regardless of individual sharing settings.
Sharing Custom Dashboards
You can assign specific users with Editor access or Reader access to custom dashboards. Dashboard-specific settings override global defaults.
To configure sharing for a dashboard, you must have the following privileges and permissions:
-
Super Admin privileges: When you're logged in with a Super Admin account, you have permission to share any custom dashboard.
or
-
Security Admin or Platform Admin privileges: When you're logged in with either a Security Admin account or Platform Admin account—and you have RBAC privileges to create custom dashboards—you can share any custom dashboard you created because you automatically have Owner permissions, or you can share any dashboard to which you've been given Editor permissions by another user.
To configure sharing for a dashboard:
-
Go to Dashboards | Custom.
-
Select a custom dashboard.
-
Select Share or Open in Visualizer | Share.
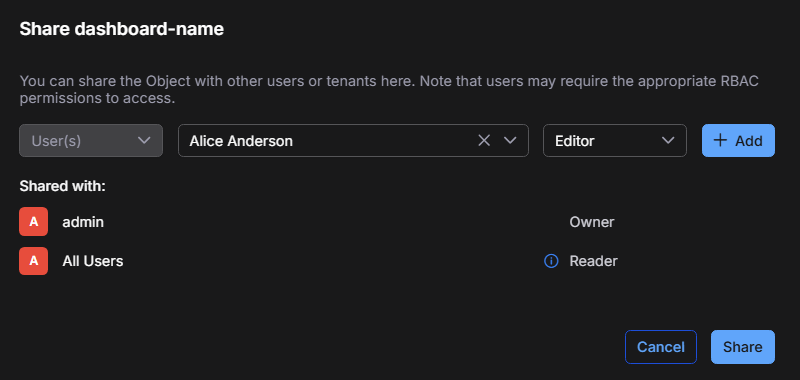
The Share dialog box displays the following information:
-
Shared with – Users who currently have access to the dashboard and their privilege roles: Owner, Editor, or Reader. The owner is the one who created the dashboard. Owners have full control, including editing, sharing, and ownership transfer. Ownership cannot be removed and must be transferred to another active user when an owner account is deleted.
-
Add Users – Grant additional users access with specific privileges. You can assign the following roles:
Editor – Can view, modify, and share the dashboard with other users.
Reader – Can view the dashboard but cannot edit or share it.
-
-
To assign access privileges for the dashboard to users, choose a username from the drop-down list and select a role—Editor or Reader.
-
To assign access privileges to an additional user, select + Add, choose the username, and select a role. Repeat as needed to add multiple users.
-
Select Share to apply the settings.
The system immediately updates the ACL for the dashboard. All assigned users see the shared dashboard listed in their dashboard library according to their permissions.


