Auto-Triage Management
The automatic triage of user-reported phishing is available as part of the Early Access Program (EAP) and is only supported on Stellar Cyber in SaaS deployments. If this feature doesn’t appear in your version of the platform, contact your account manager to inquire about taking part in the Early Access Program and enabling this functionality.
The System | HYPERAUTOMATION | Auto-Triage Management page is where you define and manage how the Stellar Cyber phishing email triage agent automatically handles user-reported phishing emails. This capability reduces the burden of manual analysis, accelerates alert generation, and enhances phishing response workflows across your organization.
Once configured, this feature integrates with a tenant-specific system-managed inbox where user-reported phishing emails are forwarded. The Stellar Cyber phishing triage agent then parses, enriches, and analyzes the email content using both built-in threat intelligence sources and an optional third-party integration with VirusTotal. Each triaged email results in an alert and optionally a correlated case for streamlined investigation.
After Stellar Cyber retrieves a reported email, the phishing email triage agent performs several automated steps:
-
The Stellar Cyber phishing email triage agent breaks down the email into its various components (header, body, attachments).
-
It parses the email to extract observables such as URLs, IP addresses, domains, and attachments.
-
It enriches the observables using internal AI-based analysis coupled with third-party threat intelligence services to extract insights from email and HTML elements.
The triage agent enriches observables using the Stellar Cyber built-in Threat Intelligence Platform (TIP), which aggregates threat feeds from multiple sources such as Abuse.ch, AlienVault, OpenPhish, and Emerging Threats, among others.
Additionally, the agent includes direct integrations with services like URLScan.io and Sophos. These integrations don’t require any setup on your part; they're already built in. The agent also supports an additional integration with VirusTotal (premium API key required). Simply enter your own VirusTotal enterprise API key within the auto triage configuration for high-quality auto triage results.
By combining its internal AI-powered threat analysis with external enrichment sources, the triage agent delivers high-confidence verdicts. This hybrid model ensures context-aware analysis, reducing false positives and improving decision-making.
-
The agent generates a static screenshot of the email body so that you can safely preview its contents without risk of executing embedded threats.
-
It creates an alert in the Stellar Cyber UI that includes the triage results, verdict (for example, true positive or false positive), threat score, and all enriched observables.
All relevant data—including enrichment outcomes, extracted observables, and email metadata—is stored in structured indexes and linked by a unique correlation ID. This enables your analysts to access a cohesive view of the alert and all related evidence. The alert is presented in the Stellar Cyber UI with contextual observables and a static screenshot for safe review.
The phishing triage feature supports multiple enrichment sources, is modular and scalable by design, and maintains full traceability—even when multiple users report the same email. The goal is to reduce manual triage burdens, standardize phishing investigation, and improve the efficiency of your SOC through automation and transparency.
The following are some of the benefits of this feature:
-
Automated Analysis: Reduces SOC analyst workload by automatically parsing and enriching phishing indicators such as URLs and attachments.
-
Centralized Management: Lets administrators view, edit, and manage multiple triage configurations from a unified interface.
-
High-Confidence Verdicts: Combines internal AI and external intelligence for reliable threat determination.
-
Structured Outputs: Links triaged emails, observables, verdicts, and screenshots into an alert that supports deep investigation.
For more detailed guidance, see the following sections:
Overview
The triage process begins when your users report suspicious emails—typically by selecting a Report Phishing button in their email client. These reported emails are delivered to a centralized mailbox that you manage within your own email infrastructure. You are responsible for configuring this mailbox to serve as the collection point for all reported phishing emails.

You set up the collection mailbox to automatically forward emails to a Stellar Cyber-provisioned inbox that’s unique for your tenant. After receiving the emails, Stellar Cyber retrieves them from the inbox and initiates the automated triage process.
At this time, automatic triage of user-reported phishing is officially supported only for Microsoft 365 environments. In Microsoft 365, you configure an Inbox Rule (Forward) in a central mailbox so that all user-reported emails are automatically forwarded to the system-provisioned inbox assigned to your tenant. The Stellar Cyber phishing triage agent retrieves emails from that inbox, analyzes them, and generates triage results and alerts.
For organizations using Google Workspace (Gmail), the workflow differs. Google Workspace does not provide a built-in centralized mailbox for collecting user-reported phishing emails. Reported phishing emails are sent directly to Google and are not accessible through an administrative mailbox. To forward these messages to Stellar Cyber, you must deploy a third-party Gmail add-on or custom script that captures reported emails and forwards them—typically as an .eml attachment—to a central mailbox such as phishing@company.com, which in turn can forward to the tenant-specific inbox monitored by Stellar Cyber. Although this configuration might work, Google Workspace is not yet officially supported or validated.
Adding an Auto Triage Configuration
To implement the automated phishing triage feature, you must configure three main components:
-
Email System (Your Infrastructure)
User-Report Mechanism: Enable users to report suspected phishing emails by clicking a button in their email client.
Centralized Mailbox: Set up a dedicated mailbox (for example, phishing@yourdomain.com) for collection.
Email Forwarding Policy: Configure a policy rule on your central mailbox to automatically forward user-reported phishing emails to the Stellar Cyber inbox.
-
Stellar Cyber Platform
Auto Triage Feature Enablement: Ensure the auto triage phishing feature is enabled.
Stellar Cyber-provisioned Inbox: Note the inbox address that Stellar Cyber creates when you define an auto triage configuration. You must add it as the destination in the policy rule that forwards suspected phishing email from the centralized mailbox to Stellar Cyber.
-
Additional Threat Intelligence (optional)
VirusTotal Premium API Access: Enter a valid VirusTotal Premium API key into the auto triage configuration for VirusTotal to provide additional enrichment.
The Stellar Cyber phishing email triage agent already includes threat intelligence enrichment through the Threat Intelligence Platform that’s built into Stellar Cyber and through direct built-in integrations with the third-party threat intelligence services URLScan.io and Sophos.
For a successful implementation, configuration is required on both your email infrastructure and within the Stellar Cyber Platform.
-
Stellar Cyber Platform (Auto Triage Configuration)
-
Email System (Your Infrastructure)
-
Stellar Cyber Platform (Auto Triage Enablement)
Follow the instructions in each section to establish a fully operational phishing triage pipeline—from user report to analyst alert—within your security operations workflow.
Stellar Cyber Platform (Auto Triage Configuration)
On the Stellar Cyber Platform, create an auto triage configuration, which involves naming, type selection, tenant selection, and optional VirusTotal credential selection. The configuration includes the provisioning of a Stellar Cyber-hosted inbox to which your tenant will forward suspected phishing emails.
-
Because this feature is currently available only to participants in the Early Access Program (EAP), you must first contact your Stellar Cyber account manager to request participation in the program.
-
After you are registered in the Early Access Program, log in to Stellar Cyber with super admin privileges.
-
(Optional) If you have a VirusTotal account and an accompanying enterprise API key, do the following to set up integration between Stellar Cyber and VirusTotal.
If you don’t have a VirusTotal account, skip this step.
Select System | INTEGRATIONS | Credential Management, select + Create, select Create for VirusTotal, enter the following, and then select Create once more:
Name: Enter a name for the VirusTotal credential configuration. You will choose this name in a later step.
Tenant: Choose the name of an individual tenant or All Tenants to determine which tenant or tenants can use this credential.
API Key: Enter the enterprise API key from VirusTotal.
-
Select System | HYPERAUTOMATION | Auto Triage Management, and then select + Config.
-
In the General section, enter a name for the configuration, choose Phishing Reports | Stellar from the Type dropdown list, and then select Next.
Choose a unique and descriptive name for the configuration to help identify its purpose or associated environment.
-
In the Config section, select an individual tenant for the configuration and, if you created a VirusTotal configuration, choose its name in the VirusTotal drop-down list.

You can only assign an auto-triage configuration to a tenant, not to the root system.
-
Select Create to complete the Auto Triage configuration.
An entry appears in the Auto Triage Management table for the configuration. The table displays the name, type, and tenant that you entered. It also displays the status of the configuration, which can be in one of the following states:
Disabled: Not active.
In Progress: Inbox provisioning is pending.
Running: Triage workflow is active.
Error: Error with the triage workflow.
Provisioning the inbox typically takes up to 24 hours but occasionally can take up to 48 hours. While it’s being provisioned, the table displays “Creating…”. After the process completes, the table displays a Stellar Cyber-provisioned inbox to which the email service must forward user-suspected phishing emails.

Email System (Your Infrastructure)
After completing the Auto Triage configuration in Stellar Cyber, configure your email system to enable users to report phishing emails and set up a centralized mailbox that collects their reports and forwards them to the provisioned Stellar Cyber inbox. This forwarding ensures that the email service automatically delivers reported messages to Stellar Cyber for triage and analysis.
Email Forwarding Configuration
Complete the following steps using your email system:
-
Provide a method for users to report suspicious emails.
In Microsoft 365, this typically involves enabling a "Report Message" or "Report Phishing" button in the Outlook client (through Microsoft Defender for Office 365). Optionally, as a fallback, you might distribute instructions for manually forwarding suspicious emails to a designated address.
In Google Workspace, there is no built-in central mailbox for user-reported phishing. As a result, achieving a workflow similar to Microsoft environments requires additional configuration. Here are a few available options:
Manual forwarding (workaround): Users can manually forward suspicious emails (as attachments, with headers intact) to a designated mailbox such as
phishing@yourdomain.com. While functional, this approach results in a suboptimal user experience and is best suited for small environments or proof-of-concept deployments.Third-party reporting add-ons: Several Gmail add-ons and custom workflows can capture user-reported phishing emails and forward them—along with full message headers—to a centralized mailbox. These options might work, but they have not been tested or officially supported byStellar Cyber as part of the Early Access Program.
-
Custom Google Workspace Add-on – Build your own using Apps Script to forward the full original email as an attachment to a specified mailbox.
-
KnowBe4 Phish Alert Button (PAB) – A common enterprise add-on that forwards reported messages to a configurable mailbox.
-
Cofense Reporter for Gmail – A Google Workspace add-on that forwards reported messages with full metadata to a central mailbox.
-
-
Identify or create a central reporting mailbox.
Designate or provision a mailbox to collect reported phishing messages (for example, phishing@yourdomain.com). All reported messages must be routed to this mailbox.
-
Create a forwarding rule to the Stellar Cyber inbox.
Configure a forwarding rule so that all emails received in the reporting mailbox are automatically forwarded—either as an attached message or as a "Forwarded message" block within the body—to the Stellar Cyber-hosted inbox. After Stellar Cyber provisions it, this inbox address is shown in the Auto-Triage Management table.
Example: Microsoft 365 Configuration
Follow the steps below to configure Microsoft 365 to forward user-reported phishing emails to the Stellar Cyber inbox. This example shows how to use mailbox rules in Microsoft 365 to automatically forward the email that users report as suspected phishing attempts. The configuration routes all user-reported emails through a central reporting mailbox and forwards them to Stellar Cyber for triage, completely automating the collection and analysis of reported email without requiring any manual analyst intervention.
Microsoft 365 supports several forwarding methods. Use the Inbox Rule (Forward) method because it creates a new message from the reporting mailbox and sets the forwarder as the sender in the outer header. This behavior enables Stellar Cyber to identify the tenant that reported the phishing email. Other methods, such as transport-level forwarding or Inbox Rule (Redirect), retain the original external sender in the header, which prevents Stellar Cyber from determining the reporting tenant. By contrast, the Inbox Rule (Forward) method embeds the original email as an attachment and sets the forwarder as the sender in the outer header, thereby identifying each tenant in a multi-tenant environment.
If a central reporting mailbox already exists
If your organization already has a mailbox dedicated to receiving phishing reports:
-
Sign in to Microsoft 365 and access the reporting mailbox.
-
Create a rule in the reporting mailbox to forward all incoming messages to the Stellar Cyber inbox provisioned for you (see Stellar Cyber Platform (Auto Triage Configuration)). Use the Inbox Rule (Forward) method so that Stellar Cyber can associate each reported email with the correct tenant in a multi-tenant environment.
If a central reporting mailbox doesn’t already exist
If your organization does not yet have a phishing report mailbox, complete the following:
-
Create a reporting mailbox.
Provision a new mailbox (for example,
phishing@yourtenantcompany.com) to serve as the destination for reported phishing emails. -
Configure the Outlook user submission settings to enable users to report email using a “Report” button
Go to:
https://security.microsoft.com/securitysettings/userSubmissionSet the reporting mailbox as the destination for the built-in "Report" button in Microsoft Outlook.

-
Add the reporting mailbox to Advanced Delivery.
Go to:
https://security.microsoft.com/advanceddeliveryAdd the reporting mailbox to the SecOps mailbox list to prevent filtering or quarantine of user submissions.
-
Enable Auto-Forwarding to Stellar Cyber.
In the reporting mailbox, create a rule to forward all messages as attachments or inline "Forwarded message" blocks" within a new email to the inbox that Stellar Cyber provisioned for you; see Stellar Cyber Platform (Auto Triage Configuration). Ensure that the "From" address in the new transport header identifies the corporate entity as the sender. By using the Inbox Rule (Forward) method, which identifies the corporate entity as the sender, Stellar Cyber can associate each reported email with the correct tenant in a multi-tenant environment.


Stellar Cyber Platform (Auto Triage Enablement)
After you have both Stellar Cyber and your email service configured for auto triage, enable it in Stellar Cyber.
-
Log back in to Stellar Cyber with super admin privileges and navigate to System | HYPERAUTOMATION | Auto Triage Management.
-
Toggle Enable Email Triage to the ON position.
-
Confirm activation and save your changes.
Test Email Forwarding and Alert Generation
Use the following test procedure to verify that the Auto-Triage for Phishing Emails feature is functioning end-to-end. This confirms that a user-reported phishing email can be (1) sent by the user, (2) received and forwarded by the email service to Stellar Cyber, (3) triaged automatically, and (4) results in an alert summarizing the analysis.
-
Send a test email.
From any user mailbox, report an email—any email, including a benign one—as a phishing attempt using the built-in “Report Phishing” function in your mail client. This action forwards the message to the designated central mailbox, which relays the user's email as an attachment to a new message to Stellar Cyber.
-
Observe results in Stellar Cyber.
After a few minutes, log in to the Stellar Cyber Platform and check the alert or case views for a new alert or case entry corresponding to the test message.
-
Review the alert details.
Open the generated alert and verify that it includes the original email content, any applied enrichment results from the internal Threat Intelligence Platform or from integrations with external sources such as URLScan.io, Sophos, or VirusTotal, and a summary, verdict, observables, and threat score. For benign messages, expect a False Positive verdict.
Check the Forwarding Rule in Microsoft 365
If your test fails, check that Inbox Rule (Forward) is the method used for your forwarding rule. Microsoft 365 supports several forwarding methods, but only the Inbox Rule (Forward) works with Stellar Cyber. This is because Microsoft 365 forwards the original email as an attachment and includes metadata that allows Stellar Cyber to identify the correct tenant in the outer email header.
The following screen captures show which Microsoft 365 settings to avoid and which to use.
Transport-Level Forwarding: Check that your Microsoft 365 configuration does not use these two transport-level email forwarding methods:
-
Dedicated Forwarding (OWA Settings)
-
Dedicated Forwarding (Admin EAC)
These methods leave the original headers intact and add an extra Received hop. As a result, Stellar Cyber does not receive a header identifying the corporate entity, without which it cannot associate the email with the proper tenant in a multi-tenant environment.

Dedicated Forwarding (OWA Settings)

Dedicated Forwarding (Admin EAC)
Inbox Rule (Redirect): Check that you’re not using the redirect method. It resends the original message with most of the original headers and adds an extra Received hop. Stellar Cyber doesn’t support this method either because the header doesn’t identify the corporate entity. As a result, Stellar Cyber cannot associate the email with the proper tenant.

Index Rule (Redirect)
Inbox Rule (Forward): Check that you are using this method. It creates a new message to which it embeds the original message and headers as an attached message or inline "Forwarded message" block. It then adds a new header that identifies the corporate entity as the sender, which Stellar Cyber uses to associate the corporate entity in the email header with its tenant.

Index Rule (Forward)
Check the email address: If you have the Inbox Rule (Forward) configured, but the test still fails, it’s possible that there’s a problem with the email address that Stellar Cyber provisioned for your tenant; that is, the address to which your email system forwards suspicious messages as attachments. A simple way to test whether you have the correct email address is to forward a message to it as an attachment from your work account.
-
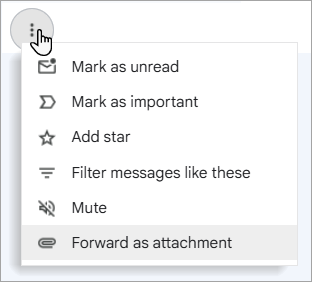
Select a message in your work email account and then select Forward as attachment.
-
Enter the email address that Stellar Cyber provisioned for you and select Send.
If Stellar Cyber receives the email, it uses the name of your corporate entity in the outer email to identify the correct tenant, creates a phishing email alert, and generates a case.
This method is suitable for testing and validation only. In a production environment, users should report suspected phishing emails by clicking a “Report” button in their email client. They should not manually forward suspected phishing messages as attachments to this address.
Using the Auto Triage Configurations Table
The table on the Auto Triage Management page displays all current configurations. Each row corresponds to a single configuration and contains the following columns:
-
Name: The label assigned to the configuration.
-
Type: The operational category of the configuration. For phishing triage, this is the fixed value Phishing Email | Inbox.
-
Tenant: The tenant to which the configuration is assigned. This field is not editable after creation.
-
Status: Indicates the current state of the configuration. Values include the following:
-
Running: The triage process is active and functioning.
-
In Progress: The configuration is being provisioned. This appears shortly after creation or reconfiguration.
-
Disabled: The configuration has been deactivated and triaging is currently paused.
-
Error: An issue is preventing normal operation. Review the Message field for more detail.
-
-
Message: Provides system status messages. A successful message reads “DP Trigger execution completed successfully”, which indicates that the triage operation was initiated and successfully completed. Other messages provide diagnostic or operational feedback based on the execution context.
-
Inbox Address: The Stellar Cyber-generated email address where reported phishing emails must be forwarded. This inbox is unique to each tenant and configuration.
-
Credential: Shows the VirusTotal credential (if assigned). When configured, this enables the use of VirusTotal as a threat intelligence source for enhanced URL and file enrichment.
-
Created Time: Timestamp when the configuration was initially saved in the Stellar Cyber Platform.
-
Updated Time: Timestamp of the most recent change to any field in the configuration. This can include both manual changes made through the UI and system-initiated updates.
This table enables you to review configuration health and validate triage inbox integration.
Editing an Auto Triage Configuration
You can edit the name and VirusTotal credential of an existing configuration by selecting the corresponding row and selecting Edit. Note that the Type and Tenant fields are fixed and cannot be changed after creation. This is by design, as each Stellar Cyber-provisioned inbox is dedicated to phishing email triage and is bound to the chosen tenant (or to "All Tenants") at the time an Auto Triage Configuration is created.
Deleting an Auto Triage Configuration
The deletion of an Auto Triage Configuration is not supported in the UI. This behavior is intentional, as each configuration is tied to a provisioned inbox that remains associated with its tenant. If you no longer want to use a configuration, you can disable it to stop triage operations. In rare cases where complete removal is required—such as a provisioning error or the need to assign the configuration to a different tenant—contact Stellar Cyber Support for assistance.
