Launching DL-m and DA-m VMs in Azure
Start the standard deployment of the Stellar Cyber Data Processor by launching separate VMs for the DL-m and DA-m using the Stellar Cyber DP image. Unlike the other public clouds, you launch Azure VMs by running an installation script in the Azure Cloud Shell rather than by stepping through a console wizard.
You use the same DP image regardless of whether you are deploying a DL-m, a DA-m, or a worker node. The script that creates each VM is identical. Later on, you assign a role in the CLI that specifies what the VM actually does.
Use our example as a guideline, as you might be using a different software version.
Preparing the Azure Environment
Complete the following before you launch either VM. You only need to do this once for the deployment, not once per VM.
Installing the Stellar Cyber Software Packages
To install the Stellar Cyber Software Packages:
-
Log in to portal.azure.com .
-
Click the hamburger menu at the upper left and select the entry for Microsoft Entra ID.
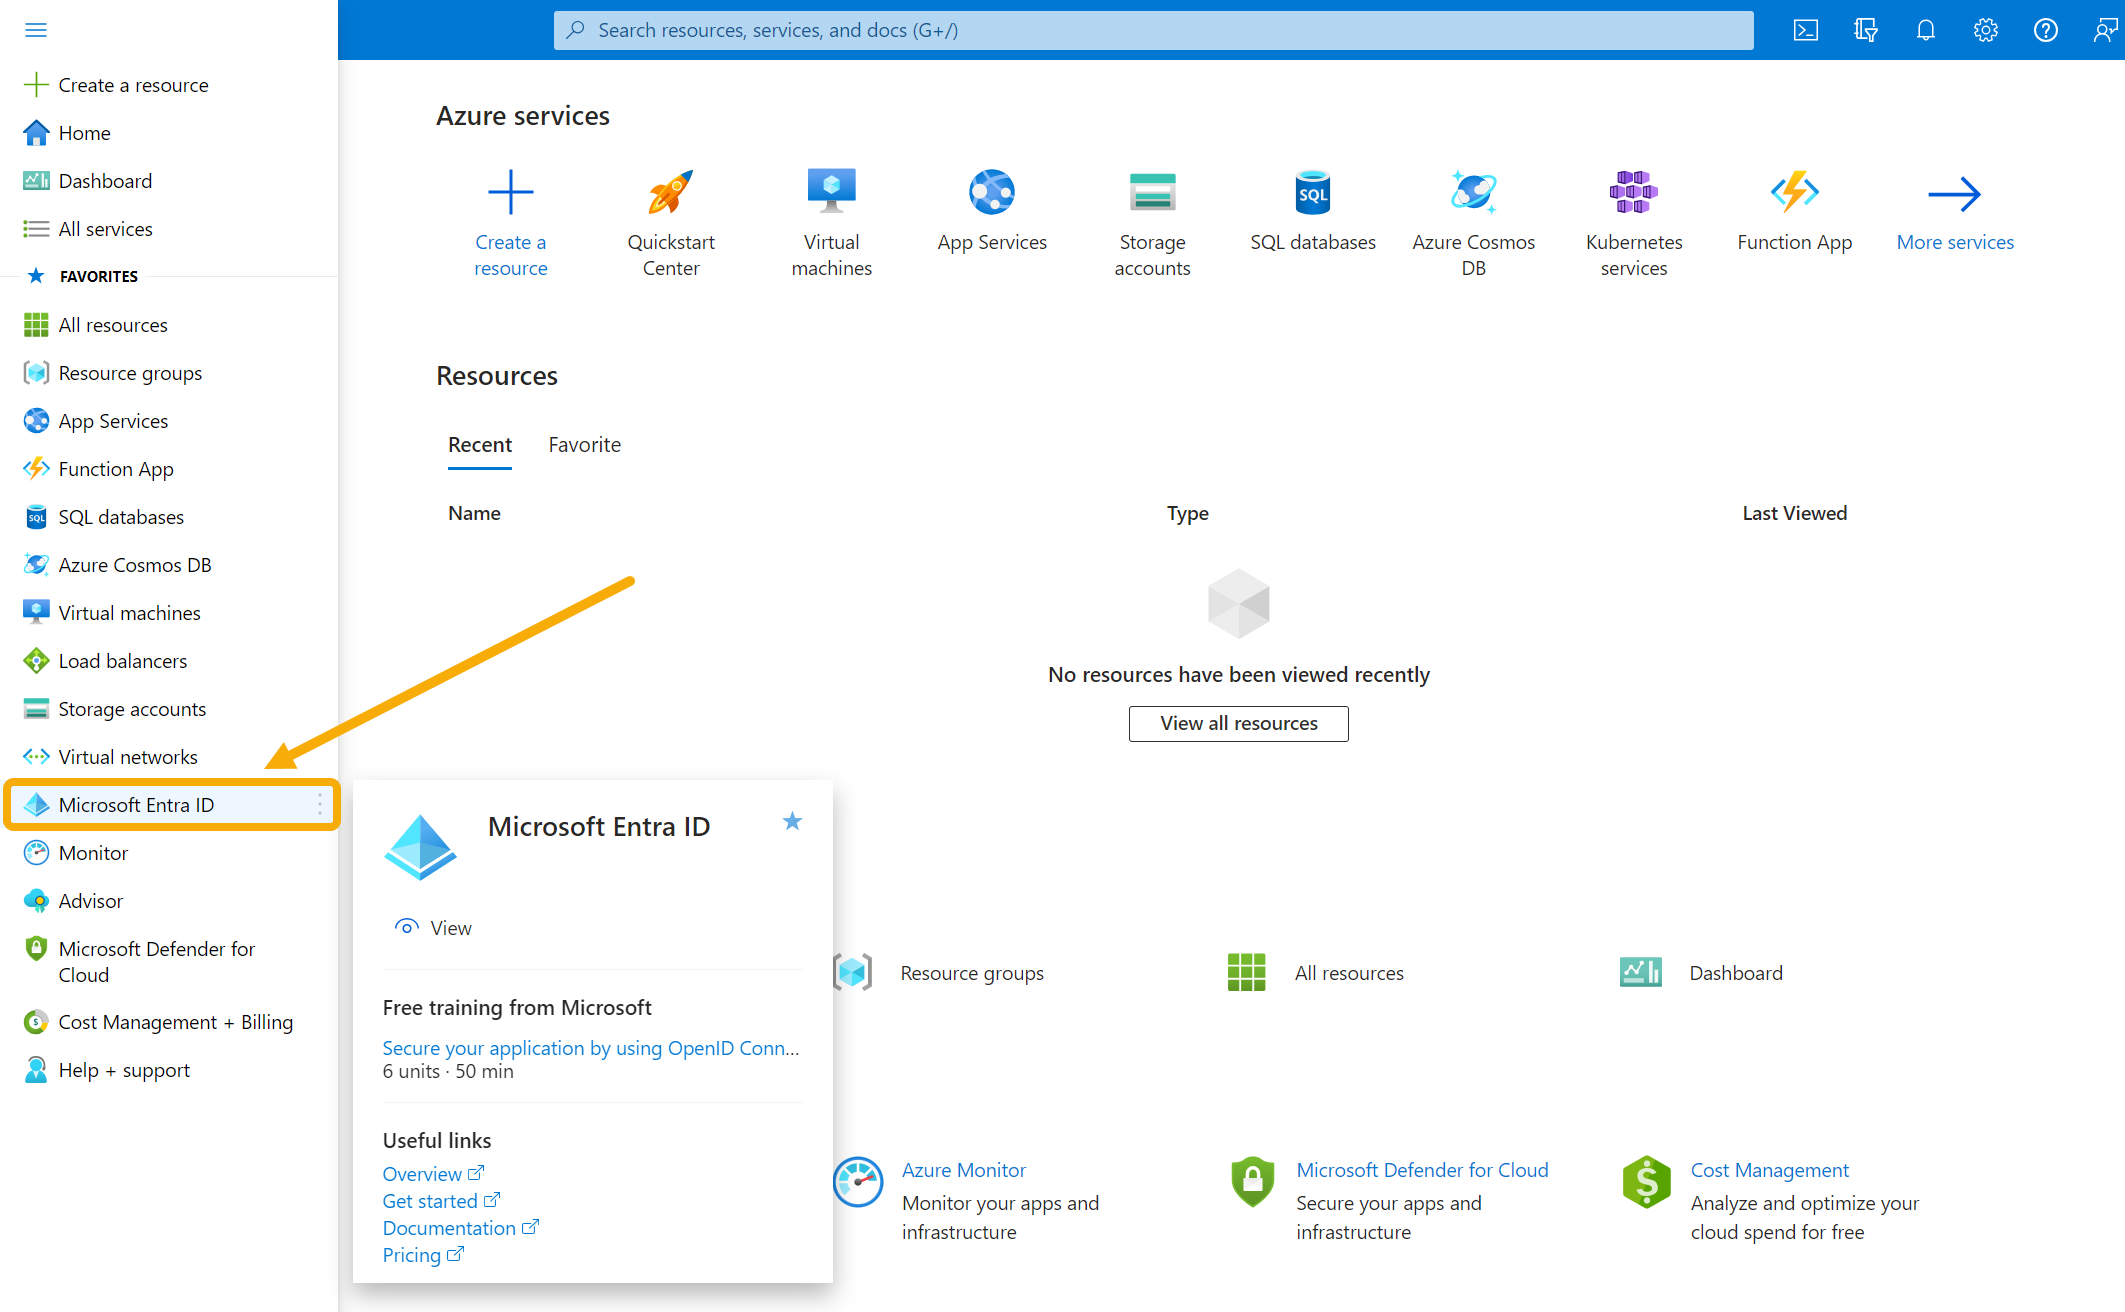
Your Microsoft Entra Overview page appears.
-
Scroll down and click Properties.
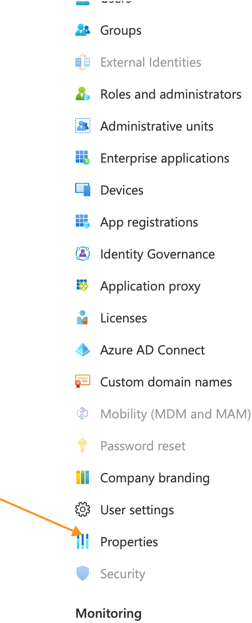
The Properties page appears.
-
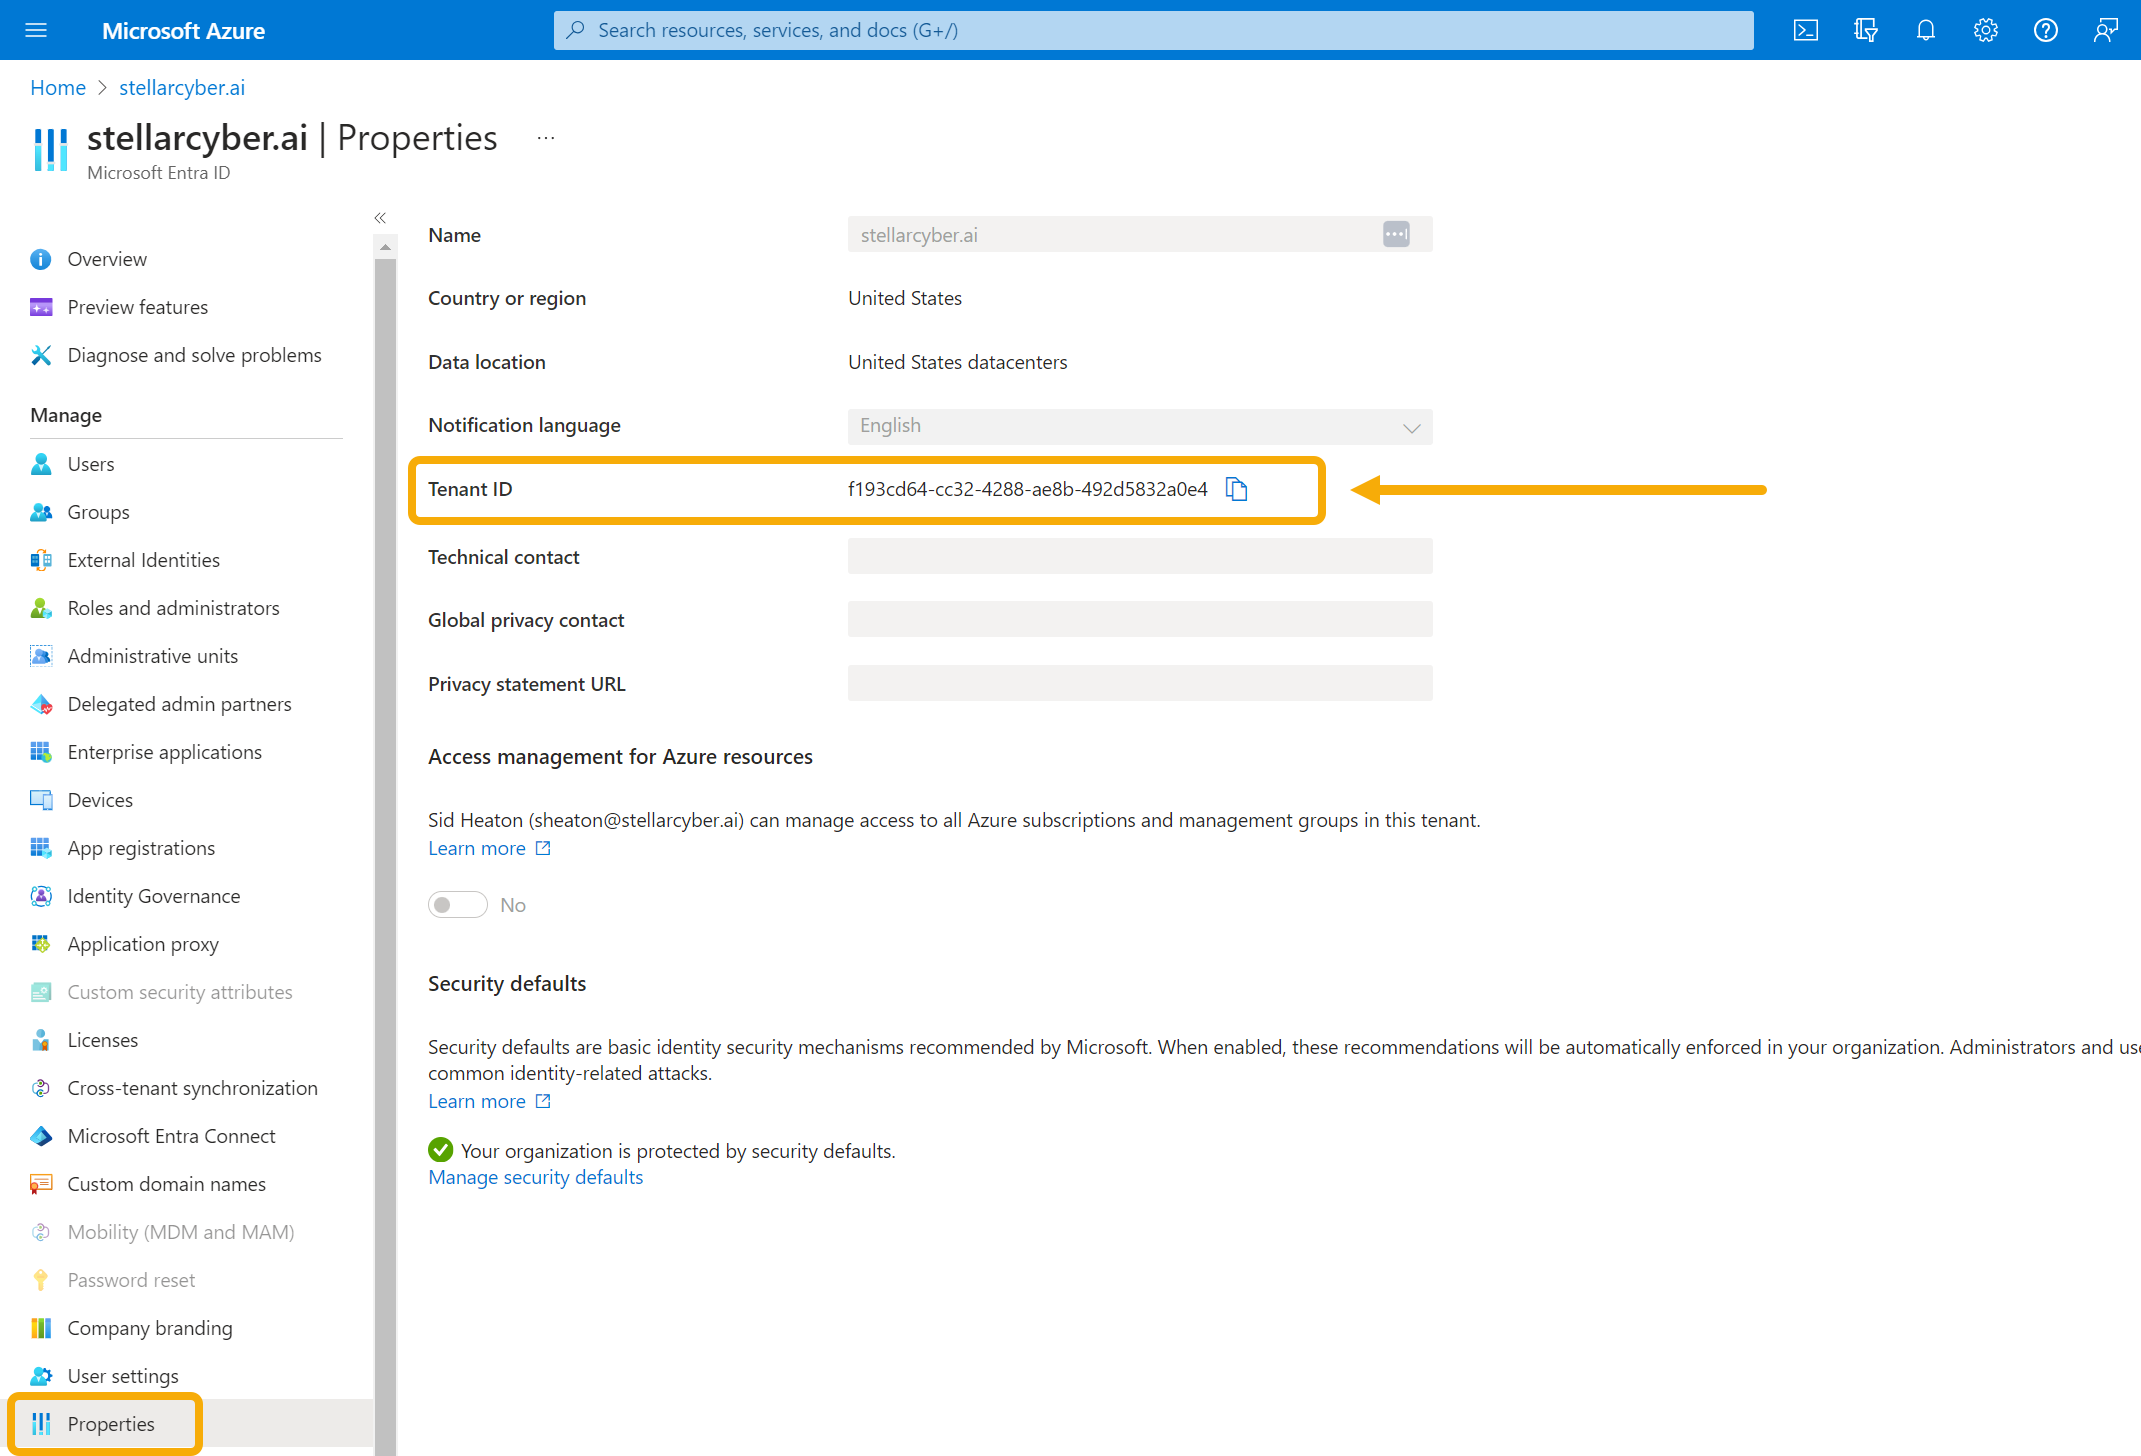
Copy the value shown for Tenant ID. You need this for the next step and also when creating the VM, so keep it handy.
-
Copy this URL, replacing <TenantID> with yours:
Copyhttps://login.microsoftonline.com/<TenantID>/oauth2/authorize?client_id=58238038-43b4-4446-8260-0fa97ace1085&response_type=code&redirect_uri=https%3A%2F%2Fwww.microsoft.com%2F - Paste that URL in a new browser tab (or window). Log in if necessary. A Permissions requested message appears.
- Click the Consent on behalf of your organization check-box.
- Click Accept. The Stellar Cyber Software Packages are released to your Azure account.
- To verify, go back to the Azure portal home page.
- In the search bar, type enterprise. Azure suggests several choices as you type.
- Choose Enterprise applications. A list of enterprise applications appears.
- Find Stellar Cyber Software Packages.
If you don't see Stellar Cyber Software Packages, contact Stellar Cyber technical support.
Creating a Resource Group for the VM
To create a new resource group for the VM:
- Go back to the Azure portal home page.
- Click Resource groups. The Resource groups page appears.
- Click Create resource group to create a new group.
- Name the resource group Stellar.
- Choose the region.
- Click Next : Tags.
- Add optional tags.
- Click Next : Review + create.
- Review your selections.
- Click Create. The Resource groups page appears, with your new Stellar group displayed.
- Select the Stellar resource group. The details appear.
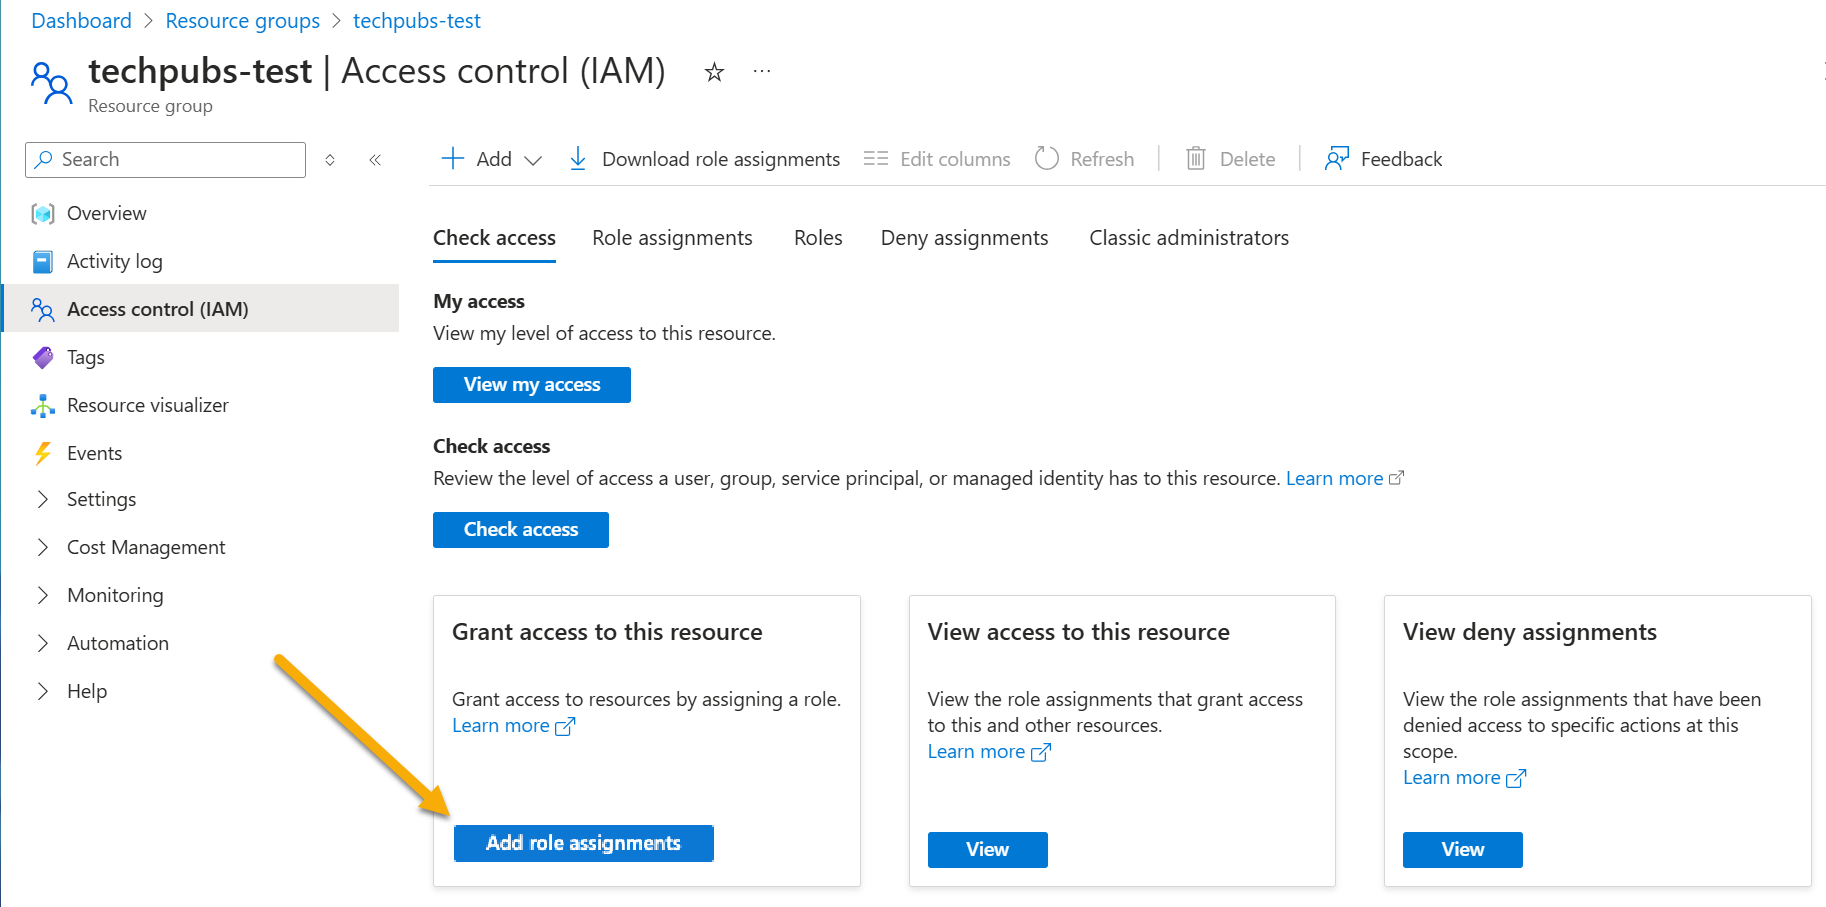
- Click Access control (IAM). The Access control (IAM) page appears.
-
Click Add role assignments to display the Add role assignment controls.
-
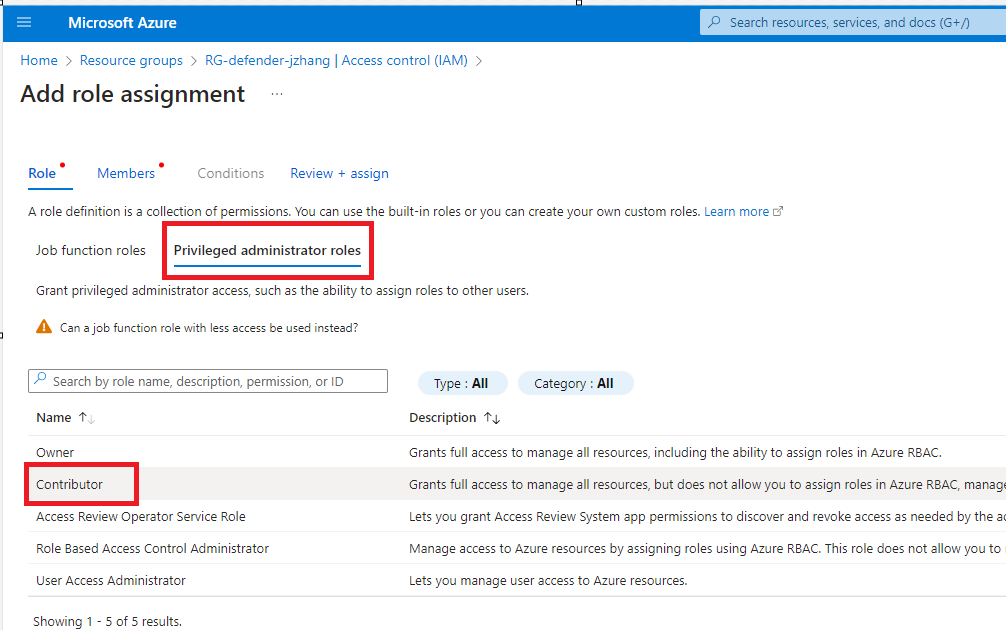
Click on Privileged administrator roles and choose the Contributor option, as illustrated below:
-
Leave the default selection of User, group, or service principal in the Assign access to dropdown.
-
In the Members section, click + Select members to display the Select members panel.
-
Start typing Stellar in the Select field of the Select members panel.
-
When the Stellar Cyber Software Packages entry appears, click its entry and then the Select button.
-
Click Review + Assign in the Add role assignment panel.
Adding a Microsoft.Network Subscription
To add a Microsoft.Network subscription:
- Go back to the Azure portal home page.
-
Click Subscriptions.
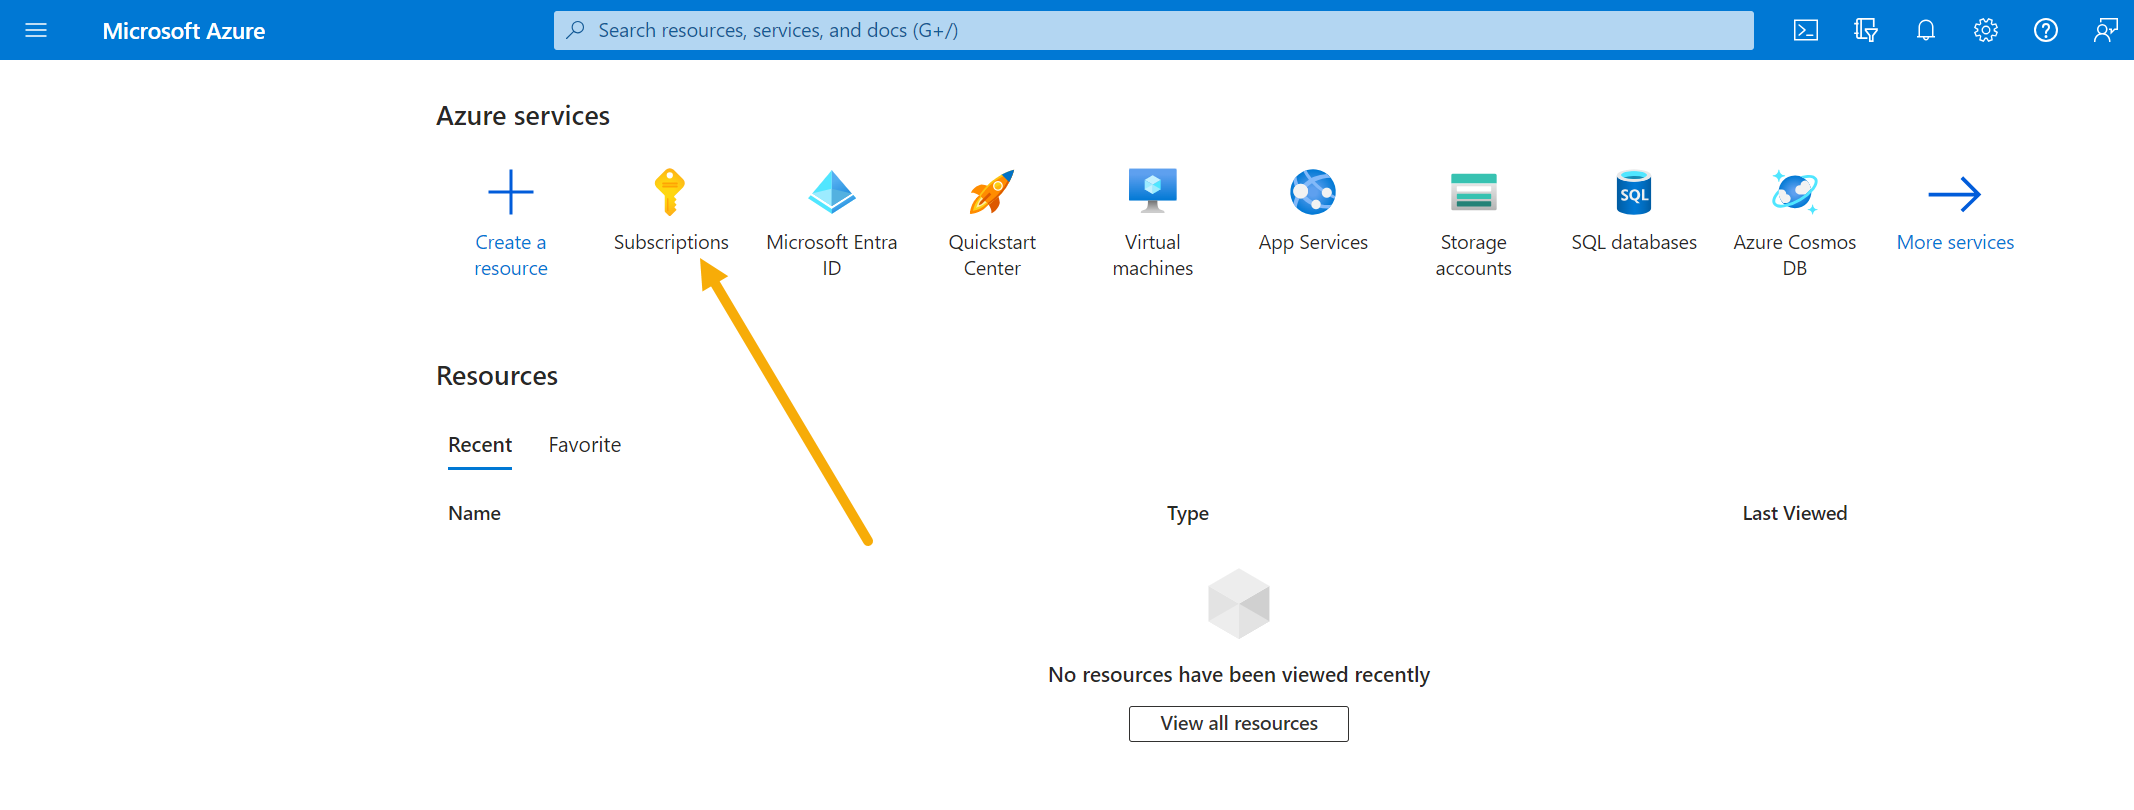
The Subscriptions page appears.
- Choose your subscription.
- Click Resource Providers.
- In the search bar, start typing microsoft.network. Azure suggests auto-completions.
- Choose Microsoft.Network.
- Click Register. The registration process begins, which can take several minutes.
The VM is now running in the Azure cloud.
Launching the VMs
You run the installation script once for each VM you are creating. For a standard deployment, that means running it twice — once for the DL-m and once for the DA-m.
-
Log in to the Azure Portal.
-
Click the Cloud Shell button to bring up a PowerShell window.

-
Paste the contents of the Azure Installation Script into a text editor.
-
Customize the script with variable definitions that match your Azure subscription and networking environment for the items listed in Variables for the Azure Installation Script.
-
Set the
$stellarInstanceTypevariable for a Data Processor. Uncomment the line with$stellarInstanceTypeset to"Stellar-DataProcessor"and comment out the line with$stellarInstanceTypeset to"Stellar-ModularSensor-Gen2". For example:Copy#$stellarInstanceType = "Stellar-ModularSensor-Gen2"
$stellarInstanceType = "Stellar-DataProcessor"This value is the same for every DP VM in the cluster, including worker nodes. There is no separate instance type for a DL, a DA, or a worker.
-
Set
$vmNamePrefixto a meaningful name that reminds you of the VM's intended role. For example, dl-master or da-master. -
Provision the VM according to the specifications for the type of VM you are launching (DL-Master or DA-Master) in VM Specifications for Public Cloud Deployments (AWS, Azure, GCP, OCI).
Stellar Cyber only supports full-SSD deployments. Spinning-disk-based storage (HDD) and hybrid drives (SSHD) are not supported. All deployments must adhere to this SSD-only policy in order to qualify for performance guarantees and technical support.
Refer to Stellar Cyber Requires Full SSD Disks for further details.Storage must meet or exceed the following sustained minimum performance metrics for 4KB random data operations:
-
Write IOPS: > 30,000
-
Read IOPS: > 60,000
-
Throughput: > 500 MB/s (read/write)
-
-
Copy and paste the customized script into the Azure Cloud Shell to create the VM.
Refer to this article for more information on the New-AzVM cmdlet used by the script.
-
If you are launching a DL-m, add a second storage disk sized between 8-16 TB, as stated in VM Specifications for Public Cloud Deployments (AWS, Azure, GCP, OCI).
-
Repeat this procedure for the DA-m VM, changing
$vmNamePrefixand the provisioning to match.
The DL-m and DA-m VMs are now running in the Azure cloud. The next step is to configure them in their respective CLIs.
Azure Installation Script
Paste the contents of this script into a text editor and supply your own values for the variables shown in angle brackets ("<variable>"). The necessary variables are listed and described in Variables for the Azure Installation Script.
# Only suppress breaking change warnings
Set-Item -Path Env:\SuppressAzurePowerShellBreakingChangeWarnings -Value "true"
Clear-AzContext -Force
#Supply your own values for the variables below:
$resourceGroup = "<resource_group_name>"
$location = "<region_name>"
$vmNamePrefix = "StellarVM-DP"
$vnetName = "<vnet_name>"
$subnetName = "<subnet_name>"
$nsg_name = "<nsg_name>"
$tenant_customer = "<customer_tenant_id>"
$subscription_customer = "<customer_subscrption_id>"
#change stellarInstanceType to install Modular Sensor or DP
#$stellarInstanceType = "Stellar-ModularSensor-Gen2"
$stellarInstanceType = "Stellar-DataProcessor"
#install the specified version below
$imageVersion = "<dp_version>"
############################################################################
#Stellar Cyber parameters, do not change
$applicationId = '58238038-43b4-4446-8260-0fa97ace1085'
$secret = 'Mkn8Q~9J54TSFbuwo_YptlIwPuqAJKDQJ86BUabX' | ConvertTo-SecureString -AsPlainText -Force
$tenant_stellar = "2f580e30-1cc1-4c08-9e80-704999508e1a"
############################################################################
if ($stellarInstanceType -eq "Stellar-DataProcessor") {
$osDiskSize = 512
$osVMSize = "Standard_E16s_v3"
}else{
$osDiskSize = 128
$osVMSize = "Standard_D16ls_v5"
}
try {
$cred = New-Object -TypeName PSCredential -ArgumentList $applicationId, $secret
Connect-AzAccount -ServicePrincipal -Credential $cred -Tenant $tenant_stellar
Connect-AzAccount -ServicePrincipal -Credential $cred -Tenant $tenant_customer
Set-AzContext -Subscription $subscription_customer -Tenant $tenant_customer
# Get the specific subnet object
$vnet = Get-AzVirtualNetwork -ResourceGroupName $resourceGroup -Name $vnetName
$subnet = Get-AzVirtualNetworkSubnetConfig -Name $subnetName -VirtualNetwork $vnet
# Get subnet ID
$subnetId = $subnet.Id
$randomString = [guid]::NewGuid().ToString("N").Substring(0, 8)
$vmName = "$vmNamePrefix-$randomString"
$image = "/subscriptions/0e28f851-f477-4f2d-94bc-35c00d3d5fd8/resourceGroups/Stellar/providers/Microsoft.Compute/galleries/StellarCyberSoftwares/images/$stellarInstanceType/versions/$imageVersion"
#Networking pieces
$pip = New-AzPublicIpAddress -ResourceGroupName $resourceGroup -Location $location -Name "mypublicdns$(Get-Random)" -AllocationMethod Static -IdleTimeoutInMinutes 4
$nsg = Get-AzNetworkSecurityGroup -Name $nsg_name -ResourceGroupName $resourceGroup
$nic_name = "Stellar-nic-$randomString"
$nic = New-AzNetworkInterface -Name $nic_name -ResourceGroupName $resourceGroup -Location $location -SubnetId $subnetId -PublicIpAddressId $pip.Id -NetworkSecurityGroupId $nsg.Id
#Create a virtual machine configuration using the $image variable to specify the image
$vmConfig = New-AzVMConfig -VMName $vmName -VMSize $osVMSize |
Set-AzVMOperatingSystem -Linux -ComputerName $vmName -Credential $cred |
Set-AzVMSourceImage -Id $image |
Set-AzVMOSDisk -CreateOption FromImage `
-DiskSizeInGB $osDiskSize `
-Caching ReadWrite `
-Name "$vmName-OSDisk" `
-StorageAccountType "StandardSSD_LRS" |
Add-AzVMNetworkInterface -Id $nic.Id
$vmConfig = Set-AzVMSecurityProfile -VM $vmConfig -SecurityType "TrustedLaunch"
$vmConfig = Set-AzVMUefi -VM $vmConfig -EnableVtpm $true -EnableSecureBoot $false
#Create a virtual machine
New-AzVM -ResourceGroupName $resourceGroup -Location $location -VM $vmConfig
} finally {
############################################################################
# CLEANUP - Always runs, even if deployment fails
############################################################################
Write-Host "Cleaning up Azure connections..." -ForegroundColor Yellow
# Disconnect Azure PowerShell
Disconnect-AzAccount -Scope CurrentUser -ErrorAction SilentlyContinue | Out-Null
# Clear Azure contexts
Clear-AzContext -Force -Scope CurrentUser -ErrorAction SilentlyContinue | Out-Null
Clear-AzContext -Force -Scope Process -ErrorAction SilentlyContinue | Out-Null
# Clear Azure CLI
az logout 2>$null
az account clear 2>$null
# Clear cached tokens
Remove-Item -Path "$env:USERPROFILE\.Azure\TokenCache.dat" -Force -ErrorAction SilentlyContinue
Remove-Item -Path "$env:USERPROFILE\.Azure\AzureRmContext.json" -Force -ErrorAction SilentlyContinue
# Clear sensitive variables from memory
$secret = $null
$cred = $null
[System.GC]::Collect()
Write-Host "Cleanup complete!" -ForegroundColor Green
}Variables for the Azure Installation Script
You will need to supply values for the variables in the table below in the Azure Installation Script before you use it in the Azure Cloud Shell. Keep in mind the following rules for variables:
-
The specified
resourceGroupmust already exist. -
The values you supply for the
vnetName,subnetName, andnsg_namearguments must already exist and be accessible to the Azure identity running the script. They do not have to be in the same resource group as the VM, but if they are not, your role assignment must cover the scope that contains them. -
Before you run the script, verify that the identity can see the network resources you specified. Run
az network vnet listandaz network vnet subnet listas the identity that will run the installation script. If your virtual network or subnet does not appear, the identity lacks access at the required scope and the deployment will not use them.
|
Installation Script Variable |
Definition |
|---|---|
| $resourceGroup | The name of the Azure Resource Group where the |
| $location | The Azure Region where the eastus), not its display name. Refer to the list of supported Azure regions above for the programmatic name of each region. |
|
$vmNamePrefix = "StellarVM-DP" |
Optional. The |
| $vnetName | The name of the virtual network for the az network vnet list command to see available virtual networks. |
| $subnetName | The name of the subnet for the az network vnet subnet list command to see the subnets in a virtual network. |
| $nsg_name |
The name of the Network Security Group for the |
| $tenant_customer | The Azure tenant ID for the deployment. You can use the az account list --output table command to see the subscription and tenant IDs available for your account. |
| $subscription_customer | The Azure subscription for the deployment. You can use the az account list --output table command to see the subscription and tenant IDs available for your account. |
|
$imageVersion |
The Stellar Cyber Sensor version you are installing. This must match the sensor version deployed to your account by Stellar Cyber support. Stellar Cyber support will help you determine the sensor version you need. For example:
The sensor version for the installation script does not include an "s" at the end, even if your DP version does. |
