Onboarding a Sensor Behind an Aggregator
When a new Server Sensor (Windows or Linux) or a Modular Sensor must reach the Stellar Cyber Data Processor (DP) through an aggregator, the order in which you configure the aggregator connection and the sensor's authorization matters. Configuring them in the wrong order is a common cause of sensors that appear to hang during onboarding or never show as authorized.
This topic assumes the aggregator itself (a Modular Sensor with the Aggregator feature enabled) is already deployed and running. Refer to Configuring a Data Aggregator for instructions on setting up the aggregator itself. This topic covers onboarding the sensor that will send data through it.
See the sections below for details:
Routing versus Authorization
Two separate things have to happen before a sensor is fully onboarded through an aggregator:
-
Routing – The
set aggregator <primary IP> <secondary IP>command tells the sensor to send its traffic through the aggregator instead of connecting directly to the DP. This establishes network reachability. -
Authorization – Separately, the sensor has to be authorized to join the platform. In a SaaS environment, this is done with a token. In an on-premises environment, there is no token – the sensor is authorized manually from the DP's Sensor page.
A sensor can have routing established (the aggregator shows the sensor as connected) while still showing Not Authorized in show version, because authorization is a separate step. Most onboarding failures reported as "wrong order" issues are really a sensor that had routing configured but was never authorized, or that attempted authorization before routing existed for it to reach the DP.
SaaS Environments
A token is required for any Server Sensor or Modular Sensor connecting to a Modular Sensor with the Aggregator feature enabled. Whether the token or the aggregator needs to be configured first depends on how you are configuring the sensor.
Prerequisite: Confirm the Aggregator feature is enabled on the Modular Sensor before configuring the Server Sensor.
Configuring During Installation (Installer Screen or Script)
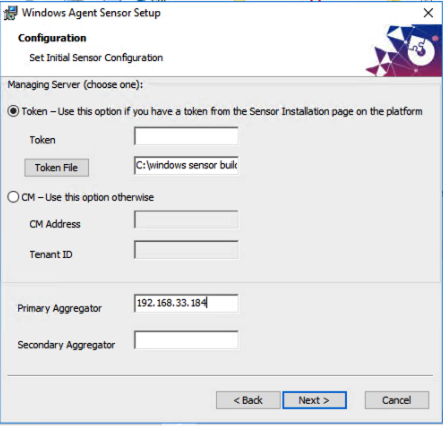
If you supply both the token and the primary/secondary aggregator addresses together – either in the Windows Server Sensor's installation wizard, the Linux installation script's --token and --primary_aggregator/--secondary_aggregator arguments, or the equivalent fields during a Modular Sensor's initial setup – order does not matter. Both values are applied together as part of installation, and the sensor comes up already routed and authorized. For example, here are the Token and Primary/Secondary Aggregator fields shown during installation of a new Windows Server Sensor that will connect to an NG-SaaS aggregator:
A successfully onboarded sensor configured this way reports the following:
show version:Ctrl Plane Status: Authorizedshow aggregator: Primary Aggregator isUPshow cm: Status isESTABLISHED
Configuring After Installation from the CLI
If you are configuring an already-installed sensor from its CLI rather than during installation, configure the aggregator before setting the token.
Run the following:
set aggregator <primary IP address> <secondary IP address>
Then run:
set token string <token>
Setting the token before the aggregator is configured, or checking sensor status in between the two steps, can look like a failure but usually isn't. Until the token is applied, show aggregator correctly reports the primary aggregator as Down with a message similar to "Cloud mode aggregator found, please set token to continue the onboarding." This is expected – finish setting the token and the aggregator will come up.
Representative CLI transcript for this sequence:
DataSensor> set aggregator 192.168.31.133 10.16.10.212
DataSensor> show aggregator
Primary Aggregator is Down because Cloud mode aggregator found, please set token to continue the onboarding
DataSensor> set token string <token>
DataSensor> show aggregator
Primary Aggregator is UP
CM controller : Down
DataSensor> show cm
CM Controller status is ESTABLISHED
DataSensor> show version
Ctrl Plane Status: Authorized
On-Premises Environments
On-premises deployments do not use a token to authorize a sensor. A CM (Cluster Manager) configuration is optional for a sensor connecting to an aggregator running on an on-premises Modular Sensor – you are not required to supply a CM address for the aggregator to work. Instead:
-
Run
set aggregator <primary IP address> <secondary IP address>on the sensor to establish routing through the aggregator. If you are configuring this during installation from the Windows Server Sensor's installation wizard instead, select the CM option and leave the CM Address field blank. Then, supply the Primary and Secondary Aggregator addresses, as shown below: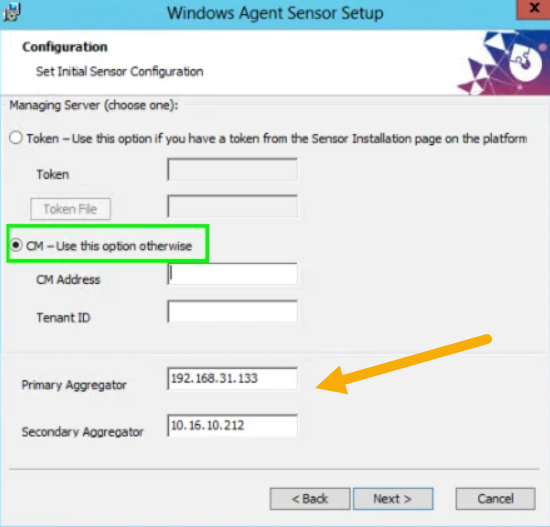
-
Authorize the sensor manually from the DP's System | DATA SOURCE MANAGEMENT | Sensors | Sensors page. The sensor appears in the list once the aggregator forwards its traffic to the DP, even before it is authorized.
Until the sensor is authorized on the DP's Sensor page, show version continues to report Ctrl Plane Status: Not Authorized even after show aggregator and show cm both report the aggregator and CM as reachable. This is expected – routing through the aggregator does not by itself authorize the sensor.
Configuring a Primary and Secondary Aggregator
Both a primary and secondary aggregator can be configured together, either during initial sensor installation (see Configuring During Installation (Installer Screen or Script) above) or afterward from the CLI, using the same set aggregator command with both IP addresses on Windows Server Sensor, Linux Server Sensor, and Device Sensor. For example, on a Linux Server Sensor or Device Sensor that is not yet routed through an aggregator:
DataSensor> show aggregator
This DS is not routed through aggregator:
Primary Aggregator     : None                   DOWN
Secondary Aggregator   : None                   DOWN
CM Controller          : 192.168.33.46          UP
DataSensor> set aggregator 192.168.31.133 10.16.10.212
DataSensor> show aggregator
This DS is routed through aggregator:
Primary Aggregator     : 192.168.31.133         UP
Secondary Aggregator   : 10.16.10.212           UP
CM Controller          : 192.168.33.46          UP
   Next hop            : 192.168.31.133
   Port                : 6648
   Protocol            : ssl
   Status              : ESTABLISHED
You can also configure a single aggregator, and add a secondary aggregator later using the same command with both IP addresses. Refer to Configuring Sensors to Use an Aggregator for the GUI equivalent of this step.
Troubleshooting Onboarding Order Issues
If a sensor behind an aggregator does not come online as expected, check the following, in order:
-
Confirm the Aggregator feature is enabled on the Modular Sensor you intend to use as the aggregator, and that it is itself already authorized and online.
-
Run
show aggregatoron the sensor being onboarded. If it reports Down with a message about needing a token, this is expected in SaaS until the token is set – it is not a failure by itself. -
Run
show cm. If the CM Controller status is notESTABLISHED, routing through the aggregator has not been established yet; recheck theset aggregatoraddresses and network connectivity between the sensor, the aggregator, and the DP. -
Run
show versionand checkCtrl Plane Status. If it still reports Not Authorized after routing is established, complete the authorization step for your environment:set token string/file/urlfor SaaS, or manual authorization on the DP's Sensor page for on-premises.
