Understanding Event Details
One of the most fundamental and useful tools in Stellar Cyber is the Event Details panel which provides analysis on the event, options to perform assorted actions, and access to the Interflow record. This panel can be accessed anywhere a table of events is found. You can access these event tables from assorted locations as follows:
-
Threat Hunting includes a table of events. Select a row of interest, and then click More Info to display the Event detail panel.
-
Cases includes a table of associated alerts; locate an alert and click the More Info button.
-
Alerts is a table of all discovered alerts, organized by type. Select an alert type of interest, then click the View button to display a page with charts and a table of the events. As above, click More Info to display details on the individual event.
Click More Info to view a panel with information on the selected event. The panel is organized into three sections:
-
Header information and panel
-
Overview tab, including Key Fields and Cases
-
Tabs for Details, Rules, Response, JSON, and Activity
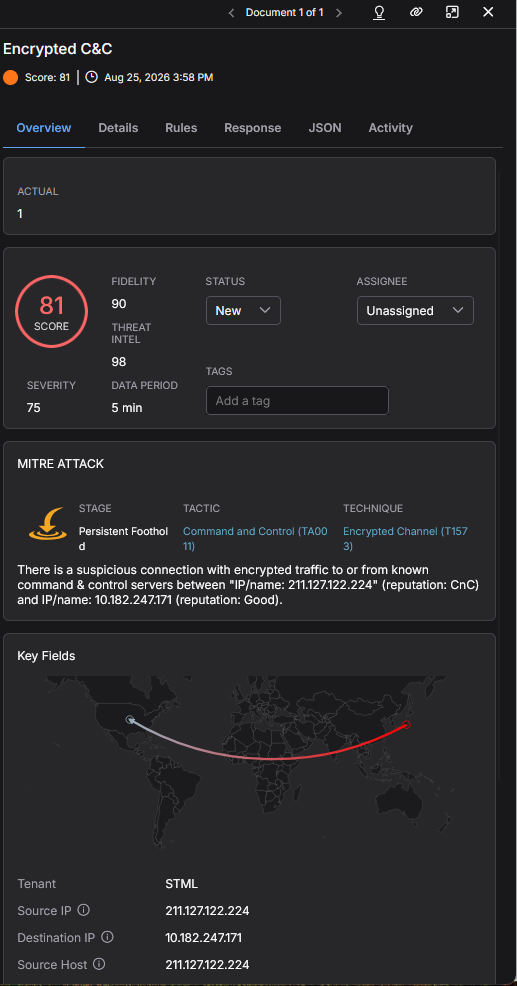
Use the information below to understand how to use the Event Details display:
- Header Information
- Overview Tab
- Details Tab
- Rules Tab
- JSON Tab
- Activity Tab
- Response Tab
- Miscellaneous
Header Information
The header information is fixed at the top of the panel.
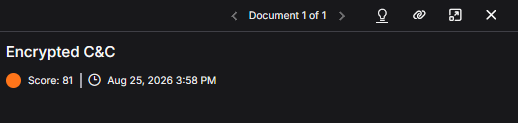
It contains the following:
-
Name of the alert type and name of the alert subtype, if any
-
Score number and color circle
-
Date and time the event occurred
At the top right are the following:
-
Count of the number of documents for the alert type
-
Icons for:
-
Go to Knowledge Base—Links to the alert type details in the Knowledge Base
-
Copy link—Copies the URL of the alert type to access this detail page independently of the event list
-
Maximize/Minimize—Increases or decreases the panel size
-
Close—Exits the alert details panel
-
Overview Tab
The Overview tab has information at the top, as well as sections for Key Fields and Cases. The Key Fields section presents a selection of the more commonly referenced key-value pairs that constitute the Interflow record. The Cases section presents all the cases with which an alert is associated and provides links to open them.
Note that some components appear only if they are relevant to the type of data record being displayed.
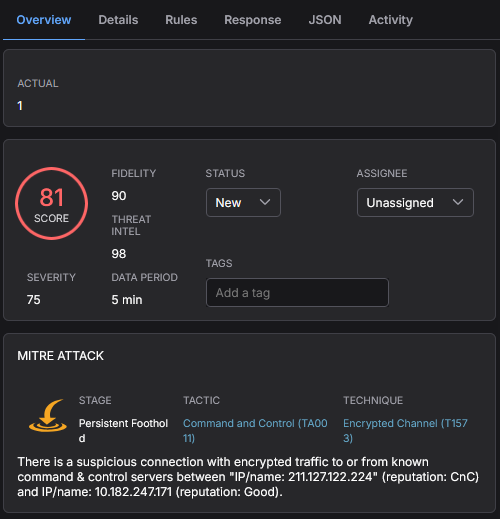
The panel contains the following:
-
Alert Score – This number appears in a circle that is color-coded for severity, to match its position on the kill chain. The higher the score, the more important it is. The score is also based on the Stellar Cyber Machine Learning model, which compute the Fidelity, Severity, and Threat Intel scores that contribute to this overall score.
-
The remaining fields in this block are additional attributes produced through Machine Learning, that contribute to the overall scoring:
- Fidelity– our confidence in our analysis. The higher the Fidelity Score, the higher our confidence that we correctly observed a malicious event. If this is high, it drives the Alert Score higher. If this and the Threat Intel score are low, they reduce the Alert Score.
- Severity– the importance of the category of the event. The higher the Severity Score, the more dangerous the possible consequences of the event. In general, later-stage events have a higher severity.
- Threat Intel – the reputation of the IP addresses and URLs as assessed by the threat intel sources. The higher the Threat Intel Score, the worse the reputation. If this is high, it drives the Alert Score higher. If this and the Fidelity Score are low, they reduce the Alert Score.
- Data Period – This is the duration of the observed event, which affects analysis of anomalous events (it is not the duration of the event itself).
-
Status – Use this drop down to assign an operational status to the event. The options include:
-
New – Observed but no action has yet been taken.
-
In Progress – Investigations involving this event are being conducted.
-
Ignored – It has been determined that no further investigation with regard to this event are needed.
-
Closed – All investigations have been concluded.
-
-
Assignee – If there is an assigned user.
-
Tags – If a user has assigned tags to the event, the tags appear in this section. (You can add tags in the Actions section, described below.)
-
The MITRE ATTACK section contains the Kill Chain Categorization – When applicable for the selected event, the following are populated (Refer to:Understanding the XDR Kill Chain for more detail on these attributes).
-
Stage
-
Tactic: If there are many tactics, click Show More to expand the list or Show Less to collapse it.
-
Technique: If there are many techniques, click Show More to expand the list or Show Less to collapse it.
-
Sub-technique: If there are many sub-techniques, click Show More to expand the list or Show Less to collapse it.
-
-
Alert description – A description of the alert type is also provided. For alerts generated based on the Stellar Cyber Machine Learning model, details specific to the event are embedded in this description, to aid in interpretation.
Key Fields
The Key Fields section summarizes additional essential information regarding an event. Most of the information is related to the source and the destination of the network packet that generated this event.
Key fields are meaningful and human-readable data points representing observables being detected.
See the Key Fields and Relevant Data Points for any alert type by their display name in All Alert Types by Name or by their XDR event name in All Alert Types by XDR Event Name. For Key Fields for Third Party Native Alert Types, see Key Fields for Alert Types.
Only key fields with values are displayed.
The Key Fields includes a global map on which the geolocation of the source and destination IP addresses are plotted with a connecting arc. For applicable alerts such as User Login Location Anomaly, the map includes data points for the closest typical login locations of that user.
If an IP address does not have corresponding geolocation information, it displays unknown or empty.
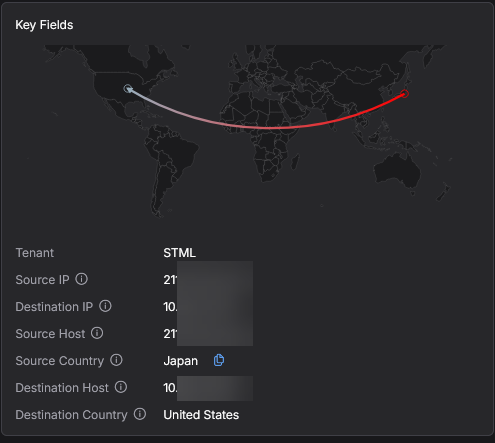
Important other information that may be included in this section:
- Tenant – the tenant associated with the sensor
- Sensor – the sensor device that collected the event data
- Username – the user name associated with this event
- Src Username – the user name that Stellar Cyber associates with the source IP address
- Dst Username – the user name that Stellar Cyber associates with the destination IP address
- Src Reputation – reputation of the source host
- Dst Reputation – reputation of the destination host
To help explain the different user names, if you log in to Admin A's computer with Admin B's credentials, they will be:
- Username – Admin B
- Src Username – You
- Dst Username – Admin A
See Reputation Definitions for definitions of the values in the Src Reputation and Dst Reputation fields.
When you open Event Details from alerts based on correlated events, links to the raw data are also provided in this section. Click the link to open a window displaying the raw data for the corresponding event (the example below shows two events - recent domain and email traffic that were correlated to trigger an alert). In this case the alert was Possible Phishing Site Visit from Email.

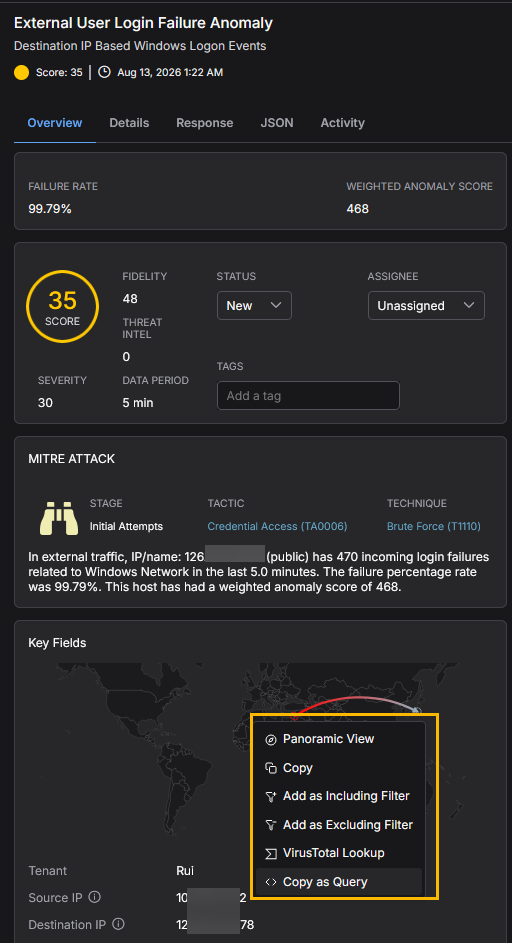
Certain fields, as illustrated below, allow operations on fields such as URL, host, user names, and IP addresses. In this section, fields that allow actions are indicated with the more button to the right of the field value. Click the button to display the list of available actions, described in: Performing Field Actions.
When the printable payload option is enabled in the Modular Sensor profile, the Printable Payload field appears in the Key Fields section and in the Details tab for intrusion detection system (IDS) alerts.  For the procedure, see Configuring Modular Sensor Profiles.
Modular Sensors must be running 7.0.0 to supply the printable payload.
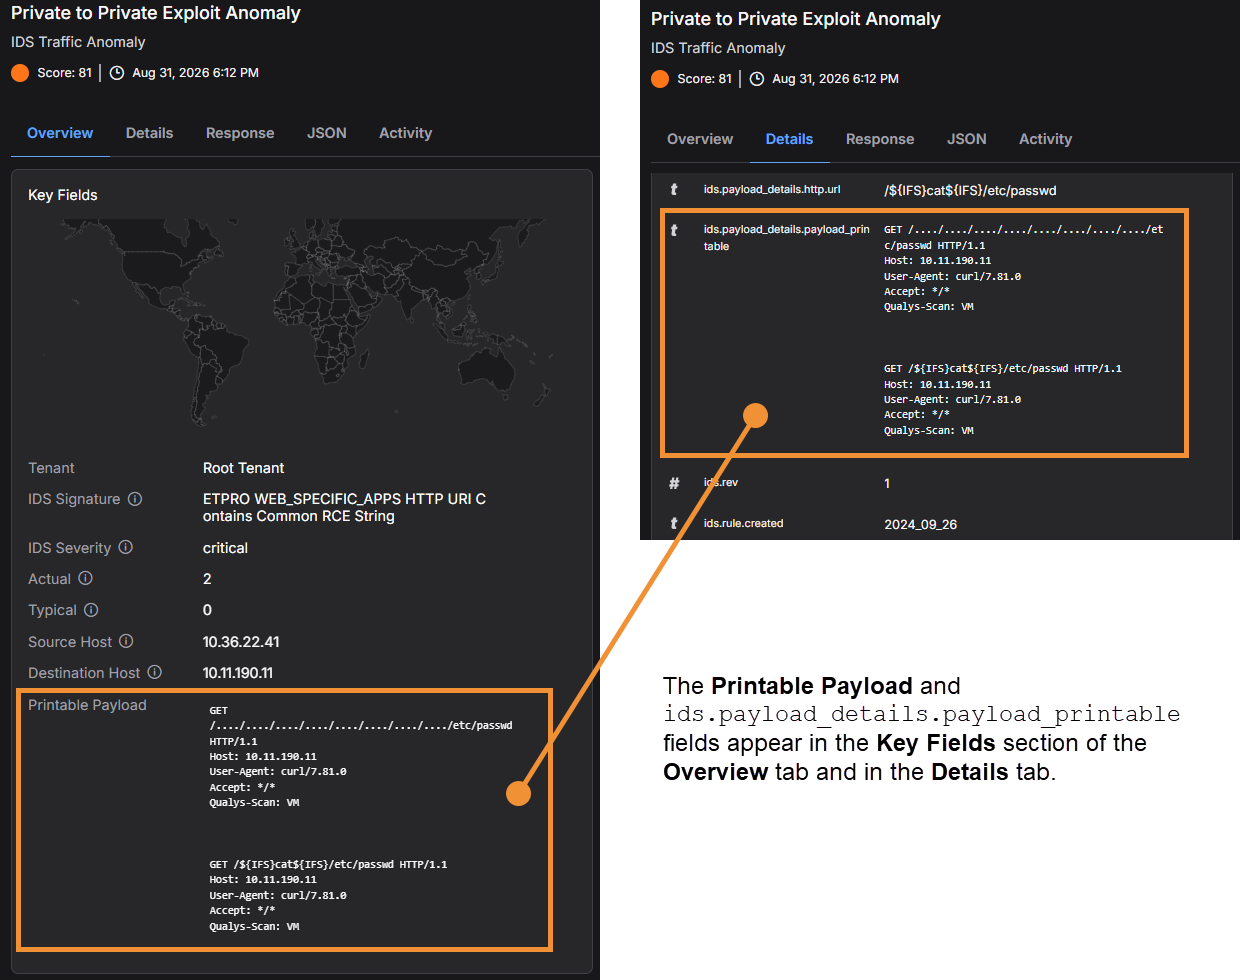
The Printable Payload field shows the printable text of the traffic that matched the IDS signature for the alert. You can view, copy, and expand the payload directly in the alert, which lets you triage the activity without first retrieving a packet capture.
Rule-Based Alerts Link to Knowledge Base
To get the Knowledge Base description for rule-based alerts, in the Key Fields, click the Stellar Rule ID link.
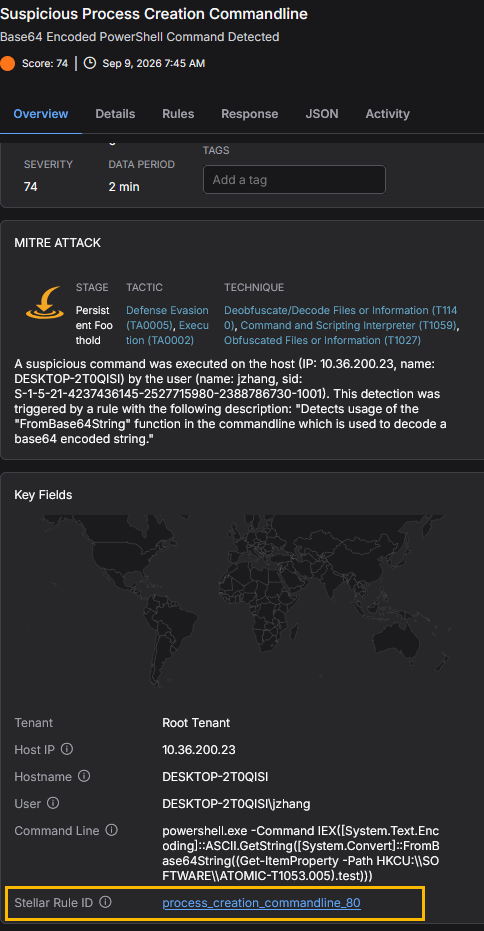
See Rule-Based Alert Details for additional information on rule-based alerts.
Cases
The Cases section lists cases associated with the event. Click the entry for an individual case in the list to open its associated Case details page.
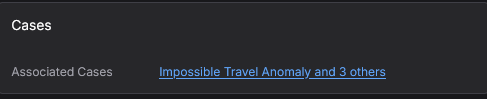
The Cases section in the Event Details display is not affected by the value specified for the Minimum Number of Alerts display filter in the Global Case Settings. Cases shows all associated cases, regardless of the number of alerts for the case.
Details Tab
The Details tab lists the Interflow object in table form. Refer also to the Metadata Dictionary or the Metadata Dictionary Subset.
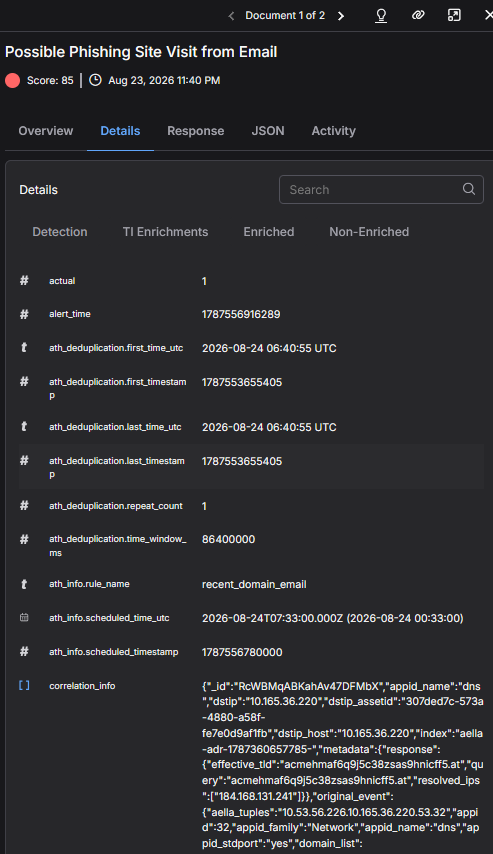
In the Details, there are tooltips on the icons on the left when you hover over them. The tooltips show their type, such as, if they are a number, array, string, date, or ip.
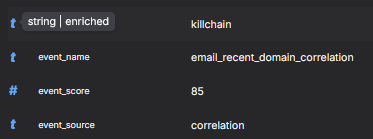
If the fields are enriched, the icons are highlighted in blue and the tooltip shows their type, such as string, as well as enriched.
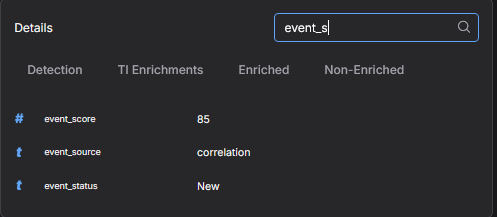
Stellar Cyber provides several options to help you more quickly find the information you're looking for in the Details section: quick filters and a search field.
The quick filters let you hide key-value pairs that do not interest you so you can more quickly see those that do. When you don't apply a filter, you see all the key-value pairs for an alert. You can apply quick filters to display Detection, TI Enrichments (where TI is Threat Intelligence), Enriched, and Non-Enriched. You can select multiple quick filters to display key-value pairs that match the selected filters.
When you apply the Detection filter, Stellar Cyber displays only the key-value pairs with field names that begin with xdr_event.
When you apply the TI enrichments filter, Stellar Cyber displays the following fields if the alert has been enriched with this information:
-
srcip_reputation -
dstip_reputation -
srcip_reputation_source -
dstip_reputation_source -
srcip_geoand all its subproperties-
srcip_geo.city -
srcip_geo.countryCode -
srcip_geo.countryName -
srcip_geo.latitude -
srcip_geo.longitude -
srcip_geo.region
-
-
dstip_geo.regionand all its subproperties-
dstip_geo.city -
dstip_geo.countryCode -
dstip_geo.countryName -
dstip_geo.latitude -
dstip_geo.longitude -
dstip_geo.region
-
If the above fields for an alert have not been enriched with information, Stellar Cyber does not display them.
You can search for any term that appears in a field key, name, or value and use commas to separate multiple terms. Stellar Cyber displays all results that match any of the search terms you enter. If you're applying a filter at the time of a search, then Stellar Cyber limits its search to just the filtered data. If no filter is applied, then it searches through all unfiltered data.
The ids.payload_details.payload_printable field shows the printable text of the traffic that matched the IDS signature for the alert. This is the same content that the Printable Payload field shows in the Key Fields section of the Overview tab.
Rules Tab
The Rules tab only displays if the alert type is rule-based. See Rule-Based Alert Details for information.
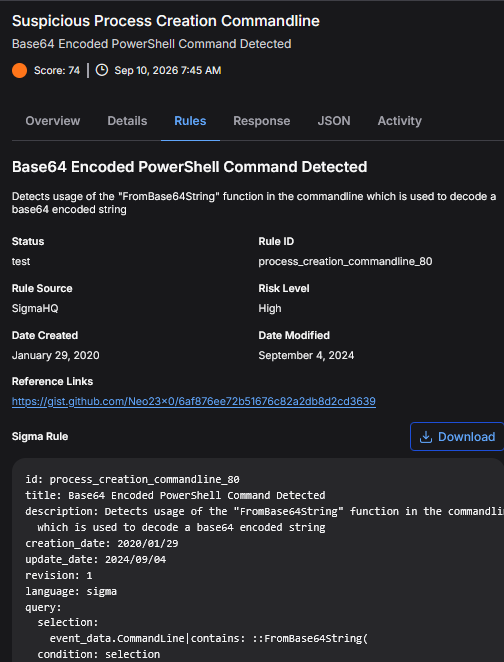
Click Download to download the Sigma Rule.
JSON Tab
The JSON tab displays the Interflow object in JSON form. You can copy it to a clipboard for pasting elsewhere.
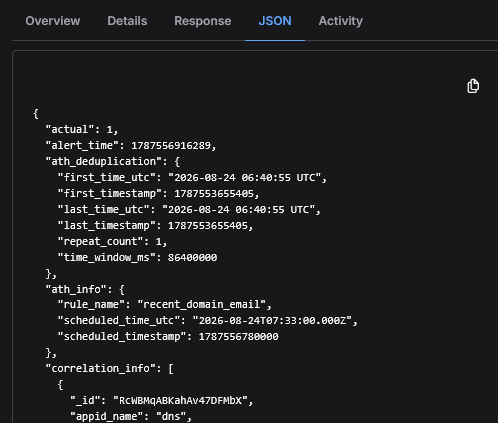
JavaScript Object Notation (JSON) is a lightweight data interchange format that's easy for humans to read and write, and easy for machines to parse and generate. It consists of two primary structures: a collection of name/value pairs and an ordered list of values. If you're interested in learning more about JSON, here are some useful resources:
-
For an introduction to JSON, see Introducing JSON.
-
For a basic reference, see JSON.
-
For a JSON error correction and validation tool, see JSONLint Validator and Formatter.
Activity Tab
The Activity tab contains sections for All, Comments, and History. The default section is All, which contains everything in the other sections.
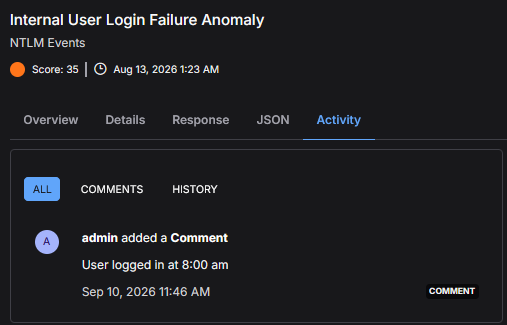
Comments
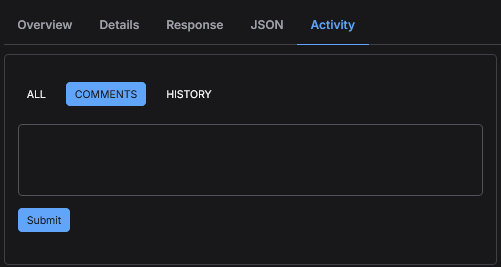
Click Comments. You can add comments to an event. Enter the comment. When you click Submit, the comment is added, along with your name and a timestamp.
History
Click History. Any action you perform on an event is recorded in the History.
Response Tab
The Response tab contains actions that can be used to alter the status of the event in the system and add new data. Some responses might not appear depending on the type of event record being displayed.
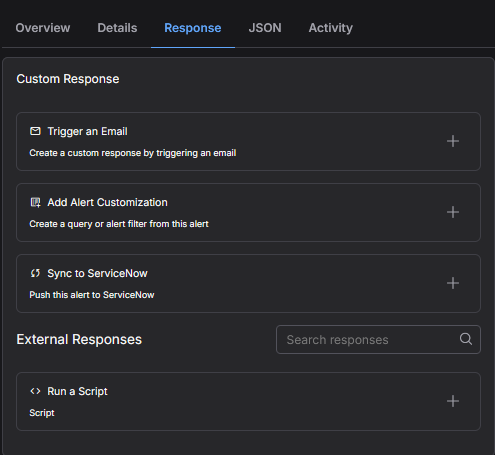
The buttons allow you to:
- Trigger An Email
- Add a Log Filter
- Add Alert Customization
- Sync to ServiceNow
-
Perform External Responses
External responses vary based on configuration and content in the Interflow record. If an option is not applicable it is grayed out in the menu, as shown below. This may occur if the required data is not present in the Interflow record, or an appropriate connector is not configured.
The following table indicates which connector respond actions are applicable for each external response, along with the requirements to enable it. Specifically, certain connectors must be configured and the indicated fields in the Interflow must contain non-null, valid data.
External Action
Connector and Data Requirement*
for Action AvailabilityApplicable Connectors
Block IP / Block on Firewall At least one firewall or security switch connector is configured and required fields are populated

AWS, Azure NSG,  Barracuda Firewall, Check Point, Check Point Smart-1 Cloud
 , Cisco FMC, Cisco Meraki, F5 BIG-IP ASM, F5 BIG-IP Firewall, F5 Silverline, Fortigate, FortiManager
 , HanDreamnet Security Switch, Hillstone, Palo Alto Networks Firewall, Palo Alto Networks Panorama, SonicWall Firewall, Sophos XG Firewall, Stormshield Network Security (SNS) Firewall
  , Versa Networks Firewall
Block URL or domain and/or Unblock URL or domain Fortigate Firewall connector required fields
Disable User Active Directory or Microsoft Entra ID (formerly Azure AD) connector required field
Active Directory, Microsoft Entra ID (formerly Azure Active Directory)
Confirm Compromised Microsoft Entra ID (formerly Azure AD) connector required field
msg_class of Content Type User ID on Which to Perform Action azure_ad_auditinitiatedBy.user.idazure_ad_signinuserIdazure_ad_risk_detectionuserIdazure_ad_risky_userazure_ad.iduser_profileuser_profile.idDismiss Risk Microsoft Entra ID (formerly Azure AD) connector required field
msg_class of Content Type User ID on Which to Perform Action azure_ad_auditinitiatedBy.user.idazure_ad_signinuserIdazure_ad_risk_detectionuserIdazure_ad_risky_userazure_ad.iduser_profileuser_profile.idRemove User from Group Active Directory or Microsoft Entra ID (formerly Azure AD) connector required field
Revoke Existing Sign-In Sessions Active Directory or Microsoft Entra ID (formerly Azure AD) connector required field
Add User to Group Active Directory or Microsoft Entra ID (formerly Azure AD) connector required field
Run a Script Always available SSH Host Contain Host (Isolate Endpoint) One of the following connectors is configured. The required data varies based on connector to be used for response.
-
Bitdefender required fields
-
CrowdStrike required fields
-
Cybereason required fields
-
Cylance required fields
-
Cynet required fields
-
Deep Instinct: required fields
-
Microsoft Defender for Endpoint required fields
-
SentinelOne required fields
-
Sophos Central required fields
-
VMware Carbon Black Cloud required fields
Bitdefender, CrowdStrike, Cybereason, Deep Instinct, BlackBerry Cylance, Cynet, Microsoft Defender for Endpoint, SentinelOne, Sophos Central, VMware Carbon Black
Collect Investigation Package Microsoft Defender for Endpoint connector required field
Restrict App Execution Microsoft Defender for Endpoint connector required field
Run Antivirus Scan Microsoft Defender for Endpoint connector required field
Stop and Quarantine File Microsoft Defender for Endpoint connector required field
Isolate Endpoint Palo Alto Networks CORTEX XDR required fields
Palo Alto Networks CORTEX XDR Hide Host CrowdStrike required fields
CrowdStrike Forescout required fields
Initiate Scan -
SentinelOne required fields
-
SonicWall Capture Client required fields
SentinelOne required fields
SentinelOne required fields
Remediate Threat SentinelOne required fields
Disconnect Host SonicWall Capture Client required fields
SonicWall Capture Client SonicWall Capture Client required fields
SonicWall Capture Client required fields
Cynet required fields
Barracuda Email Security Service required fields
N/A
Universal Webhook Responder, ESET Responders

 ,
,WithSecure Elements (Respond)
 , BlackBerry Cylance (Respond),
WatchGuard Firebox Responder
, Acronis Cyber Protect Cloud (Respond), Proofpoint on Demand (Respond) , Netskope (Respond),
  , Trend Micro Vision One (Respond)
 -
Trigger An Email
To send an email about this security event:
-
From the event display, select the Response tab, and click Trigger An Email. The email is automatically "from" the email address specified in System | ORGANIZATION MANAGEMENT | Mail Server options.
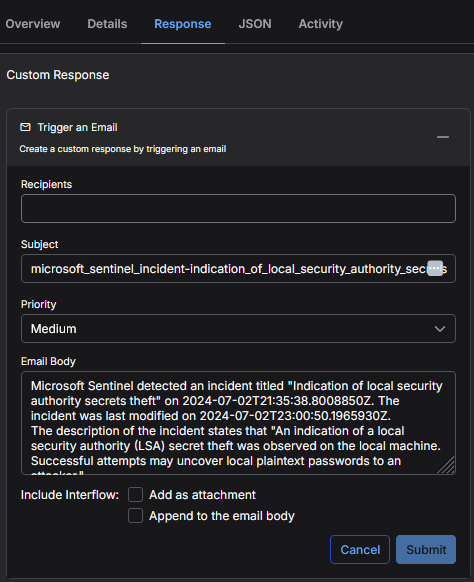
-
You can add recipients by directly typing a full email address, or selecting them from the dropdown list that appears when you click in the Recipients field.
-
Change the Subject, Priority, or Email Body, if desired.
-
You can choose whether to include the Interflow data as an attachment or append it to the email body.
-
Click Submit. Stellar Cyber immediately sends the email.
Add a Log Filter
See the "Creating Log Filters from the Event Display" section in Managing Log Filters.
Add Alert Customization
Depending on the type of event, you may have the option to create an alert filter. See the "Use the Filter Builder in Alert Event Details" section in Queries and Filters.
Sync to ServiceNow
The manual Sync to ServiceNow button is visible in the Response tab when an alert cannot be synchronized to any InSync configuration automatically.
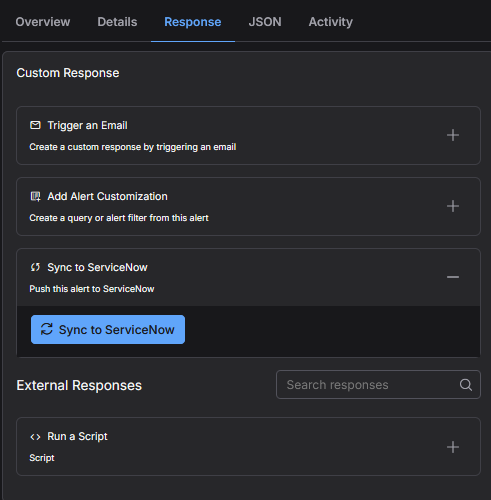
After clicking the Sync to ServiceNow button and if the manual synchronization is successful, the button is hidden and the ServiceNow icon displays on the top of the Alert Details page.
External Responses
The Search box allows you to look for an External Response by name.
External Actions: Block IP
You can immediately respond to an event by creating a new firewall rule:
-
From the event display, select the Response tab, and click Block IP for a Firewall or Security Switch.
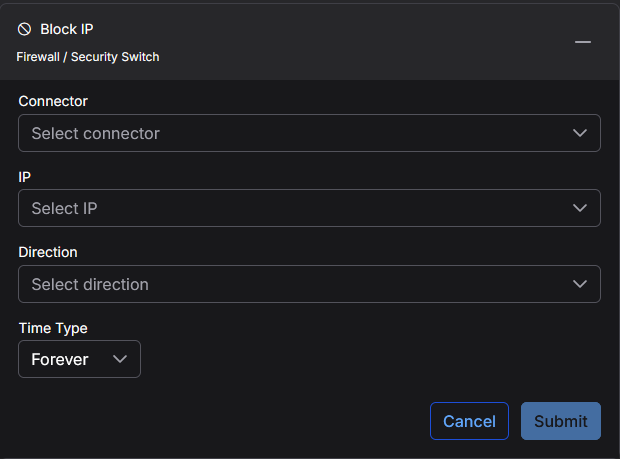
To add a new firewall or switch, see Configuring Connectors.
-
Choose the connector you want to use to perform the action.
-
Choose the IP address to be blocked. The dropdown contains both the source and destination IP addresses from the event.
-
For Direction:
-
For all firewalls, select Incoming, Outgoing, or Any.
-
When Incoming is selected, an Inbound firewall rule is created to match the Source IP address.
-
When Outgoing is selected, an Outbound firewall rule is created to match the Destination IP address.
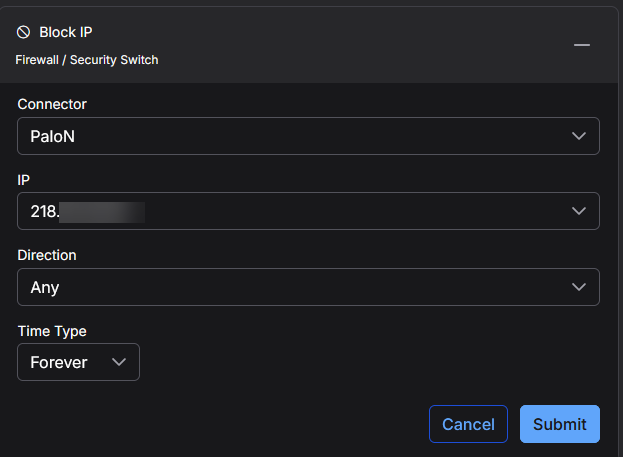
-
-
If you selected a Security Switch, the Direction setting is not applicable.
These actions are reported in Automation | Action History | Security Switch Actions.
-
-
Choose a Time Type. You can choose Forever, Minutes, Hours, orDays.
-
Click Submit. The new firewall rule is submitted to the firewall.
-
The status is reported in the Event Details pane and in the Automation | Action History, Firewall Actions tab.
For Firewall actions, if you block an IP host that is already blocked or if you unblock an IP host that is already unblocked, the action is marked as Succeeded. You can view status details in the Status Message.
External Actions: Block URL
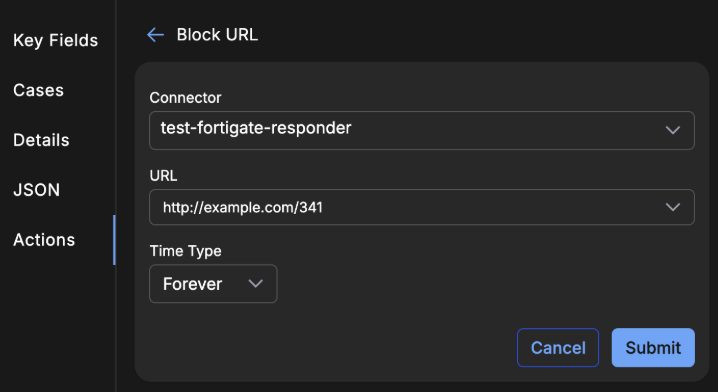
You can respond to an event by blocking a URL or domain on a Fortigate Firewall. You can also unblock a URL or domain.
-
From the event display, select the Response tab, and click Block URL.
-
Choose the connector you want to use to perform the action.
-
Choose the URL to be blocked. This field may be automatically populated from the
event.urlorurlfields in the JSON record. -
Choose a Time Type. You can choose Minutes, Hours, Days, or Forever.
-
Click Submit.
-
The status is reported in the Event Details pane and in the Automation | Action History, Firewall Actions tab.
Blocking a URL in Another Field
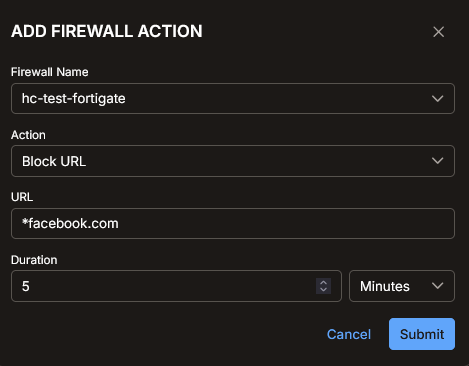
To block a URL or domain that is present in a field other than event.url or url, you can add a firewall action to manually add the URL or domain you want to block. See Managing Firewall Actions. You can also refer to the FortiOS Administration Guide for Static URL filter.
-
Navigate to Automation | Action History.
-
Select the Firewall Actions tab, and click Add.
-
Choose a Firewall Name from the drop-down list.
-
For Action, select Block URL. There may also be options for Unblock URL, Block IP, and Unblock IP.
-
For URL, you can use the wildcard character (*) to block a domain. The wildcard will block all matching URLs, for example, *facebook.com.
-
Choose a Duration. You can choose Minutes, Hours, Days, or Forever.
-
Click Submit.
Unblocking a URL or Domain
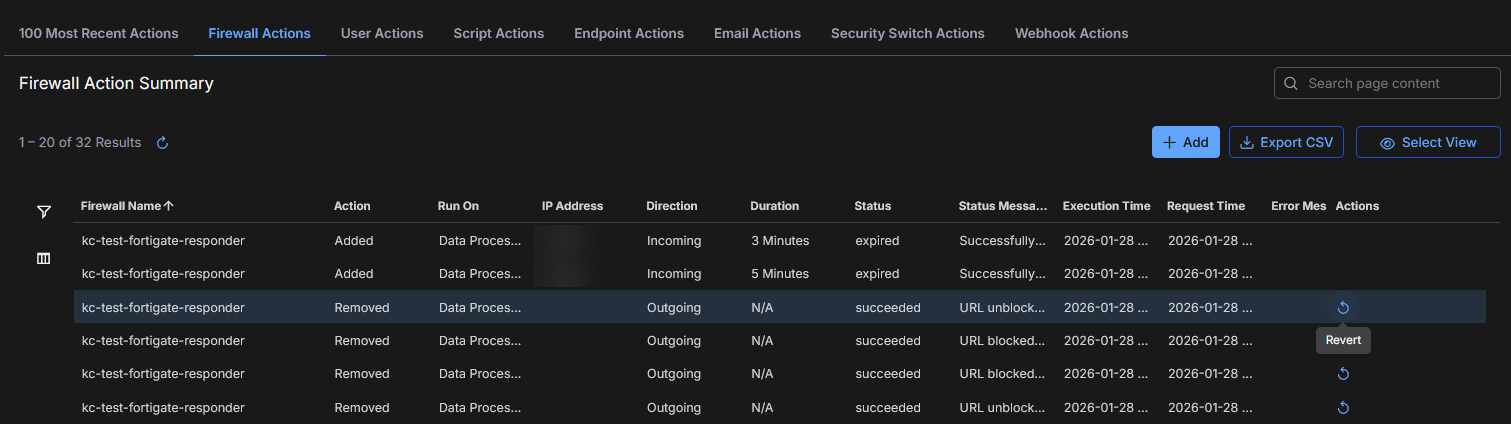
You can revert the action to block a URL or domain.
-
Navigate to Automation | Action History.
-
Click Firewall Actions.
-
Click Revert in the Actions column.
External Actions: Disable User
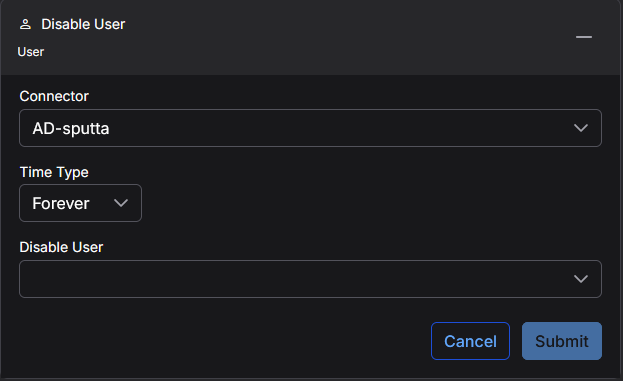
You can immediately respond to an event by disabling a user:
-
From the event display, select the Response tab, and click Disable User.
-
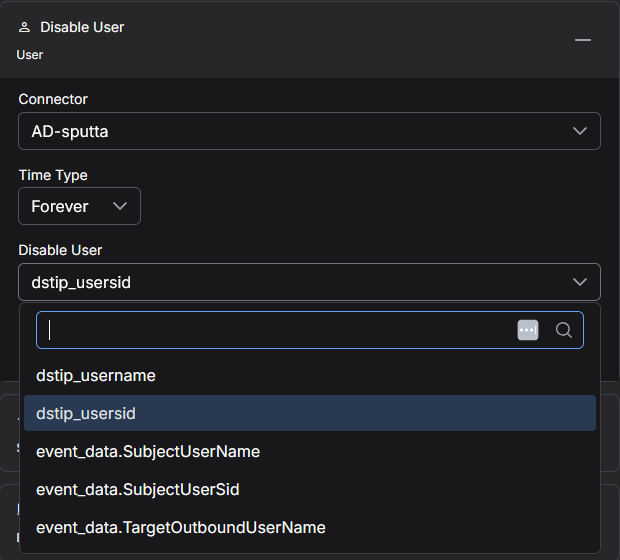
Choose a Connector from the dropdown. You can select either Active Directory or Microsoft Entra ID (formerly Azure AD) connectors.
-
Set the Time Type. You can choose Forever, Minutes, Hours, or Days.
-
Set a value for the Disable User field by selecting or typing a field name to match (from the Interflow record).
For Microsoft Entra ID (formerly Azure Active Directory) Connectors this field is automatically populated from the
userPrincipalNamefield. Also, theusernamefield is populated from Office 365 records.
-
Choose which user to disable. Depending on the event, you might have only one option.
-
Click Submit. The user is immediately disabled.
To enable a user after disabling, visit the User Actions tab in the Automation | Action History page to revert the disable action.
External Actions: Confirm Compromised
You can confirm that a user is compromised:
-
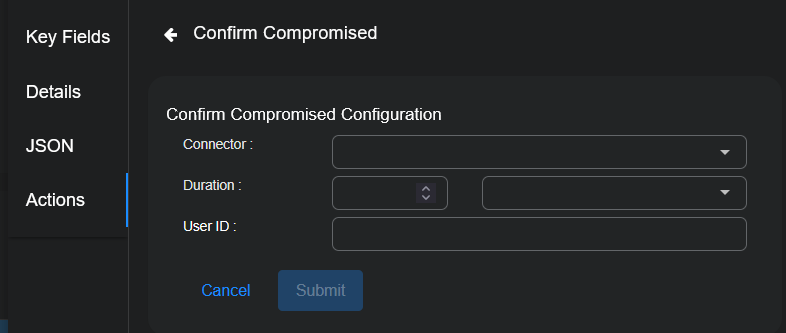
From the event display, select the Response tab, and click Confirm Compromised.
-
Choose the Connector. Only Microsoft Entra ID (formerly Azure Active Directory) connectors are supported.
-
Set the Duration. This is how long an action is triggered. Then it is reverted by the Dismiss Risk action. You can choose Minutes, Hours, Days, or Forever.
-
Choose a User ID. They are automatically populated from the JSON record.
-
Click Submit. It is immediately confirmed that the user was compromised.
External Actions: Dismiss Risk
For a user that was confirmed compromised, you can dismiss the risk of that user:
-
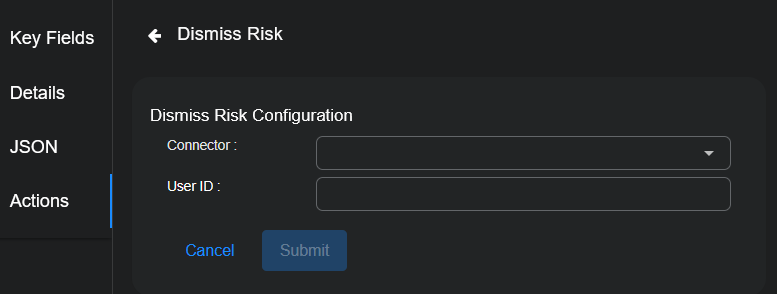
From the event display, select the Response tab, and click Dismiss Risk.
-
Choose the Connector. Only Microsoft Entra ID (formerly Azure Active Directory) connectors are supported.
-
Choose a User ID. They are automatically populated from the JSON record.
-
Click Submit. The user is immediately dismissed.
There is no Duration for this action. Once a user is dismissed, they stay dismissed. In other words, there is no Revert action that returns the user to Confirm Compromised.
External Actions: Add User to Group
You can add a user to a group.
-
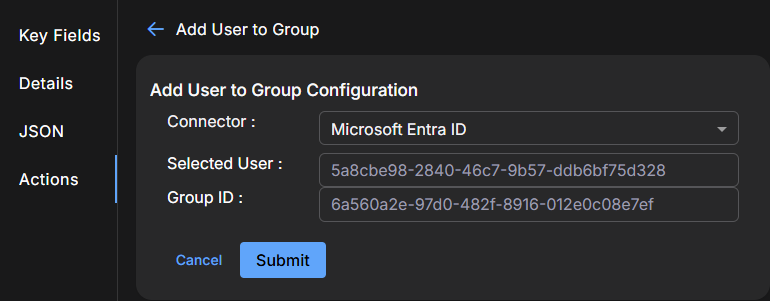
From the event display, select the Response tab and click Add User to Group.
-
Choose the Connector. Only Microsoft Entra ID (formerly Azure Active Directory) connectors are supported.
-
Choose a Selected User. This field is automatically populated from the
user_idfield. -
Choose a Group ID. This field is automatically populated from the
group_idfield. -
Click Submit. The user is added to the group.
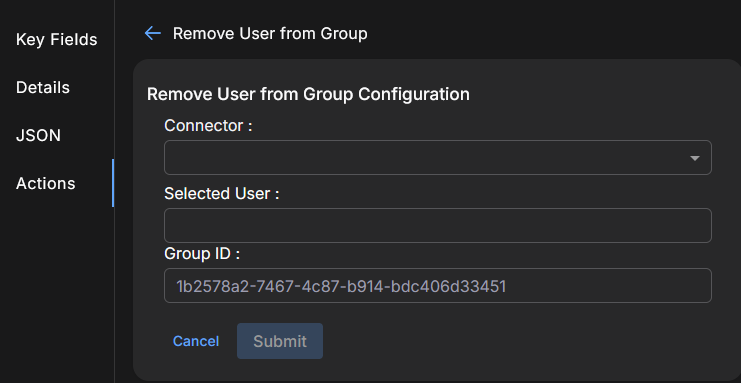
External Actions: Remove User from Group
The Remove User from Group action is only supported for manual action. It is not supported in Automated Threat Hunting (ATH) playbooks.
You can remove a user from a group.
-
From the event display, select the Response tab and click Remove User from Group.
-
Choose the Connector. Only Microsoft Entra ID (formerly Azure Active Directory) connectors are supported.
-
Choose a Selected User. This field is automatically populated from the
user_idfield. -
Choose a Group ID. This field is automatically populated from the
group_idfield. -
Click Submit. The user is removed from the group.
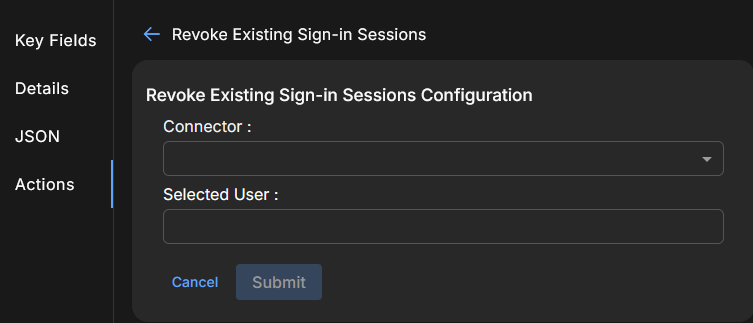
External Actions: Revoke Existing Sign-In Sessions
The Revoke Existing Sign-In Sessions action is only supported for manual action. It is not supported in Automated Threat Hunting (ATH) playbooks.
You can revoke existing sign-in sessions:
-
From the event display, select the Response tab and click Revoke Existing SIgn-In Sessions.
-
Choose the Connector. Only Microsoft Entra ID (formerly Azure Active Directory) connectors are supported.
-
Choose a Selected User. This field is automatically populated from the
userPrincipalNamefield. -
Click Submit. All active sign-in sessions for the specified user are terminated.
External Actions: Run a Script
You can immediately respond to an event by running a saved script or creating a new script:
- From the event display, select the Response tab, and click Run a Script.
- Choose the Target remote host from the dropdown. The connection information is automatically filled in. The dropdown also includes the option to add a new remote host. If needed, select "create new remote host" as the target:
- Specify the host name, IP address, port to which to connect, and the user and password.
- Specify whether to run the script on the Data Processor or a device sensor.
- Note that the host is saved
- Choose a script from the dropdown. The script is automatically added to the Script Body field. To create a new saved script, see Creating Saved Scripts.
- You can also choose Custom and create a new script. This new script will not be saved.
- Click Submit. The script is executed.
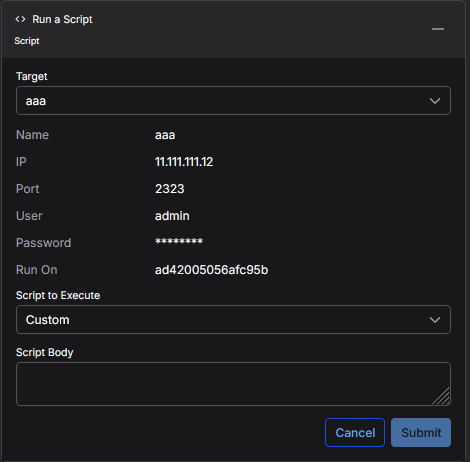
The script action appears on the Script Actions page.
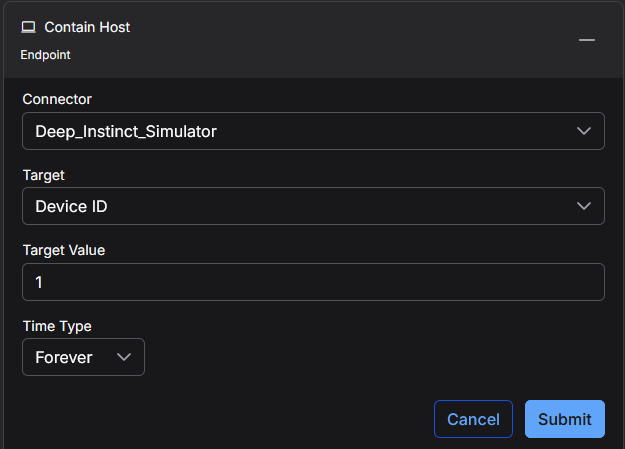
External Actions: Contain Host
You can immediately contain (lock down or isolate) a host managed by certain services such as Bitdefender, BlackBerry Cylance, CrowdStrike, Cybereason, Cynet, Deep Instinct, Microsoft Defender for Endpoint, SentinelOne, Sophos Central, VMware Carbon Black Cloud. You must have previously configured a connector to that service in order to perform this action.
- From the event display, select the Response tab, and click Contain Host.
-
Choose the connector from the Connector dropdown.
If you contain a host that is not managed by selected connector, the action status on the Endpoint Actions page will be failed.
-
Choose the Target. This menu option allows you to specify the source or destination host associated with the event as the host you want to isolate or lock down. For Cybereason connectors, the Target Value is automatically populated with the ID of a single Cybereason machine or a list of machines. For all other connectors, the value is the MAC ID of that host.
-
Choose a Time Type. You can choose Forever, Minutes, Hours, or Days.
-
Click Submit. The Contain Host action is reported in the Automation | Action History | Endpoint Actions table.
Depending on the originating connector, you may be able to revert a host containment from Stellar Cyber. If this is supported, a Revert button is displayed in the row for the containment action of the Automation | Action History | Endpoint Actions table. For supported connectors, using Revert triggers a Lift Containment action that is displayed in the same table. If the API for the managing service does not support a revert option then you need to use that product's UI to manage the host state.
Blackberry Cylance connector's Contain Host action automatically expires upon the requested duration but this action is not reported back to Stellar Cyber. The Endpoint Actions table reports that the containment was successful, but not expired.
If you use a Cynet connector to perform a response action on a host that is not in your Cynet list of hosts, the Automation | Action History | Endpoint Actions row for the action will indicate that with an error message such as: The remote server returned an error: (422) Unprocessable Entity.
The action appears on the Endpoint Actions page.
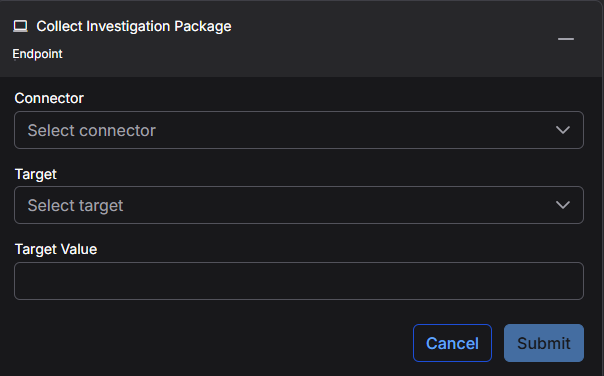
External Actions: Collect Investigation Package
You can collect an investigation package from a device.
-
From the event display, select the Response tab and under External Responses, click Collect Investigation Package.
-
Choose the Connector from the drop-down. Only Microsoft Defender for Endpoint connectors are supported.
-
The Target and Target Value fields are automatically populated from
microsoft_defender.idormicrosoft_defender.machineId. -
Click Submit.
External Actions: Restrict App Execution
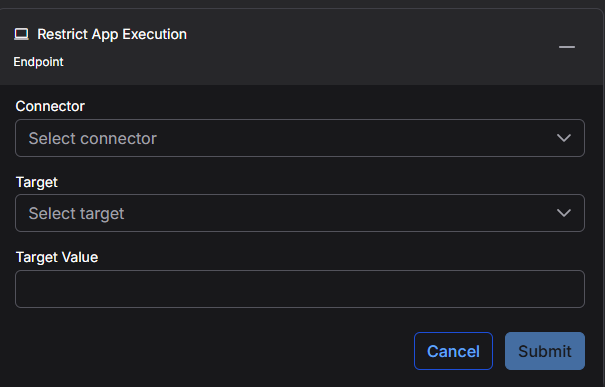
You can restrict execution of all applications on the device except a predefined set.
-
From the event display, select the Response tab and under External Responses, click Restrict App Execution.
-
Choose the Connector from the drop-down. Only Microsoft Defender for Endpoint connectors are supported.
-
The Target and Target Value fields are automatically populated from
microsoft_defender.idormicrosoft_defender.machineId. -
Click Submit.
External Actions: Run Antivirus Scan
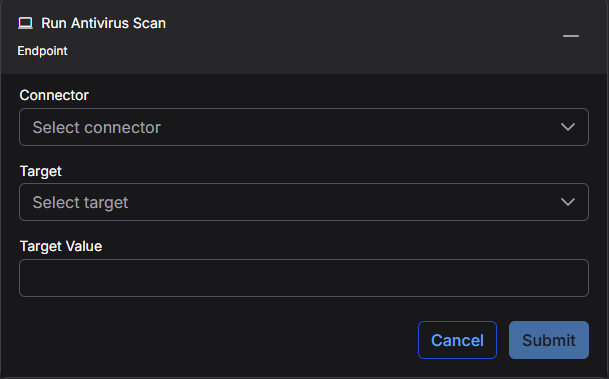
You can initiate a Microsoft Defender Antivirus scan on a device.
-
From the event display, select the Response tab and under External Responses, click Run Antivirus Scan.
-
Choose the Connector from the drop-down. Only Microsoft Defender for Endpoint connectors are supported.
-
The Target and Target Value fields are automatically populated from
microsoft_defender.idormicrosoft_defender.machineId. -
Click Submit.
External Actions: Stop and Quarantine File
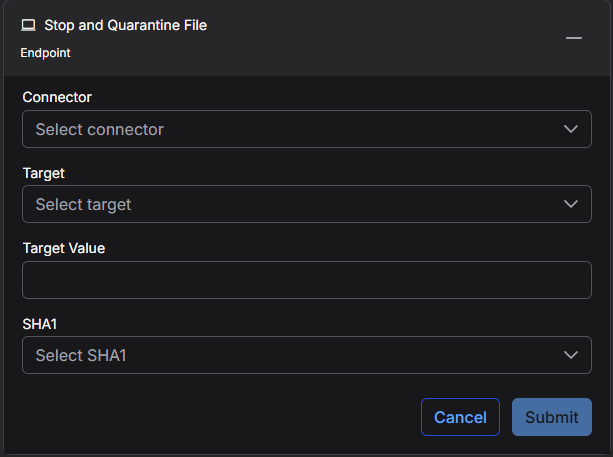
You can stop the execution of a file on a device and delete it.
-
From the event display, select the Response tab and under External Responses, click Stop and Quarantine File.
-
Choose the Connector from the drop-down. Only Microsoft Defender for Endpoint connectors are supported.
-
The Target and Target Value fields are automatically populated from
microsoft_defender.idormicrosoft_defender.machineId. -
Choose the SHA1 from the drop-down. The field is automatically populated from
microsoft_defender.evidence[].sha1in the alert. -
Click Submit.
External Actions: Isolate Endpoint
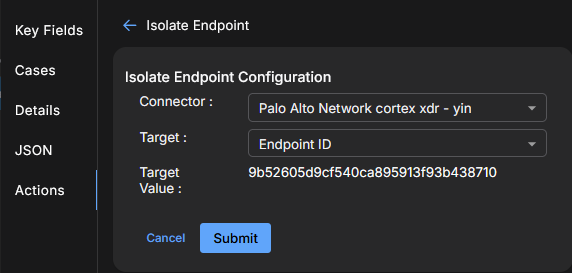
You can isolate an endpoint on Palo Alto Networks CORTEX XDR. You must have previously configured a connector to that service in order to perform this action. You can also unisolate an endpoint.
- From the event display, select the Response tab, and click Isolate Endpoint.
-
Choose the connector from the Connector dropdown.
-
Choose the Target. This menu option allows you to specify the Endpoint ID. The Target Value is populated.
-
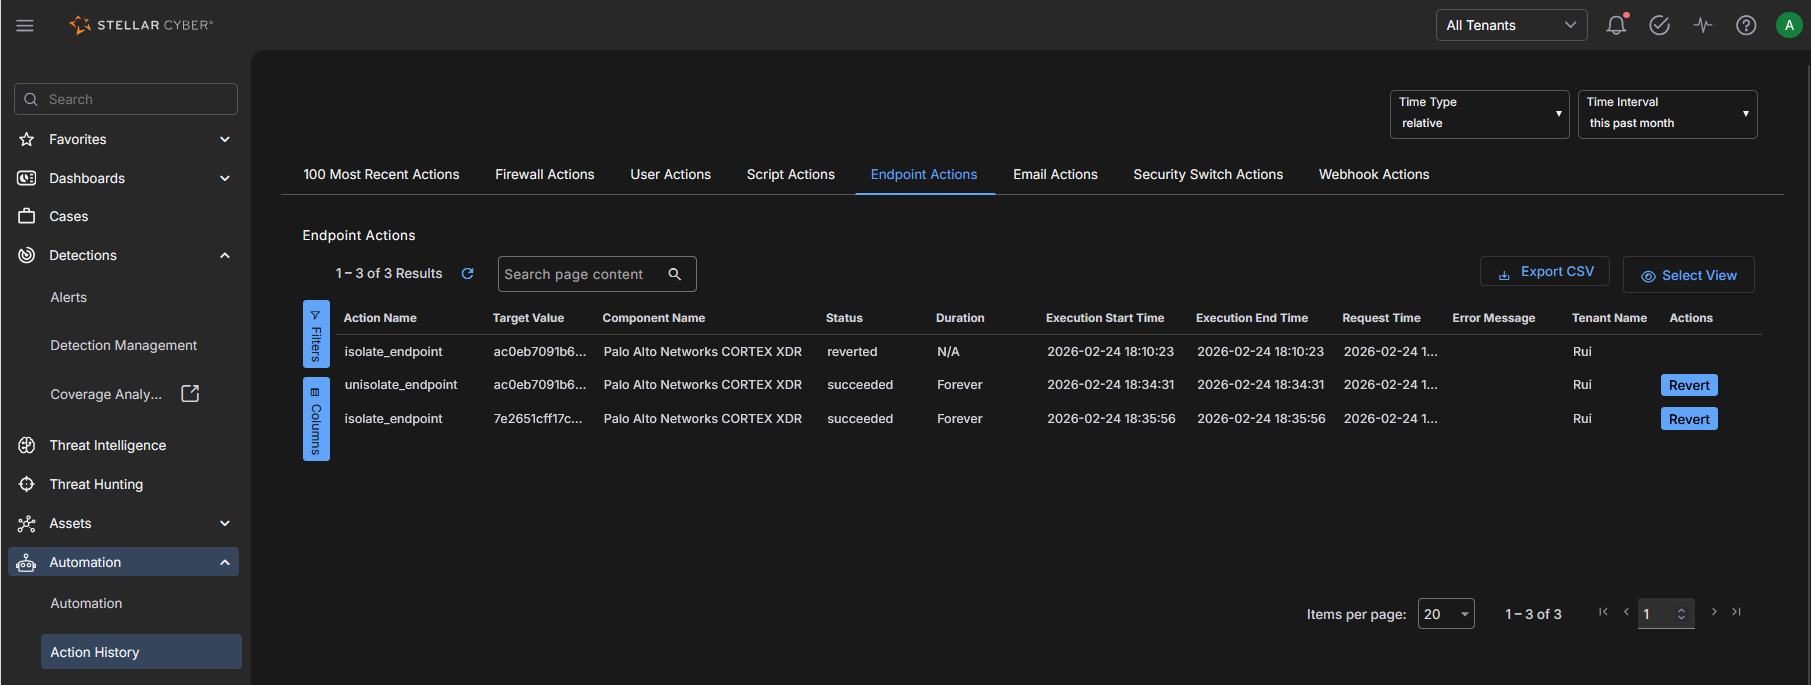
Click Submit. The Isolate Endpoint action is reported in the Automation | Action History | Endpoint Actions table.
-
To unisolate the endpoint, use the Revert button in the Actions column of the table.
External Actions: Hide Host
You can immediately hide a host managed by CrowdStrike Falcon:
- From the event display, select the Response tab, and click Hide Host.
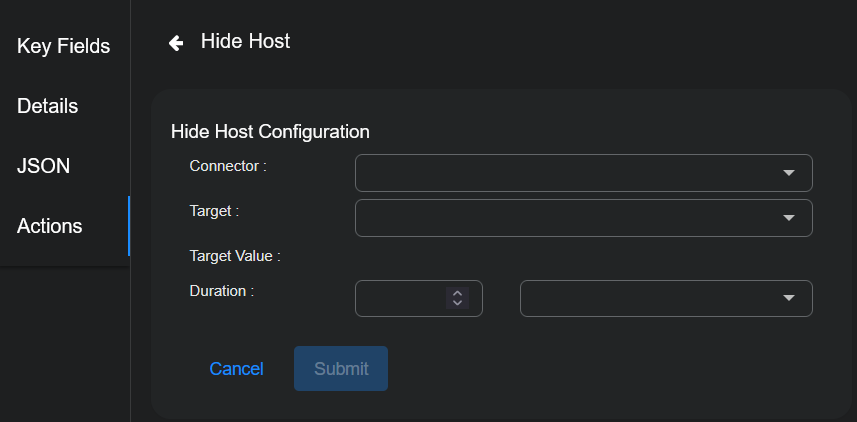
- Choose your CrowdStrike Falcon service from the dropdown. You can add a CrowdStrike connection from System | INTEGRATIONS | Connectors menu.
- Choose the Target from the dropdown.
- Choose a Duration. You can choose Minutes, Hours, Days, or Forever.
- Click Submit. The host is hidden in CrowdStrike. That host now has an Unhide action, allowing you to revert.
The action appears on the Endpoint Actions page.
If you hide a host that is not managed by your CrowdStrike service, the action status on the Endpoint Actions page will be failed.
External Actions: Disconnect Host
You can immediately disconnect a host managed by SonicWall Capture:
- From the event display, select the Response tab, and click Disconnect Host.
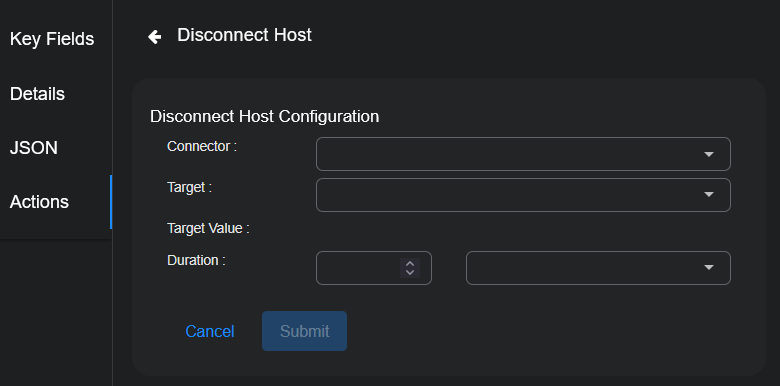
- Choose your SonicWall Capture service from the dropdown. You can add a SonicWall Capture connector from System | INTEGRATIONS | Connectors.
-
Choose the Target and Target Value.
- Choose a Duration. You can choose Minutes, Hours, Days, or Forever.
- Click Submit. The host is disconnected from the network.
The action appears on the Endpoint Actions page.
If you disconnect a host that is not managed by your SonicWall Capture service, the action status on the Endpoint Actions page will be failed.
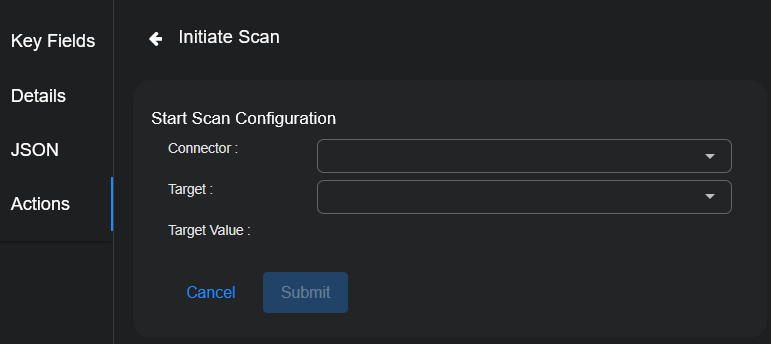
External Actions: Initiate Scan
You can immediately scan an asset managed by SonicWall Capture or SentinelOne.
-
From the event display, select the Response tab, and click Initiate Scan.
-
Choose the applicable connector from the dropdown menu.
-
Then select the asset / device / agent from the available list that is populated based on your connector selection.
-
Choose the Target Value.
-
Click Submit. A vulnerability scan of your selection is triggered immediately from the service associated with your connector.
The action appears on the Endpoint Actions page.
If you scan a host that is not managed by your SonicWall Capture service, the action status on the Endpoint Actions page will be failed.
External Actions: Restart Machine
You can immediately restart a host managed by SonicWall Capture:
- From the event display, select the Response tab, and click Restart Machine.
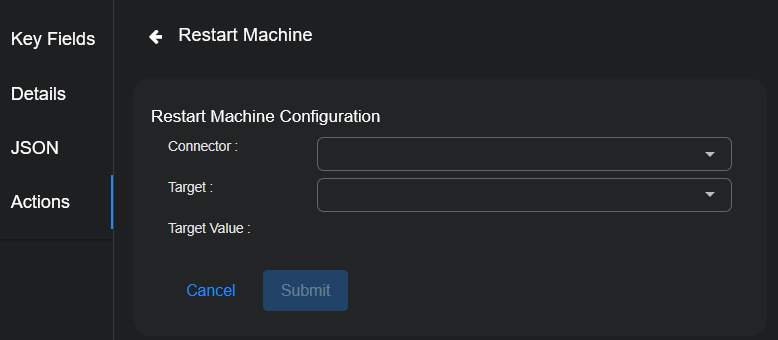
- Choose your SonicWall Capture service from the dropdown. You can add a SonicWall Capture connector from System | INTEGRATIONS | Connectors.
-
Choose the Target Value.
- Click Submit. The host is immediately restarted.
The action appears on the Endpoint Actions page.
If you restart a host that is not managed by your SonicWall Capture service, the action status on the Endpoint Actions page will be failed.
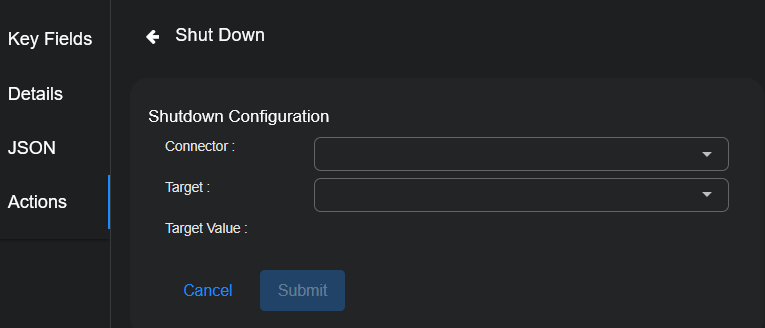
External Actions: Shutdown Host
You can immediately shut down a host managed by SonicWall Capture or Cynet:
-
From the event display, select the Response tab, and click Shut Down.
-
From the dropdown menu, select the connector you want to use to perform the shut down.
-
Specify the target device on which you want to perform the action.
If you select a Cynet connector, the Target Value is automatically populated with related JSON information.
-
Choose the Target Value.
-
Click Submit. The host is immediately shut down.
If you use a Cynet connector to perform a response action on a host that is not in your Cynet list of hosts, the Automation | Action History | Endpoint Actions row for the action will indicate that with an error message such as: The remote server returned an error: (422) Unprocessable Entity.
If you shut down a host that is not managed by your SonicWall Capture service, the action status on the Endpoint Actions page will be failed.
The action appears on the Endpoint Actions page.
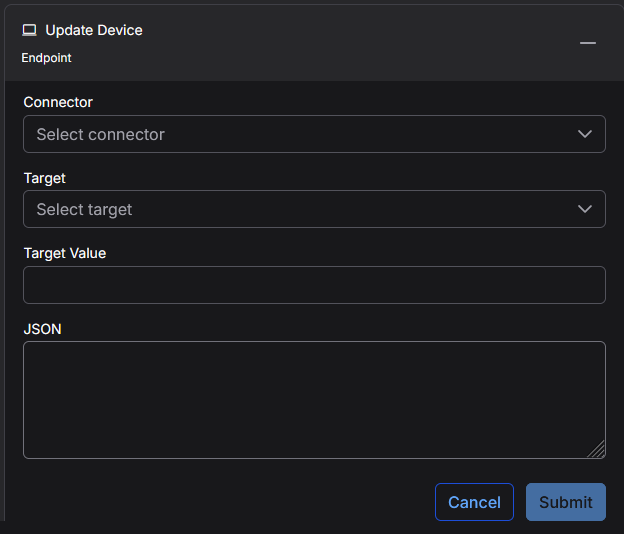
External Actions: Update Device
You can upload JSON to run actions on a device known to a Forescout connector:
-
Access the Event Details Display:
-
Select Threat Hunting.
The Interflow Search tab appears.
-
Select the Indices for Traffic.
-
Select an event and click the More Info button.
-
-
From the event display, select the Response tab, and click Update Device.
-
From the Connector menu, select the Forescout connector.
-
The Target menu lists the addresses associated with this event. Select the host on which you want to run the Forescout connector update action. The target can be one of these: Source Host, Destination Host, Source MAC, or Destination MAC. The Target Value is updated automatically from the event data. These two fields are required default parameters for the Forescout action and should not be specified in the JSON added in the next step.
-
If your connector was created with default JSON, you can customize it now, or skip this step. Populate the JSON field with the action you want the connector to transmit to the Forescout app configured in the beginning of this procedure. Note that Stellar Cyber verifies general format of the JSON, not the logic. Following is an example based on ActionAPI's supported JSON properties:
{
"connect_actionapi_vlan_assign":true,
"connect_actionapi_vlan_assign_id":"vlan233"
}
Do not include the IP or MAC address, as that is added automatically based on your selection in the previous step. The JSON that is transmitted to Forescout will include the IP or MAC and the property tag, similar to the sample below.
{
"mac":"009027390a7c",
"properties":{
"connect_actionapi_vlan_assign":true,
"connect_actionapi_vlan_assign_id":"vlan233"
}
}
Refer to Forescout documentation for supported fields and syntax details.
-
Click Submit. The connector runs the update action one time.
External Actions: Kill Threat
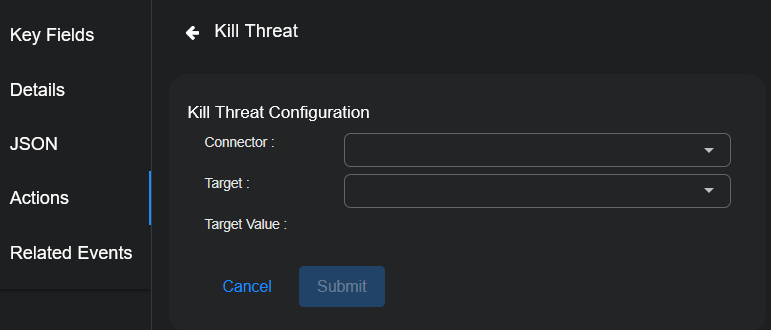
For assets managed by a SentinelOne service, if you have configured your connector for Respond actions, you can use this action to kill a threat.
- From the event display, select the Response tab, and click Kill Threat.
-
Choose the SentinelOne connector from the dropdown menu.
-
Then select the Target from the available list that is populated based on your connector selection.
-
The Target Value is automatically populated.
- Click Submit. A kill threat signal on the target is immediately triggered from the SentinelOne service associated with your connector.
The action appears on the Endpoint Actions page.
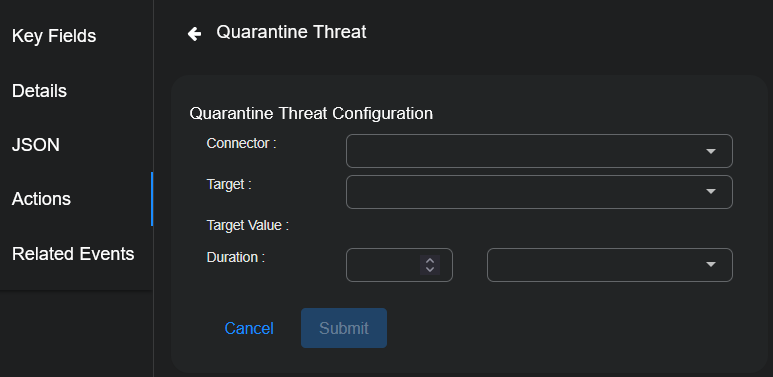
External Actions: Quarantine Threat
For assets managed by a SentinelOne service, if you have configured your connector for Respond actions, you can use this action to quarantine a threat.
-
From the event display, select the Response tab, and click Quarantine Threat.
-
Choose the SentinelOne connector from the dropdown menu.
-
Then select the Target from the available list that is populated based on your connector selection.
-
The Target Value is automatically populated.
-
Choose a Duration. You can choose Minutes, Hours, Days, or Forever. This specifies the length of time to put the target in quarantine.
-
Click Submit. A quarantine on the target is immediately triggered from the SentinelOne service associated with your connector.
The action appears on the Endpoint Actions page.
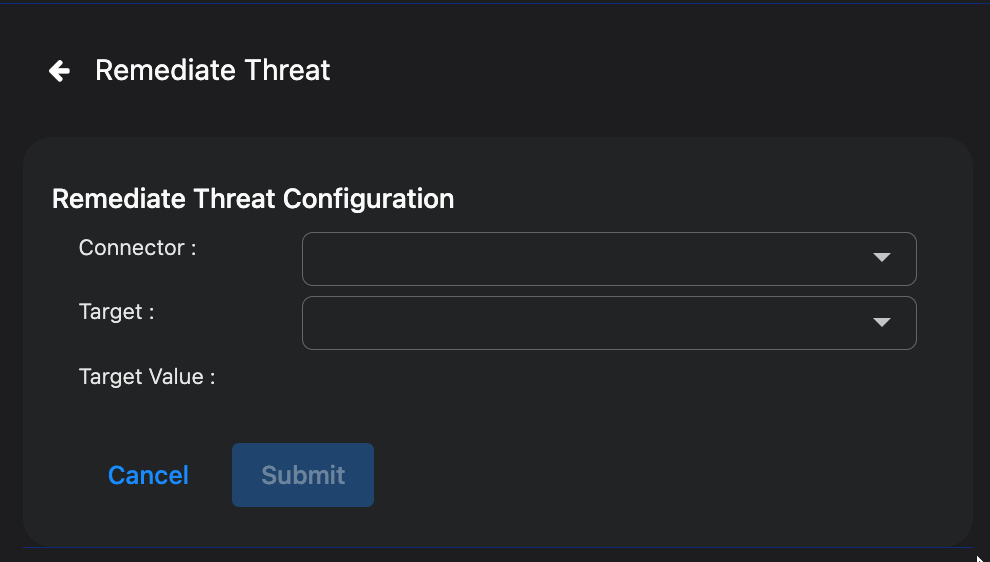
External Actions: Remediate Threat
For assets managed by a SentinelOne service, if you have configured your connector for Respond actions, you can use this action to remediate a threat.
- From the event display, select the Response tab, and click Remediate Threat.
-
Choose the SentinelOne connector from the dropdown menu.
-
Then select the Target from the available list that is populated based on your connector selection.
-
The Target Value is automatically populated.
- Click Submit. A remediation signal on the target is immediately triggered from the SentinelOne service associated with your connector.
The action appears on the Endpoint Actions page.
External Actions: Remediate Email
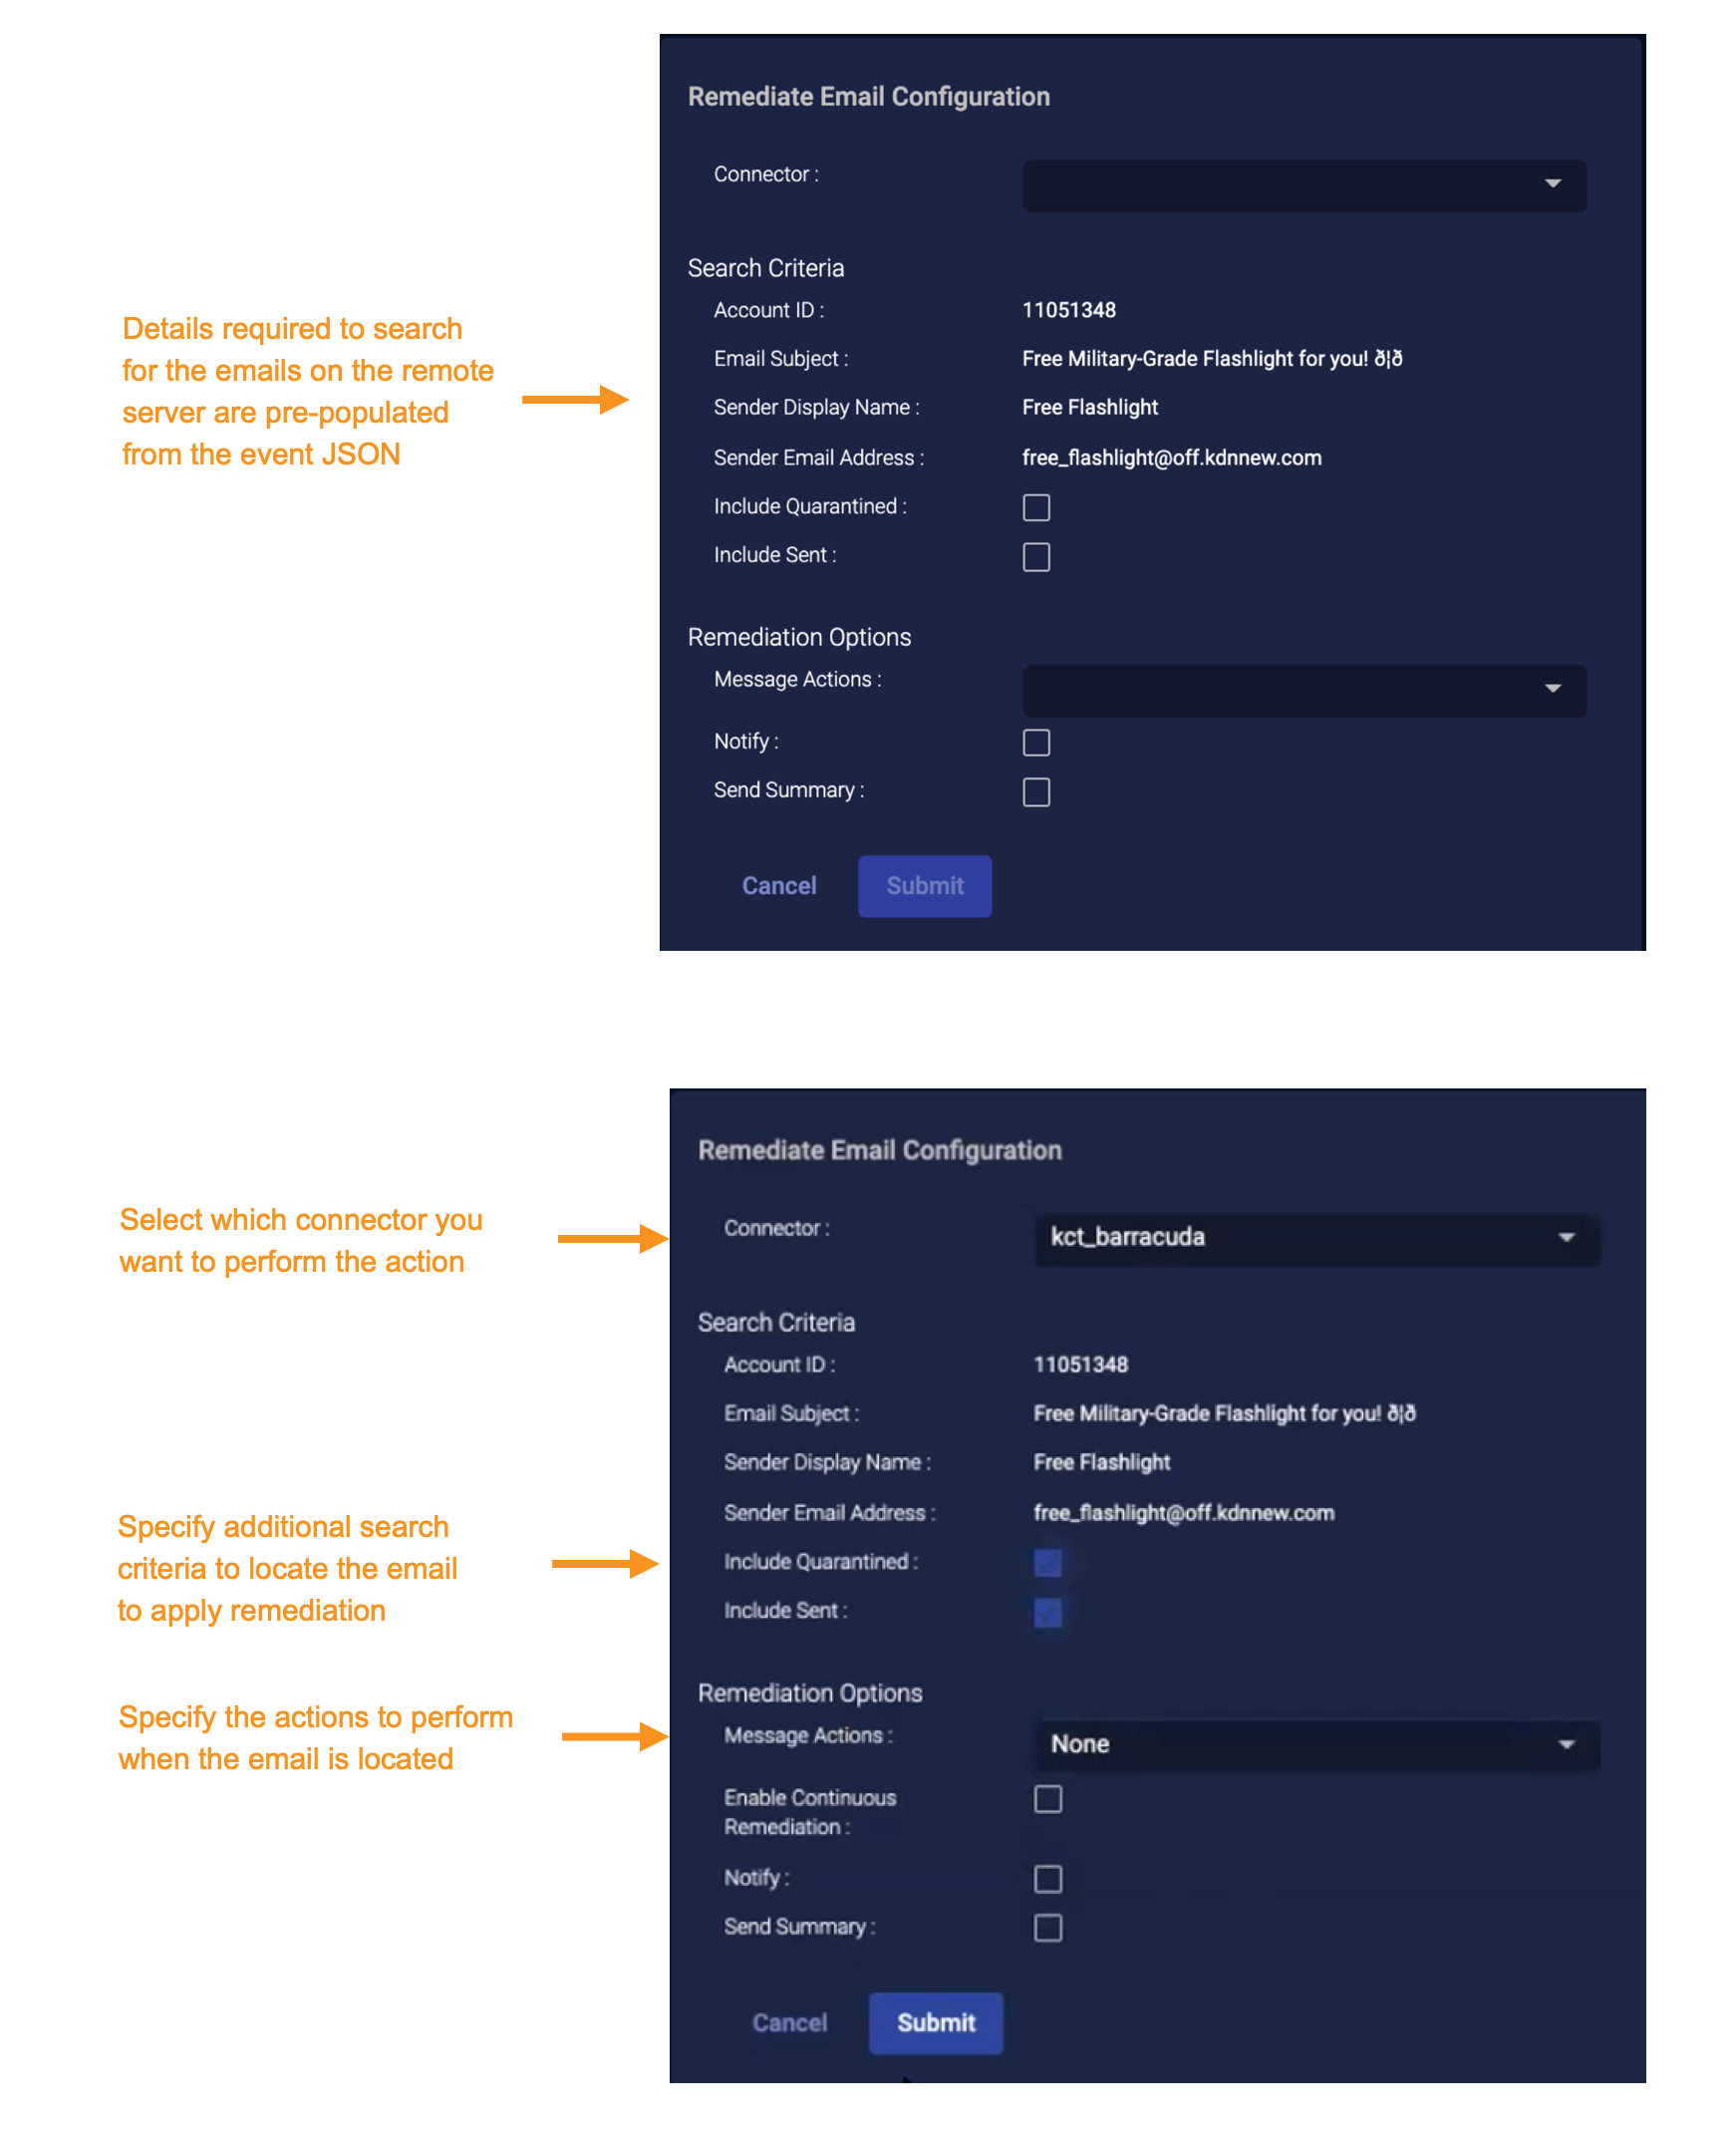
For deployments integrated with the Barracuda Email Security Service you can use Stellar Cyber to create an incident in a Barracuda Forensics And Incident Response system.
-
From the event display, select the Response tab, and click Remediate Email. The dialog appears with some sections pre-populated from the JSON associated with the selected event.
-
Choose the applicable connector from the dropdown menu.
-
Optionally, specify whether to search for the email in previously Quarantined and Sent categories.
-
Specify which remediation actions to perform on the Barracuda response system.
-
Message Actions: Select either None, Delete, or Quarantine.
-
Enable continuous quarantine: (Visible only when the message action is set to Delete or None) Select this option to request that the action continue for 72 hours after the initial remediation has completed.
-
Notify: Select this option to also send a warning email alert to the affected user.
-
Send summary: Select this to copy an incident summary to the configured security team.
-
-
Click Submit. An incident is sent to the Barracuda Forensics And Incident Response associated with your connector.
The action appears on the Automation | Action History | Email Actions page.
External Actions: Webhook
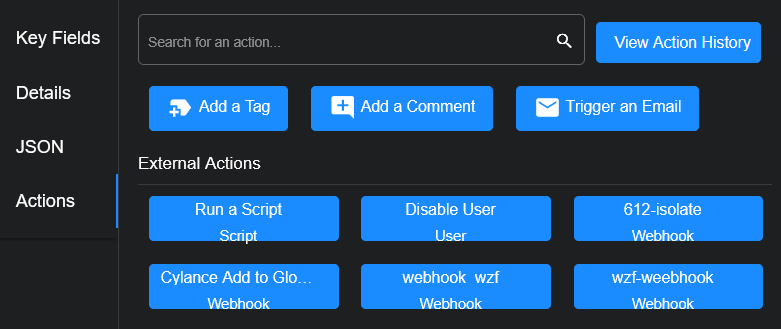
You can manually trigger a Webhook action. The action may have been created from a customization in the Universal Webhook Responder or from a predefined template in the Universal Webhook Responder or ESET Responder.
-
From the event display, select the Response tab, and click a Webhook action.
-
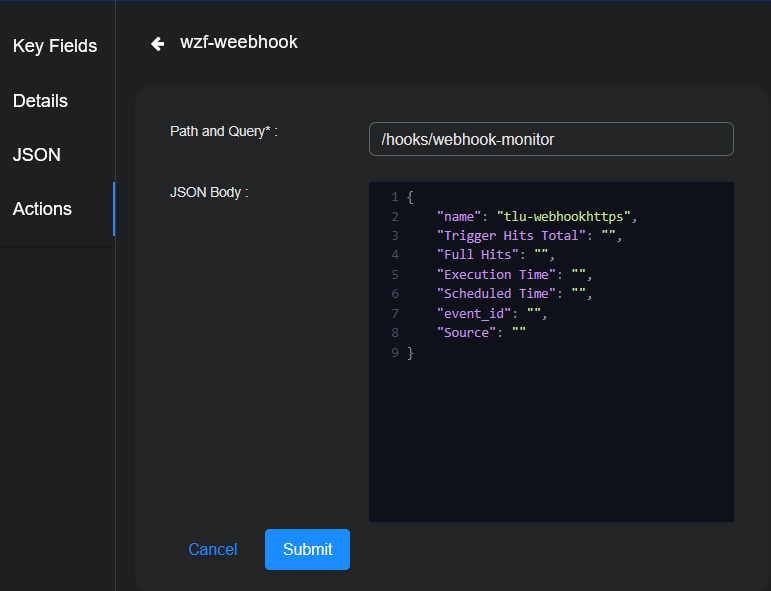
(Optional) When the Webhook Responder is triggered manually, you can edit the Path and Query and the JSON Body when you issue the action.
-
Click Submit.
Miscellaneous
Related Events
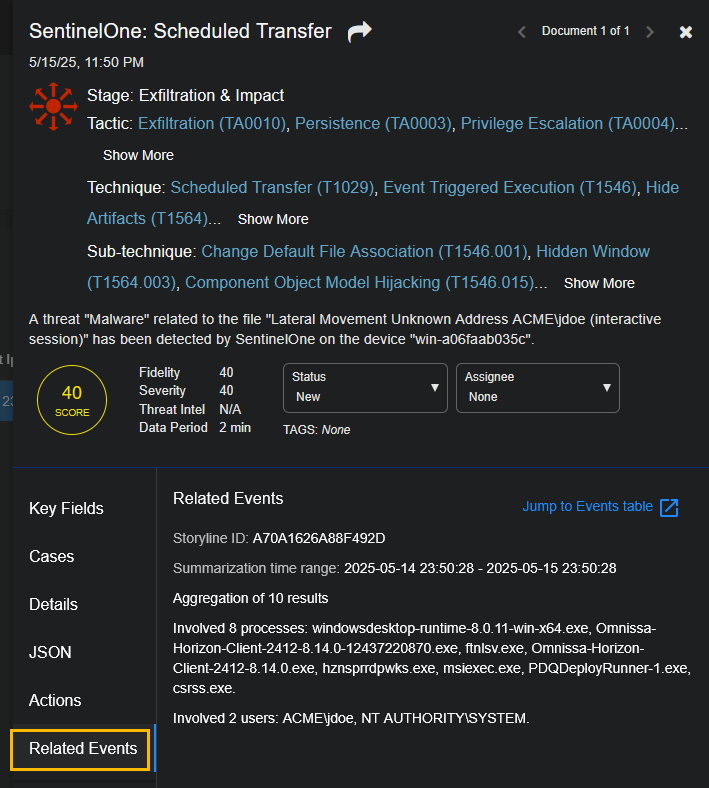
The Related Events tab only displays if the alert type is SentinelOne. The tab contains a summary of related SentinelOne Deep Visibility events. For details, see Related Events for Alert Types.
InSyncs
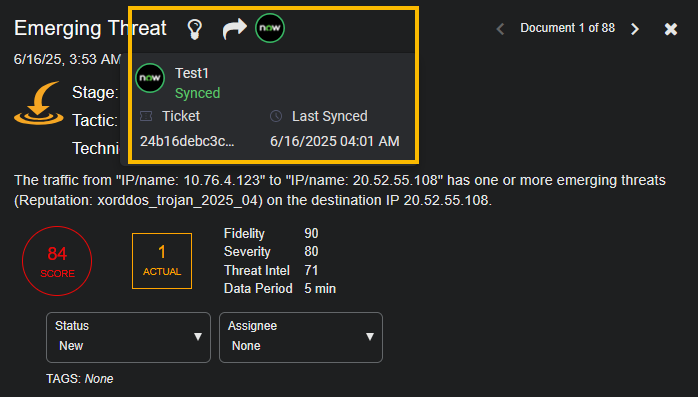
If there are any integration syncs, there is a ServiceNow icon displayed at the top of the Details page.
When you hover over the ServiceNow icon, the status, Ticket ID, and Last Synced date and time are displayed.
For details, see Using InSyncs.
