Configuring Active Directory Federation Services SSO
These instructions explain what to configure in Active Directory Federation Services (AD FS) and in Stellar Cyber so that AD FS can authenticate Stellar Cyber administrative users. It’s assumed that you’ve already deployed AD FS and are using it to authenticate users on your network. If not, see Deploy and configure AD FS. It’s also assumed that user accounts for Stellar Cyber administrative users have already been added to Active Directory and that each account has an email address and password. AD FS will use these to authenticate users during login.
If you use domain names in the authentication settings for Stellar Cyber (the relying party), use domain names in the configuration for AD FS (the identity provider). Similarly, if you use IP addresses in Stellar Cyber, use IP addresses on AD FS.
Active Directory Federation Services
-
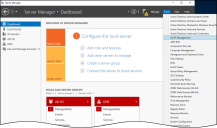
Log in to Server Manager and view the Dashboard.
-
Select Tools > AD FS Management.
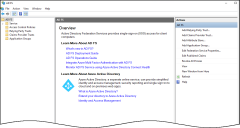
This opens the AD FS management console.
AD FS Server: Create a Relying Party Trust
-
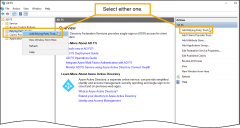
Select Add Relying Party Trust in the right panel or access the context menu for Relying Party Trusts in the left panel and select Add Relying Party Trust there.
To access the context menu when using a mouse, right-click Relying Party Trusts in the left panel. To access it when using a handheld device, long-press (press and hold) Relying Party Trusts.
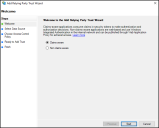
The Welcome to the Add Relying Party Trust Wizard appears.
-
Leave Claims aware selected and then Start.
-
In the Select Data Source step, select Enter data about the relying party manually and then select Next.
-
In the Specify Display Name step, enter a name for the relying party such as
Stellar Cyber AIO CE, optionally enter any notes for future reference, and then select Next. -
Skip the Configure Certificate step and select Next.
-
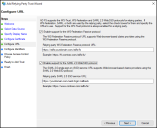
For the Configure URL step, select Enable support for the WS-Federation Passive protocol and enter the relying party URL, such as
https://adfs.yourdomain.com/adfs/fs, replacing yourdomain with your actual domain name.When Stellar Cyber users attempt to log in, this is the URL to which Stellar Cyber redirects them so they’ll authenticate through AD FS.
-
Select Enable support for the SAML 2.0 WebSSO protocol and enter the relying party SAML 2.0 SSO service URL, such as
https://yourdomain.com/saml/login/callback.This is the URL where AD FS sends SAML assertions to Stellar Cyber after a successful authentication. An assertion contains a user’s authentication details and attributes.
-
When done, select Next.
-
For the Configure Identifiers step, enter the Stellar Cyber URLs that will communicate with Active Directory. For example:
https://adfs.yourdomain.com/adfs/lshttps://yourdomain.com/saml/login/callbackhttps//yourdomain.com -
Skip the Choose Access Control Policy step and select Next.
-
Skip the Ready to Add Trust step and select Next.
-
Leave Configure claims issuance policy for this application selected and Close.
AD FS: Add Rules
Create transform rules to define where Active Directory authenticates users and what attributes it returns to Stellar Cyber after a successful user authentication.
Rule 1
-
In the Relying Party Trusts page, access the context menu of the relying party trust you just made and Edit Claim Issuance Policy.
To access the context menu when using a mouse, right-click the relying party trust name. To access it when using a handheld device, long-press (press and hold) the relying party trust name.
-
Add Rule to check the email address on an incoming claim against the Name IDs in the Active Directory attribute store.
-
Leave the claim rule template as Send LDAP Attributes as Claims, and then select Next.
-
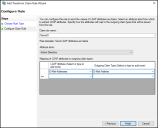
Enter the following in Add Transform Claim Rule Wizard and then select Finish:
Claim rule name: Enter a name such as NameID.
Attribute store: Active Directory
LDAP Attribute: E-Mail-Addresses
Outgoing Claim Type: E-Mail Address
After AD FS (the identity provider) authenticates a user, this rule instructs it to take the value of the email attribute in the user’s Active Directory account and transform it into an E-Mail Address claim in the token it sends to Stellar Cyber (the relying party).
Rule 2
-
Add Rule to transform the incoming claim type of E-Mail Address to an outgoing claim type of Name ID.
The value (for example, user@yourdomain.com) remains the same; it’s just the claim type that changes.
-
For the claim rule template choose Transform an Incoming Claim and then select Next.
-
Enter the following in Add Transform Claim Rule Wizard and then select Finish:
Claim rule name: Enter a name such as
Transform Name ID.Incoming claim type: E-Mail Address
Outgoing claim type: Name ID
Rule 3
-
Add Rule to set the scope of the Stellar Cyber user as Root.
-
For the claim rule template choose Send Claims Using a Custom Rule, and then select Next.
-
Enter the following in Add Transform Claim Rule Wizard and then select Finish:
Claim rule name: Enter a name such as
Stellar Scope (Root).Custom rule:
=> issue(Type = "stellar_scope", Value = "root");
Rule 4
-
Add Rule to set the scope of the Stellar Cyber user as a tenant.
-
For the claim rule template choose Send Claims Using a Custom Rule and then select Next.
-
Enter the following in Add Transform Claim Rule Wizard and then select Finish:
Claim rule name: Enter a name such as
Stellar Scope (Tenant).Custom rule:
=> issue(Type = "stellar_scope", Value = "tenant");
Rule 5
-
Add Rule to set the scope of the user as a Stellar Cyber partner.
-
For the claim rule template choose Send Claims Using a Custom Rule and then select Next.
-
Enter the following in Add Transform Claim Rule Wizard and then select Finish:
Claim rule name: Enter a name such as
Stellar Scope (Partner).Custom rule:
=> issue(Type = "stellar_scope", Value = "partner");
Rule 6
-
Add Rule to set the administrative privilege of the Stellar Cyber user as Super Admin.
-
For the claim rule template choose Send Claims Using a Custom Rule and then select Next.
-
Enter the following in Add Transform Claim Rule Wizard and then select Finish:
Claim rule name: Enter a name such as
Stellar Privilege (Super_Admin).Custom rule:
=> issue(Type = "stellar_privilege", Value = "super_admin");
Rule 7
-
Add Rule to set the Stellar Cyber tenant name for the user.
-
For the claim rule template choose Send Claims Using a Custom Rule and then select Next.
-
Enter the following in Add Transform Claim Rule Wizard and then select Finish:
Claim rule name: Enter a name such as
Stellar Tenant (tenant-name).Custom rule:
=> issue (Type = "stellar_tenant", Value = "tenant-name");Replace
tenant-namewith the actual name of the tenant. -
To save the set of rules, select OK.
Stellar Cyber
Configure Stellar Cyber to authenticate users using SSO (SAML) with Active Directory Federation Services.
-
Log in to Stellar Cyber with user privileges that let you configure authentication settings and select System | Administration | Settings.
-
Enter the following in Authentication Settings:
Authentication Method: SSO (SAML)
SSO Configuration Method: Metadata URL
Issuer URL: Enter the domain name of the AD FS (the identity provider) that issues security tokens for authenticated users, such as the following for example:
https://adfs.yourdomain.com/adfs/services/trustStellar Cyber(the relying party) uses the issuer URL to verify the identity of the token issuer.
Metadata URL: Enter a URL with a resolvable domain name for your Active Directory Federation Services system, such as the following for example:
https://adfs.yourdomain.com/federationmetadata/2007-06/federationmetadata.xmlThis is the URL where AD FS publishes its federation metadata, which contains information such as is certificates, supported claims, and other configuration details.
Allow Clock Skew: (select)
Use IDP for: Authentication Only
Two-Factor Authentication: Optional 2FA will be configured on the tenant and user levels
-
When you’re done configuring the authentication settings, Submit your changes.
A logout notice appears in the Stellar Cyber user interface explaining that by submitting your changes, Stellar Cyber will immediately terminate all currently active user sessions.
-
To proceed, select Yes.
When you log back in, your browser redirects you to the AD FS login page to begin using SSO authentication.
