Configuring a Central Windows Log Collector
You can configure a single Windows computer to collect logs from source computers and forward them to the sensor. The collector and source computers must be able to communicate, and must be on the same Active Directory domain.
To configure a central windows computer to collect logs from source computers and forward them to a sensor, you will:
-
Configure a central Windows computer (collector) to collect logs.
-
Configure the source Windows computers to forward their logs to the collector.
-
Configure the sensor in Stellar Cyber.
Our examples use Windows 10. Other versions of Windows might have different field names or locations.
Configuring the Collector to Collect Logs
You must configure the collector to:
-
start the event collector service
-
subscribe to the events
Starting the Collector Service
To start the collector service:
-
Log in to the collector.
-
Run a terminal session as an administrator.
-
Run the
wecutil quick-configcommand. -
Enter
Yto proceed. The Windows Event Collector service begins. -
Enter
exitto end the terminal session.
Subscribing to Events
To subscribe to events:
-
Log in to the collector.
-
Open the Computer Management app.
-
Open System Tools | Event Viewer.
-
Right-click on Subscriptions.
-
Click on Select Subscriptions.... The Subscription Properties screen appears.

-
Enter a Subscription name.
-
Enter a Description.
-
Click Select Computers. The Computers dialog box appears.
-
Choose the source computers you want to receive logs from. Click Test to test the connection if you want.
-
Click OK.
-
Click Select Events.... The Query Filter screen appears.
-
Select the events you want to receive. Note the names of the events you selected, as you'll need to configure the source computers to send those events.
-
Click the Event logs dropdown.
-
Select Windows Logs.
-
Open Applications and Service Logs | Microsoft.
-
Select Windows.

-
Click outside of the dropdown to close it.
-
Click OK.
-
Click OK. You should now see events in the Event Viewer.
Configuring Source Forwarding Computers
You can configure multiple Windows computers to send logs to the collector. You must configure the source forwarding computers to:
-
enable remote management
-
set the collector as the destination for the logs
-
send logs to the collector
Enabling Remote Management
To configure a source forwarding computer for remote management:
-
Log in to the forwarding computer.
-
Run a terminal session as an administrator.
-
Run the
winrm quickconfigcommand. -
Enter
Yto start the service with delayed auto start. -
Enter
Yto enable the exception. -
Enter
exitto end the terminal session.
Setting the Collector as the Log Destination
To configure the source forwarding computer to send logs to the collector:
-
Log in to the forwarding computer.
-
Open the Computer Management app.
-
Open System Tools | Local Users and Groups | Groups.
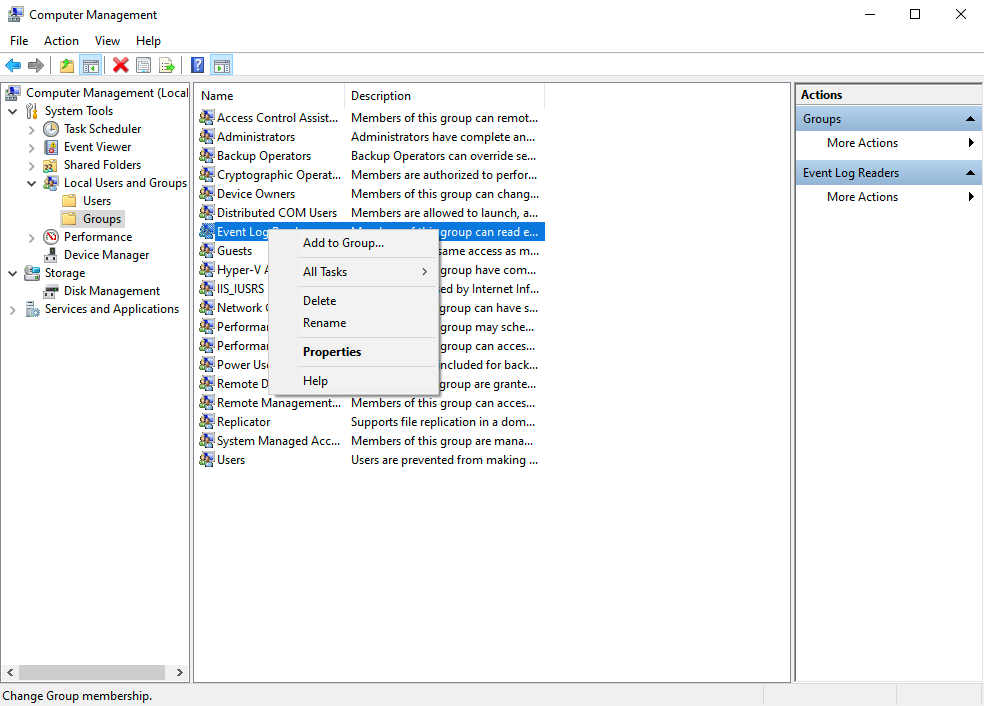
-
Right-click on Event Log Readers.
-
Click on Add to Group.... The Event Log Readers Properties dialog box appears.
-
Click Add.... The Select Users dialog box appears.
-
Click Object Types.... The Object Types dialog box appears.
-
Ensure that Computers is enabled.
-
Click OK.
-
Select the collector.
-
Click OK.
-
Click OK.
Sending Event Logs to the Collector
To configure the source forwarding computer to send the event logs to the collector:
-
Log in to the forwarding computer.
-
Run a terminal session as an administrator.
-
Run the
wevtutil glcommand for each event name. For example, for security events:wevtutil gl security
A display similar to the following appears.

Note the string following channelAccess.
-
Run:
wevtutil sl Security /ca:O:BAG:SYD:(A;;0xf0007;;;SY)(A;;0x7;;;BA)(A;;0x1;;;BO)(A;;0x1;;;SO)(A;;0x1;;;S-1-5-32-573)(A;;0x1;;;S-1-5-20) -
Run the
wevtutil gl securitycommand again. The channelAccess string should now match the new string. -
Repeat for each event category.
-
To verify that the logs are enabled, run:
get log ForwardedEventsget log Microsoft Windows TCPIP/Operational -
Reboot the computer.
Configuring the Sensor
To configure the sensor to receive the logs from the collector, on Stellar Cyber:
-
Click System | DATA SOURCE MANAGEMENT | Sensors | Sensor Profiles. The Sensor Profile Configuration page appears.
-
Click to edit the profile used by the sensor. The Edit Sensor Profile screen appears.
-
Open the Windows options.
-
Open the Other Channels options.
-
Enter Microsoft Windows TCPIP/Operational in the Types field.
-
Click Add. Microsoft Windows TCPIP/Operational appears in the Added box.
-
Click Submit.
The sensor can now receive the events forwarded by the collector.
