Configuring GCP Packet Mirroring
You can configure GCP packet mirroring to send cloud-based traffic to a Stellar Cyber Security Data Sensor (SDS) or Network Data Sensor (NDS).
Configuring GCP packet mirroring consists of the following major steps:
Packet mirroring lets you send packets from a mirror source to a destination. Mirroring sessions consist of the following main components:
-
Mirror source. This is where the traffic will be mirrored from.
-
Mirror destination. This is where mirrored traffic will be sent – a Stellar Cyber SDS/NDS in our case.
-
Mirror filters. These let you limit which traffic is mirrored to just the packets of interest.
The GCP documentation describes how to set up Packet Mirroring. The following procedures provide an example specific to a Stellar Cyber deployment.
Traffic Mirroring Prerequisites and Rules
Review the GCP prerequisites and rules for traffic mirroring. In general:
-
You must have the appropriate GCP permissions to configure Packet Mirroring.
-
You must have an internal TCP/UDP load balancer configured for packet mirroring available in the same region as the instances to be mirrored.
-
You must have configured firewall rules that permit mirrored traffic from source instances to destination instances. Refer to the GCP documentation for information on creating firewall rules.
Packet Mirroring Example
The procedures in this section set up the simple packet mirroring configuration illustrated belowm with all components residing in the same network (mirrored VM, load balancer, destination sensor, and associated DP).
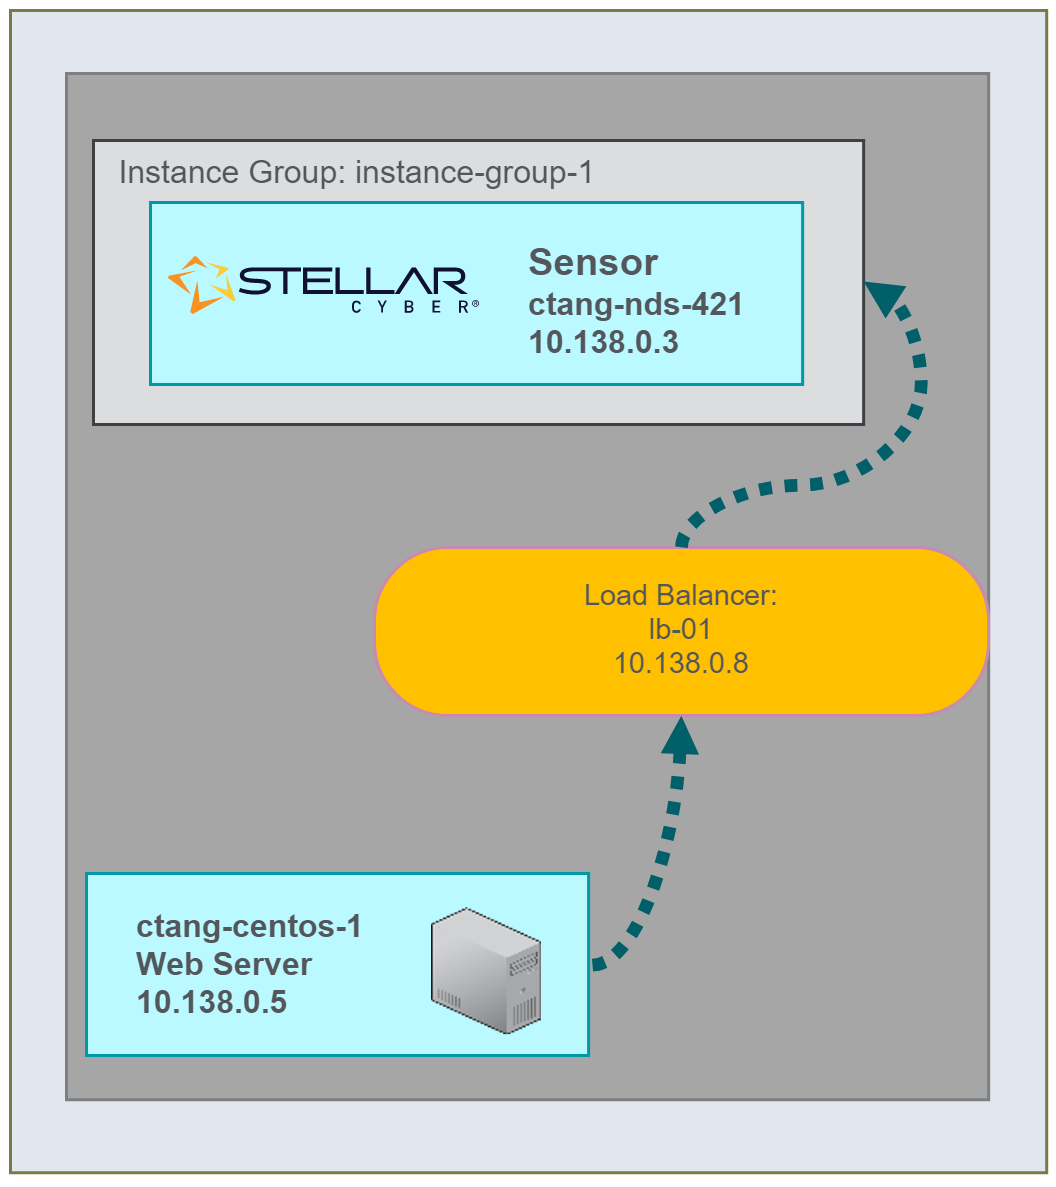
In this example, we will mirror traffic from the ctang-centos-1 instance to a Stellar Cyber NDS at ctang-nds-421. The sections below demonstrate how to set up this packet mirroring configuration.
Starting Configuration
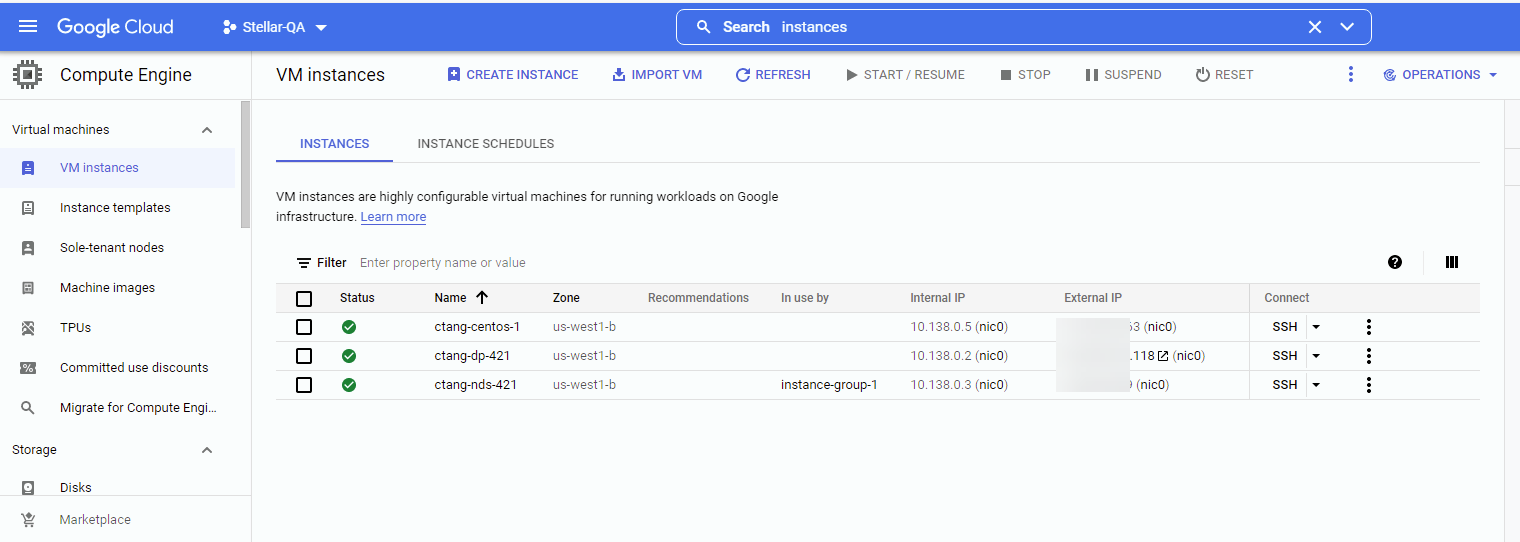
The figure below shows our initial configuration in the Compute Engine | Virtual machines | VM instances list, with separate VMs for the mirrored instance, the destination NDS, and the managing DP. The creation of the actual VPCs, networks, and subnets used in this example are outside of the scope of these topics – we are only illustrating a simple packet mirroring configuration in an existing deployment.
Configure the Instance Group
GCP packet mirroring policies can only send traffic to the frontend of a load balancer. In turn, a load balancer can only use an instance group as a backend. Because of this, we must put the sensor to be used as the target of a packet mirroring policy in an instance group.
-
Create an Instance Group for our sensor using the Compute Engine > Instance Groups > Create Instance Group interface in the GCP console.
-
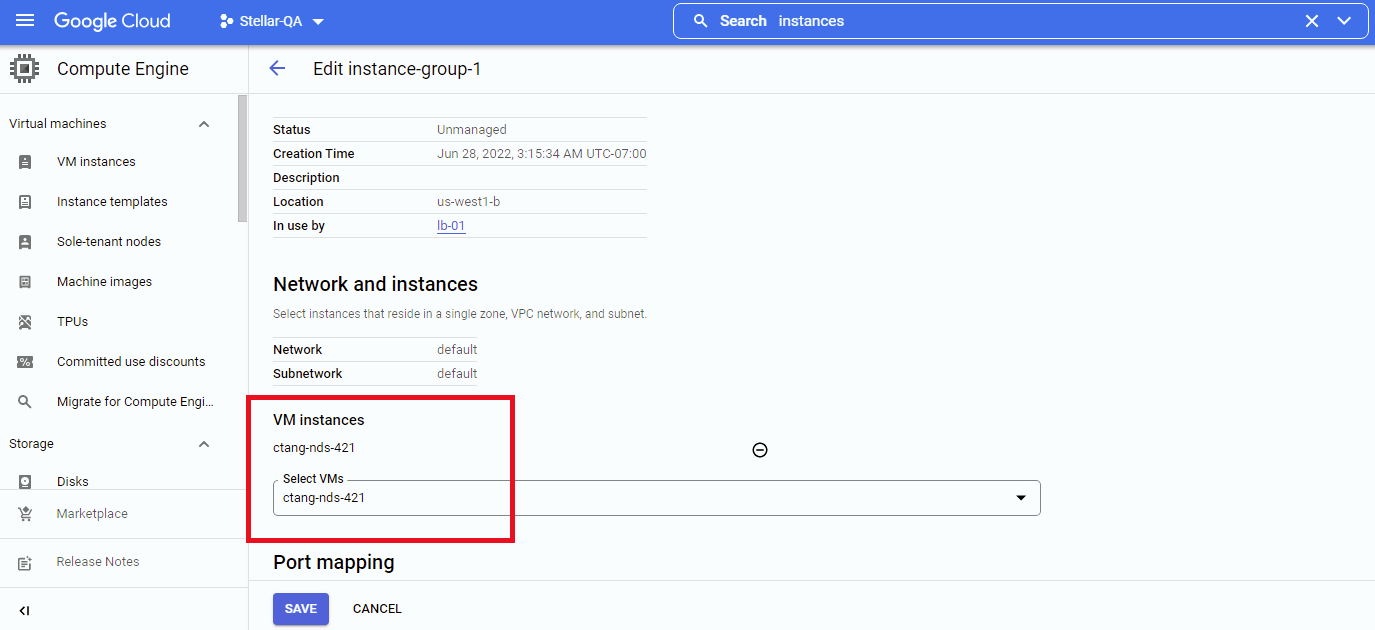
Select the New unmanaged instance group option and set the options illustrated below. Note that the only VM Instance in the Instance Group is our NDS, ctang-nds-421.
Here’s our instance-group-1 instance group with a single sensor instance:
Configure an Internal Load Balancer
Next, we’ll set up an internal load balancer to distribute traffic from a frontend collection point to our backend sensor instance.
-
You work with load balancers in the Network services > Load balancing > Create Load Balancer interface in the GCP console.
-
Click the Start configuration button under TCP Load Balancing:
-
Choose the options that best match the type of traffic you intend to mirror. In this example, we are using this load balancer as the destination for packet mirroring entirely from cloud-based instances in a single region:
-
Supply a name for your internal load balancer (lb-01 in this example) and click Create:
Set Backend Configuration Options
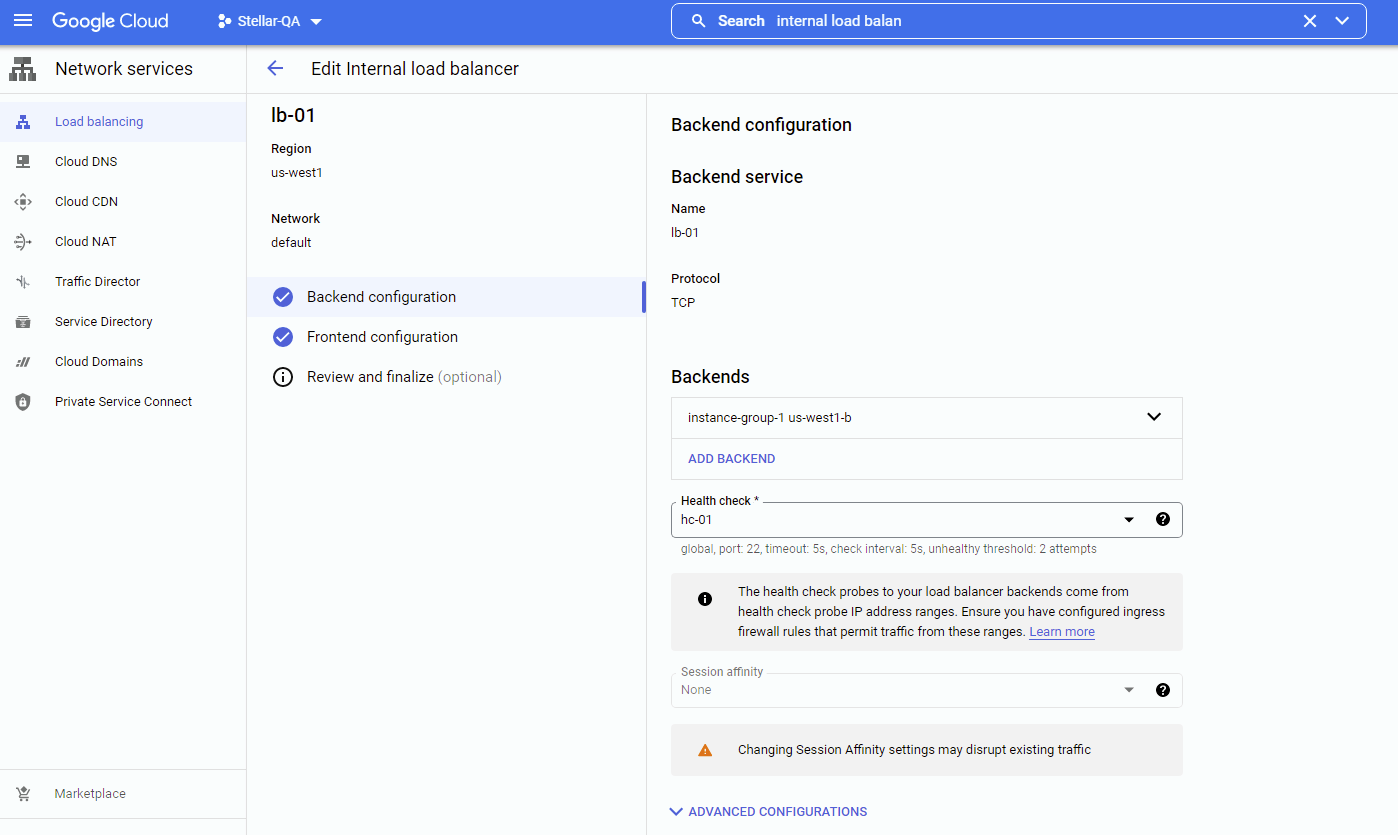
Click the Backend configuration option and set the options provided. Note the following:
-
Select the Network with the monitor port of the destination sensor.
-
With the monitor network selected, we can choose the instance-group-1 instance group we configured in the previous section because it has an interface in that network.
-
You must configure a Health check for the load balancer or you will not be able to save the configuration.
-
Do not enable Session affinity. Backends with Session affinity enabled cannot be used for packet mirroring.
Here are the backend options for our lb-01 load balancer:
Set Frontend Configuration Options
Next, we’ll create a frontend for our internal load balancer.
-
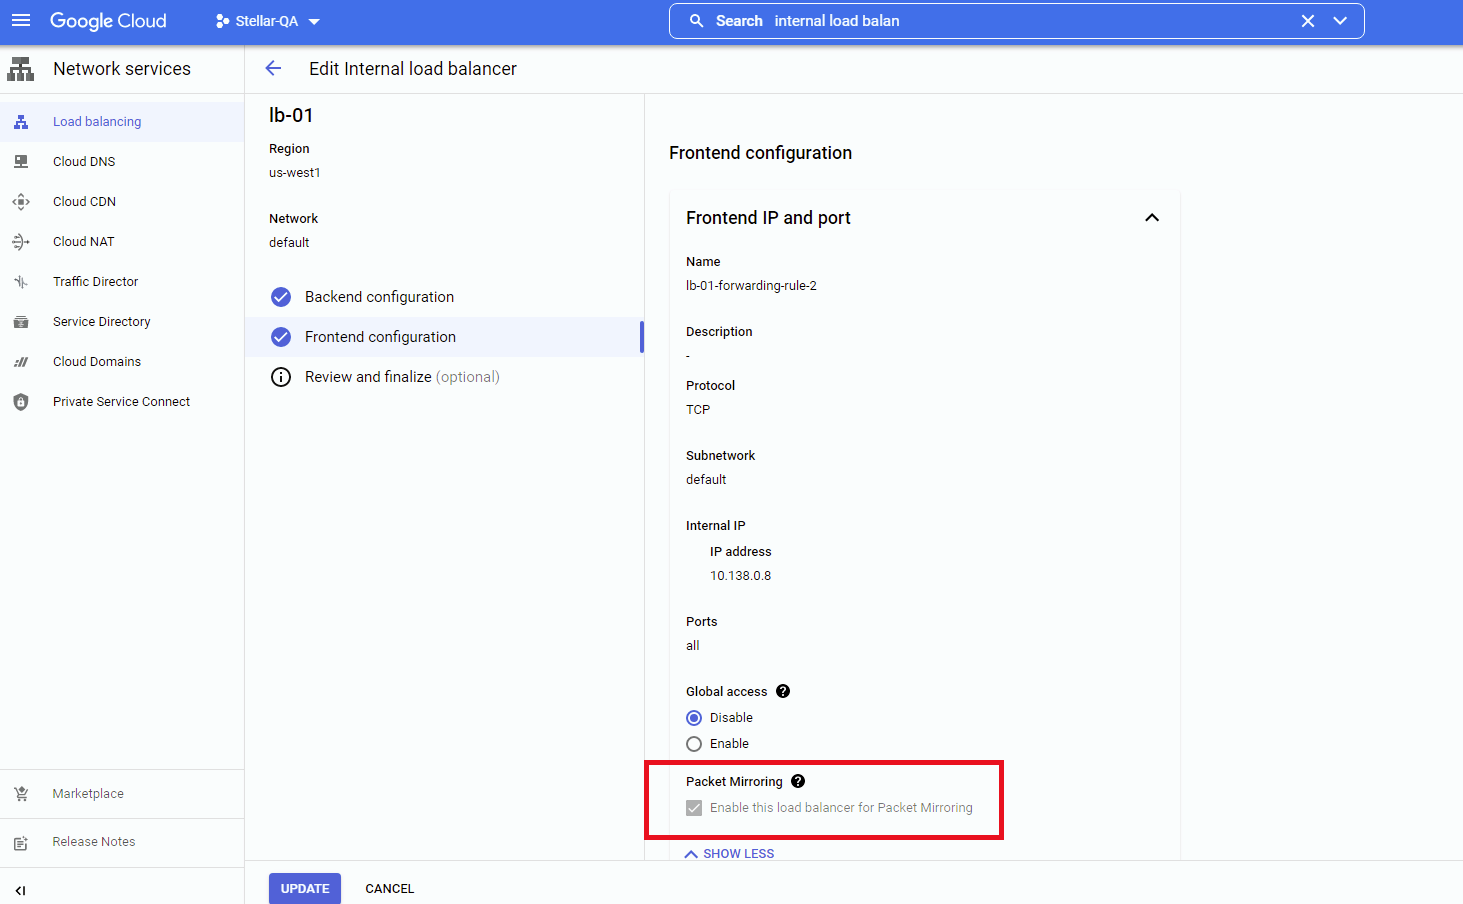
Click the Frontend configuration option, supply a name for the Frontend, and set the options provided. Note the following:
-
The name of this frontend is lb-01-forwarding-rule-2.
-
The frontend is on the same subnet as the destination sensor instance group.
-
You must click the Advanced options entry and check the Enable this load balancer for Packet Mirroring option to use it with a packet mirroring policy, as highlighted in the figure below.
Checking this option also ensures that Session affinity is not enabled in the Backend configuration; the Console won’t let you enable the option if its associated with a Backend that has Session affinity enabled.
When you have finished configuring the Frontend, click Review and finalize to review the load balancer’s configuration, followed by Create to create it.
-
Configure Traffic Mirroring Policy
The final step in configuring packet mirroring is to set up the mirroring policy itself. The policy specifies the following:
-
The source of the packets to be mirrored. In our example, we’ll select a specific instance (ctang-centos-1, an Apache server) to mirror.
-
The destination of the packets to be mirrored. This will be the frontend of the internal load balancer you configured in the previous section.
-
Which packets to mirror. By default, all ingress and egress traffic is mirrored. However, you can set optional filters to limit forwarded traffic.
You configure packet mirroring in the VPC network > Packet mirroring > Create Policy interface in the GCP console:
-
Start by clicking Create Policy and supplying a name (policy-01 in this example) and region for the policy.
-
Leave Policy enforcement set to Enabled if you would like the Packet mirroring session to start right away. This option specifies whether packet mirroring will take place according to the policy definition once it is created.
-
Select the locations of the source and destination for the packet mirror. In this example, both are in the default VPC.
-
Select the source(s) of mirrored traffic. In this example, we are going to Select individual instances to mirror.
-
Click the Select button and choose the instances to mirror. In this example, we are mirroring the ctang-centos-1 Apache server from Packet Mirroring Example.
-
Select the destination for the mirrored traffic. Note that this is the frontend of the internal load balancer we created in the previous section (lb-01-forwarding-rule).
-
Specify which traffic should be mirrored. By default, all traffic is sent. You can use this interface to set optional filters,
-
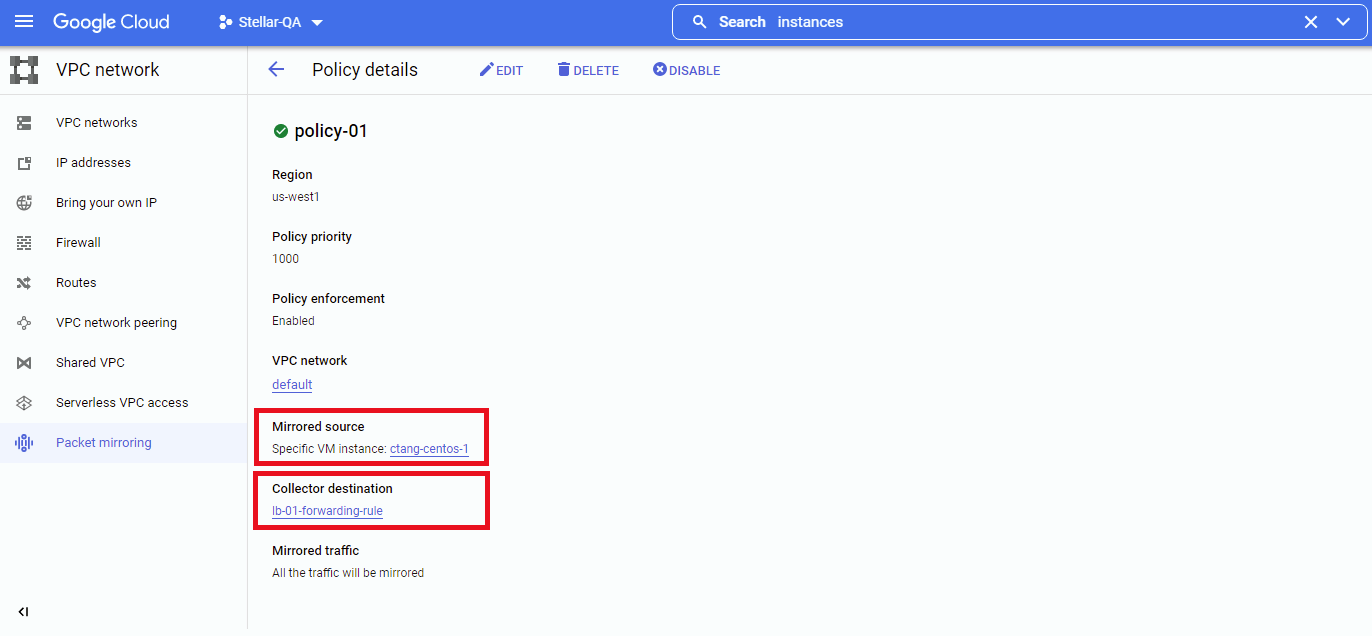
After you click Submit, the new policy appears in the GCP Console’s summary list.
The figure below illustrates the configuration of our packet mirroring policy: