Installing a Photon 100 Sensor
The Photon 100 sensor is a complete, self-contained Modular Sensor that can monitor up to 1 GB of network traffic and send compressed metadata to a designated Data Processor.
This page describes how to set up and configure a Photon 100 sensor, adding it to the network.
Starting with the 4.3.7 release, new physical sensors are shipped as modular sensors on Ubuntu 22.04.
Site Requirements
The Photon 100 requires the following site preparations.
- Either a fixed IP address or access to a DHCP server. For a fixed IP address, the net mask and gateway address are also required. These values will be entered in the configuration steps below.
- If the Photon 100 is going to be assigned to a Tenant, you must first have the Tenant record created and obtain its Tenant ID. You do this in the Tenant Management screen.
- A network tap to provide data to the Photon 100. Most enterprise-class network switches can be configured to mirror all traffic to a given port. After this is done it will be connected to the Photon 100 as described below.
- Open firewall ports for the sensor.
- Open firewall ports for log ingestion.
For help scoping resources for the installation, contact your sales team.
Physical Installation
Place the Photon 100 in a site that has access to power and adequate ventilation. Attach the power supply.
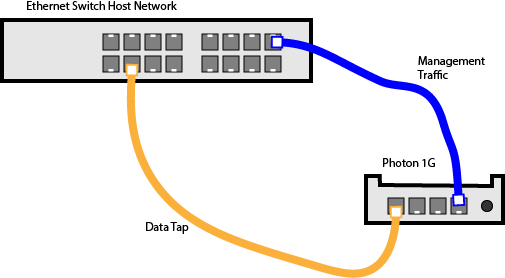
The Photon 100 requires two network connections:
-
The Management port (LAN1) is used to communicate with the Data Processor.
-
At least one of the data ports (LAN2..LAN4) must be connected to a network tap or mirror port. This is where the packets to be observed are sent into the system.
A schematic of these connections is shown in the figure above. The data link is shown in brown and the management link is shown in blue.
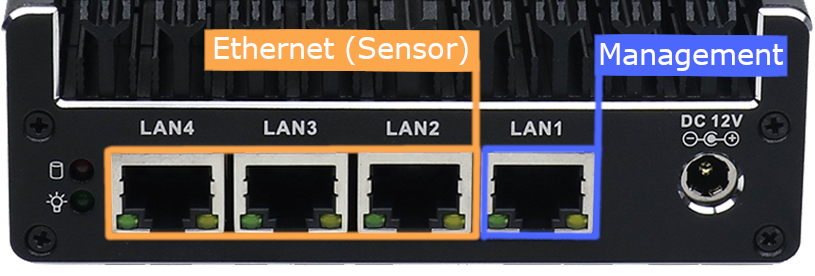
The two images below show the Photon 100 connector arrangement in greater detail. Note that any of the LAN ports 2, 3, or 4 can be used for tapped network data. The LAN port 1 must be used for management.
Applying a Token to the Installed Sensor
The next step is to obtain and apply the token used to authorize and configure the installed sensor.
Obtaining a Token for the Installation
Tokens are required to authorize and configure the installation of a sensor to be used with a SaaS DP. Tokens point the installed sensor to the correct DP, assign the specified tenant, and authorize the sensor installation.
Use the following procedure to obtain a token in the Tokens tab:
-
Navigate to the System | Deployment | Sensor Installation page and click on the Tokens tab.
-
If a token already exists for the target tenant for the sensor installation, you can either use the Copy button to copy it to the clipboard or use the Download button to download it as a file.
-
Copy the token if you plan on applying it by pasting it into a
set token string <token>command in the CLI. -
Download the token as a file if you plan on hosting the file on an HTTP server and referring to it in a
set token url <token url>command.
Refer to Assigning Tokens for a summary of the different ways in which tokens can be applied to a sensor installation.
-
-
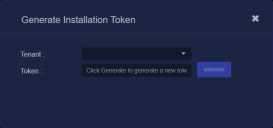
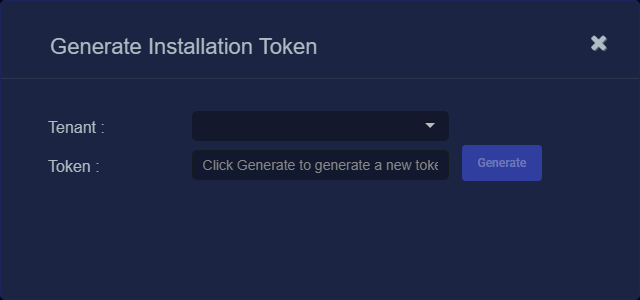
If there is not already an unexpired token for the target tenant, click the Generate button.
The Generate Installation Token dialog appears:
-
Select the tenant for the token from the Tenant dropdown. This is the tenant to which all sensors authorized with this token will be automatically assigned. The dropdown lists all tenants configured for your organization in the System | Tenants page.
-
Click the Generate button.
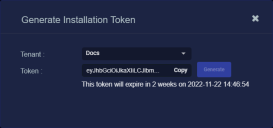
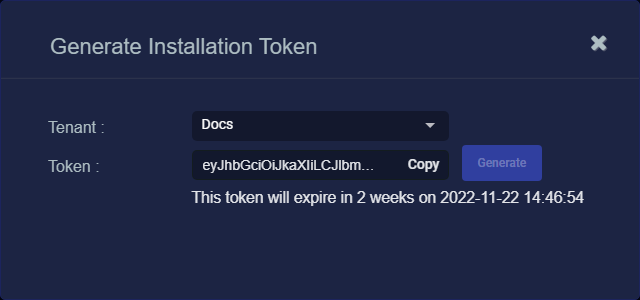
The system generates the token and displays its contents in the Token field. The dialog also updates to display the expiration date for the token, as illustrated below.
-
You can use the Copy button to copy the token to the clipboard immediately, or simply close the dialog and retrieve the token from the Tokens tab later on.
Connect to the Sensor CLI
The next step is to connect to the sensor CLI. You can do this over either of the following types of connections:
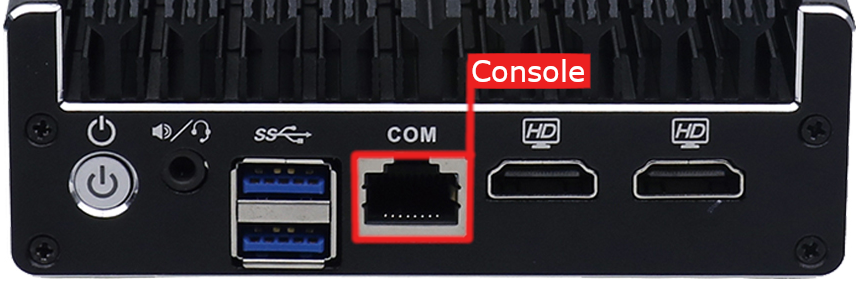
- An HDMI-capable monitor and USB keyboard can be attached to the appropriate connectors on the front panel in the images shown above.
- An RS-232 terminal can be connected to the RJ-45 COM port on the front panel in the images shown above. The RS-232 device must be configured with 9600 BAUD, 8 bits, no parity, and one stop bit.
The instructions below are the same regardless of which type of console you use.
- If the Photon 100 is not already powered on, press the power button on the left side of the front panel. Refer to the image above for the button's location.
- Update the administrator password. The default username and password are aella and changeme. You are prompted to change these when you first log in.
Applying the Token to the Sensor
Tokens are required to complete the installation of a sensor to be used with a SaaS DP.
-
Apply the token to the installed sensor from the sensor CLI with the
set tokencommand. Refer to the table below for a summary of the available techniques:Copy and Paste Token String
Copy the token string from the Tokens tab and paste it into the CLI command. The syntax is as follows:
set token string <pasted string>Host Token on HTTP Server
Download the token as a file from the Tokens tab, upload it to an HTTP server, and reference it in the
set tokencommand. The syntax is as follows:set token url http://<url to token>You can also use an HTTPS server. In that case, the specified URL must also include the username and password for the server using the following syntax:
set token url https://<user:password>@URL> -
The CLI reports that the Sensor token is successfully set.
If you receive an error message instead, it's possible that the token has expired. Refer to the Tokens tab to see the expiration date. If you are using the File technique, it's also possible that an extra space or line may have crept into your text file – check the file to make sure it includes only the token text.
-
Wait a minute or so. Then, verify that the token was successfully applied using any combination of the following techniques:
-
Check the System | Sensors tab in the user interface to see that the sensor has registered itself successfully.
-
Verify that the
show systemcommand shows all services as running. -
Verify that the
show receivercommand displays a receiver. -
Verify that the
show jsoncommand reports some data sent in theBYTE_SENTcolumn.
-
Configuring a Static IP Address (Optional)
By default, the sensor uses DHCP for the management port's IP address. For ease of troubleshooting, however, Stellar Cyber recommends that you reconfigure the management port to use a static IP address. The procedure is as follows:
- Log in to your sensor. The default username/password is aella/changeme, but you changed this when you applied the token in the previous section.
-
You can set IP parameters manually using commands similar to the following (substitute your own IP parameters for the ones shown in bold below):
set interface management ip 192.168.14.100/255.255.255.0
set interface management gateway 192.168.14.1
set interface management dns 8.8.8.8
-
Verify the IP settings with the
show interfacescommand. - Log out with the
quitcommand.
