Configuring Webroot Connectors
This connector allows Stellar Cyber to ingest logs from Webroot and add the records to the data lake.
Connector Overview: Webroot
Capabilities
-
Collect: Yes
-
Respond: No
-
Native Alerts Mapped: No
-
Runs on: DP
-
Interval: Configurable
Collected Data
|
Content Type |
Index |
Locating Records |
|---|---|---|
|
Blocked Urls Blocked Traffic Endpoints Phishing Threat History Traffic Summary |
Syslog |
Domain
|
https://unityapi.webrootcloudav.com |
Response Actions
N/A
Third Party Native Alert Integration Details
N/A
Required Credentials
-
Client ID, Client Secret, Username, Password, Parent Keycode (GSM key)
Let us know if you find the above overview useful.
Adding a Webroot Connector
To add a Webroot connector:
Obtaining Webroot Credentials
Use the following steps as a guide to obtain the credentials required to allow Stellar Cyber to retrieve data with the Webroot API.
-
Access the Webroot Identity Portal (Management Console) as the username and password you will use to configure the Stellar Cyber connector. Make note of the login information for later use.
-
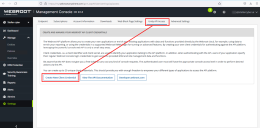
From the left navigation pane, select Settings.
-
When the Settings page displays, select the Unity API Access sub-tab.
-
Click the button to Create New Client Credential.
-
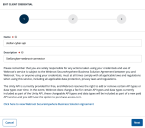
In the dialog that displays, specify a Name and Description for the credential, then click Next.
-
On the next screen, enable the option to use the event notification API, specifying Other use ... for the Purpose. Then click Next.
-
On the final screen, click Save.
-
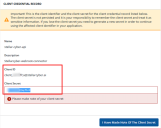
The console displays a dialog with both the Client ID and the Client Secret. Make note of both of these values. The Client Secret cannot be retrieved later, although it can be regenerated.
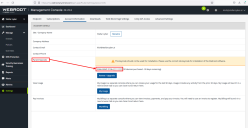
- The final information you need is the Parent Keycode, which you will enter as the GSM Key later. Click the sub-tab for Account Information and record the value for that field.
-
Review your list of information before proceeding. You should now have:
-
Username
-
Password
-
Client ID
-
Client Secret
-
Parent Keycode (GSM key)
-
Adding the Connector in Stellar Cyber
With the access information handy, you can add a Webroot connector in Stellar Cyber:
-
Log in to Stellar Cyber.
-
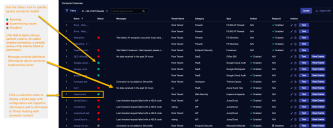
Click System | Integration | Connectors. The Connector Overview appears.
-
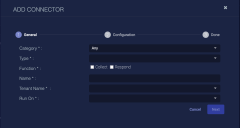
Click Create. The General tab of the Add Connector screen appears. The information on this tab cannot be changed after you add the connector.
The asterisk (*) indicates a required field.
-
Choose Endpoint Security from the Category drop-down.
-
Choose Webroot from the Type drop-down.
-
For this connector, the supported Function is Collect, which is enabled already.
-
Enter a Name.
This field does not accept multibyte characters.
-
Choose a Tenant Name. This identifies which tenant is allowed to use the connector.
-
Choose the device on which to run the connector.
-
(Optional) When the Function is Collect, you can create Log Filters. For information, see Managing Log Filters.

-
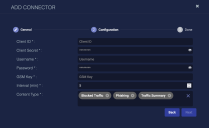
Click Next. The Configuration tab appears.
The asterisk (*) indicates a required field.
-
Enter the following information you noted from the previous section:
-
Enter the Client ID.
-
Enter the Client Secret.
-
Enter the Username and Password.
-
Enter the GSM Key (Parent Keycode).
-
-
Choose the Interval (min). This is how often the logs are collected.
-
Chose the Content Type. The following are available:
-
Blocked Urls
-
Blocked Traffic
-
Endpoints
-
Phishing
-
Threat History
-
Traffic Summary
-
-
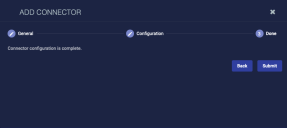
Click Next. The final confirmation tab appears.
-
Click Submit.
To pull data, a connector must be added to a Data Analyzer profile if it is running on the Data Processor.
The new connector is immediately active.
Testing the Connector
When you add (or edit) a connector, we recommend that you run a test to validate the connectivity parameters you entered. (The test validates only the authentication / connectivity; it does not validate data flow).
For connectors running on a sensor, Stellar Cyber recommends that you allow 30-60 seconds for new or modified configuration details to be propagated to the sensor before performing a test.
-
Click System | Integrations | Connectors. The Connector Overview appears.
-
Locate the connector that you added, or modified, or that you want to test.
-
Click Test at the right side of that row. The test runs immediately.
Note that you may run only one test at a time.
Stellar Cyber conducts a basic connectivity test for the connector and reports a success or failure result. A successful test indicates that you entered all of the connector information correctly.
To aid troubleshooting your connector, the dialog remains open until you explicitly close it by using the X button. If the test fails, you can select the button from the same row to review and correct issues.
The connector status is updated every five (5) minutes. A successful test clears the connector status, but if issues persist, the status reverts to failed after a minute.
Repeat the test as needed.
Resolving Error Messages for Webroot Connectors
In certain situations, the initial Test for a Webroot connector may report success but then subsequently display an error message in the Messages column of the System | Connectors page. Use the following information to resolve common error messages for Webroot connectors:
-
WSAT is not enabled for this site"{"statusCode":400,"requestId":"c60683f4-09a7-48c2-ae48-c8df21e8bb90","error":"wsat_not_enabled","error_description":"WSAT is not enabled for this site.","AdditionalInformation":{}}"This error message appears when the Security Awareness Training feature in Webroot is either not enabled or its subscription has expired. Try the following in Webroot:
-
Make sure that WSAT is enabled in Security Awareness Training | Settings | Enable Security Awareness Training.
-
Make sure the Security Awareness subscription has not expired.
-
-
DNSP is not enabled for this site{"statusCode":400,"requestId":"0e12a84d-1123-4c87-937b-a6469ee52b3c","error":"dnsp_not_enabled","error_description":"DNSP is not enabled for this site.","AdditionalInformation":{}}This error message appears when the DNS Protection feature in Webroot is either not enabled or its subscription has expired. Try the following in Webroot:
-
Make sure that the DNS Protection subscription in Webroot is not expired.
-
Make sure that the DNS Protection feature is set to On in Webroot.
-
Verifying Ingestion
To verify ingestion:
- Click Investigate | Threat Hunting. The Interflow Search tab appears.
- Change the Indices to Syslog. The table immediately updates to show ingested Interflow records.
