Working with Cases 
The Cases view lets you manage cases generated by Stellar Cyber. A case is a set of multiple correlated alerts and entities constituting a potential unified security attack, ranked by a dynamically updated score indicating the severity of the attack. Stellar Cyber uses its machine-learning capabilities to generate cases automatically, grouping related alerts into a unified case for improved attack resolution. In addition, you can also create your own cases from any table that includes alerts (for example, Investigate | Threat Hunting or Visualize | Predefined | Analyst View).
Cases offer the following benefits:
-
Streamlined workflows matching standard security analyst procedures.
-
Enact case-specific responses recommended by Stellar Cyber (for example, blocking an IP address) directly within the Case interface.
-
Evidence Locker lets you store emails, PDFs, CSV files, and links to bolster your case.
-
Full export capabilities let you share cases with executive staff.
-
Case Activity log tracks all events related to a case, providing a detailed audit trail.
Cases evolve in real time as new alerts are discovered and associated with an attack, either automatically by machine learning or manually by a user. You can use Cases as part of your standard SOC workflows to direct a proactive response to ongoing security issues, ensuring they are assessed, assigned, tracked, and resolved.
Refer to Understanding Cases for a detailed discussion of how cases are created and correlated.
Once a case's status has been changed to either Resolved or Cancelled, Stellar Cyber no longer associates new alerts with it. Instead, new alerts are either used to create a new case or associated with a different open case.
Cases vs. Incidents
Previous releases of Stellar Cyber referred to cases as incidents. The transition to cases improves their usability and accompanies other changes to both their presentation in the user interface and the underlying architecture.
Case Table
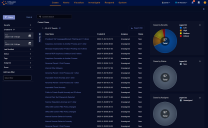
Cases are initially shown in a sortable table with customizable columns. You can click any case to drill to its detail page. You can also use the filters at the left of the page to focus your work on cases that meet specified criteria.
The tabular view lists each case on its own row with the following default columns:
-
Case Name – Stellar Cyber automatically assigns a name to each case it reports. You can either accept the default name or supply your own in the Case Detail view.
-
Score – Stellar Cyber assigns scores to cases based on how critical they are. A case's score updates in real time as events and entities are added to or removed from the case. Scores are color-coded to indicate the seriousness of the case.
-
Severity– The severity of the case (Critical, High, Medium, or Low). Severity automatically changes with a case's score until it is changed manually in the Case Detail view. Once you manually edit a case's severity, it no longer updates automatically based on the case's score. Severity indicators are color-coded to direct your attention to more serious cases.
-
Creator – The user account that created the case. Cases created by Stellar Cyber are listed with a creator of System.
-
What – The Tactic or Technique for the alert with the highest severity associated with this case.
-
Who – The user(s) and/or host(s) associated with the case. You can find details on the observables for the case in the Case Detail page's Analysis tab.
Working with the Case Table
The Case Table supports standard Stellar Cyber table functionality. You can change the columns in the Case Table:
-
Click the vertical Columns button at the left of the table to toggle open a panel where you can choose the columns to display.
You can add any of the following additional columns:
-
Alerts – A count of the alerts associated with the case.
A case can have a maximum of 5,000 associated alerts.
-
Assignee – The assignee for the case, if any. Cases can be assigned to resources in the Case Detail view.
-
Closed At – The time at which the case was closed. Cases are closed when their status is set to either Resolved or Cancelled.
-
Created At – The time at which the case was created.
-
Last Modified – The last time the case was modified.
-
Modified By – The user account that last modified the case.
-
Status – The status associated with this case. Can be either New, In Progress, Resolved, Cancelled, or Escalated. You can change a case's status in the Case Detail view, giving you a handy way to track your team's response to a case over time.
-
Tags – The tags assigned to the case, if any. You can assign tags to a case in the Case Detail view.
-
Tenant – The tenant with which this case is associated.
-
Ticket ID – The system-assigned ticket number for the case.
Not All Columns Supported for Sorting
-
Assignee
-
Tenant
-
Creator
-
Modified By
-
Tags
-
Who
-
What
Using Case Filters
The Cases page provides a Filters panel that lets you focus the display on just those cases matching the criteria you supply. By default, you can filter the Cases page by Score, Severity, Assignee, Created At date, Last Modified date, Status, or Tags. You can also use the Add new filter feature to add filters based on Case Name, Creator, Alerts, Closed At, Modified By, Tenant, or Ticket ID (the same criteria available as columns for the Case table).
The Filters panel indicates which filters are currently applied with a special  icon in the entry for each filter type. For example, in the figure above, we can see that there is currently a Created At filter applied. Similarly, when the Filters panel is cascaded closed, its entry updates to show the total filters applied, as in the example below.
Use Case filters as follows:
-
Score – Use the slider bar to specify the range of case scores from 0-100 to display.
-
Severity– Check the boxes for the case priorities to display (Critical, High, Medium, and/or Low).
-
Assignee – Start typing in the Search field to see a list of matching user accounts that can be selected as a filter or choose one of the listed users. Users only appear for selection if they have the Edit Cases privilege assigned in Role-Based Access Control and belong to the logged-in tenant. You can select multiple users for the filter.
-
Created At– Use the date controls to specify a range for the creation dates of the cases to display.
-
Last Modified – Use the date controls to specify a range for the modification dates of the cases to display.
The dates you specify for both the Created and Last Modified filters are specified in terms of the browser's local time zone.
-
Status – Check the boxes for the case statuses to display (Escalated, New, In Progress, Resolved, and/or Cancelled).
-
Tags – Start typing in the Search field to see a list of matching tags that can be selected as a filter or choose one of the listed tags. You can select multiple tags for the filter.
The figure below shows the Case Filters panel with all default filter criteria cascaded open:
Searching the Case Table
The Case table includes a Search tool at the top of the display that lets you perform a text-based search using Lucene syntax for a specified value. Keep in mind the following when searching Cases:
-
The data returned by the search is limited to just those entries that pass the current Case filters.
-
The search is performed across all available pages of cases, not just the currently displayed page. For example, if there are three pages of 20 cases available in the Case table, matches can be found on any of the three available pages, regardless of the sort order.
Not All Fields Supported for Searching
-
Assignee
-
Tenant
-
Creator
-
Modified By
-
Who
-
What
Using the Case Table Charts
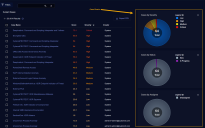
High-level charts at the far right of the Case table let you see at a glance the following information:
-
Cases by Severity
-
Cases by Status
-
Cases by Assignee
All charts can be viewed in either donut or pie mode and are color-coded using the supplied legend, as illustrated below:
Keep in mind that charts only display data for those cases passing the current Case filters. So, for example, if you set a Case filter that limits the display to just those cases with a Severity of High, similarly, the Cases by Severity chart will only show cases with a Severity of High.
Standard Case Table Functionality
The Case table offers standard table functionality, including the ability to sort on a column, pin columns, autosize columns, reset column sizes, Export as CSV, or Change Columns.
Setting the Minimum Case Score and Number of Alerts
Users with a User Scope of root and RBAC privileges to change user interface settings can click the Settings  button at the upper right of the Case table to specify the minimum number of alerts and case score for system-generated cases to be displayed.
Note that these settings only apply to system-generated cases. They do not apply to cases created by users.
Default/Minimum/Maximum Settings
The default, minimum, and maximum settings are as follows:
-
Minimum Number of Alerts – Default value of two, minimum value of one, no maximum.
-
Minimum Case Score – Default value of one, minimum value of zero, maximum of 100.
This means that with the default settings, a system-generated case must have at least two associated alerts and a minimum score of one to be displayed.
System-Wide Policy
The settings made with these options form a system-wide policy for Stellar Cyber and affect the display of cases in both the XDR Kill Chain Dashboard and all cases displays.
Ensuring All Alerts Appear in Case Displays
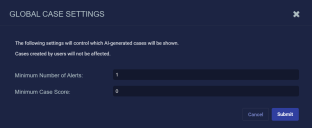
Depending on your environment, you may want to ensure that all alerts appear in cases. Set the options in the Global Case Settings dialog box as follows to ensure that all alerts appear in case displays:
- Minimum Number of Alerts – 1
-
Minimum Case Score – 0
The image below illustrates these settings.
Drilling to the Case Detail Page
You can click on a case's entry in the Case table to drill to the Case Detail view for the corresponding incident.
Displaying Cases from Event Details
In addition to accessing the Case table from the Cases menu, you can also display a filtered Case table from the Cases list in an alert's Event Details view.
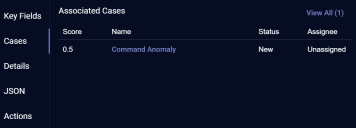
The Cases list shows cases associated with the selected alert in descending order by score, up to a maximum of five. You can click the View All (x) link at the upper right of the list to open a new tab with a filtered view of the Case summary page showing just those cases associated with the selected alert. You can also click an individual case's entry in the list to open its associated Case details page. The figure below shows the Cases list for a sample alert's Event Details view:
About Case Data Retention
To control the number of stored cases and improve the overall performance of case queries, Stellar Cyber stores a case for a maximum of one year from the time of its last update.


