Configuring Rippling SSO
You can configure Stellar Cyber to use Rippling single sign-on (SSO) for user authentication. In Security Assertion Markup Language (SAML) terminology, Stellar Cyber then becomes the Service Provider (SP) and Rippling becomes the Identity Provider (IdP) for Stellar Cyber admin user authentication.
Adding Stellar Cyber as a New Application in Rippling
Add Stellar Cyber as a new application in Rippling.
Create Custom Fields and Edit Users
-
Log in to Rippling as a user with super admin or full admin permissions, or as an administrator with permission to manage a Rippling or third-party application.
-
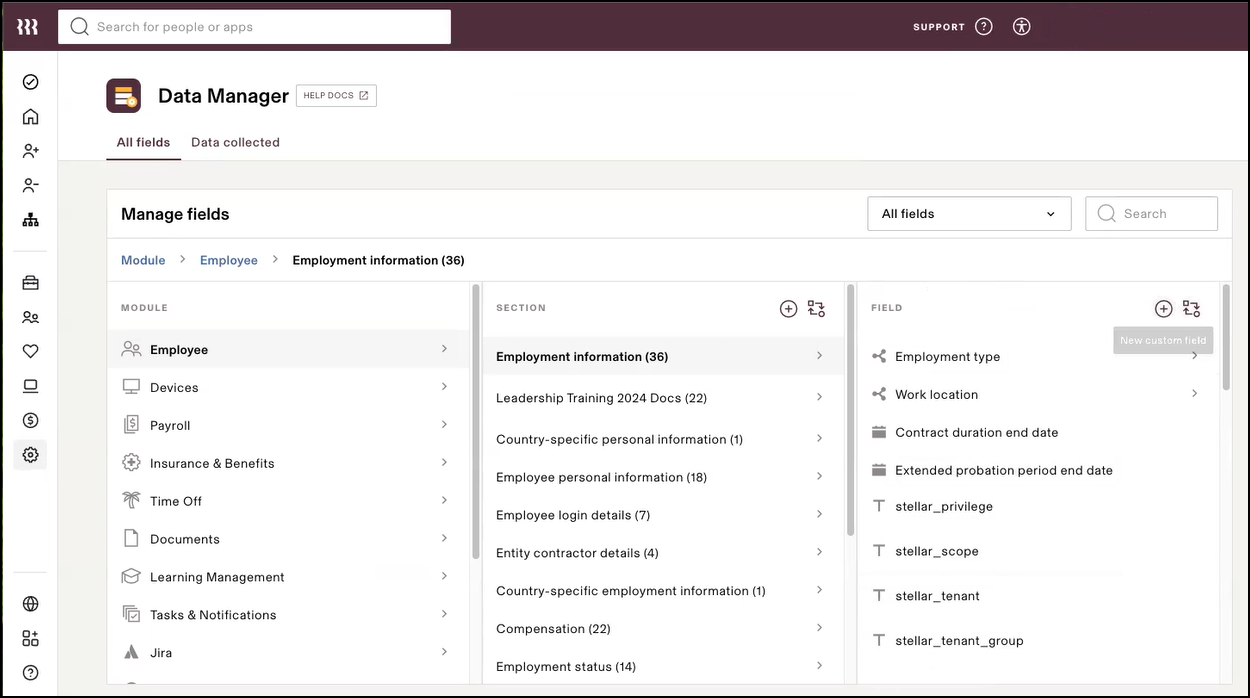
Select Settings | Data Manager | Employee | Employment Information and then select the New custom field icon ( + ) at the top of the Field panel.
-
Select Start from scratch and create the following custom fields as explained in Collect a custom field from new hires when they onboard to Rippling.
You must be logged in to a Rippling account to view the knowledge base article.
Custom Field Name
Default Value
Values Required stellar_scoperoot rootpartnertenantYes stellar_privilegePlatform Admin super_adminplatform_adminsecurity_adminuserYes
stellar_tenant(none) (can be empty) Yes
stellar_tenant_group(none) (can be empty) Yes
-
Select the People icon in the left navigation panel to access the list of employees and select the name of a user account for someone who will be a Stellar Cyber administrative user.
This opens the user's account settings.
-
Select Custom Fields | Edit and add the custom fields you just created, choosing the appropriate scope and privilege level for the user.
-
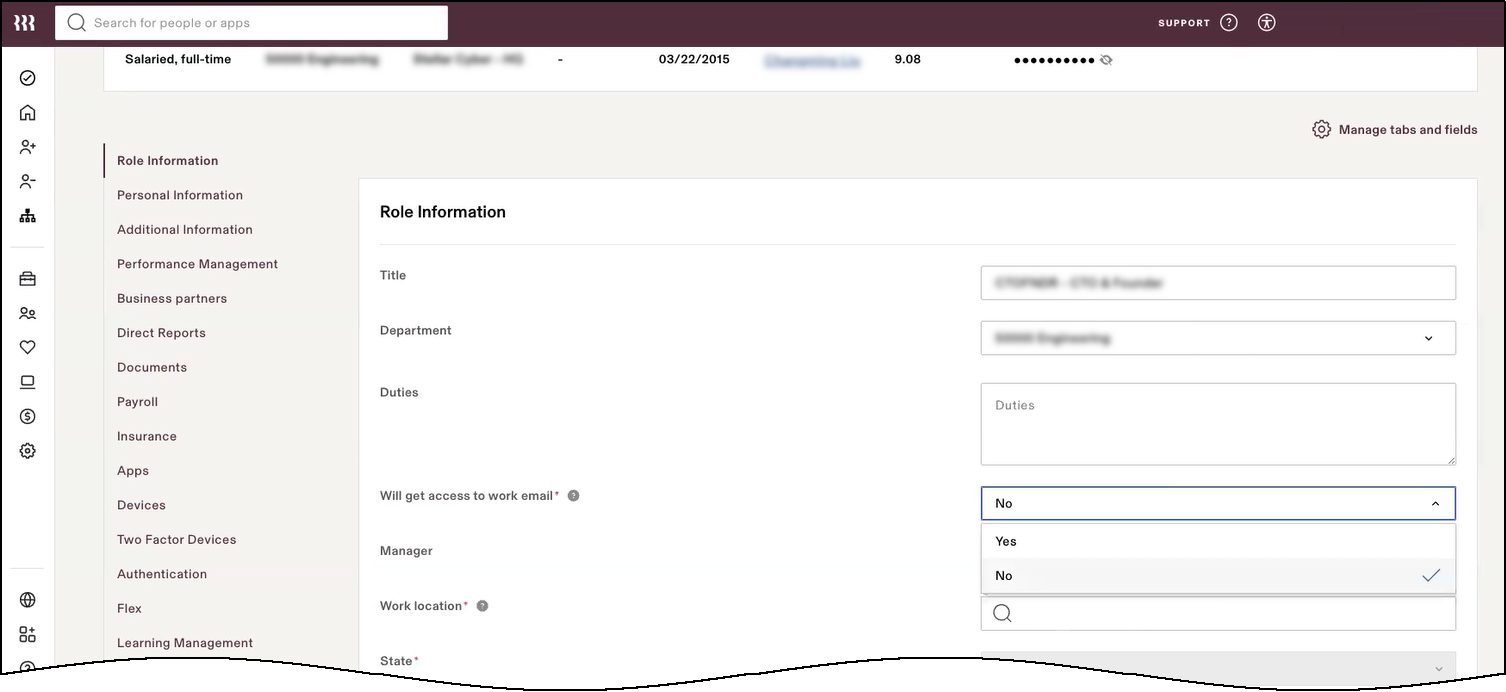
Select Role Information | Edit, and set Will get access to work email as Yes.
-
Save your edits.
-
Repeat the previous steps for all users who need to log in to Stellar Cyber.
Create a Custom Application for Stellar Cyber
-
Select IT Management (icon) | Custom App | Create new Custom app.
-
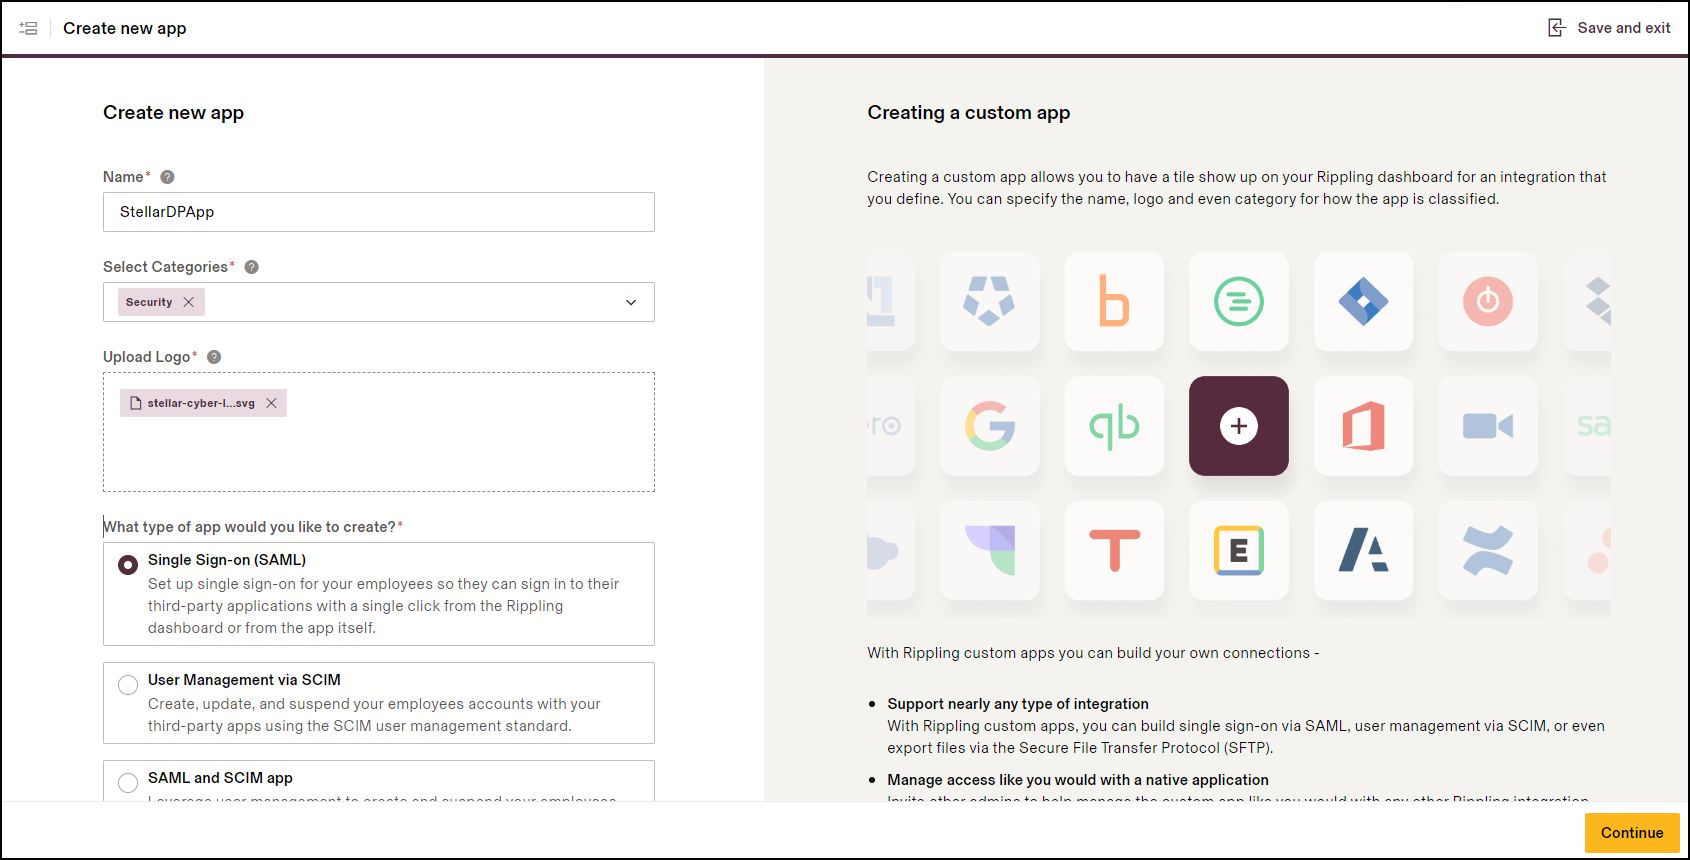
On the Create new app page, enter the following and then select Continue:
Name: Enter a name such as StellarDPApp.
Select Categories: Security
Upload Logo: (Select an image of the Stellar Cyber logo, which you can download from the Stellar Cyber Media Kit.)
What type of app would you like to create?: Single Sign-on (SAML)
-
On Select Installer, select I’m the
<application_name>admin, I’ll install it and then select Continue.
Set up SSO for Stellar Cyber through Rippling
-
On the Create new app page, enter the following and then select Continue:
Single Sign-on URLor Target URL
Issuer or IdP Entity ID
X509 Certificate
IdP Metadata URL (only if using the Metadata URL configuration in Stellar Cyber)
-
Enter the following URL so that Rippling can submit SAML assertions (SAML messages) when using the Manual Config option in Stellar Cyber:
Assertion Consumer Service URL: https://
<your-domain-name>/saml/login/callback -
Enter the following URL so that Rippling can uniquely identify Stellar Cyber account when using the Manual Config option in Stellar Cyber:
Service Provider Entity ID: https://
<your-domain-name>/saml/login/callback -
Select Move to Next Step.
-
On SSO App Access Rules, set up a rule to determine who will get SSO access—for example, Set up rules for which new hires or transitions should have an account—and then select Create custom policy.
-
Under “Which departments should get access to
<application_name>?”, select Only departments I specify, choose one or more departments, and then select Save changes. -
On SSO Provision Time, define when to start applying the SSO app access rules by selecting As soon as they’ve signed their offer letter or agreement and then Continue.
-
On SSO for admin, let anyone with a full admin account in Rippling sign in to the
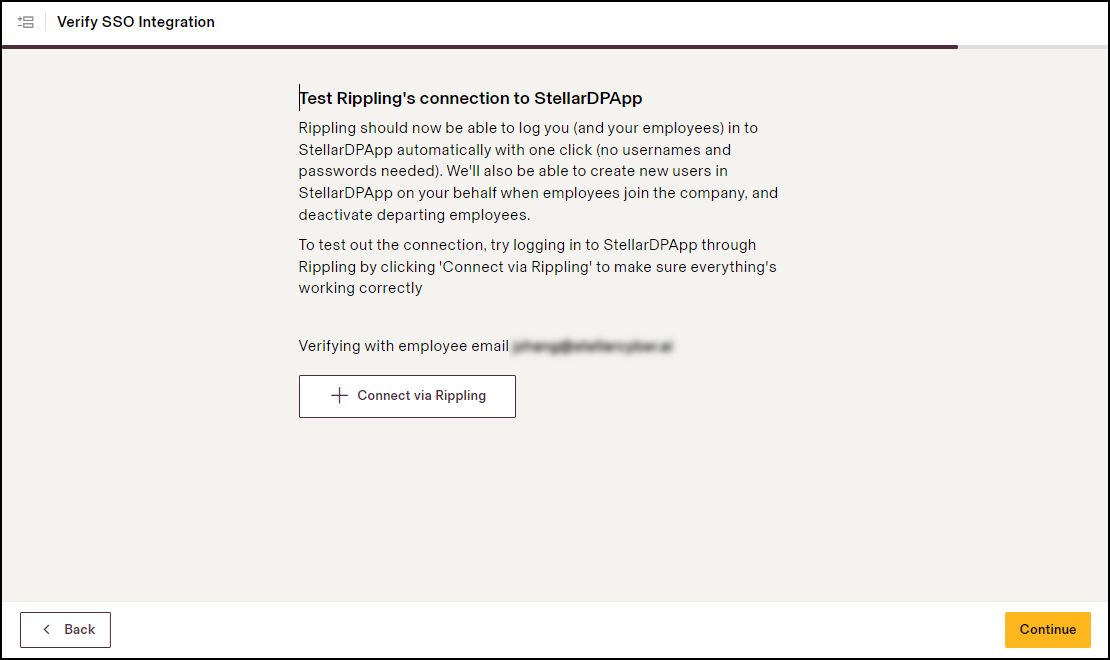
<application_name>admin account by selecting Let Stellar Cyber, Inc. admins sign in to<application_name>admin account and then selecting Continue.The next step in the SSO setup is Verify SSO Integration. However, before doing this, you must first configure SSO authentication with Rippling in Stellar Cyber. Either keep Rippling open to the Verify SSO Integration page or log back in and return to it after setting up SSO with Rippling on Stellar Cyber.
Configuring SSO Authentication in Stellar Cyber
With all your details collected, you are now ready to configure SSO Authentication in Stellar Cyber. The steps below are generally applicable for a global or per-tenant configuration.
Prepare for Users
-
For Authentication Only SSO: First, manually add all users on the Stellar Cyber platform. After this manual entry, users can log in with SSO.
-
For Authentication and Authorization SSO: Configure all users through the IdP.
You enable SSO for all users except the root admin user. The root admin user must always use local authentication (
https://<stellar_cyber_platform_ip-address>/login). -
For Local access (bypass) when SSO is enabled: If Stellar Cyber loses connectivity with your IdP, users configured for SSO cannot log in. As a preventive bypass method, manually create a new user on the Stellar Cyber platform with root scope and with a valid email address that has "+admin" appended to a valid user name, as follows:
<user>+admin@yourorganization.com(joe+admin@yourorganization.com).The user you create must be able to receive a password reset email at
<user>@yourorganization.com. This process involves an email alias that Stellar Cyber uses to permit the bypass of an SSO for local login. After you create this separate manual user account, that user can log in two ways:-
an SSO user with
<user>@yourorganization.com -
a local user at
https://<stellar_cyber_platform_ip-address>/loginusing<user>+admin@yourorganization.com
or
-
If SSO is configured, it’s recommended to keep an active administrative account in Stellar Cyber user management.
Enable SSO
-
Log in to Stellar Cyber with super user privileges and a root user scope.
-
Select System | Settings.
-
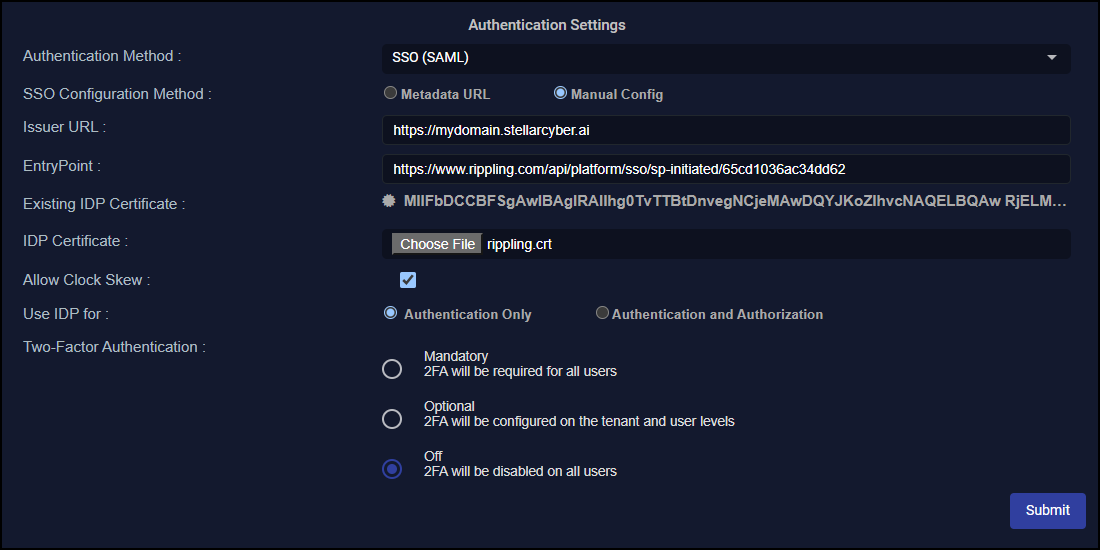
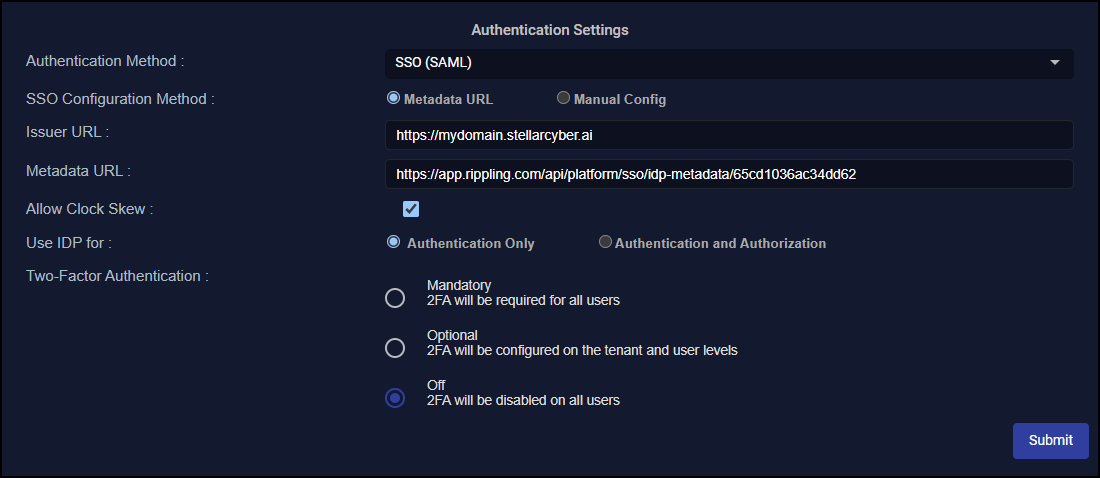
For Authentication Settings, choose SSO (SAML) in the Authentication Method drop-down.
-
Choose Metadata URL or Manual Config:
If you choose Manual Config:
-
Enter the Issuer URL. This is your Stellar Cyber IP address or FQDN. You must include
http://orhttps://in the Issuer URL field. -
Enter the Entry Point. This is the Single Sign-on URL or Target URL you noted during your IdP setup.
-
Upload the IDP Certificate. This is the X509 Certificate you obtained during your IdP setup.
-
-
Select Allow Clock Skew to allow for system time differences between Stellar Cyber and your IdP. Authentication messages have an expiration. If the system times on Stellar Cyber and your IdP are not synchronized, the messages might expire before they even get to Stellar Cyber. The result is that users cannot log in because they cannot authenticate.
-
Choose your IdP setting: Authentication Only or Authentication and Authorization. (This is for global configurations only and isn’t applicable to a tenant-specific configuration). Note the following:
-
A global selection of Authentication and Authorization applies to all users, so the option to change authentication method for a specific tenant is not applicable when the global method is set to Authentication and Authorization. Users cannot log in to a tenant SSO when the global SSO is set to Authentication and Authorization. If you want to use SSO but also allow local users and tenant override, you must set the global authentication method either to Local or to use the IdP with Authentication Only.
-
Although you can customize SSO configuration on a per-tenant basis, the Authorization capability is only supported at the global level. Overrides you make at the tenant level are for Authentication only, so the toggle for Authentication and Authorization is not offered in the tenant editor.
-
The root tenant must be configured to use either Default (the same method as the global authentication) or Local. It is not supported for configuration with an independent SSO.
- Choose Authentication Only forStellar Cyber to authenticate users from your IdP, but manage scope and privilege locally. If you choose this, you must create users in Stellar Cyber before adding them to your IdP.
-
Choose Authentication and Authorization for Stellar Cyber to authenticate users from your IdP, along with their scope and level of privilege. You must configure authorization on your IdP before enabling this, otherwise users cannot log in. If you choose this, you do not need to create users manually in Stellar Cyber. Stellar Cyber creates users automatically and assigns scope and privilege based on the information passed from the IdP.
- When Global Settings is configured for Authentication and Authorization, the option to create new users manually is hidden because new users must come from the IdP source.
-
-
If multi-factor authentication (MFA) is not required for users in Rippling, set Two-Factor Authentication as Off. If MFA is required, set Two-Factor Authentication as On and choose the option that matches your IdP configuration:
Off: If you choose this option, Stellar Cyberuser accounts are not offered a 2FA option.
Mandatory: If you choose this option, all users for every tenant are required to use 2FA when logging in to Stellar Cyber.
Optional: If you choose this option:
The 2FA option can be customized for individual tenants under System | Tenants.
Individual users can choose to enable 2FA under their User Profile, accessed from the top menu of the Stellar Cyber interface.
You can enforce 2FA for specific users under System | Users when adding or editing a user.
The overall Global Settings for 2FA affect authentication for partners and tenant users. For example, if 2FA is Mandatory, all users must use 2FA.
Enabling 2FA here is independent of what you have configured on your SSO service. Enabling it here causes a separate 2FA prompt to be displayed upon logging in to Stellar Cyber.
The 2FA page from Stellar Cyber refers to use of Google Authenticator, but other authenticator applications also work.
-
Review your settings and then Submit.
If you selected Metadata URL enter the Issuer URL and Metadata URL from your IdP provider.
Testing SSO Integration
To test the setup with your email address, return to the Verify SSO Integration in Rippling and do the following:
-
On the Verify SSO Integration page, click + Connect via Rippling and confirm that you were able to connect.
-
Select IT Management | Custom App | Manage Custom Apps and check that the Status for your Stellar Cyber application is Active.
- Select HR Management | People, open one of the users, and select Role Information for this user.
- Make sure that Will get access to work email is Yes for this user and for all users who must use Rippling SSO to log in to Stellar Cyber.
- Select Custom fields and check that stellar_privilege is Platform Admin and stellar_scope is root (or one of the other values set in the custom fields) for this user and all users who must use Rippling SSO to log in to Stellar Cyber.
- For users who need administrative access to Stellar Cyber, select IT Management | Identity Management | Custom App | Manage Custom Apps | Visit App (for <application-name>) | Overview, and in the Employee Access table, select Grant Access.
