Forwarding Malware to an External HTTPS Server
When the malware sandbox feature is enabled, Stellar Cyber Security and Modular sensors identify, extract, and reconstruct malware traveling through the network using HTTP, FTP, SMB, and SMTP. By design, Stellar Cyber sensors do not store reconstructed malware. However, if your forensic needs require you to store such files, you can use the sensor CLI to configure HTTPS forwarding to send them to an external server for storage.
Please use this feature carefully – reconstructed files still have the possibility of being malicious.
The file transfer feature requires HTTPS and relies on the CA certificate uploaded to the DP in System | Certificates and assigned to the sensor using the Apply CA Certificate button in System | Sensors.
About Malware Forwarding
When malware forwarding is enabled in the sensor CLI, the sensor forwards files identified as malicious (files with score greater than zero) to the HTTPS target specified using the set malware_upload commands. Note the following:
-
Only files extracted by the sensor from network traffic are forwarded to the external HTTPS target. File that are manually uploaded using the Upload File button in the Malware Sandbox dashboard are not forwarded.
-
Uploaded files are named using the sha256 checksum for the detected file. This has the following benefits:
-
Prevents different files with the same detected filename from being overwritten on the target.
-
Prevents otherwise identical files with different detected filenames from taking up disk space on the target.
-
Allows easy searching for additional metadata on the file (source, target, protocol, score, and so on) by searching the sha256 column for the value matching the filename.
-
-
Files for upload are stored in a directory on the sensor and removed once successfully forwarded. Failed uploads are retried for two hours before being removed from the sensor directory. The sensor directory holds a maximum of 1000 files; newly arriving malware files are discarded when the maximum is reached.
Requirements for Receiving Uploaded Malware Files
The server receiving uploaded malware from Stellar Cyber sensors must meet the following requirements:
-
Accept multipart/form-data.
-
Respond to uploads using standard HTTP status codes:
-
2xx – success
-
All other status codes indicate failure
-
CLI Commands for Malware Forwarding
This section describes the CLI commands used to manage the forwarding of malware from a sensor to an external HTTPS server. The commands are summarized in the table below. Use the links in the table to see details on each command:
|
Command |
Summary |
|---|---|
set malware_upload
|
Use this command to configure and enable the malware forwarding feature. |
unset malware_upload
|
Use this command to clear all malware upload configuration settings and reset them to their default values (disabled). |
show malware_upload
|
Use this command to perform any of the following tasks depending on the arguments specified:
|
Keep in mind the following rules when using the malware_upload CLI:
-
The CLI uses the space character as the delimiter. Values including spaces are not supported.
-
The CLI only accepts ASCII values.
set malware_upload
You use the set malware_upload command to configure and enable forwarding of malware to an external HTTPS server. In general, you only need to specify the url for the external HTTPS target and set enabled to true to enable forwarding. The full syntax is as follows:
|
Command |
Argument |
Description |
|---|---|---|
set malware_upload
|
account
|
If the server specified as the target for the malware upload uses only basic authentication, you use the |
enabled <True | False>
|
Use this feature to toggle the malware_upload feature between Note: Make sure you use the |
|
http_form_file
|
By default, the file is uploaded using a field name of |
|
|
|
|
You can use this argument to specify additional key/value pairs to be uploaded with the malware. You can include multiple key/value pairs separated by spaces. For example, if the destination uses token-based authentication and expects a secret token to be supplied in a form field named
You can remove a key by supplying the key portion of the pair with no value. For example, to remove the token key we just specified, we can use the following command:
Note: If a value is specified, it is saved in lowercase. |
|
|
|
You can use this argument to include additional information in the HTTPS request header used for the malware upload, depending on the target server's needs. For example, your server may require a token, user name, or an upload path. You can use this argument to ensure that the HTTP header includes the necessary information for a successful upload. Note: If a value is specified, it is saved in lowercase. |
|
|
|
If you elect to use basic authentication for the malware upload feature's HTTPS post, you use the |
|
|
|
Specify the URL of the HTTTP server where the malware will be uploaded. Make sure the URL represents a valid HTTPS target. For example:
Note: The |
unset malware_upload
You use the unset malware_upload command to clear all malware upload configuration settings on the sensor, regardless of whether the sandbox is running. Note the following:
-
The change takes effect in real time without restarting the maltrace service.
-
Malware upload statistics are not reset and can still be seen using the
show malware_uploadcommands. -
Malware staged for upload is removed from the queue.
show malware_upload
The show malware upload command includes arguments that let you see the feature's settings or its current status, as well as perform a test upload to verify settings. The full syntax is as follows:
|
Command |
Argument |
Description |
|---|---|---|
show malware_upload
|
config
|
You can use this argument to see the current configuration of the malware_upload feature. Note that the settings for the |
status
|
You can use this argument to see the running status for the malware_upload feature. The output includes the following:
|
|
test [filesize [fileName]]
|
You can use this argument to upload a test file to the configured HTTPS server. Optional arguments let you specify the filename and file size on the target server. If you do not specify the file size or name, the defaults are 8192 bytes with a filename of sample-file. Note the following:
The following example shows a failed test with the file name and size specified:
The following example shows a successful test using the default file name (
|
show maltrace
In addition to the show malware_upload commands, the existing show maltrace command has also been updated to include running statistics on the malware_upload feature.
Example: Configuring the Malware Upload Feature
The following example demonstrates how to configure the malware upload feature using a simple HTTPS server with the following configuration:
-
Upload directory at
/opt/upload/malwares. -
Certificate named
mu.crt.
As part of the example, we'll observe some simple configuration errors and fix them as we go.
-
Let's start by seeing whether the malware upload feature is already configured:
DataSensor> show malware_upload config
malware_upload is not configured.
-
To configure the feature, we'll specify the URL for the upload:
DataSensor> set malware_upload url https://example.com:25443/upload
-
Let's check our configuration again:
DataSensor> show malware_upload config
{
"url": "https://example.com:25443/upload",
"http_form_file": "file",
"enabled": "False"
}
-
Looks good. Let's try a test upload using the default file name (sample-file) and size (8192 bytes):
DataSensor> show malware_upload test
Uploading sample-file (8192 bytes) to https://example.com:25443/upload ...
Failed to DoRequest, error: Post https://example.com:25443/upload: x509: certificate signed by unknown authority (possibly because of "crypto/rsa: verification error" while trying to verify candidate authority certificate "example.com")
-
The test failed with the
certificate signed by unknown authorityerror message. Recall from our initial configuration that the sample server uses a certificate namedmu.crt. We need to upload that certificate to the DP and apply it to the sensor.-
Open a browser connection to the DP and navigate to System | Certificates.
-
Click the Upload button.
-
Supply a name for the certificate, set Type to CA Certificate, and use the Choose File button to navigate to the server's certificate, as illustrated below.
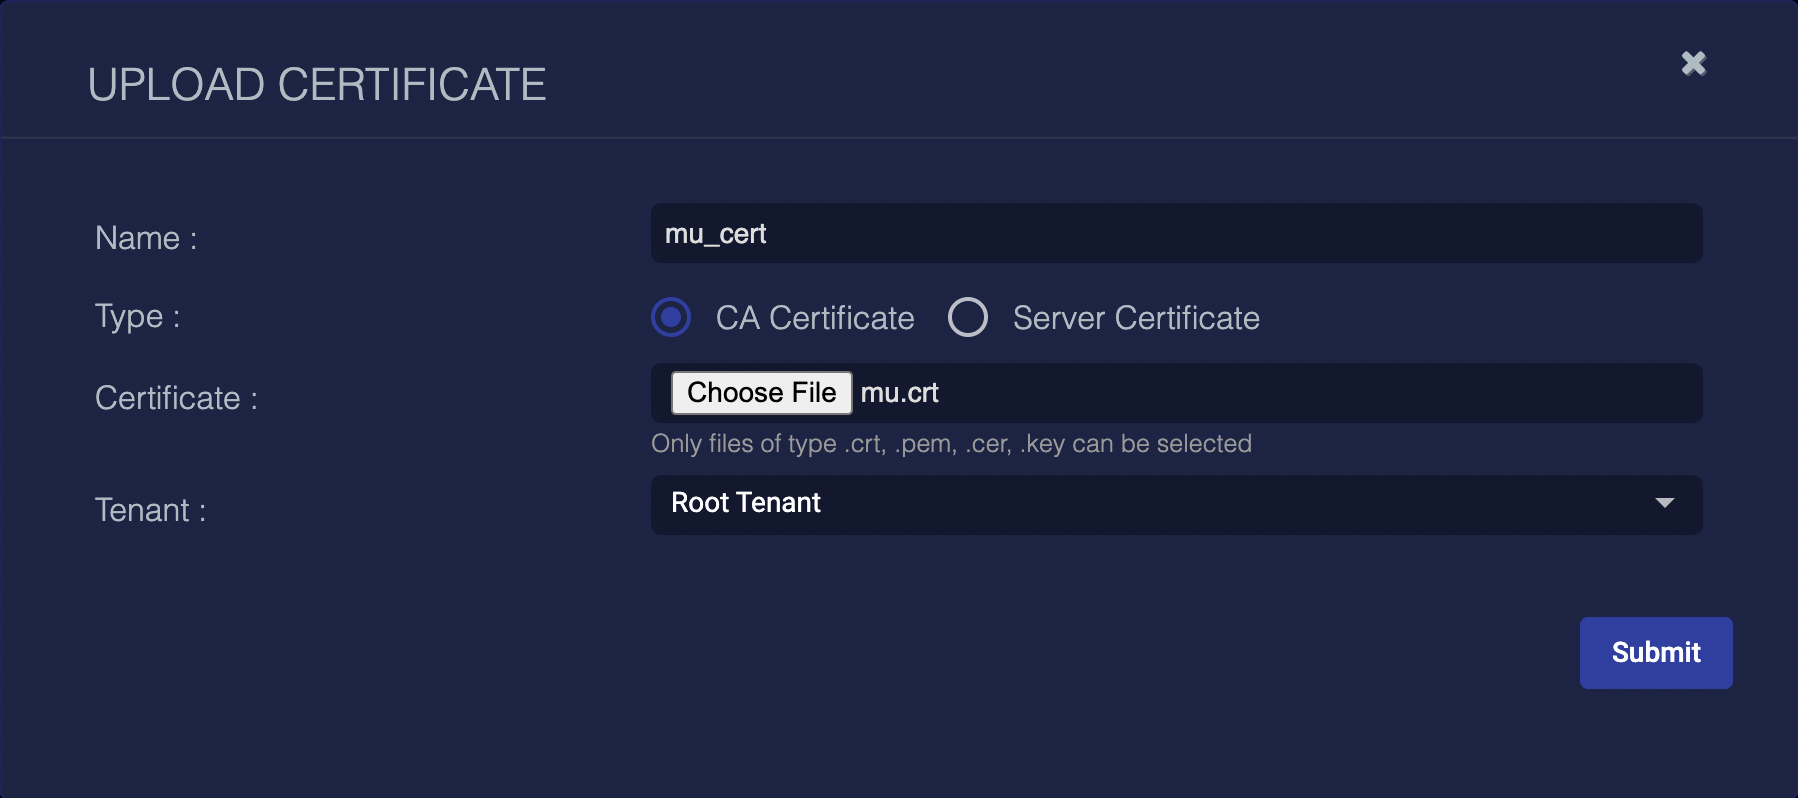
-
Select Submit to upload the certificate to the DP.
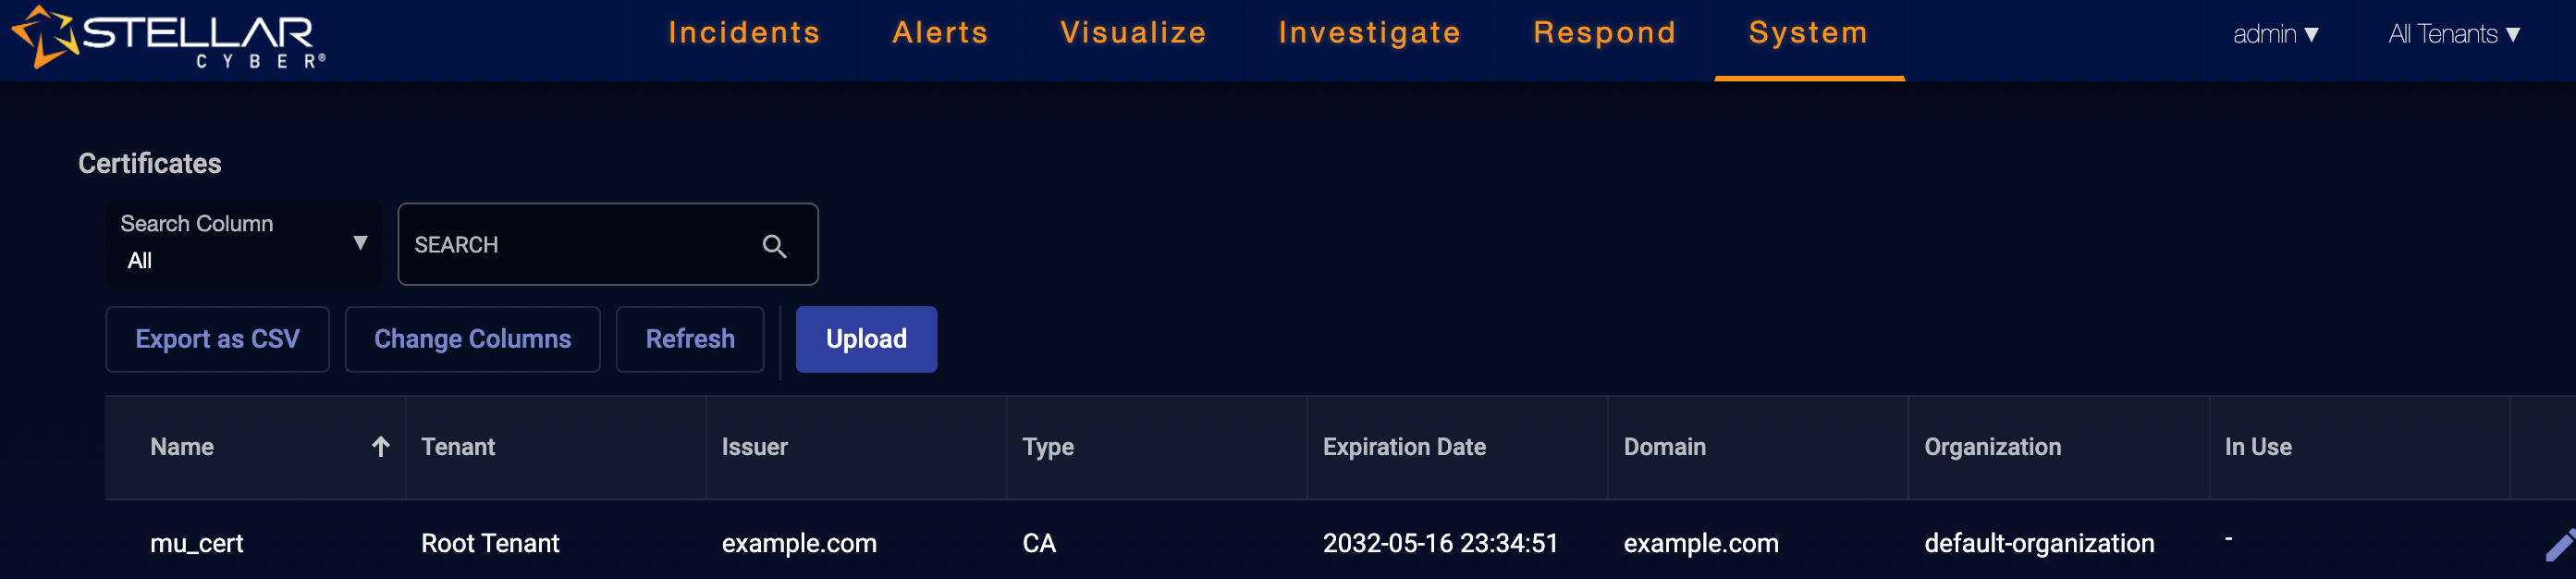
The certificate appears in the System | Certificates list, as illustrated below:
-
Next, we must apply the certificate to the sensor performing the malware upload. Navigate to System | Sensors.
-
Select the entry for the sensor performing the malware upload (sds-10016 in this example), select Apply CA Certificate, and select the certificate you uploaded in the previous steps (mu_cert in this example), as illustrated below:
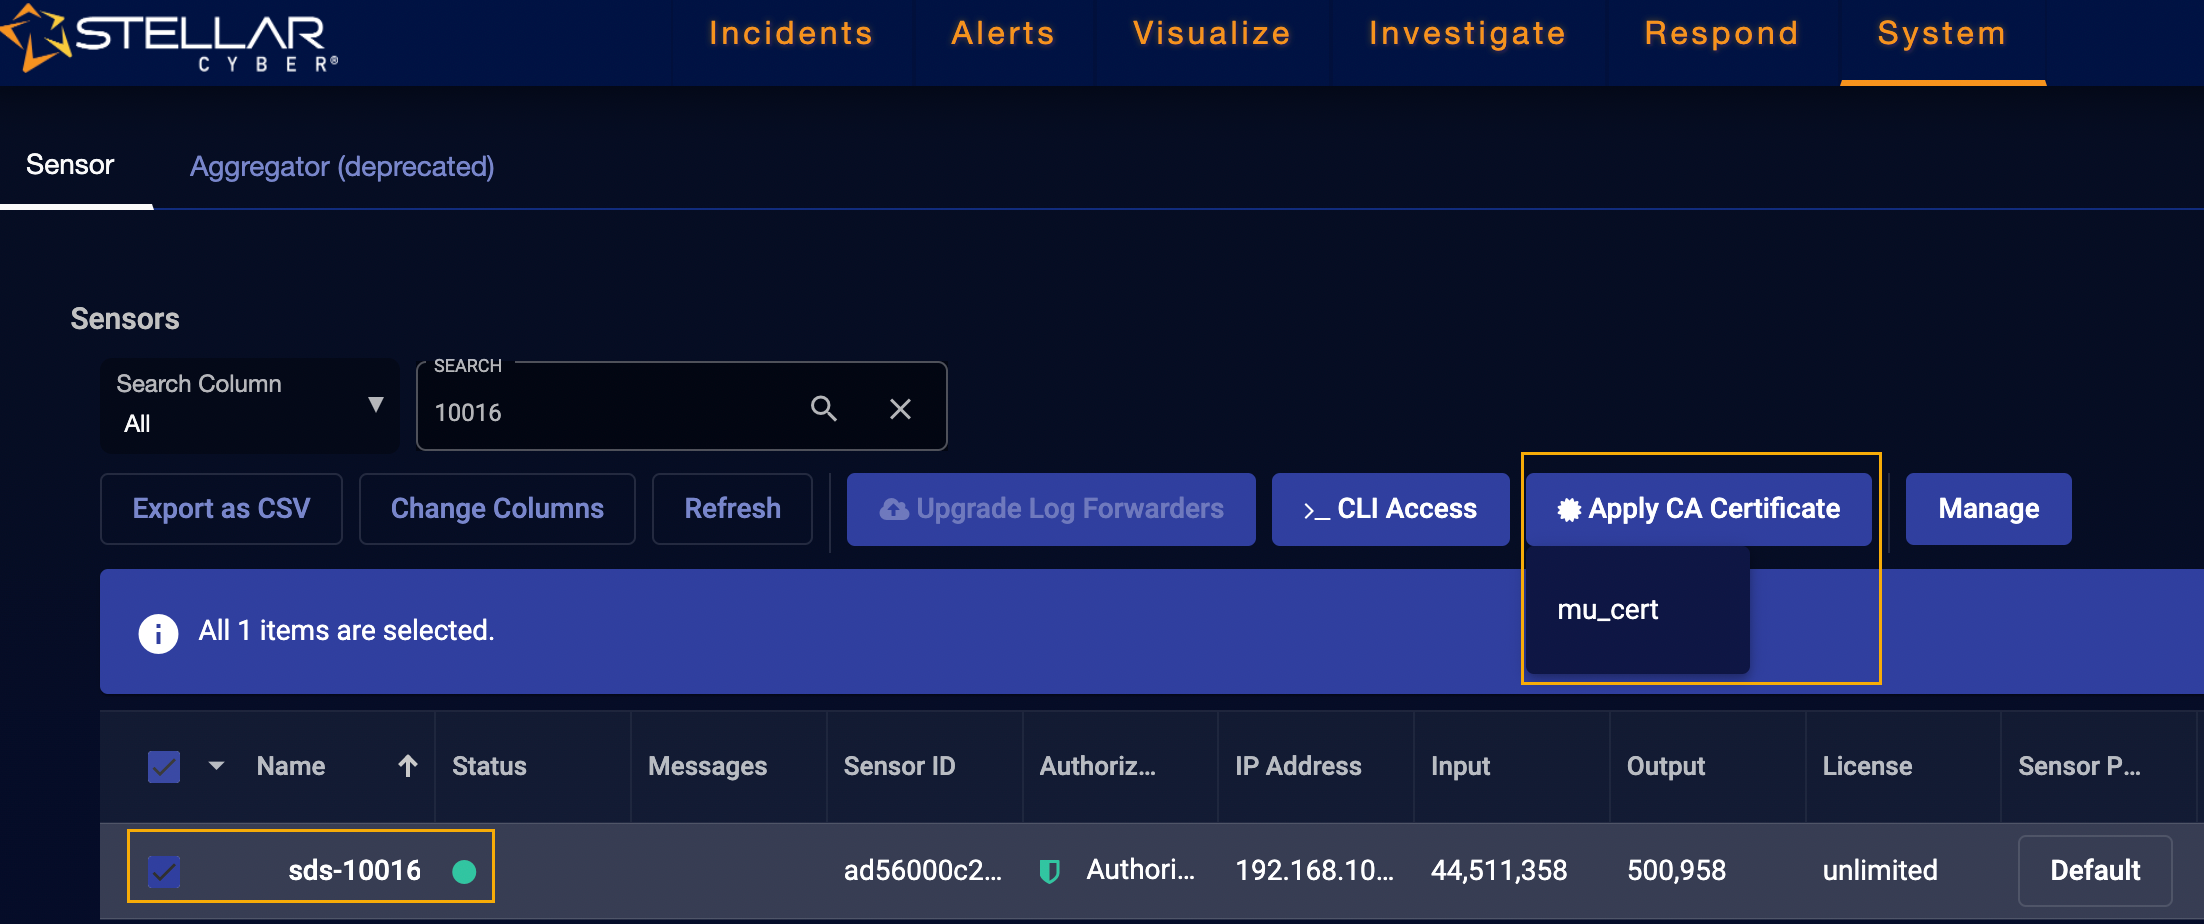
-
-
At this point, the certificate is uploaded and applied. Let's try our test again!
DataSensor> show malware_upload test
Uploading sample-file (8192 bytes) to https://example.com:25443/upload ...
FAIL! statusCode: 401, status: 401 Unauthorized
-
The good news is that we've resolved our certificate issue. However, it looks like we now have an authorization problem.
Some servers may use basic authentication, in which case we could use the
accountandsecretarguments withset malware_upload. In this example, however, the server uses token-based authentication and accepts thetokenfield in text form. We can pass the token using thehttp_form_textargument to include a key/value pair as part of the file upload. For example:DataSensor> set malware_upload http_form_text token=mysecrettoken
-
Let's check our configuration again:
DataSensor> show malware_upload config
{
"url": "https://example.com:25443/upload",
"http_form_file": "file",
"http_form_text": {
"token": "mysecrettoken"
},
"enabled": "False"
}
-
Looks good. We can see the
tokenfield is filled correctly. Let's try the test one more time:DataSensor> show malware_upload test
Uploading sample-file (8192 bytes) to https://example.com:25443/upload ...
OK! statusCode: 200
Malware Upload is currently disabled. You can go head to enable it.
-
Success! If you want, you can check the HTTPS server's logs where you should see a message similar to the following:
time="2022-05-20T07:02:04Z" level=info msg="file uploaded by POST" path=/opt/upload/malwares/sample-file size=8192 url=/files/sample-file
-
The CLI even reminded us that we still need to enable malware_upload now that it's testing correctly. Let's do that:
DataSensor> set malware_upload enabled True
-
From here, we can keep tabs on our malware uploads using
show malware_upload statusin the CLI.
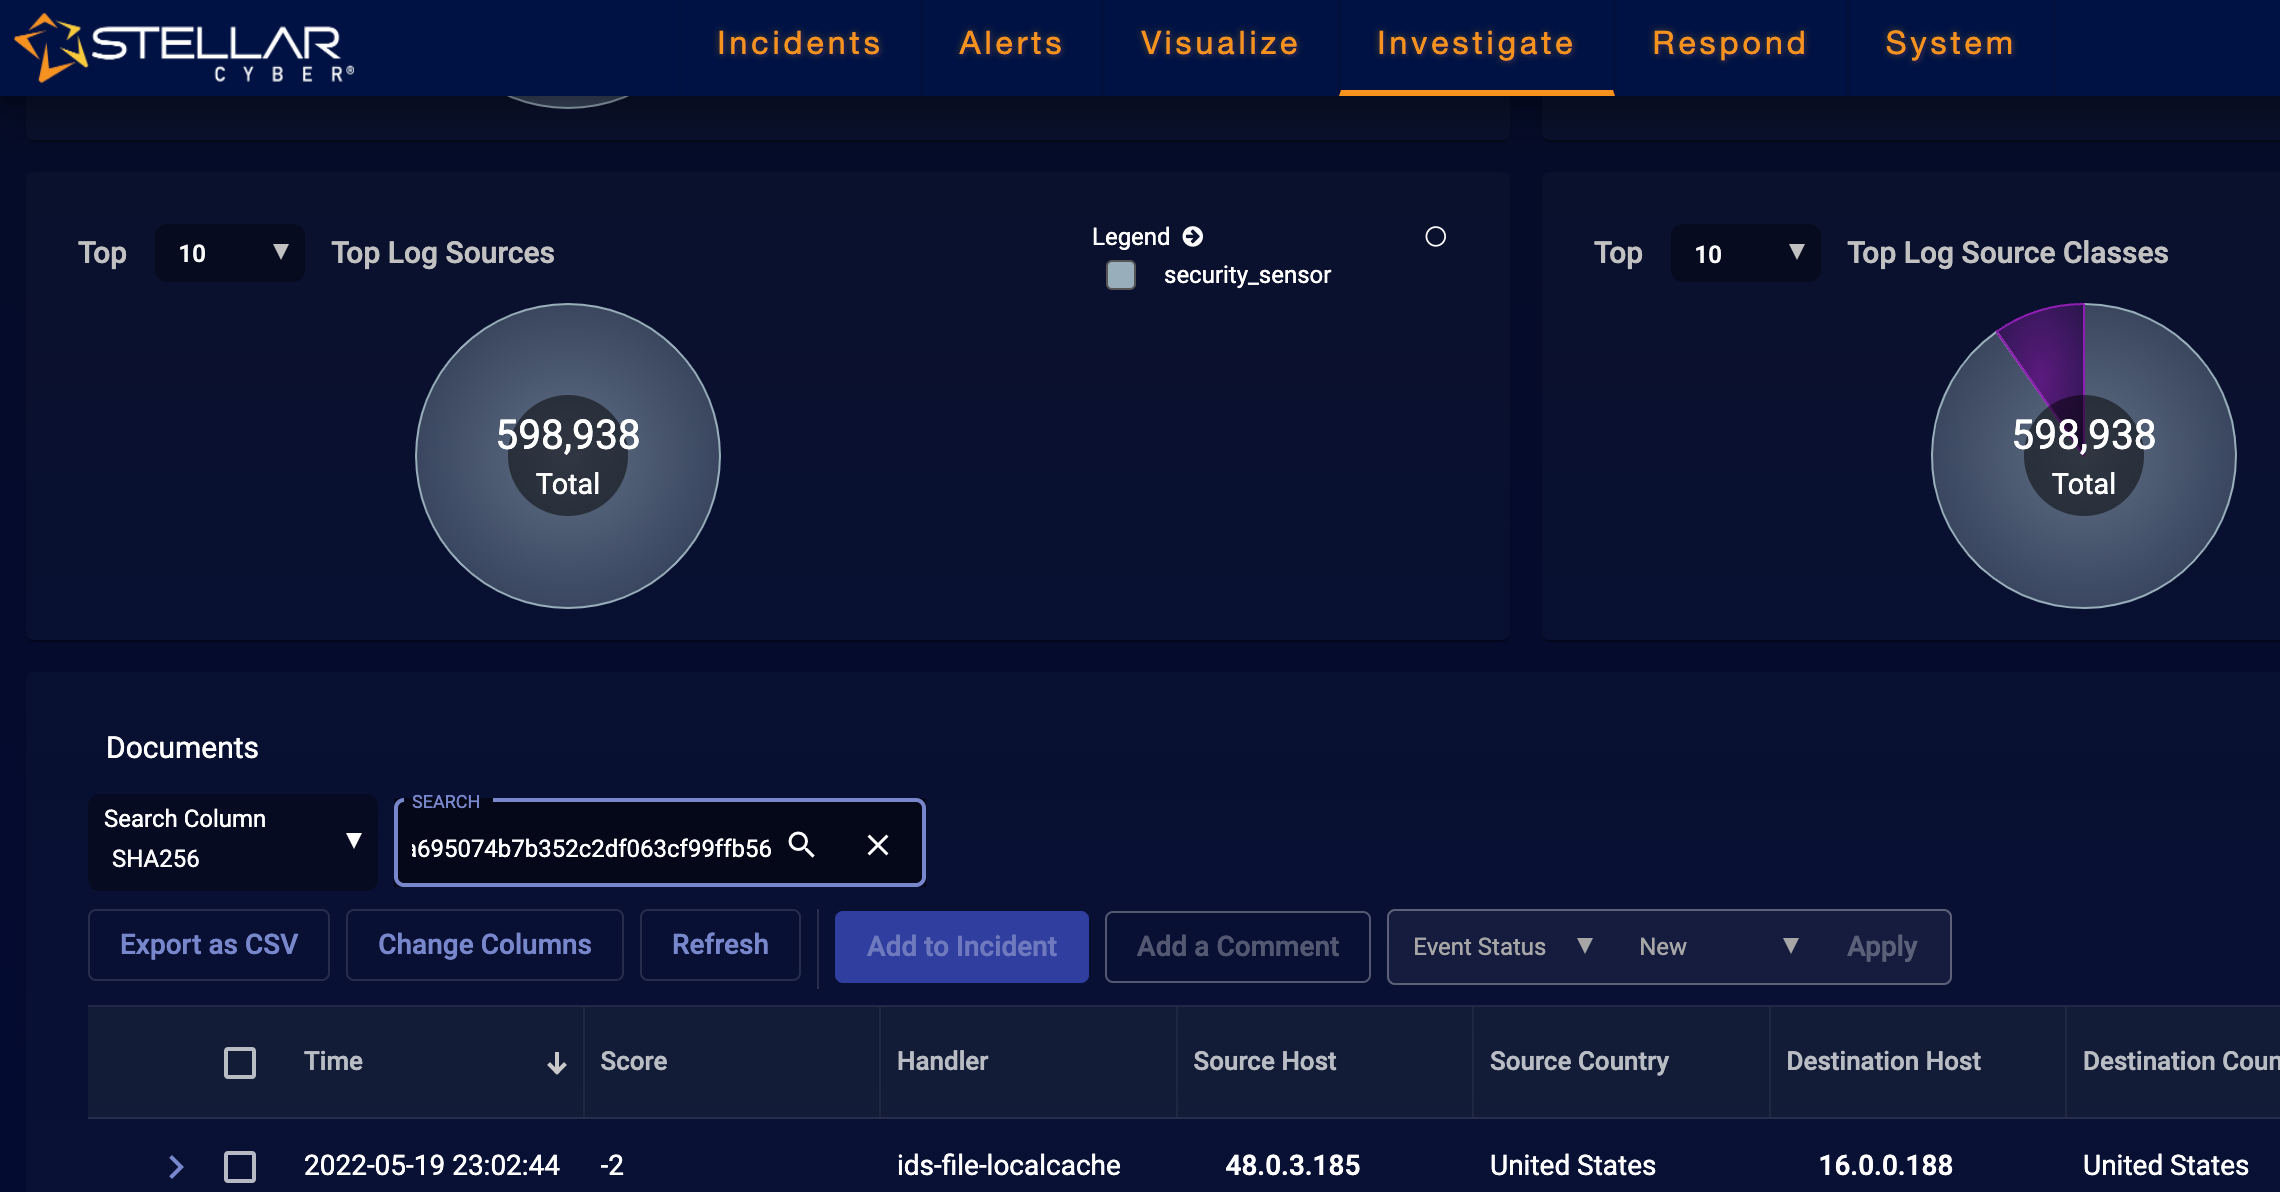
Finding More Information on an Uploaded File in Stellar Cyber
Malware files uploaded to an external HTTPS server are named using their sha256 checksums. If you want to find more information about a given file uploaded to the external server, you can copy its filename and then search the sha256 column in any Interflow table that supports it. For example:
-
Locate a file of interest uploaded to your external HTTPS server and copy its filename.
-
Open a browser connection to the DP and navigate to Investigate | Threat Hunting.
-
Set the Index to Traffic.
-
Scroll to the Documents table and set the Search Column dropdown to SHA256.
-
Enter the filename you copied from the external HTTPS server in the SEARCH field and press Enter.
For example: