Importing Assets
Stellar Cyber tracks assets in your system and analyzes their behavior to detect security events. Stellar Cyber can discover both IP and MAC addresses and associate them with hosts. You can also import assets from a CSV file. Stellar Cyber recommends downloading its template to use so that the formatting of the file is correct. Stellar Cyber merges your imported data with the discovered asset information. Imported data takes priority over discovered data but will not be deleted if there's no matching imported field. When you import another CSV of assets, Stellar Cyber adds new assets to previously imported assets and updates matching records. Stellar Cyber does not delete records.
You can do the following:
Getting & Editing the Asset Import Template
To get the asset import template:
-
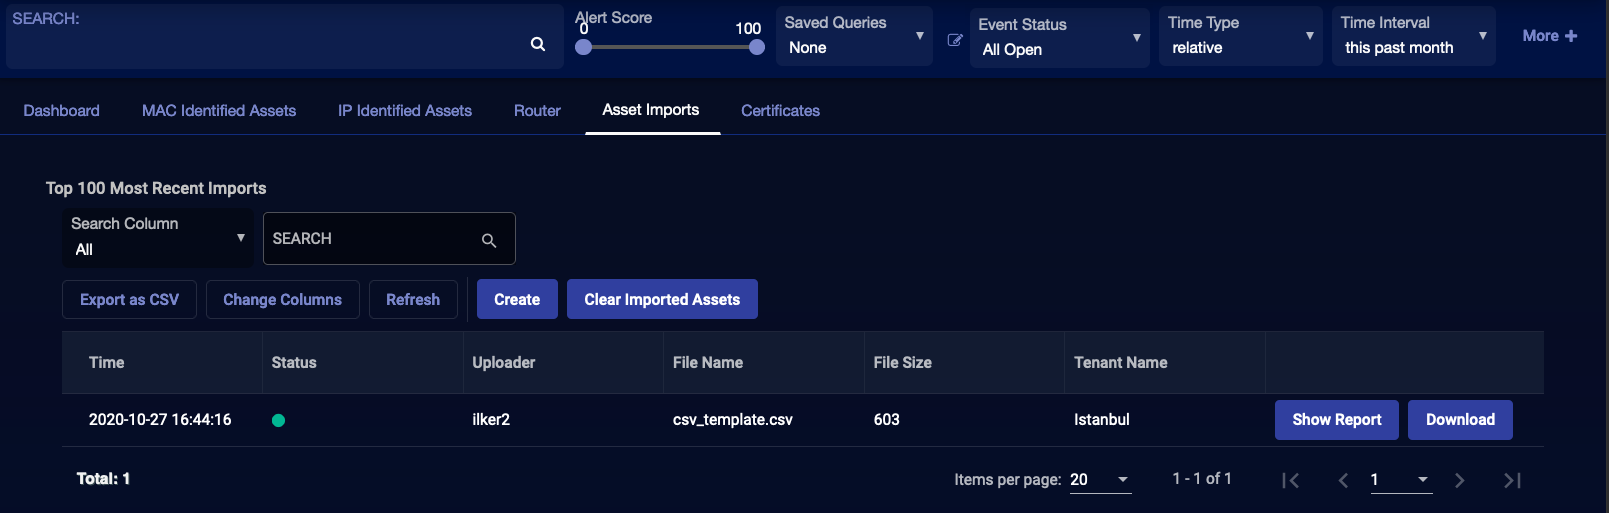
Select Investigate | Asset Analytics.
The asset dashboard appears.
-
Select Asset Imports.
The most recent asset imports appear.
-
Create.
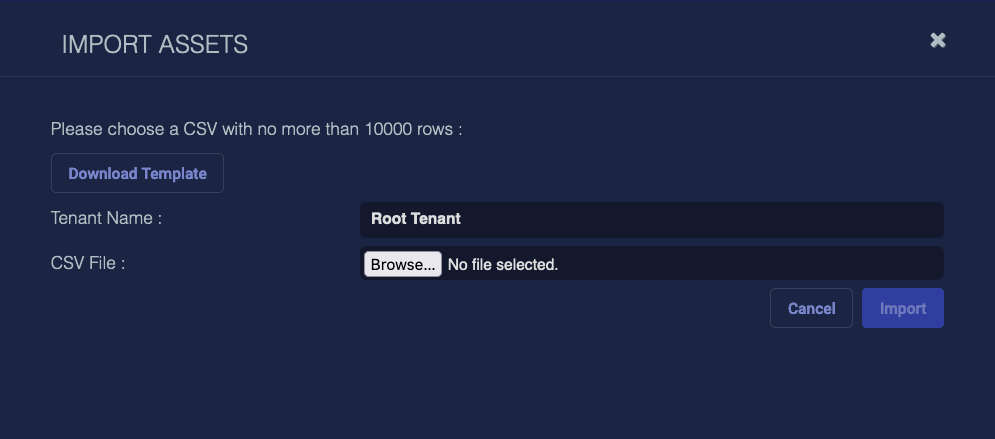
The Import Assets dialog appears.
-
Download Template.
Depending on your browser and system, the file is either immediately downloaded to your Downloads folder or you are prompted for a location. You can now edit the template to add up to 10,000 assets.
Importing Assets
You can import your assets from a CSV file. Stellar Cyber recommends using its template so that the formatting of the file is correct. To import assets:
-
Select Investigate | Asset Analytics.
The asset dashboard appears.
-
Select Asset Imports.
The most recent asset imports appear.
-
Create.
The Import Assets dialog box appears.
-
Choose a tenant.
-
Choose File, navigate to the file you want to import, select it, and then Open.
Stellar Cyber checks the file to make sure the
hostname,ip, andmacfields are included and that no reserved fields (such asvlan,risk_score, andvuln_score) were added. If the file is valid, the Import button activates. -
Import.
A Task List panel pops up showing the progress of the import until it finishes.
-
When the import operations completes, see the import details by selecting Show Report.
Imported assets list CSV as a Data Source on the Asset Details page.
You can remove any columns you want except these (and at least one of them must a value):
hostnameipmac
To add additional information, simply add a new column with the exact metadata field as the column heading. Some metadata fields (such as
vlan,risk_score, andvuln_score) cannot be overwritten, so if you include these in your CSV file, you cannot upload your file.
Clearing Imported Assets
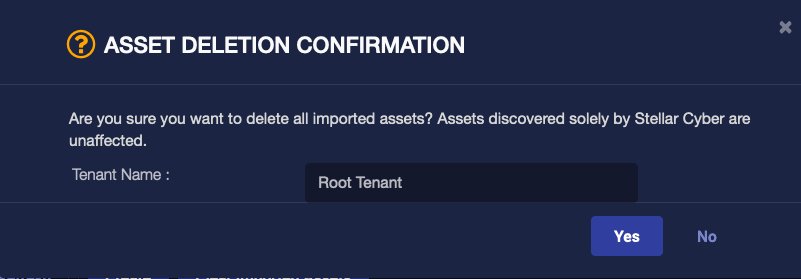
You can clear (that is, delete) asset information that you imported. If the imported data was merged with discovered data, only the imported data is cleared. To clear all imported assets:
-
Select Investigate | Asset Analytics.
The asset dashboard appears.
-
Select Asset Imports.
The most recent asset imports appear.
-
Select Clear Imported Assets.
The Asset Deletion Confirmation appears.
-
Choose a tenant and then select Yes.
A Task List panel pops up showing the progress of the deletion until it finishes.
Downloading Imported Assets
To download imported assets:
-
Select Investigate | Asset Analytics.
The asset dashboard appears.
-
Select Asset Imports.
The most recent asset imports appear.
-
Select Download for the import you'd like to download.
The download dialog appears.
-
Choose a location to download the imported assets to and then Save.
A Task List panel pops up showing the progress of the download until it finishes.
