Using the Sensor Installation Page 
Stellar Cyber uses a wide variety of sensors to collect data to ingest into its security database. You use the tabs in the System | Sensor Installation page to download images for different types of sensors, manage the tokens used to authorize and configure their use, and obtain batch deployment syntax and files for Windows Server Sensors. Depending on the privileges assigned to your user profile, the following tabs are available:
-
Download Image – Lets you download installation files for Linux Server Sensors, Windows Server Sensors, and Modular Sensors.
-
Tokens – Lets you generate and manage the tokens used to authorize and configure sensor installations.
-
Batch Deployment – Lets you obtain batch deployment syntax and supporting files for bulk deployment of Windows Server Sensors using either your own scripts or Microsoft Group Policy Objects (GPO).
See the sections below for details:
Using the Download Image Tab
The Download Image tab appears when you first display the System | Sensor Installation page, as shown in the figure below.
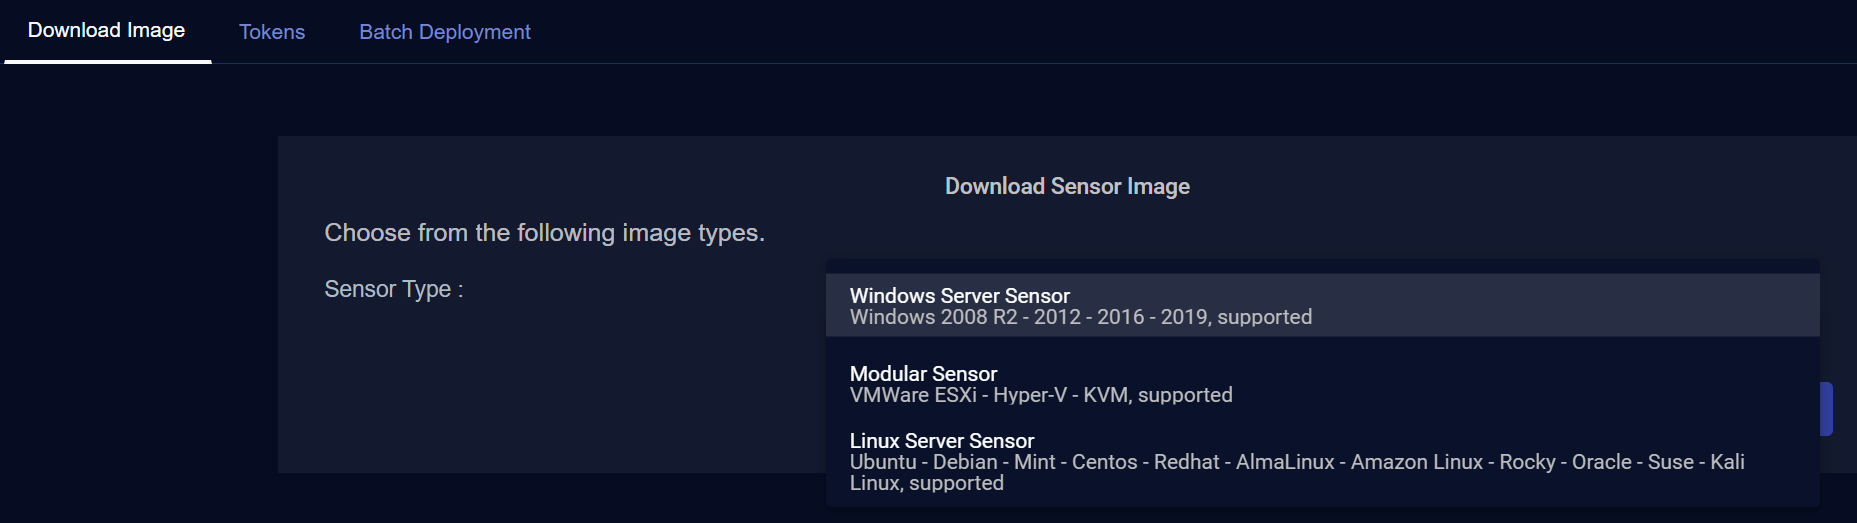
You can use the Download Image tab to obtain the installation files for different sensors. As shown in the figure above, the you can download installation files for the following types of sensors:
-
Windows Server Sensor – Supported for installation in Windows Server 2008 R2, 2012, 2016, 2019, and 2022 21H2 (Server Desktop Experience). The same .msi installation file supports all of these environments.
-
Modular Sensor – Supported for installation in VMware ESXi (.ova), Hyper-V (.vhdx), and KVM (.zip of .sh and .qcow2) environments.
-
Linux Server Sensor – Supported for installation in the Linux environments listed below. The same, self-contained installation script (ds_linux_install.sh) can install the Linux Server Sensor on all supported operating systems. :
-
Alma Linux 9
-
Amazon Linux 2 and 2023
-
CentOS 7, 8, 9
-
CloudLinux 7.9
-
Debian 8, 9, 10, 11, and 12
-
Kali Linux 2023.4
-
Linux Mint 18, 19, 20, 21
-
Oracle Linux 7, 8.5, 8.6, 8.8
-
Red Hat Enterprise Linux 7, 8, and 9
-
Rocky Linux 8, 9, 9.3
-
SUSE Linux 12 SP3-SP5
-
SUSE Linux 15 GA, SP1-SP5
-
Ubuntu 16.04, 18.04, 20.04, 21.04, 22.04, and 24.04
-
Server Sensors install as system daemon processes (agents) on a target machine. Modular Sensors install as dedicated virtual machines running Stellar Cyber software.
Only users with the Deployment | Sensor Installation | Sensor Image Download privilege assigned to their profile in the System | Role-Based Access Privileges interface can download images.
Downloading Sensor Installation Files
Use the following procedure to download sensor installation files:
-
Start by selecting the type of sensor installation file to download from the Sensor Type dropdown.
-
If you selected a Modular Sensor, choose the target Linux version from the Image Typedropdown.
The display updates to show you the size of the files to be downloaded.
-
Click the Download button.
The system downloads the installation file for your selected target along with its corresponding SHA-1 hash file.
-
The next step is to use the Tokens tab to obtain the token you will use to install the downloaded sensor, as described below. Then, refer to the installation topic for your sensor type and environment.
For more information regarding sensors that are currently installed, see the Sensor Overview page.
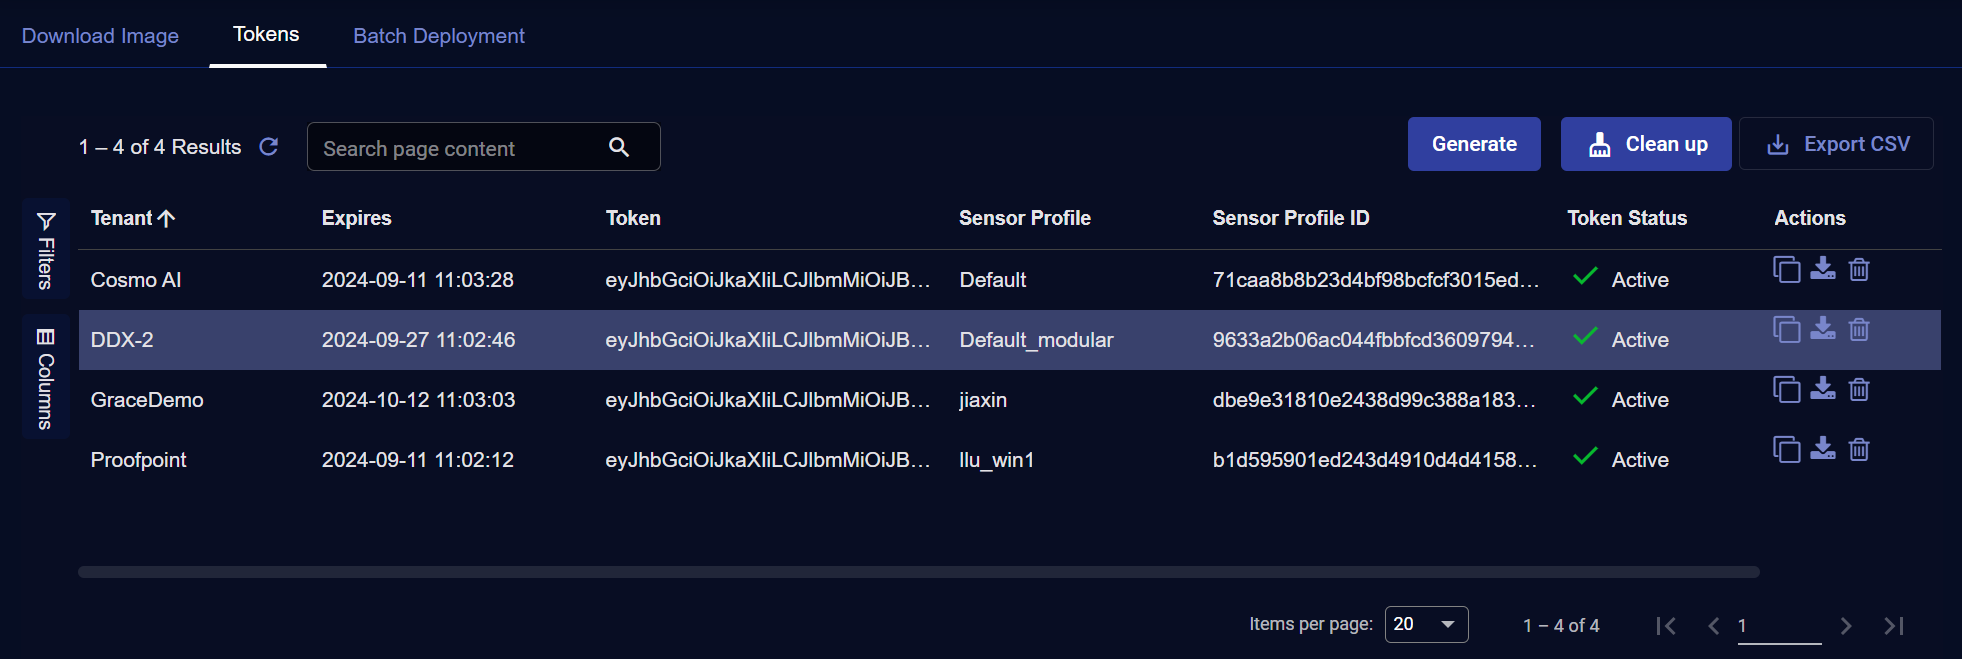
Managing Tokens in the Tokens Tab
The Tokens tab lets you manage the text-based tokens used to authorize and configure sensor installations. Tokens are required to authorize and configure the installation of a sensor image downloaded from the DP in the Download Image tab. You can either include the token directly in the set token CLI command used to assign the token or reference a token text file.
Refer to the installation topic for your sensor type and environment for details on how to assign a token.
What Do Tokens Do?
Tokens give security organizations a convenient way to allow installation of preconfigured sensors in their tenants' environments. Tokens perform the following services:
-
Point the installed sensor at the correct Stellar Cyber platform
Once a token is assigned to a sensor, it automatically adds itself to the correct Stellar Cyber platform instance for the organization that generated the token.
-
Identify the tenant for the sensor
When you apply a token to a sensor, the sensor is automatically assigned to the tenant specified in the token.
-
Assign a Sensor Profile to the sensor
Tokens can optionally be associated with a Sensor Profile, allowing you to assign settings to sensors as part of the installation. If you do not want to assign a sensor profile as part of the token-based installation, you can also create tokens that do not have associated sensor profiles.
If you delete a sensor profile that is associated with a token, Stellar Cyber alerts you with a confirmation prompt informing you that all associated tokens will also be deleted.
-
Authorize the sensor installation
Each of these tasks was performed manually in previous sensor installations. The use of tokens simplifies the process, providing an authorization credential that configures the sensor with the correct tenant and Stellar Cyber platform settings.
Tokens Are Reusable
Tokens are reusable. You can use the same token to authorize and configure multiple sensors in the same tenant environment until it expires two weeks after its initial generation.
Tokens Have Configurable Expiration Dates – Sensors Do Not
When you create a token, you specify an expiration date for the token, from two weeks up to three months. Tokens can be used to authorize and configure sensors from their initial generation up to their expiration date.
Stellar Cyber alerts you in the Notification Center when tokens are about to expire, as well as when they have expired.
When a token expires, sensors authorized with the token continue to operate as normal. Once a sensor successfully registers with the Stellar Cyber platform, it no longer uses the token. It is only used for the initial authorization, registration, and configuration of the sensor.
You can also configure tokens that never expire. However, Stellar Cyber recommends that you avoid this practice to enhance the security of your deployment. In addition, tokens that are configured not to expire can only be used with sensors running 5.3.0 or later.
If you see a message reading Expired token. Generate a new one and reapply. when applying a token, it's possible that you may be trying to apply a newer token to an older, incompatible sensor (for example, a token configured never to expire on a pre-5.3.0 sensor). Check the token to make sure it's compatible with the sensor to which you are applying it.
Using the Tokens Tab
The Tokens tab lists the tokens that have already been generated. Depending on the privileges assigned to your role, you may see all the tokens on the system or just those for a particular tenant. Tokens are listed in a standard table with the following information:
-
Tenant – Lists the tenant to which the token is assigned. Sensors installed with this token are automatically assigned to the corresponding tenant.
-
Expires – Lists the date at which the token expires. Tokens expire two weeks after they are created. Once a token expires, it cannot be applied to sensors. However, any sensors with the token already applied continue to operate as normal.
-
Token – Displays the token itself. Tokens are simply long JSON strings that can be decrypted by a sensor to read their encoded information. You can hover your cursor over a token and use the standard
 button to copy it to the clipboard.
 -
Sensor Profile – The Sensor Profile associated with the token. Sensors installed with this token automatically have this sensor profile assigned.
This column shows None for tokens without a sensor profile installed, including those migrated from releases prior to 5.3.0.
-
Sensor Profile ID – The internal Sensor Profile ID associated with the token.
-
Token Status – Shows whether tokens are active, expired, or invalid. You can remove expired and invalid tokens from the list using the Clean up button at the top of the table.
-
Copy – Copies the token to the clipboard so that it can be accurately pasted into a script or
set tokencommand. -
Download – Downloads the token as a text file. This is useful when you want to authorize and configure a sensor by referring to a token file instead of pasting the text directly into the
set tokencommand. -
Delete – Deletes the corresponding token.
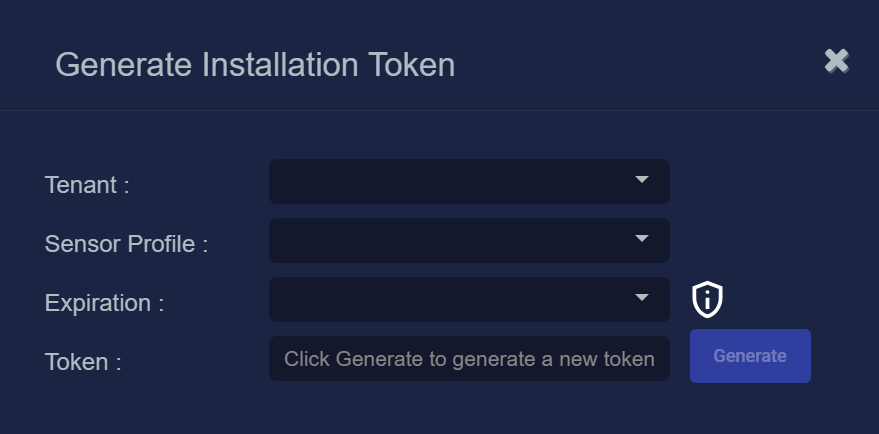
Generating a Token
Use the following procedure to generate a new token:
-
Navigate to the System | Sensor Installation page and click on the Tokens tab.
-
Click the Generate button.
The Generate Installation Token dialog appears:
-
Select the tenant for the token from the Tenant dropdown. This is the tenant to which all sensors authorized with this token will be automatically assigned. The dropdown lists all tenants configured for your organization in the System | Tenants page.
-
Select the Sensor Profile to be assigned to all sensors authorized with this token from the Sensor Profile dropdown. The dropdown lists all sensor profiles available in the System | Sensor Profiles page for the selected Tenant.
If you do not want to assign a Sensor Profile with a token, you can set this field to None (no sensor profile selected). This is also the setting for any tokens migrated from a pre-5.3.0 release as part of an upgrade.
-
Use the Expiration dropdown to select an expiration date for this token. You can select specified expiration dates ranging from two weeks to three months.
You can also select Never expires for the expiration date. However, Stellar Cyber recommends that you specify expiration dates for your tokens in order to improve the security of your deployment.
Remember that when a token expires, sensors authorized with the token continue to operate as normal. Once a sensor successfully registers with the Stellar Cyber platform, it no longer uses the token. It is only used for the initial authorization, registration, and configuration of the sensor.
-
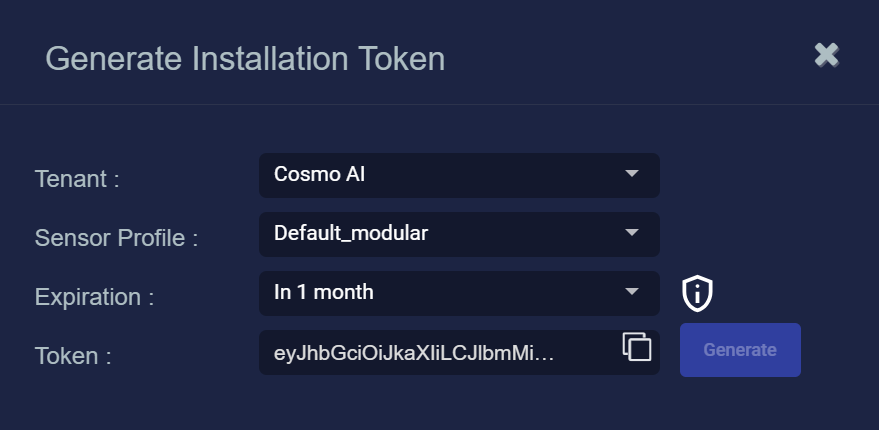
Click the Generate button.
The system generates the token and displays its contents in the Token field. The dialog also updates to display the expiration date for the token, as illustrated below.
-
You can use the Copy button to copy the token to the clipboard immediately, or simply close the dialog and retrieve the token from the Tokens tab later on.
Once you've generated a token, you're ready to use it to authorize and configure sensors. Refer to Assigning Tokens, below, for a summary of the procedure and the specific installation procedures for each sensor type for detailed instructions.
Cleaning Up Expired and Invalid Tokens
You can easily remove all expired and invalid tokens available to your tenancy and role by clicking the Clean up button at the top of the Tokens table. After clicking through the confirmation prompt, Stellar Cyber removes the invalid and expired tokens available to your tenancy and role from the table.

Who Can See, Generate, and Delete Tokens?
The Deployment | Sensor Installation | Sensor Token privileges in the System | Role-Based Access Control interface specify who can see, generate, and delete the sensor installation tokens in the Tokens tab; there are separate privileges for each.
Keep in mind that anyone installing a sensor image downloaded from the DP needs a token to complete the installation. Depending on your security strategy, you can either send a token to the person performing an installation (tokens are simply text strings) or grant them view privileges for the Tokens tab so they can get them on their own.
Assigning Tokens
Tokens are required to complete the installation of a sensor image downloaded from the DP in the Download Image tab.
You apply tokens to sensors as the last step in the overall installation procedure:
You can also pass tokens as part of a script or using the Batch Deployment tab for Windows Server Sensors.
-
Download the installation file(s) for your sensor type and environment in the Download Image tab.
-
Install the image using the installation instructions for your sensor type and environment.
-
Copy the token to be used for the authorization and configuration of the sensor from the Tokens tab. You can copy it either as a string or a file, depending on how you want to apply the token.
-
Apply the token to the installed sensor from the sensor CLI with the
set tokencommand. Refer to the table below for a summary of the available techniques:Copy and Paste Token String
Copy the token string from the Tokens tab and paste it into the CLI command. The syntax is as follows:
set token string <pasted string>Upload Token File to Sensor
Download the token as a file from the Tokens tab, upload it to the sensor, and reference it in the
set tokencommand. The syntax is as follows:set token file <path to local file>For example, the following command points to the
token.textfile stored in the/tmpfolder:set token file /tmp/token.textThis technique only works for Server Sensors. There isn't a way to upload the token.text file to a newly installed modular sensor virtual machine.
Host Token on HTTP Server
Download the token as a file from the Tokens tab, upload it to an HTTP server, and reference it in the
set tokencommand. The syntax is as follows:set token url http://<url to token>You can also use an HTTPS server. In that case, the specified URL must also include the username and password for the server.
-
The CLI reports that the Sensor token is successfully set.
If you receive an error message instead, it's possible that the token has expired. Refer to the Tokens tab to see the expiration date. If you are using the File technique, it's also possible that an extra space or line may have crept into your text file – check the file to make sure it includes only the token text.
-
Wait a minute or so. Then, verify that the token was successfully applied using any combination of the following techniques:
-
Check the System | Sensors tab in the user interface to see that the sensor has registered itself successfully.
-
Verify that the
show systemcommand shows all services as running. -
Verify that the
show receivercommand displays a receiver. -
Verify that the
show jsoncommand reports some data sent in theBYTE_SENTcolumn.
-
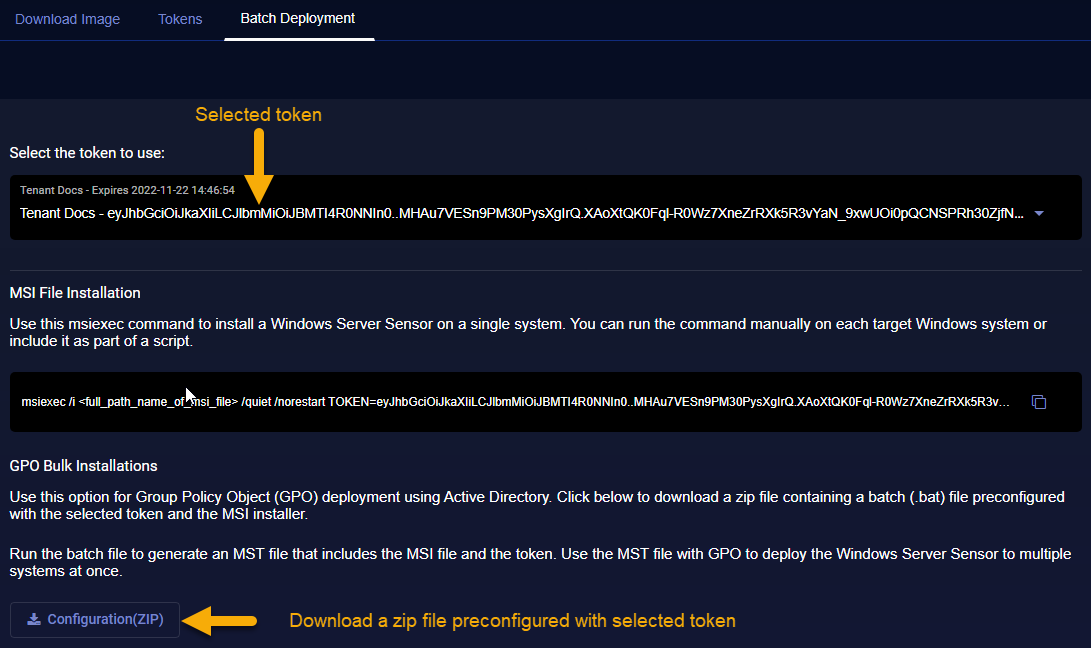
Using the Batch Deployment Tab
The Batch Deployment tab provides tools that help you deploy Windows Server Sensors using a selected token.
-
Start by selecting the token to use for the installation from the Select the token to use dropdown. The dropdown lists all tokens available to your organization.
Make sure you select a token that is either associated with a Standard sensor profile or no sensor profile at all. You can't apply a Modular sensor profile to a Windows Server Sensor.
-
Optional. Select a primary and secondary aggregator to be used with sensors authorized by this token. The dropdowns lists the aggregators configured for your tenancy.
-
Next, see the sections referenced in the table below for information on how to use the rest of the options in the tab:
|
Provides a sample msiexec command that can be used to install an .msi file downloaded from the Download Image tab with the token and optional aggregator(s) selected at the top of the page. |
|
|
Downloads a zip file containing a batch file preconfigured with the selected token and aggregator(s), as well as the batch installer. Run the batch file to generate an MST file that can be used with Microsoft Group Policy Object (GPO) to deploy the Window Server Sensor to multiple systems at once. |
MSI File Installation
The MSI File Installation tool provides a sample msiexec command using the token (and aggregator(s), if selected) at the top of the page. All you need to do is replace the <full_path_name_of_msi_file> portion of the command with the actual path to the .msi installation file you downloaded in the Download Image tab.
You can run the command manually on each target Windows system or include it as part of a script.
For example, the following procedure downloads a Windows installation file and uses a copy-and-pasted msiexec command to install it with a selected token:
-
Navigate to the System | Sensor Installation | Download Image page.
-
Set the Sensor Type dropdown to Windows Server Sensor and click the Download button.
-
Click on the Batch Deployment tab and select the token to use for the installation. Tokens are listed with their configured tenant and expiration date. In this example, we are using the token for the tenant named Rui.

-
You can configure the msiexec command with optional primary and secondary aggregators. The dropdowns list the aggregators available for the selected tenant.
-
As shown in the figure above, once you select a token and optional aggregator(s), the MSI File Installation tool updates to show you a sample msiexec command using the token. Use the Copy button to copy the command to the clipboard.
-
Open a text editor and paste in the command you copied from the MSI File Installation tool.
-
Replace the
<full_path_name_of_msi_file>with the path to the installation file you downloaded at the start of the procedure. Copy the edited command. -
Open a command window, paste in the copied command, and press Enter. For example, the following command installs a Windows Server Sensor stored in
D:\tmp\.msiexec /i D:\tmp\aellads_5.0.0_windows-x64_20221108_231ecd9.msi /quiet /norestart TOKEN=<token> -
Verify the installation using the techniques listed in Assigning Tokens.
You can also install a Windows Server Sensor interactively by double-clicking the downloaded .msi file and following the wizard's prompts. The wizard guides you through pasting in a copied token or navigating to a downloaded token file. Refer to Installing a Windows Server Sensor for details.
GPO Bulk Installations
The GPO Bulk Installations tool lets you download a zip file containing a batch file preconfigured with the selected token and aggregator(s), if selected. Use the following procedure to use the contents of the zip file to generate an MST file that can be used with Microsoft Group Policy Object (GPO) to deploy the Window Server Sensor to multiple systems at once:
-
Navigate to the System | Sensor Installation | Download Image page.
-
Click on the Batch Deployment tab and select the token to use for the installation. Tokens are listed with their configured tenant and expiration date. In this example, we are using the token for the tenant named Docs.
-
Optional. Select the primary and secondary aggregators for the installation from the dropdowns.
-
Click the Configuration (ZIP) button in the GPO Bulk Installations section to download a zip file with the preconfigured files you can use to generate an MST.
-
Extract the zip file. The zip file includes the following files:
-
.msi Installation File – Windows Server Sensor .msi installation file (for example, aellads_5.0.0_windows-x64_20221108_231ecd9.msi)
-
genMST.bat – Batch file used to create MST file. Batch file is preconfigured with selected token and .msi filename.
-
genMST.vbs – Visual Basic script called by genMST.bat when creating MST file.
-
-
Create the MST file for use with GPO by running the batch file. You can do this either from the command line or by double-clicking its entry in Windows Explorer.
The script generates a preconfigured MST file that can be used in a Windows Active Directory bulk installation. The MST file has the same name as the .msi file but with an .mst extension.
Refer to the Microsoft Active Directory Administrator's manual for further information on working with MST files.
