Managing the Mail Server
You must have Root scope to use this feature.
An important part of the Stellar Cyber Automated Threat Hunting capability is to have the system send out email messages when security breaches are observed. In order to do this Stellar Cyber must have access and credentials to a mail server. This screen is used to connect Stellar Cyber to a suitable mail server.
Setup Screen
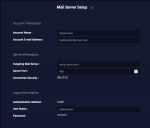
When the screen is displayed it shows a form similar to the sample that is shown in the following image. When first entered the screen is in display-only mode.
To enter or edit the mail system parameters, click the button. The fields can then be edited. The available fields include:
- Account Name—The name that will be used as the sender of emails may be entered here.
- Account E-mail Address—The email address assigned to the Stellar Cyber user account.
- Outgoing Mail Server—The DNS or IP address of the SMTP server.
- Server Port—The port used for email services in the SMTP server. This value will depend on the setup of the server and the security protocol selected in the next field.
- Connection Security—The options provided are None, STARTTLS, or SSL/TLS. The selection will depend on the configuration of the server.
- Authentication Method—The available options are None or Login. If you set this to None , the SMTP server must be set up to accept unauthenticated email.
- User Name—The user name to use for authentication.
- Password—The password used for authentication.
Edit Controls
In edit mode the buttons shown in the image are shown. The actions taken are:
- Cancel—Close edit mode without saving any changes.
- Submit—Save changes and end edit mode.
- Reset—Clear the email settings. This option will halt any outgoing e-mail activity. A confirmation dialog box will appear when this button is clicked.


