Installing a Photon 100 Sensor
The Photon 100 sensor is a complete, self-contained Modular Sensor that can monitor up to 1 GB of network traffic and send compressed metadata to a designated Data Processor.
This page describes how to set up and configure a Photon 100 sensor, adding it to the network.
Starting with the 4.3.7 release, new physical sensors are shipped as modular sensors on Ubuntu 22.04.
Site Requirements
The Photon 100 requires the following site preparations.
- Either a fixed IP address or access to a DHCP server. For a fixed IP address, the net mask and gateway address are also required. These values will be entered in the configuration steps below.
- If the Photon 100 is going to be assigned to a Tenant, you must first have the Tenant record created and obtain its Tenant ID. You do this in the Tenant Management screen.
- A network tap to provide data to the Photon 100. Most enterprise-class network switches can be configured to mirror all traffic to a given port. After this is done it will be connected to the Photon 100 as described below.
- Open firewall ports for the sensor.
- Open firewall ports for log ingestion.
For help scoping resources for the installation, contact your sales team.
Physical Installation
Place the Photon 100 in a site that has access to power and adequate ventilation. Attach the power supply.
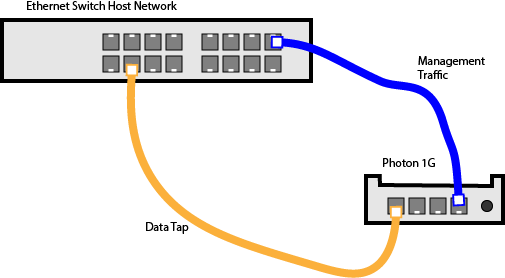
The Photon 100 requires two network connections:
-
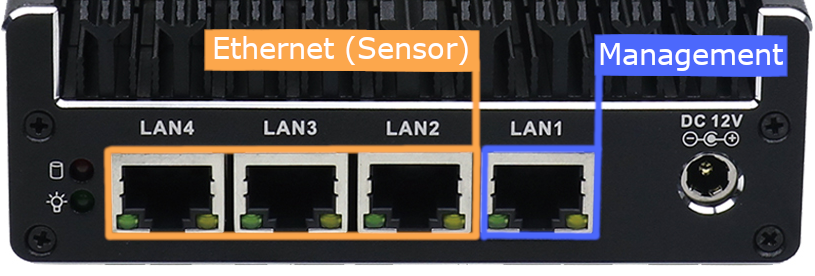
The Management port (LAN1) is used to communicate with the Data Processor.
-
At least one of the data ports (LAN2..LAN4) must be connected to a network tap or mirror port. This is where the packets to be observed are sent into the system.
A schematic of these connections is shown in the figure above. The data link is shown in brown and the management link is shown in blue.
The two images below show the Photon 100 connector arrangement in greater detail. Note that any of the LAN ports 2, 3, or 4 can be used for tapped network data. The LAN port 1 must be used for management.
Configuration
The next step is to configure the Photon 100 with its operating parameters. You can do this over either of the following types of connections:
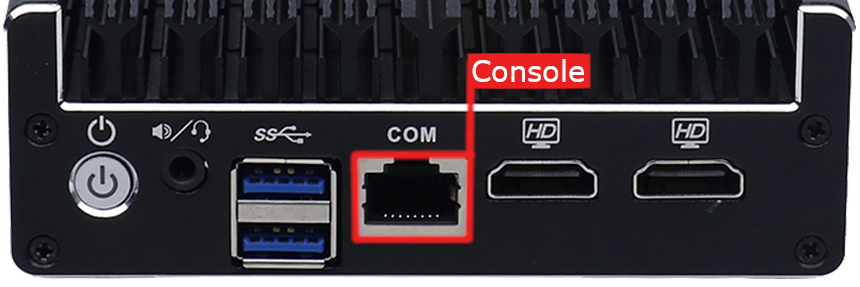
- An HDMI-capable monitor and USB keyboard can be attached to the appropriate connectors on the front panel in the images shown above.
- An RS-232 terminal can be connected to the RJ-45 COM port on the front panel in the images shown above. The RS-232 device must be configured with 9600 BAUD, 8 bits, no parity, and one stop bit.
The instructions below are the same regardless of which type of console you use.
- If the Photon 100 is not already powered on, press the power button on the left side of the front panel. Refer to the image above for the button's location.
- Update the administrator password. The default username and password are aella and changeme. You are prompted to change these when you first log in.
-
Set the management IP network parameters. If a DHCP server is available, use the following command:
set interface management ip dhcpYou can also set IP parameters manually using commands similar to the following:
set interface management ip 192.168.14.100/255.255.255.0set interface management gateway 192.168.14.1set interface management dns 8.8.8.8 -
Set the hostname. The hostname is displayed in the Stellar Cyber user interface and should be unique among all sensors. For example:
set hostname floor12 -
Optional: Set the proxy http server. For example:
set proxy http://192.168.33.10:8080 -
Optional: Set the Tenant. For this step you will need the Tenant ID from the Stellar Cyber user interface. For example:
set tenant_id mytenant/1099933If no Tenant is entered, the sensor is automatically assigned to the Root Tenant.
-
Use the
set cmcommand to specify the IP address to reach the management interface of the Data Processor. For a DP cluster, this is the IP address of the DL-master's management interface. For a single DP deployment, this is simply the DP's management IP address. You can specify either an IP address or a hostname. For example:set cm 192.168.44.10or
set cm example.company.com
Sensor Authorization
You must authorize the sensor when it appears in the network.
You can authorize multiple sensors at a time. So if you're installing multiple sensors, install them all, then authorize them all at once.
Converting the Photon 100 to a Security Data Sensor
You can use the CLI to convert a Photon 100 from a Modular Data Sensor to a Security Data Sensor with support for up to 250 Mbps. Refer to Converting a Photon 100 to a Security Data Sensor for details.
