Managing Tenants
The Stellar Cyber multi-tenant feature allows all the features and capabilities of Stellar Cyber, including machine learning, to be applied to any number of independent networks.
See the Tenants overview page for general information about tenants.
Tenants Table
When you select the System | Administration | Tenants option, Stellar Cyber displays a table of the existing tenants similar to the example below.
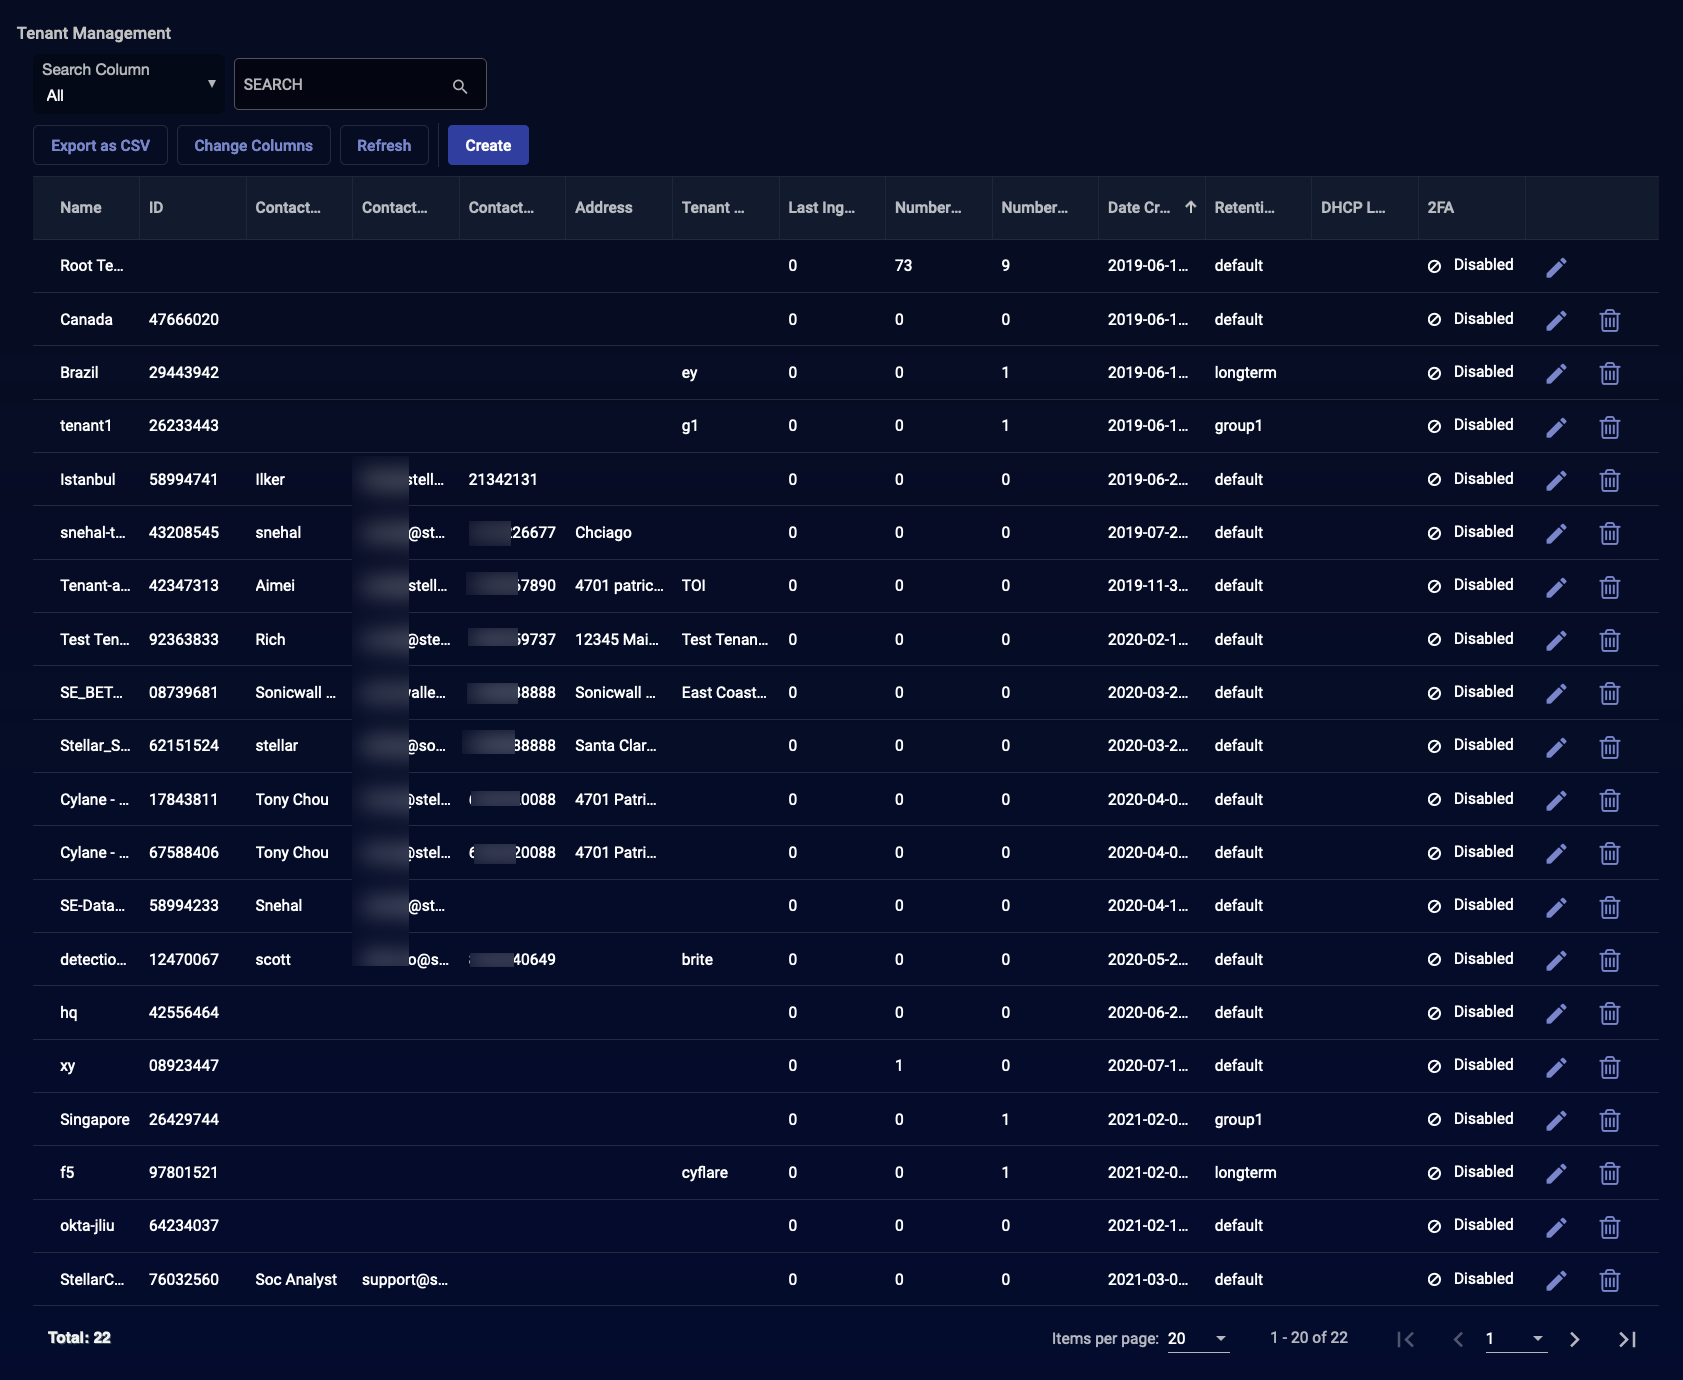
The columns are:
-
Name—The name of the tenant.
-
ID—The unique ID number for the tenant. This number is often required for sensor and software setup functions to precisely identify the tenant.
-
Contact Name—The name of the person responsible, as entered.
-
Contact Phone—The phone number of the person responsible, as entered.
-
Address—The address of the tenant, as entered.
-
Last Ingestion Volume (GB)—The amount of data ingested on behalf of the tenant as of the previous day. This value is updated every midnight, local system time.
-
Number of Users—The number of tenant users.
-
Number of Sensors—The number of sensors installed for the tenant.
-
Date Created—The timestamp of when the tenant was created.
-
Action—The actions you can take.
The actions you can take are:
-
Click Create to create a new tenant. The ADD TENANT dialog box (described below) appears.
-
Click
 to edit the corresponding tenant. The EDIT EXISTING TENANT dialog box appears.
 -
Click
 to delete the corresponding tenant. For details on this, see:
Removing Tenants (<4.3.5) or
See the Tables page for more information on working with tables.
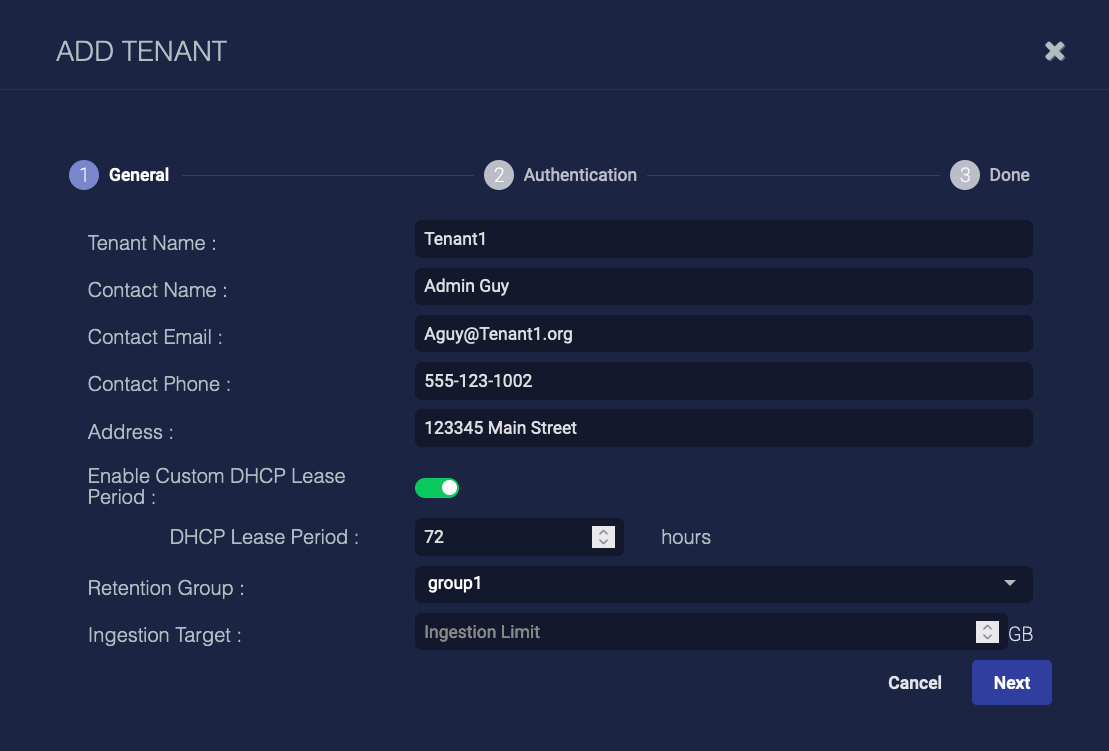
Adding or Editing Tenants
All fields other than the tenant name are stored in the record without further processing. Their values can be defined by the system owner's policy.
-
When you either add a new tenant or edit an existing tenant, a dialog box similar to the following appears:
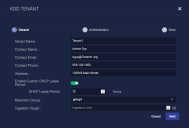
Here you can enter or update the following:
-
Tenant Name—A unique name that identifies the tenant. This field is required.
-
Contact Name—The name of the party responsible for the tenant.
-
Contact Email—The email address of the party responsible for the tenant.
-
Contact Phone—The phone number of the tenant.
-
Address—The address of the tenant.
-
Enable Custom DHCP Lease Period—Toggle this on to specify a custom DHCP lease period for this tenant. Stellar Cyber uses this period to release IP addresses from the asset IDs, preventing the accumulation of multiple asset IDs for a single asset (due to changing IP addresses). If you do not enable this, Stellar Cyber uses the global DHCP Lease Period.
-
Retention Group—Choose a retention group for this tenant. This defines custom data retention times for a group of tenants. You can create retention groups under System | Data Processor | Data Management.
If you move a tenant to a different retention group, the tenant uses the new data retention times immediately.
-
Ingestion Target—You can use this field to create a target ingestion limit for this tenant. The value you specify here is for your reference only and is not enforced.
-
-
After modifying the above fields, click Next to proceed.
-
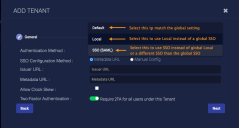
The Authentication Method screen enables you to configure tenant-specific overrides to the global authentication strategy.

-
Select Default for the tenant to use the same settings as the global authentication (set in System | Administration | Settings). If you select this option, no further configuration steps are required.
-
You might select Local authentication if the server is globally using SSO, but you want a specific tenant to use the Local authentication from the Stellar Cyber server. If you select this option, no further configuration steps are required.
-
Select the SSO option if you want the tenant to use a different SSO than the global configuration, or the global configuration is Local but that tenant wishes to use SSO. Use the following for SSO configuration guidance:
CONFIGURE TENANT-SPECIFIC SSO (Authentication Only)
-
A Global selection of Authentication and Authorization applies to all users, so the option to change authentication method for a specific tenant is not applicable when the Global method is set to Authentication and Authorization. You can not log in to Tenant SSO when Global SSO is set to Authentication and Authorization. If you want to use SSO but also allow local users and tenant override, you must set the Global authentication method either to Local or to use the IdP with Authentication Only.
-
Although you can customize SSO configuration on a per-tenant basis, the Authorization capability is only supported at the global level. Overrides you make at the tenant level are for Authentication only, so the toggle for Authentication and Authorization is not offered in the Tenant editor.
-
Choose Metadata URL or Manual Config.
-
If you selected Manual Config:
-
Enter the Issuer URL. This is your Stellar Cyber IP address or FQDN. You must include http:// or https:// in the Issuer URL field.
-
Enter the Entry Point. This is the URL you noted during your IdP setup steps. For example:
In Microsoft Entra ID (formerly Azure AD), it is referred to as Identifier (Entity ID)
In OKTA, it is referred to as Identity Provider Single Sign-On URL
-
Upload the IDP Certificate you obtained during your IDP setup steps.
-
-
If you selected Metadata URL enter the Metadata URL from your IDP provider.
-
-
-
Select Allow Clock Skew to allow for system time differences between Stellar Cyber and your IdP. Authentication messages have an expiration. If the system times on Stellar Cyber and your IdP are not synchronized, the messages might expire before they even get to Stellar Cyber. The result is that users cannot log in, because they cannot authenticate.
-
Set the Two-Factor Authentication for the users of this tenant. Note that the overall Global settings for 2FA affect this option. For example, if 2FA is Mandatory in Settings, all users must use 2FA.
-
Click Submit to save the tenant.
-
Configure your IdP for the tenant callback.

When you configure SSO on a per-tenant basis, you MUST modify the Single Sign-on URL (and Audience URL, if applicable) to use a customer ID, otherwise the callback applies to all of the Stellar Cyber DP not just the tenant. The ID you use can be for a single tenant. Most IdPs support the following syntax:
-
https://your.Stellar Cyber.address/sso/saml/metdata/cust_id/<tenant id>(This syntax is required for Azure AD B2C SSO configuration)
Example:https://10.33.2.5/sso/saml/metdata/cust_id/59125044 -
https://your.Stellar Cyber.address/saml/login/callback?cust_id=<tenant id>
Example:https://10.33.2.5/saml/login/callback?cust_id=59125044
Tenant Groups
You can add tenants to groups on the Tenant Groups page. See Tenant Groups for more information.
