Examples: Using the API with Tenants
You can use the Stellar Cyber API to perform the following tasks for tenants:
-
Create a new tenant
-
Delete an existing tenant
-
Update an existing tenant's settings
-
List all tenants
-
Retrieve a tenant's information using its tenant ID
Refer to Configuring API Authentication for general requirements to use the API.
Tenants API Syntax
The tenants API is available at the following location:
https://<DP url>/connect/api/v1/tenants
The table below lists the available methods for the tenants API, along with the corresponding syntax. Following the table, separate sections provide the schema for each method along with a corresponding example.
|
Task |
Method |
Syntax |
|---|---|---|
| GET | /tenants | |
|
GET
|
/tenants/{id} | |
| DELETE | /tenants/{id} | |
| POST | /tenants/ | |
| PATCH | /tenants/{id} |
Get All Tenants
The following example uses cURL with basic authentication to query for all tenants with a GET command using the following details:
-
Username:API Key – ohtani:N-YrP02Xl6yHO-1HW1gi1nems2g319Q3wLNpOAxWx9_ttbMw3pyB5qPvSVl3qt9CmgvOhHhtDCuEs5KcIn6mWw
-
Stellar Cyber DP IP Address –192.168.11.11
curl -k -u ohtani:N-YrP02Xl6yHO-1HW1gi1nems2g319Q3wLNpOAxWx9_ttbMw3pyB5qPvSVl3qt9CmgvOhHhtDCuEs5KcIn6mWw -i -H "Accept: application/json" -H "Content-Type: application/json" -X GET https://192.168.11.11/connect/api/v1/tenants
Values in bold are the values you must supply as part of a similar query.
Get a Specific Tenant
The following example uses cURL to query for a specific tenant with a GET command using the following details:
-
Username:API Key – ohtani:N-YrP02Xl6yHO-1HW1gi1nems2g319Q3wLNpOAxWx9_ttbMw3pyB5qPvSVl3qt9CmgvOhHhtDCuEs5KcIn6mWw
-
Stellar Cyber DP IP Address –192.168.11.11
-
Tenant ID – e4241ed4714c43df93bce83e847dfa0e
You can find the tenant ID in the System | Administration | Tenants page. Click the
 in the ID column and use the Copy to Clipboard command in the context menu that appears to copy the Tenant ID.
curl -k -u ohtani:N-YrP02Xl6yHO-1HW1gi1nems2g319Q3wLNpOAxWx9_ttbMw3pyB5qPvSVl3qt9CmgvOhHhtDCuEs5KcIn6mWw -i -H "Accept: application/json" -H "Content-Type: application/json" -X GET https://192.168.11.11/connect/api/v1/tenants/e4241ed4714c43df93bce83e847dfa0e
In response, the API returns configuration details for the specified tenant, similar to the following:
{"data":{"address":"","authentication_method":"system_default","contact":"","contact_email":"","contact_phone":"","cust_id":"f257fe53576a4dada621fcac940a9fb5","cust_name":"docs","ds_num":0,"info":"{}","ingestion_limit":"","mfa_enabled":false,"org_id":"default-organization","retention_group":"default","tgrp_name":"","ts_created":"1682412066","user_num":0}}
The "field":"value" pairs returned by the API are same options you set when creating a tenant manually in the System | Administration | Tenants page. and are described in the schema in Create a Tenant.
Delete a Specific Tenant
The following example uses cURL to delete a specific tenant with a DELETE command using the following details:
-
Username:API Key – ohtani:N-YrP02Xl6yHO-1HW1gi1nems2g319Q3wLNpOAxWx9_ttbMw3pyB5qPvSVl3qt9CmgvOhHhtDCuEs5KcIn6mWw
-
Stellar Cyber DP IP Address –192.168.11.11
-
Tenant ID – 55e521cdc5be4374bd42df5cdae628e1
You can find the tenant ID in the System | Administration | Tenants page. Click the
 in the ID column and use the Copy to Clipboard command in the context menu that appears to copy the Tenant ID.
curl -k -u ohtani:N-YrP02Xl6yHO-1HW1gi1nems2g319Q3wLNpOAxWx9_ttbMw3pyB5qPvSVl3qt9CmgvOhHhtDCuEs5KcIn6mWw -i -H "Accept: application/json" -H "Content-Type: application/json" -X DELETE 'https://192.168.11.11/connect/api/v1/tenants/55e521cdc5be4374bd42df5cdae628e1'
In response, the API returns a success or failure message. Success messages appear as follows:
{"data":"Ok\n"}
Note: If you use the API to delete the last tenant in a Tenant Group, both the tenant and the now-empty Tenant Group are deleted.
Create a Tenant
This section describes how to create a new tenant in the API. The schema for the tenants API lets you specify all of the same configuration details you would when creating a new tenant in the user interface. The only mandatory field is the Tenant Name (cust_name). The available fields are as follows:
{
  "cust_name": "string",
  "contact": "string",
  "contact_email": "string",
  "contact_phone": "string",
  "address": "string",
  "info": "string",
  "retention_group": "string",
  "mfa_enabled": true,
  "authentication_method": "sso_saml",
  "sso_config": {
    "allow_clock_skew": true,
    "idp_certificate": "string",
    "idp_metadata": "string",
    "idp_callback_type": "string",
    "issuer_url": "string",
    "sso_config_method": "metadata",
    "sso_entry_point": "string"
  },
  "ingestion_limit": 0
}
Your call must have the header and the /connect/api/v1/tenants path, and must have at least the cust_name field, in addition to any optional fields shown in the schema above.
Sample Create Tenant Script
Here is a sample Python script with arguments filled in. Note that any arguments that you don't supply values for are left at their default settings, as described in Managing Tenants
#!/usr/bin/env python
import json
import requests
headers={'Accept': 'application/json', 'Content-type': 'application/json'}
elastic_url ='https://192.168.11.11/connect/api/v1/tenants'
json_data = {
"cust_name": "My New API Tenant",
"contact": "Dev Ops",
"contact_email": "devops@fakecompany.com",
"contact_phone": "415-555-1212",
}
query = json.dumps(json_data)
response = requests.post(elastic_url, auth=('ohtani','N-YrP02Xl6yHO-1HW1gi1nems2g319Q3wLNpOAxWx9_ttbMw3pyB5qPvSVl3qt9CmgvOhHhtDCuEs5KcIn6mWw'), data=query, verify=False, headers = headers)
print (response.text)
This example performs a POST call as the user ohtaniwith the API key shown in the text. The call is to the Stellar Cyber server at 192.168.11.11to create a tenant with the following fields:
-
cust_name – My New API Tenant
-
contact– Dev Ops
-
contact_email – devops@fakecompany.com
-
contact_phone – 415-555-1212
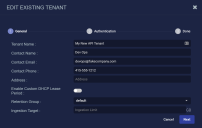
All other fields for the tenant are left at their default values. Here's how the tenant appears in the user interface after we created it in the API:
Update a Tenant
This section describes how update the settings for an existing tenant. You can use a PATCH to the tenants API to change any of the configuration details available when creating a new tenant in the user interface. The only mandatory fields are the Tenant ID and the Tenant Name (cust_name). The available fields are as follows:
{
  "cust_name": "string",
  "contact": "string",
  "contact_email": "string",
  "contact_phone": "string",
  "address": "string",
  "info": "string",
  "retention_group": "string",
  "mfa_enabled": true,
  "authentication_method": "sso_saml",
  "sso_config": {
    "allow_clock_skew": true,
    "idp_certificate": "string",
    "idp_metadata": "string",
    "idp_callback_type": "string",
    "issuer_url": "string",
    "sso_config_method": "metadata",
    "sso_entry_point": "string"
  },
  "ingestion_limit": 0
}
Your call must have the header and the /connect/api/v1/tenants/<tenant_id> path, and must have at least the cust_name field, in addition to any optional fields shown in the schema above that you want to change.
Sample Update Tenant Script
This script takes the tenant we created in Create a Tenant and changes the contact name. Note that any arguments that you don't supply values for are left at their existing settingsManaging Tenants
#!/usr/bin/env python
import json
import requests
headers={'Accept': 'application/json', 'Content-type': 'application/json'}
elastic_url ='https://192.168.11.11/connect/api/v1/tenants/046b8eeceac549a2aefa579a180dfb45'
json_data = {
"cust_name": "My New API Tenant",
"contact": "James Dean",
}
query = json.dumps(json_data)
response = requests.patch(elastic_url, auth=('ohtani','N-YrP02Xl6yHO-1HW1gi1nems2g319Q3wLNpOAxWx9_ttbMw3pyB5qPvSVl3qt9CmgvOhHhtDCuEs5KcIn6mWw'), data=query, verify=False, headers = headers)
print (response.text)
This example performs a PATCH as the user ohtaniwith the API key shown in the text. The call is to the Stellar Cyber server at 192.168.11.11to patch the tenant's contact name to James Dean:
-
Tenant ID – 046b8eeceac549a2aefa579a180dfb45
The Tenant ID can be retrieved from the System | Administration | Tenants page and included in the URL.
-
cust_name – My New API Tenant
-
contact– James Dean
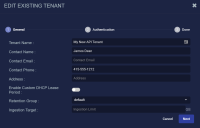
All other fields for the tenant are left at their existing values. Here's how the tenant appears in the user interface after we patched it in the API:


