Automated Threat Hunting
![]() Learn more at Stellar Cyber Academy.
Learn more at Stellar Cyber Academy.
The following link takes you to a course on the Stellar Cyber Academy technical training portal where you can learn more about this topic by watching the suggested lessons.
(2024) SOC ANALYST - Investigations and Workflows (05h:48m)
Explore workflow tools within the Stellar Cyber UI, including case management, knowledge sharing, task assignment, and alert triage. Discover ways to enhance collaboration, automate notifications, and integrate the UI tools into efficient SOC workflows.
Discover foundational strategies for building workflows in the Stellar Cyber Platform, focusing on tools that support knowledge transfer, case management, and task tracking. Learn how to structure workflows to streamline operations within your SOC.
The first time you access a link on the portal during a session, you must log in to access content.
Automated Threat Hunting (ATH), accessible from the Respond | Automation menu, is a key aspect of the Stellar Cyber architecture to enable automated responses, creation of data, and other actions. Stellar Cyber automatically notifies you by whatever method you configure when it finds a possible threat. The system includes more than 250 playbook templates and Stellar Cyber is always developing more.
This article is organized into the following main sections:
Playbook List
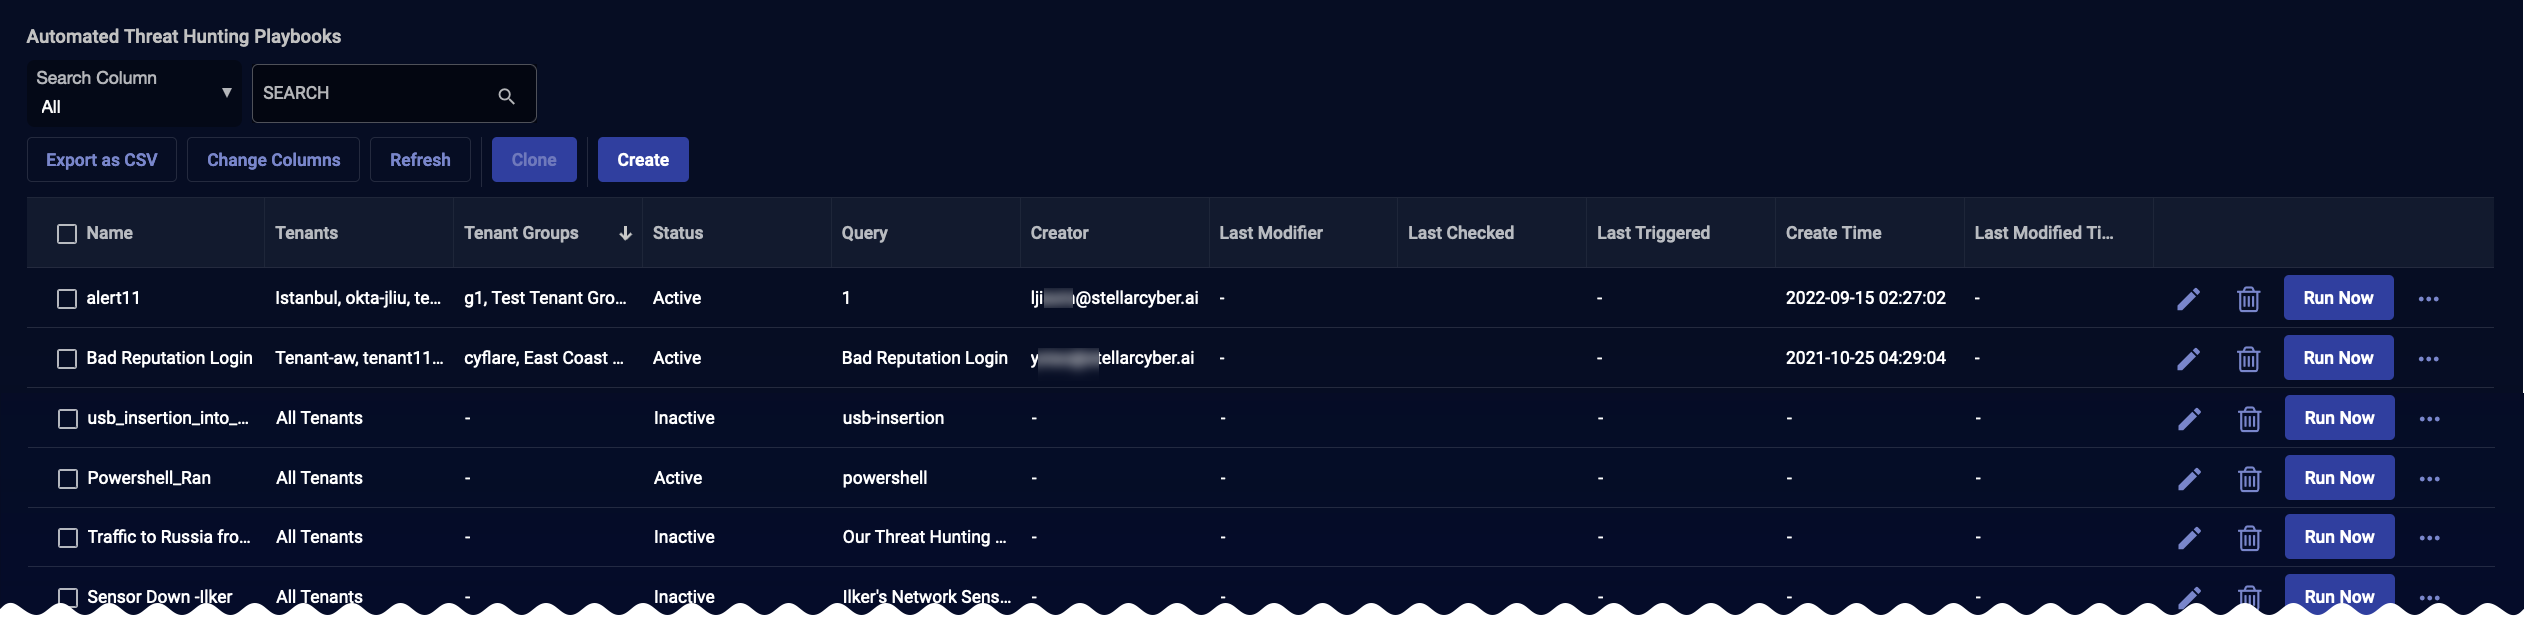
When you navigate to Respond | Automation, Stellar Cyber displays the playbook list. The list begins with two default playbooks and includes any that you create or load from a template.
The visible playbooks are restricted to those accessible to the currently active tenant. The columns for Tenant and Tenant Group are displayed only for Partner users and Root users.
Playbook Actions
You can create a new playbook using the following techniques:
-
Creating: To open editor with blank fields and define a completely new playbook, click the Create button.
-
Cloning: To use an existing playbook as a template, select one or more check boxes at the start of a row and then click the Clone button. The playbook(s) are duplicated and named the same as the original with a timestamp added. Edit the copy to customize it, as needed.
-
From a Custom Alert Type in the Alerts Page: As described in Creating New Alert Types , you can use a custom alert type's Add Playbook option in the Alerts list to create a new playbook pre-filled with the settings from the custom alert type.
For each playbook in the list, you can:
-
Click
 to edit the playbook. The configurations in the Edit dialog box are identical to those in the Add dialog box.
 -
Click
 to delete the playbook. You must confirm the deletion. (You cannot delete the default playbooks.)
 -
Click Run Now to run the playbook immediately, regardless of the schedule, and take any configured actions. You can do this whether the playbook is active or not. Running the playbook now does not reset the schedule.
-
Click and Disable or Enable to immediately disable or enable the playbook.
-
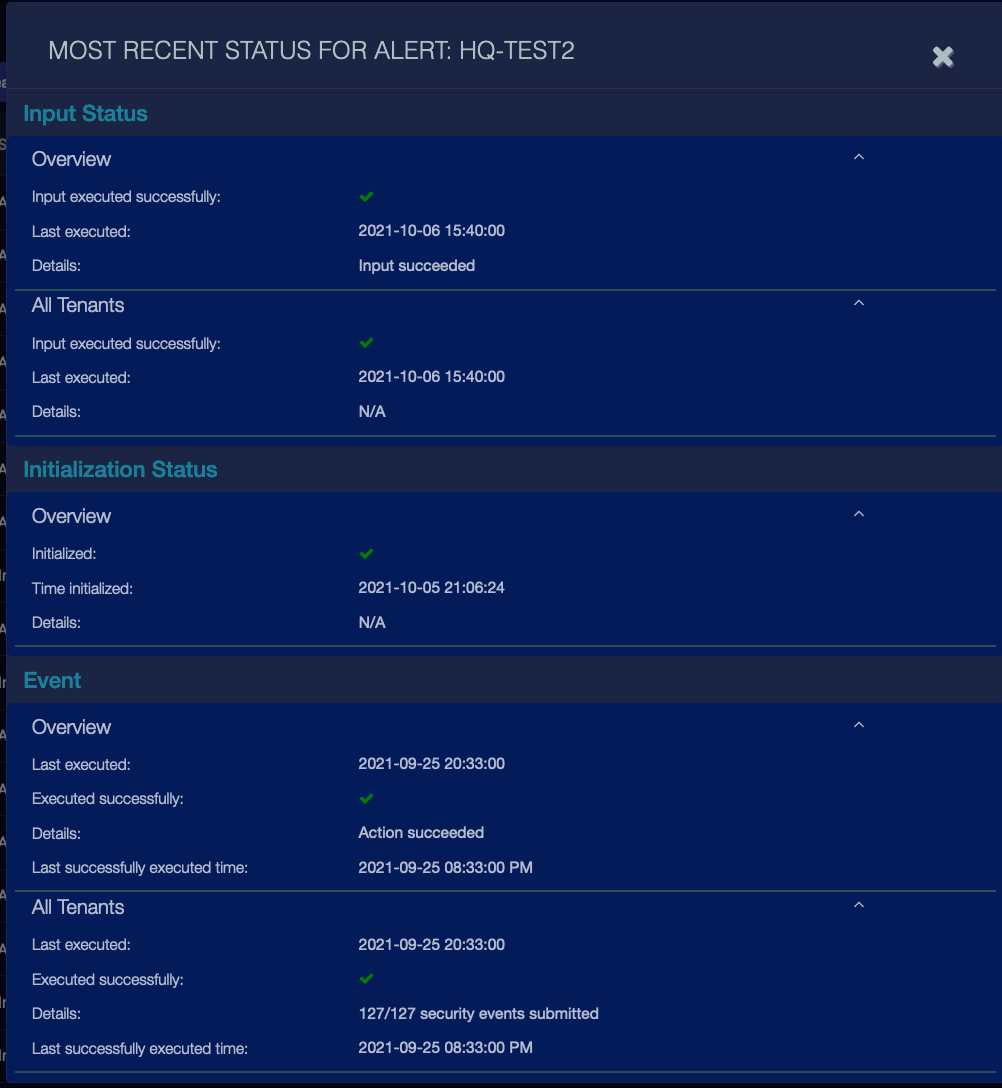
Click and Last Status to see the results of the last time the playbook ran, including the email address where any email notifications was actually sent. The screen is similar to the following.
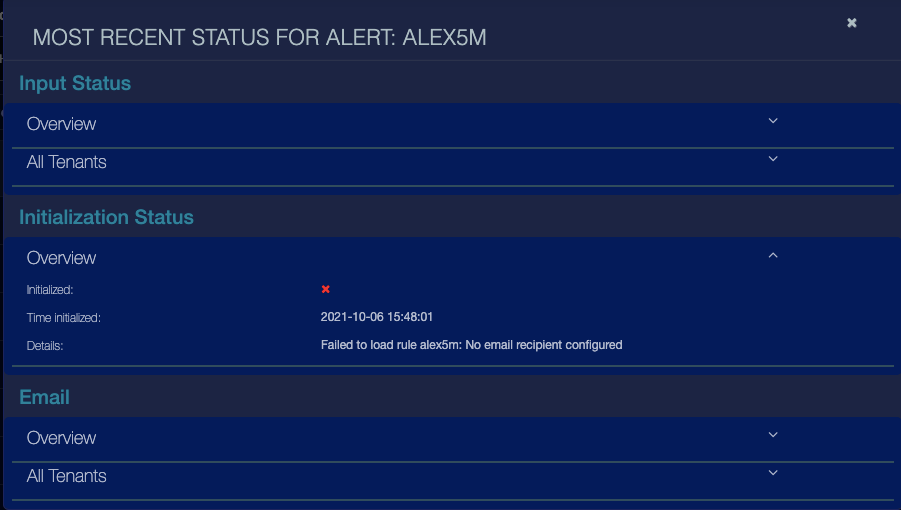
When Stellar Cyber sends an email message with a file attachment that’s too large for email servers to forward, it displays the following message when you select Respond | Automation and then … | Last Status for one of the Automated Threat Hunting playbooks:
Attachment too large (Email server returned 500, message: None), sent without interflow attachment (sent to: user@domain.name). In addition, the Executed successfully field shows a red x to indicate no attachment was included.For newly created playbooks, a basic validation is done when you first save your configuration and when the playbook is run. The result of this validation is displayed in the Last Status dialog section titled Initialization Status.
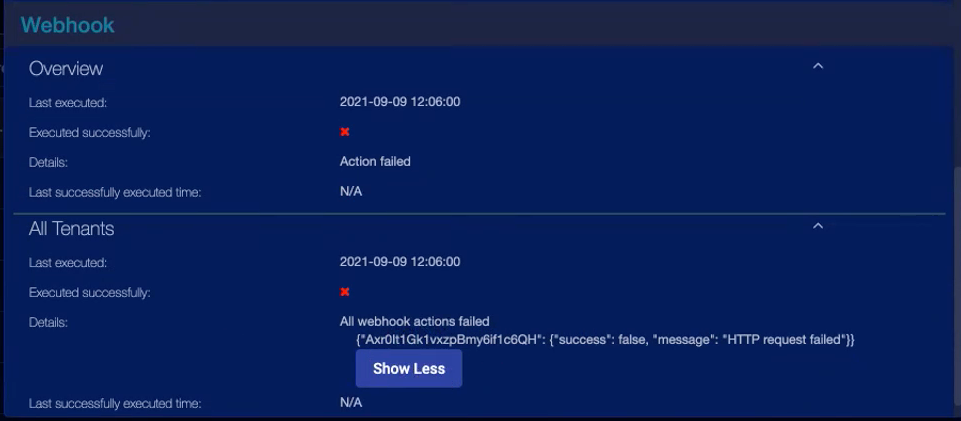
In cases where the action failed and that failure generated a log file, you can use the Show Logs button to examine the log detail.
-
Click and Restore Default to reset the edited values of a factory defined playbook to the factory default values. This action does not affect whether you have enabled or disabled the playbook, or other attributes displayed in the table of automations. It only affects the playbook configuration.
Default Playbooks
Stellar Cyber includes default playbooks for common threat hunts so you can focus on your custom threat hunts. The default playbooks have a creator of System.
You can edit the default playbooks to add recipients, actions, or anything else. You can disable them, but you cannot delete them. The default playbooks are:
-
Data Ingestion Anomaly for Network and Security Sensors
-
Description – a data ingestion anomaly has been reported at least once
-
Frequency – every 5 minutes
-
Indices – aella-ser-*
-
event_name – ade_outbytes_anomaly
-
Action – email to every user with the Super Admin profile
-
-
Data Ingestion Anomaly for Agent Sensors
-
Description – a data ingestion anomaly has been reported at least once
-
Frequency – every 5 minutes
-
Indices – aella-ser-*
-
event_name – ade_outbytes_anomaly
-
Action – email to every user with the Super Admin profile
Create or Edit a Playbook
When you select the Create button from the Respond | Automation playbook list, or from an Alerts table, a fresh playbook editor appears. If you edit a playbook, the same editor appears with its previously configured settings. The steps are the same, whether you are adding or editing and whether you opened it from the Respond | Automation or Alerts menu.
The configuration of an ATH playbook involves the following steps:
| Objectives | Steps | Links | ||
| 1 – Set the foundation | Define the playbook name, schedule, tenant, and index in the Alert Configuration section. | See Alert Configuration. | ||
| 2 – Build detection logic | Create or load your query or correlation in the Query section. | See Build a Query or Build a Correlation. | ||
| 3 – Refine query results | Optionally perform mathematical operations and aggregate data returned in your query results in the Calculations section. | See Add Calculations (Optional). | ||
| 4 – Specify trigger conditions | Define your logic for triggering alerts in the Condition Configuration section. | See Add Conditions. | ||
| 5 – Configure responses | Set up automated responses in the Actions section. | See Configure Actions. | ||
| 6 – Submit your playbook | Save and activate the configuration. | |||
| The playbook is automatically enabled. |
Use the remainder of this section as a guide for how to work with each section of the playbook page. For specific examples, refer to the following descriptions:
- Create a playbook that looks for too many half-opened sessions.
- Create a playbook that looks for sensors that haven't transmitted data for a while.
- Create a playbook that looks for pass-the-hash attacks.
- Create a playbook that sends an email or Slack message whenever a case's score exceeds a specified threshold.
- Create a playbook that uses nested calculations to block a port-scanning source IP address.
Alert Configuration
The Alert Configuration section is at the top of the ATH playbook.
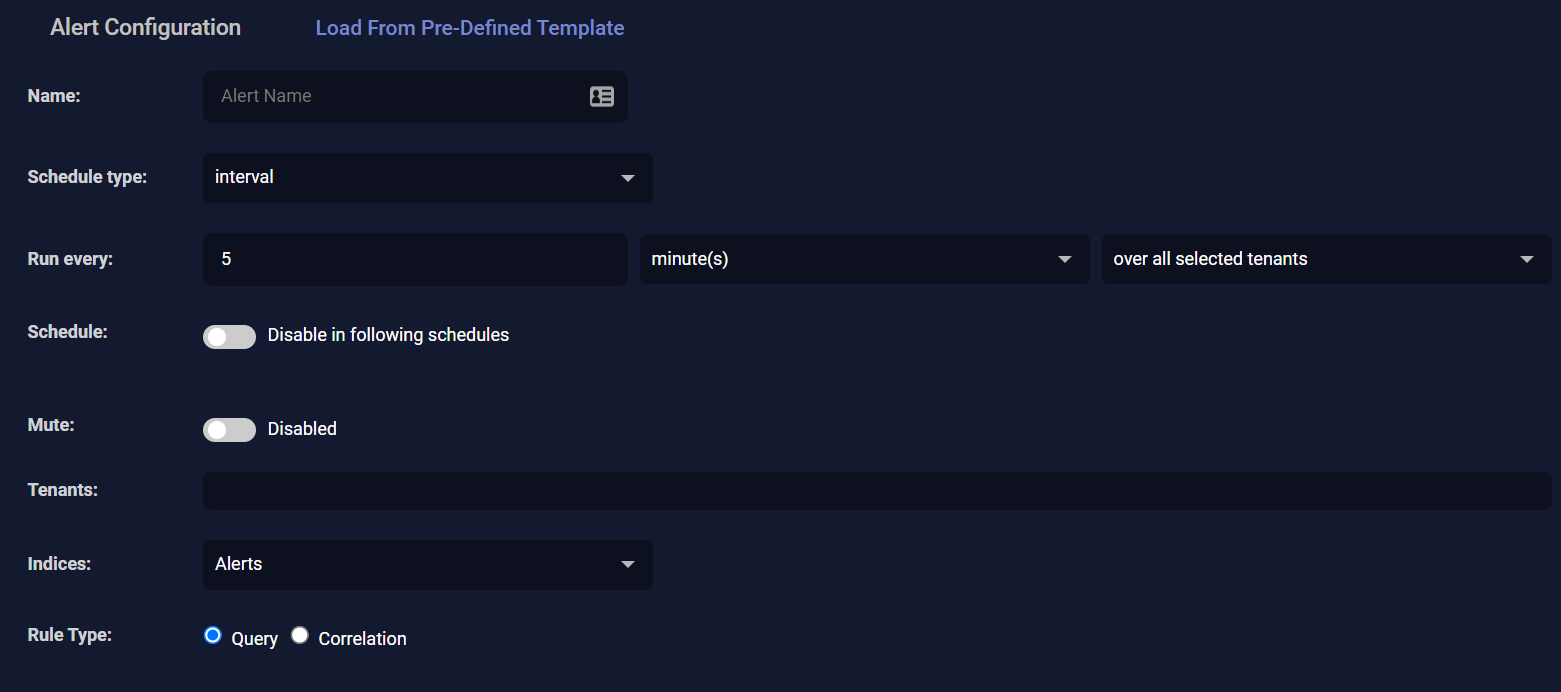
Stellar Cyber recommends using one of the templates to start. You can modify the template as much as you want.
-
Select Load From Pre-Defined Template.
-
Select a template.
-
Select Submit.
The playbook is immediately populated with the template settings.
-
Enter a name for the playbook.
The name is automatically the template you loaded; you can change it.
-
(Optional) In the Description field, enter a note about the purpose of the playbook for future reference.
You can enter up to 250 characters in any language, including characters in unicode.
-
Select the Schedule type.
You can select anything from interval (to specify minutes) to Monthly.
Scheduled times entered as part of Daily, Weekly, and Monthly schedules are expressed in UTC and not the timezone of your browser.
-
Use the Run every options to specify when you want the playbook to run given the type of schedule you selected in the previous step. For example, if you chose Monthly in the previous step, you can use the Run every options to specify on which day of the month to run the playbook.
In previous releases, if you chose Per Tenant, you could only send an email as the action. This restriction is no longer in place – you can now use either the Email or Create Alert action when Per Tenant is selected.
-
Use the optional Schedule settings to disable the playbook during specific time windows.
For example, you could restrict the playbook to running only during business hours in Europe.
-
Select Disable in following schedules to turn the option on.
-
Choose the time zone from the drop-down list.
-
Use the table that appears to schedule windows of time where the playbook does not run.
For example, in the figure below, weekends are excluded:
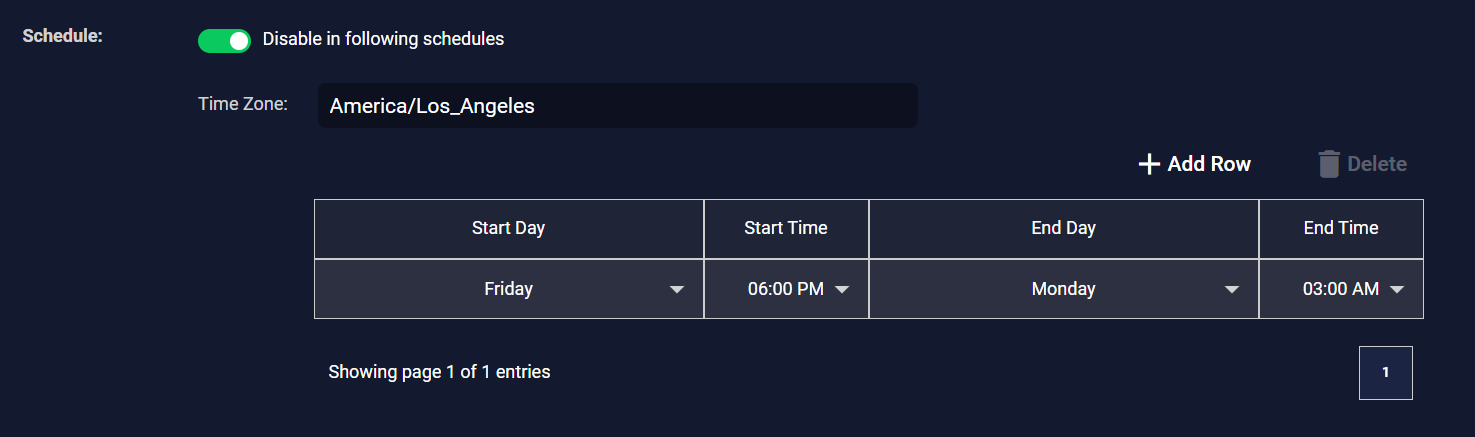
If necessary, delete rows by selecting them and then selecting Delete.
If you have trouble getting the schedule rows to display the available options, try double-clicking.
-
-
To temporarily silence alert generation from the playbook for a specified amount of time, toggle Mute from Disabled to Enabled and use the adjacent fields to specify for how long you want to stop triggering alerts.
You can also mute individual actions associated with the playbook. Note that Alert-level mutes take precedence over Action-level mutes. If the alert is muted, no actions will be triggered. If the alert is unmuted, you can mute individual actions.
-
Select the tenants or tenant groups on which to run.
Sending an alert to a tenant group has the same performance impact as sending alerts to each individual tenant.
If you configure an Automated Threat Hunting (ATH) playbook to create alerts using the Create Alert action and you add calculations, set the scope to a single tenant rather than All Tenants. Alerts cannot be created if calculations are applied across multiple tenants because the results cannot be associated with a specific tenant. Other actions, such as email notifications, Slack messages, webhook queries and so on, still work because they don’t require a specific tenant ID.
-
Select the index.
-
Select the rule type.
The default for this template is Query. If you select Correlation, you can load a correlation or create a new one.
Build a Query
The Build a Query section appears if you select the Query rule type. This is the query you want to run on the specified tenant.
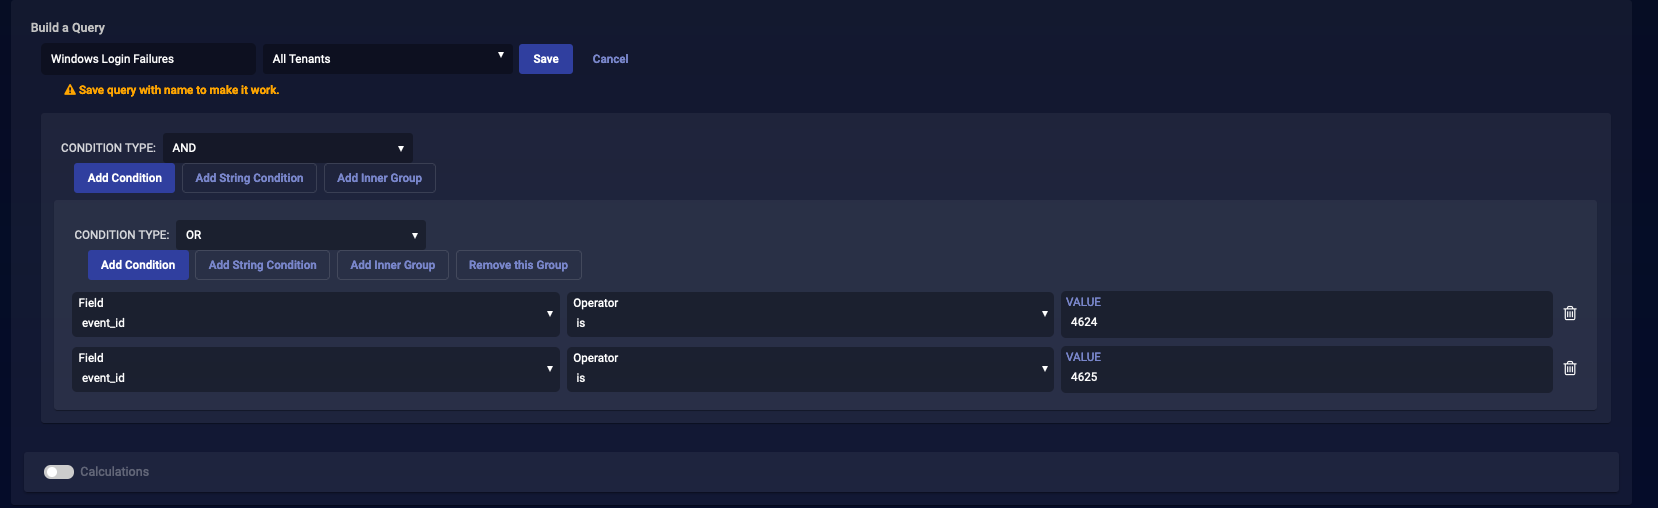
The template built a query, which can be changed if you want. To edit (or build) your query:
-
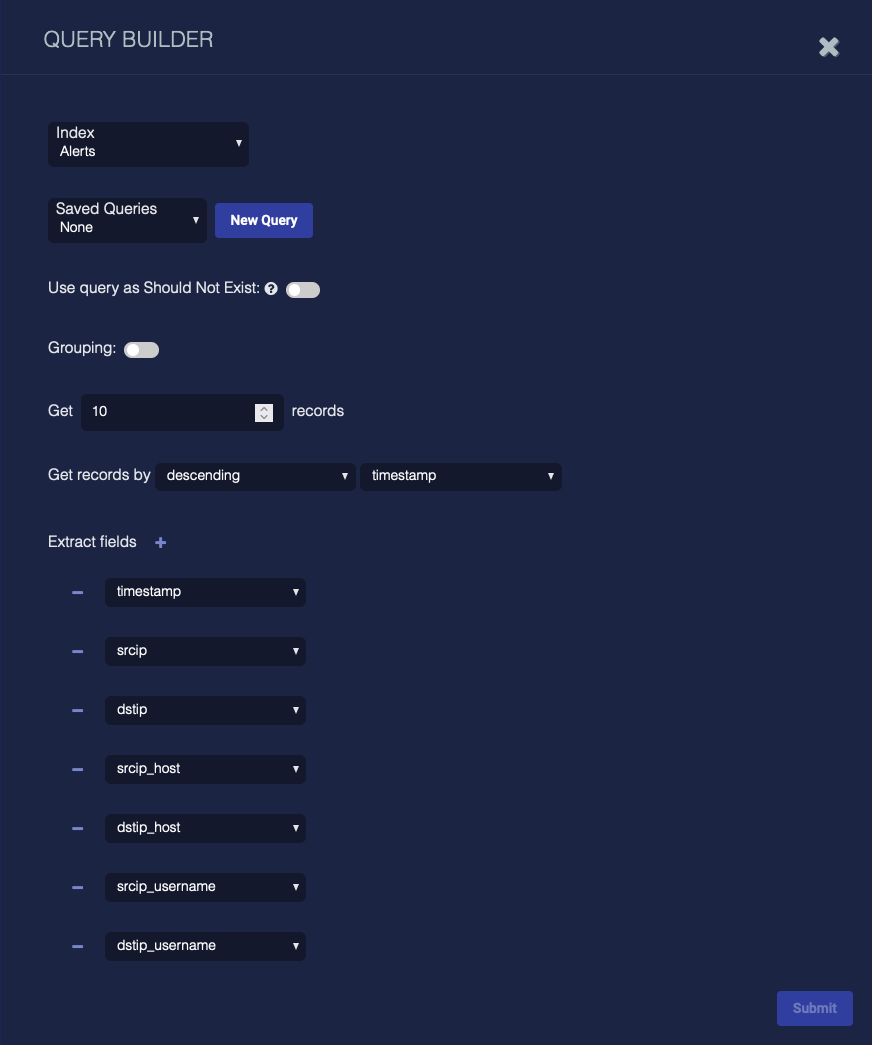
Enter a name for the query.
The name is automatically the template you loaded. The query name is listed in the Automated Threat Hunting Playbooks list for easy reference.
Special characters are not permitted in name fields for Queries, Lookup lists, or Reports/Dashboards. Letters, underscores, spaces, dashes, numbers and periods are permitted.
-
When referencing fields in a query condition, use
_source, such as_source.appid_name. This is required because ATH queries operate on Elasticsearch results where each document is wrapped in a_sourceobject underhits.hits[]. In contrast, when specifying a field in a calculation, use only the field name—for example,appid_name. This is because calculations are based on aggregation buckets located inaggregations.<name>.buckets[], where fields are not nested under_source. While the UI displays field names without_source.due to internal optimization, this does not affect how queries or calculations must be written.The scope of a query determines which tenants can use it. Whether it's possible to create a query for All Tenants depends on the scope of the object being queried, such as charts, correlations, and Automated Threat-Hunting (ATH) rules. In short, the scope of a queried object cannot be more restrictive than the scope of the query itself. For example, if you create an ATH rule for All Tenants, then the query for this ATH rule can either be All Tenants or just a single tenant, such as "Tenant A" for example. However, if you create an ATH rule for Tenant A, then the query cannot be for All Tenants because the other tenants won’t have this ATH rule and won’t be able to query it. In this case, the query can only be for Tenant A.
-
Save the query.
The display changes to show the saved query in Domain Specific Language (DSL).

For more details on Queries, see Queries and Filters.
From this point you can take the following actions:
-
Select the saved query to load another saved query.
-
Select Edit to return to the Query Builder screen.
-
Select Delete to delete the query.
-
Select New Query to build another query.
For more details on Queries, see Queries and Filters.
-
Select Calculations to perform data aggregation and analysis within query results in the playbook. (If you add a calculation, you can include a CSV file with an email action).
For another example using multiple nested calculations, see ATH Example: Blocking a Port Scanning Source IP .
Build a Correlation
Correlation settings appear if you select Correlation as the rule type.
To load a saved correlation, select Load Saved, choose the saved correlation, and then Submit your choice.
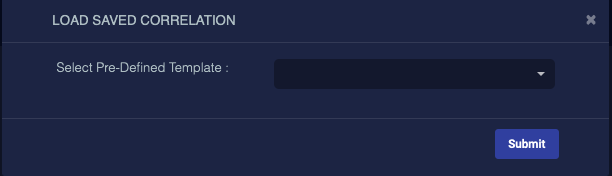
Your correlation is immediately displayed.
However, for this correlation example, you create your own correlation.
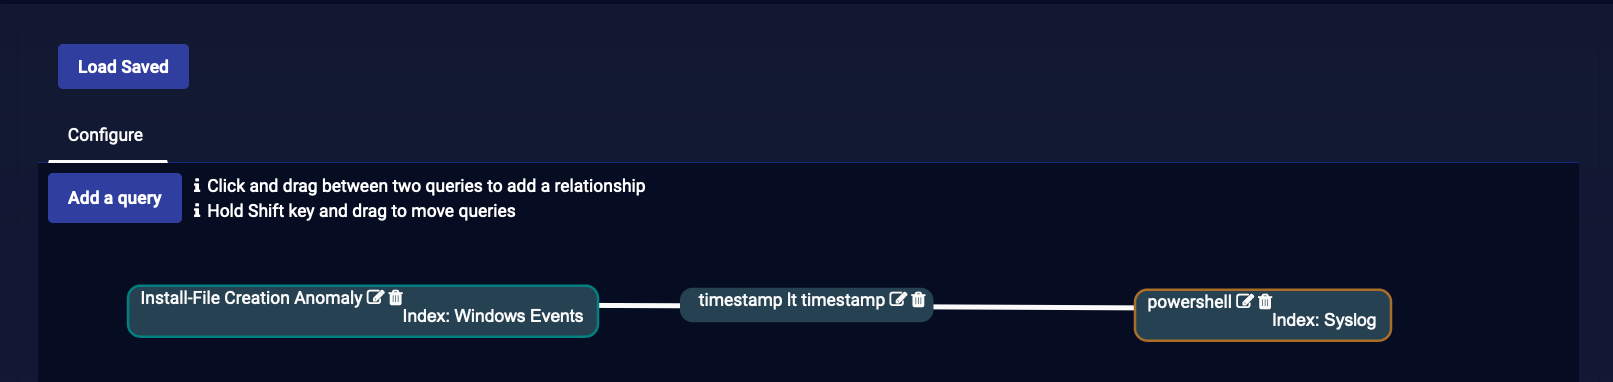
-
Select Add a query and add two queries
-
Click the button on each query to edit its details.
When you create a correlation for use in a Firewall action, ensure that Grouping is not enabled. In addition, the list of Extracted Fields (see above image) must include
srcipanddstipin the query object for the host on which you want to perform the Firewall action. That same query object must be enabled with the Active setting when you perform the Firewall action configuration, below. -
Add a relationship.
-
Continue with the rest of the playbook configuration.
Add Calculations (Optional)
The Calculations section in an Automated Threat Hunting (ATH) playbook is an optional feature that's disabled by default. To use it, you must first enable the section. After that, its configuration options become visible. Calculations allow you to perform data aggregation and analysis directly within query results before conditions and actions are applied. This helps to prioritize threats, reduce noise, and improve the accuracy of automated detection.
When adding calculations to an ATH playbook, ensure that the scope is set to a single tenant if you intend to use the Create Alert action. If the scope is set to All Tenants and multiple tenants are involved, alerts cannot be created because calculation results span multiple tenants and Stellar Cyber cannot assign a valid tenant ID to the alert. Other actions continue to function because they don't depend on a tenant ID.
The Calculations section supports different types of data aggregations, including metric aggregations (such as sum or average) and bucket aggregations (such as top or bottom-ranked values). When a calculation is applied, its result can be referenced in the Conditions section of the playbook, allowing you to create more refined automation logic. For example, a calculation could determine the top 5 source IP addresses by event count, and a condition could then trigger actions only if the count exceeds a threshold.
Calculation Types
The Calculations section in an ATH playbook allows users to analyze data using three types of calculations:
-
Top: Retrieves the highest-ranking values based on a selected field
-
Bottom: Retrieves the lowest-ranking values based on a selected field
-
Metric: Performs a mathematical operation on a dataset
When you select Top or Bottom, you must configure these settings:
-
Field to calculate on: The dataset field used for ranking
When specifying a field in Field to calculate on, use only the field name—for example,
appid_name—and not_source.appid_name. This is because calculations are based on aggregation buckets located inaggregations.<name>.buckets[]and fields aren't nested under_source. In contrast, when referencing fields in a query condition, do use_source, such as_source.appid_name. This is required because ATH queries operate on Elasticsearch results where each document is wrapped in a_sourceobject underhits.hits[]. While the UI displays field names without_source.due to internal optimization, this does not affect how queries or calculations must be written.If using a text field, you must append
.keywordto the field name. -
Calculate By: Defines the mathematical operation (see Section 2)
-
Size: Specifies the number of results to return (default: 10)
When you select Metric, you must choose two components for the calculation from two drop-down lists:
-
From the first list, choose one of several mathematical operations to perform on the dataset: average, maximum, minimum, sum, or unique count.
-
From the second list, choose a field on which to apply the operation.
Mathematical Operations
Each calculation type supports different mathematical operations
If you choose a mathematical operation other than Count, you must also choose the field on which to perform the operation.
Count: Counts the total number of aggregated Interflow records that include the specified field and therefore fall into the same bucket, or group, as it's called in the Stellar Cyber UI. Examples:
-
Counting the number of alerts for a given IP address
-
Counting the total number of failed login attempts across all users
-
Counting the number of times a specific file is accessed
Average: Calculates the average of numeric values extracted from the specified field in all aggregated Interflow records. Examples:
-
Determining the average response time for HTTP requests
-
Calculating the average number of connections made per user
-
Finding the average CPU utilization across multiple servers
Maximum: Returns the highest value extracted from the specified field in all aggregated Interflow records. Examples:
-
Finding the maximum number of login attempts from an IP address
-
Identifying the peak network bandwidth usage in a given timeframe
-
Determining the highest number of alerts generated for a single user
Minimum: Returns the lowest value extracted from the specified field in all aggregated Interflow records. Examples:
-
Identifying the shortest session duration for a user
-
Finding the lowest CPU utilization recorded in the last 24 hours
-
Determining the smallest number of login attempts made by an individual user
Sum: Adds up numeric values extracted from the specified field in all aggregated Interflow records. Examples:
-
Summing up the total number of bytes transferred by a source IP
-
Summing the total duration of all remote desktop sessions in a given period
-
Summing the total number of login attempts across all users
Unique Count (cardinality): Calculates an approximate count of distinct values extracted from the specified field in all aggregated Interflow records and ignores records with duplicate values in this field. Examples:
-
Counting the number of unique users accessing a particular server
-
Counting the distinct IP addresses that have connected to a network in the last 24 hours
-
Counting the number of unique domains visited by a specific user
Nested Subgroups
Subgroups in Automated Threat Hunting (ATH) calculations let you drill deeper into data relationships by creating hierarchical layers of analysis. They refine the primary Top or Bottom calculation by applying additional filters within its results. This helps you identify attack patterns, prioritize threats, and automate detection with greater accuracy.
For example, instead of simply identifying the top 10 most active source IP addresses in failed login attempts, you can add a subgroup to further break down the top 5 destination hosts targeted by each of those addresses. You can then add another subgroup to list the top 3 usernames used in the failed logins for each host. By layering calculations like this, you can more easily detect patterns such as credential stuffing attacks or lateral movement.
Understanding the display of subgroups in the UI
Each subgroup is nested beneath its parent calculation, forming a tiered structure that lets you refine results step by step. The UI visually represents these relationships using indentation and L-shaped lines that connect each subgroup to its parent.
-
Parent Calculation (top-level calculation): The first calculation that defines the dataset scope
-
Subgroup (child calculation): A calculation applied within the results of the parent calculation
-
Additional Subgroups: Each subsequent subgroup filters data from its immediate parent, creating deeper levels of segmentation.
Example: Tracing Failed Login Attempts
This example demonstrates how to use nested subgroups to investigate failed login attempts, a key indicator of brute-force attacks or credential stuffing. The following are the three goals of these calculations:
-
Identify the top 10 most active source IP addresses that are generating failed login attempts.
-
Within each of these addresses, find the top 5 destination hosts they are targeting.
-
For each host, determine the top 3 usernames used in failed login attempts.
By structuring calculations in this way, you can correlate attack behavior across different dimensions and focus your security response on the most targeted systems and compromised credentials.
The Query in this ATH playbook filters Interflow records that match the condition: event_name is user_login_fail.
-
Enable the Calculations section in your ATH playbook.
-
To create the parent calculation, select the + (Add a Calculation) icon next to Calculations to add a new calculation and enter the the following:
Name:
Top 10 Source IPs for Failed LoginsCalculation type: Top
Field to calculate on: srcip
Calculate By: Count
Size: 10
-
On the right side of the newly created
Top 10 Most Active Source IPscalculation, select Add Subgroup and then enter the following:Name:
Top 5 Destination HostsCalculation type: Top
Field to calculate on: host.external_ip
Calculate By: Count
Size: 5
-
On the right side of the
Top 5 Destination Hostscalculation, select Add Subgroup and then enter the following:Name:
Top 3 Usernames in Failed LoginsCalculation type: Top
Field to calculate on: username
Calculate By: Count
Size: 3
After adding these calculations, Stellar Cyber displays nested calculations with each subgroup appearing indented beneath its parent.

Each subgroup calculation only applies within the results of its parent group, letting you refine security analysis step by step.
Add Conditions
Automated Threat Hunting (ATH) playbooks let you define conditional logic that determines when an action should be executed. Conditions are configured within the Condition Configuration section of a playbook and can be based on direct field values or calculated results from an aggregation, which is a grouping of Interflow records based on specified fields.
After configuring settings in the Alert Configuration, Query, and (optionally) Calculations sections, select + (Add a Condition) in the Condition Configuration section.

Condition Types
When configuring a condition, the Type setting determines how the condition evaluates data. The following are the two Type options:
-
Compare Value: Directly compare a field value against a comparison value.
-
Compare List: Evaluate whether one or more values in a dataset match a condition.
Compare Value
When you select Compare Value, the Value setting presents a single option: Total Hits. This means the comparison applies to the total number of Interflow records matching the query defined earlier in the playbook. After choosing an operator from the list (does not equal | equals | is greater than | is greater than or equal to | is less than | is less than or equal to), enter a comparison value in the field on the right.
Example: Detecting Excessive Login Failures
This condition triggers when a query defined earlier in the playbook gets results for at least five failed login attempts within a monitored dataset, which might indicate a brute-force attack or unauthorized access attempts.
-
Condition Name:
Multiple Failed Logins -
Type: Compare Value
-
Value: Total Hits
-
Operator: is greater than or equal to
-
Comparison Value: 5
Compare List
When you select Compare List, the Field setting provides multiple options depending on whether a calculation has been configured within the playbook.
Comparison Field Options
The Field list includes options from two sources:
-
Calculation-Based Fields
If a calculation is configured in the Calculations section of the playbook (above the Conditions section), the following options appear:
-
Result list of <calculation-name>
-
Result counts of <calculation-name>
These options allow the condition to compare against the computed results of the configured calculation. The calculation name in these options corresponds to the name assigned in the Calculations section of the playbook.
Configuring a calculation is optional. If no calculation has been set, these options don’t appear in the Field list, although you can still choose among the security alert field names that comprise the rest of the items in the Field list.
-
-
Event-Based Fields from Security Alert Interflow Records
The Field list contains a broad set of security alert metadata field names extracted from Interflow records. These field names originate from various security alerts generated by Stellar Cyber or detected through third-party security integrations and can include attributes such as these for example:
-
abnormal_security.attackVector – The method used in the attack (for example, phishing, malware, and exploit).
-
abnormal_security.attachmentCount – The number of attachments in an email security event.
-
abnormal_security.category – The classification of the alert (for example, phishing, impersonation, and data exfiltration).
These field names allow conditions to be based on raw event data independent of any configured calculations.
-
Example: Identifying Large Data Transfers
This condition is designed to detect excessive outbound data transfers, which might indicate data exfiltration, unauthorized file transfers, or insider threats. It ensures that any host exceeding a 1-GB data transfer threshold is flagged for security review.
The condition references a previously defined calculation (High-Transfer-Hosts), which identifies the top 10 hosts with the highest outbound data volume. The condition references a previously defined calculation (High-Transfer-Hosts), which identifies the top 10 hosts with the highest outbound data volume. By applying a threshold of 1,000,000,000 bytes (1 GB), this rule isolates only significant data transfers, reducing false positives from routine network activity.
-
Condition Name: Data Transfer Threshold Exceeded
-
Type: Compare List
-
Comparison: At least one
-
Field: Result list of High-Transfer-Hosts
-
Operator: is greater than or equal to
-
Comparison Value: 1000000000
Comparison Modes
When configuring a Compare List condition, the Comparison setting affects how results are evaluated:
-
At least one: The condition is met if at least one result matches the criteria.
-
All: The condition is met only if all results match the criteria.
These options are only available when using Compare List. If Compare Value is selected, the Comparison setting is removed.
Best Practices
-
Use Compare Value when working with overall counts.
-
Use Compare List when evaluating specific field values or calculated results.
-
Ensure the correct Comparison mode is selected based on whether any or all results must match.
-
If using calculations, verify that Result List and Result Counts appear in the field options.
-
If comparing security alert metadata, check Interflow records in Investigation | Alerts to confirm field values.
Configure Actions
You can configure any number of actions to take place if your playbook gets the specified number of hits. Those actions are:
- Slack
- Webhook Responder

- Legacy Webhook
- Firewall / Security Switch
- Create Alert
- Disable User
- Run Script
You can also temporarily mute an action if you find that you are receiving too much "noise" from it.
Email Action
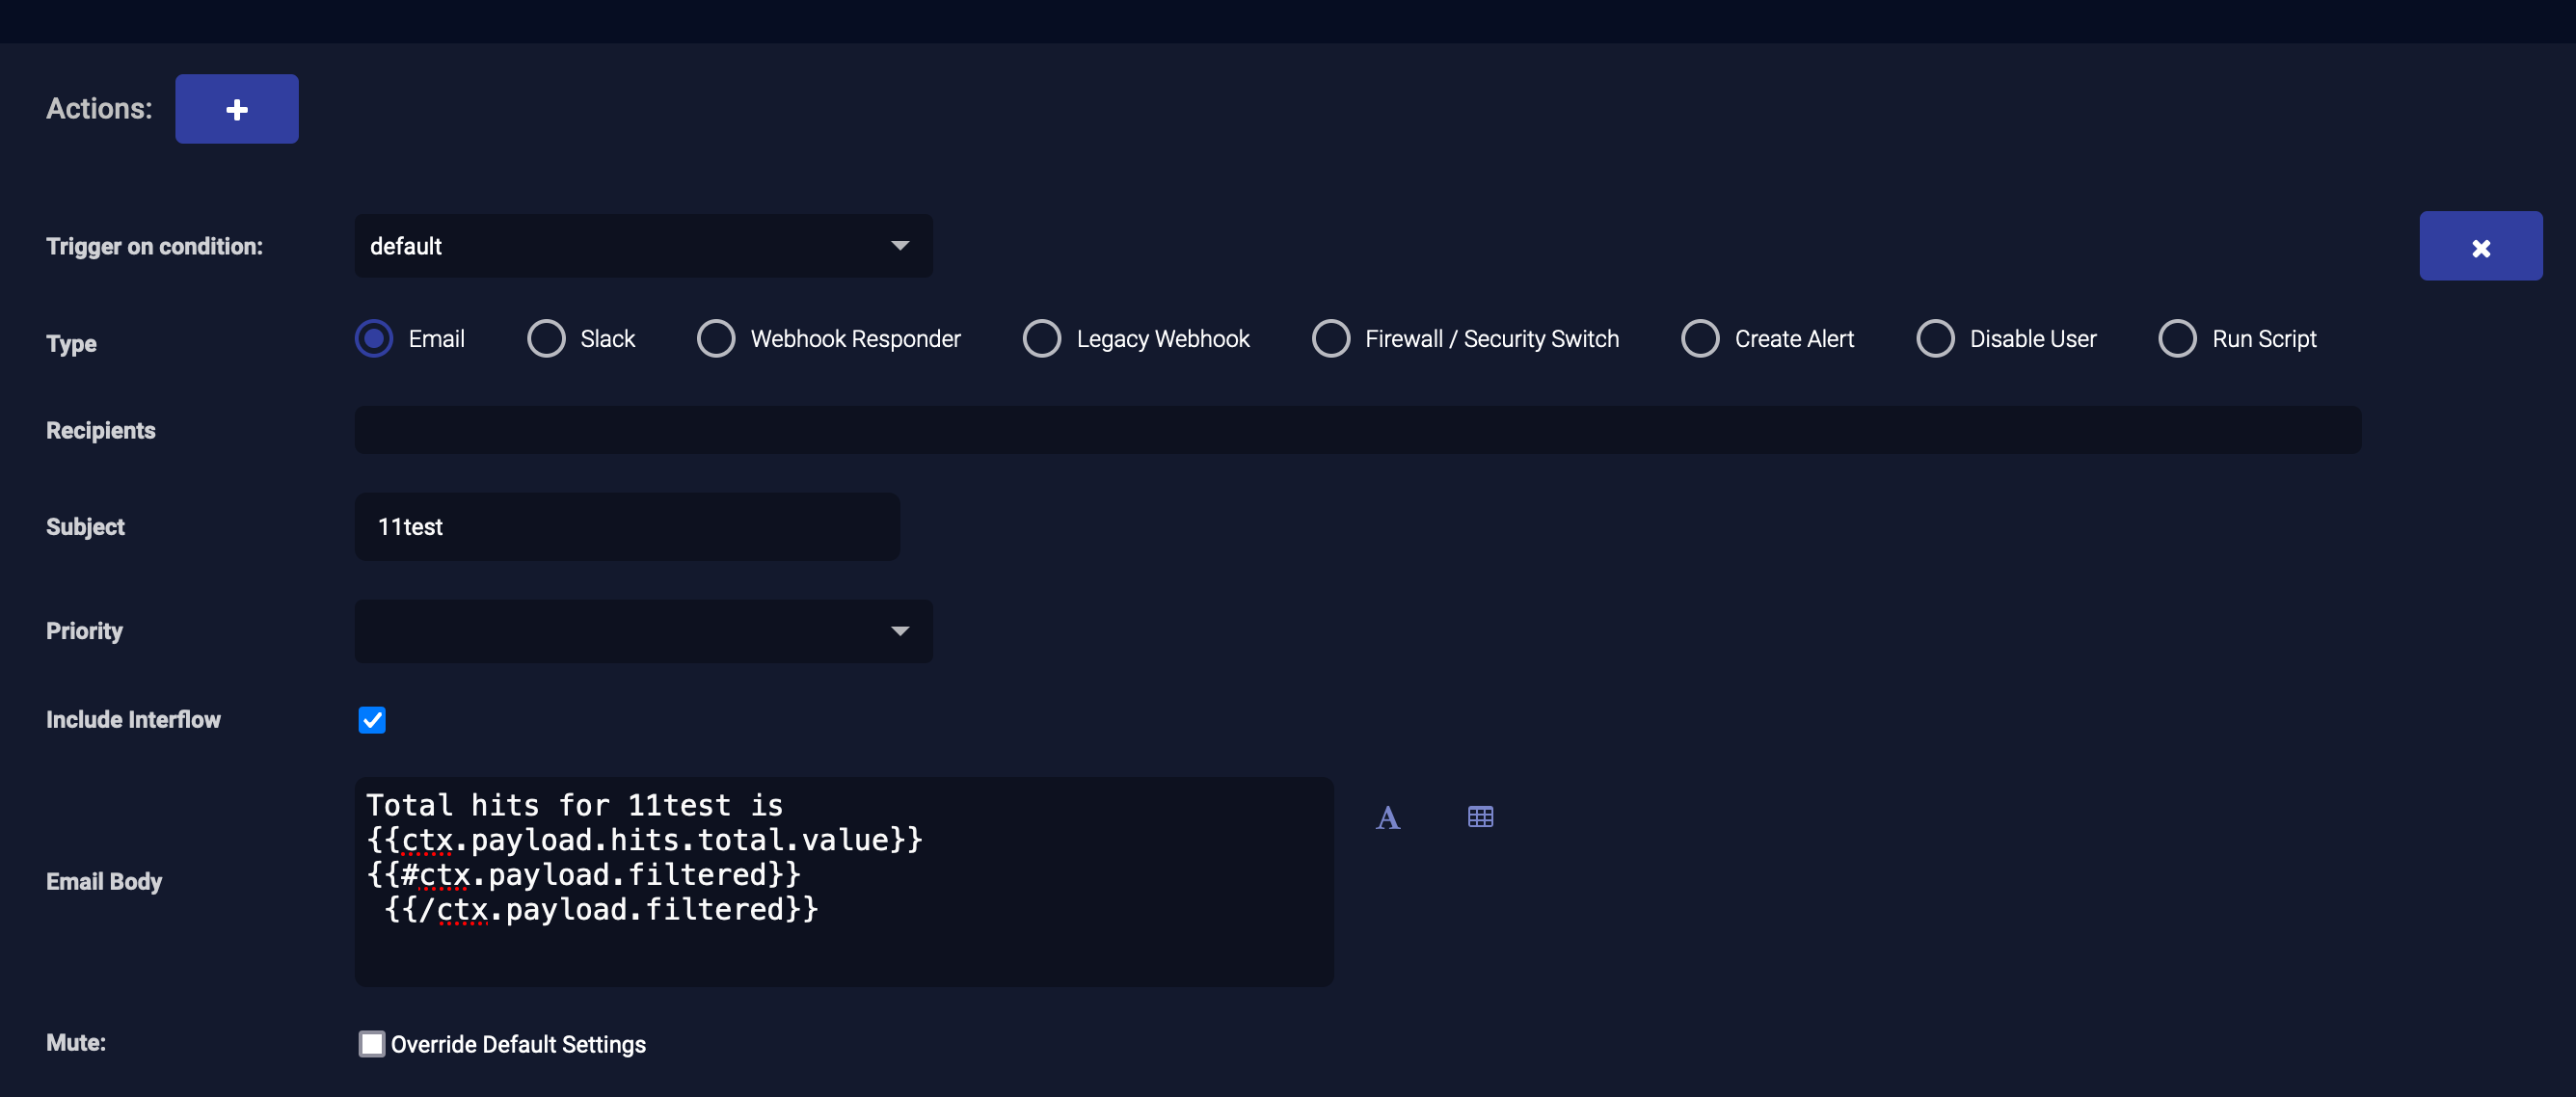
Sending an email is the default action, so Stellar Cyber automatically selects it and populates the Subject and Email Body. To send an email as an action:
-
Select the Trigger on condition.
-
Ensure that Email is selected for the Type.
-
Choose Recipients.
To add a new recipient, see Adding a Recipient.
-
Edit the Subject.
The subject can contain alphanumeric characters, spaces, and underscores.
-
Include the Interflow data if you want. Choose Include Interflow to have the Interflow data appended to the email.
-
If you added a calculation when building a query, choose Include CSV of Calculation Results to attach a CSV file to the email.
If you have multiple calculations, the email will include multiple attachments with the results of each calculation in its own CSV file.
-
Edit the Email Body if you want.
Slack Action
Before you add a Slack action, make sure you enable incoming webhooks in Slack and create an incoming webhook for use with Stellar Cyber. Refer to this article in the Slack API documentation for details.
To configure a Slack message as an action:
-
Click the button to add an action.
Another action appears below the existing action.
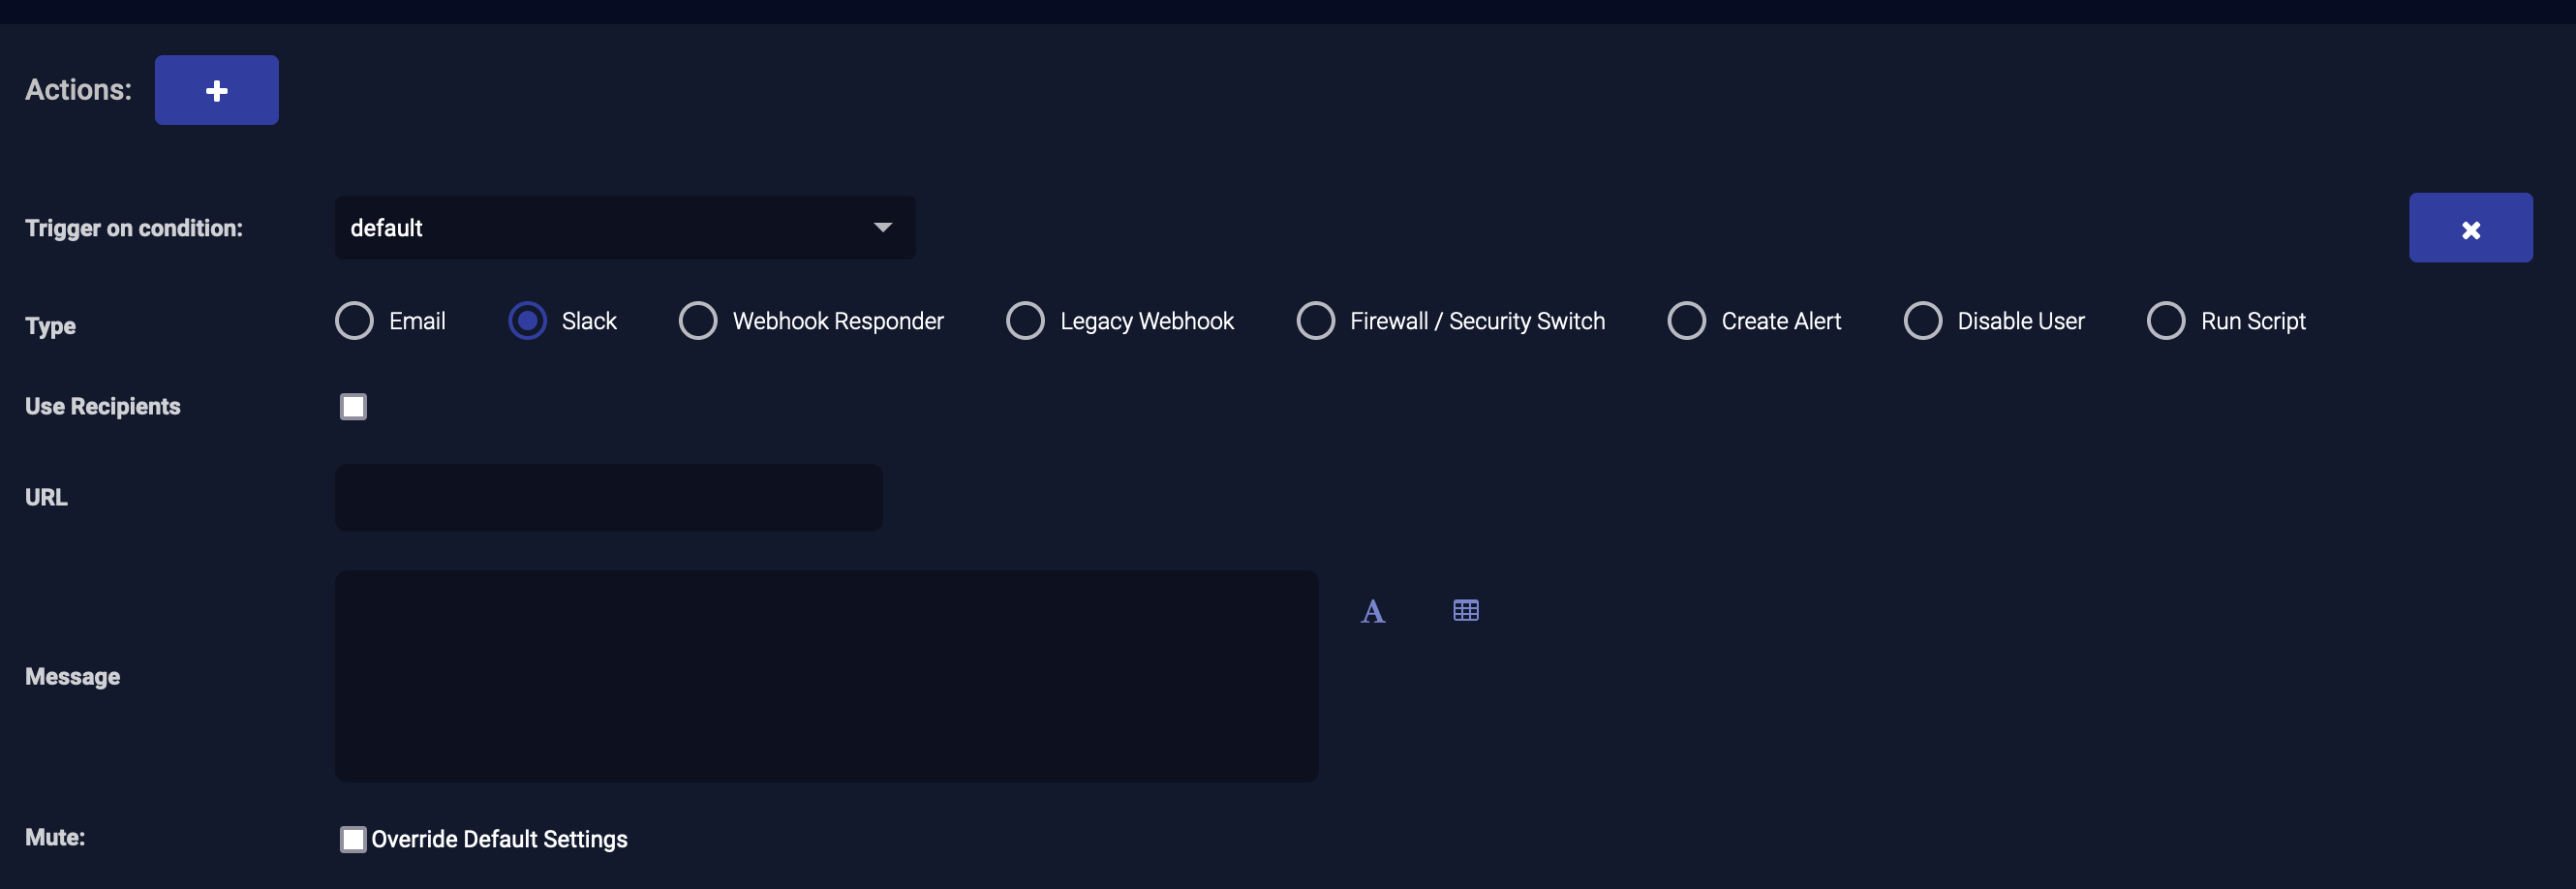
-
Select the Trigger on condition.
-
Select Slack for the Type.
-
If the recipient is already in Stellar Cyber, select Use Recipients and select the recipients for the message.
-
If the recipient is not in Stellar Cyber, enter the URL you created in Slack for incoming webhooks.
That incoming webhook is associated with the Slack channel where the message will be posted.
-
Add the message to be sent.
Webhook Responder Action
When you configure a Webhook Responder, you can use it in an ATH playbook. You can select the Webhook Responder or ESET Responder to use for the action triggered by ATH.
To create a webhook responder rule for an action:
-
Select Respond | Automation and then select Create.
-
Configure the ATH playbook and then scroll down to Actions.
-
Select the button to add an action.
Another action appears below the existing action.
-
Select Trigger on condition.
-
Select Webhook Responder for the Type.
-
Choose a previously configured Custom Webhook, ESET, WithSecure Elements, or Blackberry Cylance Responder from the drop-down menu.
The Path and Query and JSON Body fields populate.
-
(Optional) Modify the Path and Query or JSON Body.
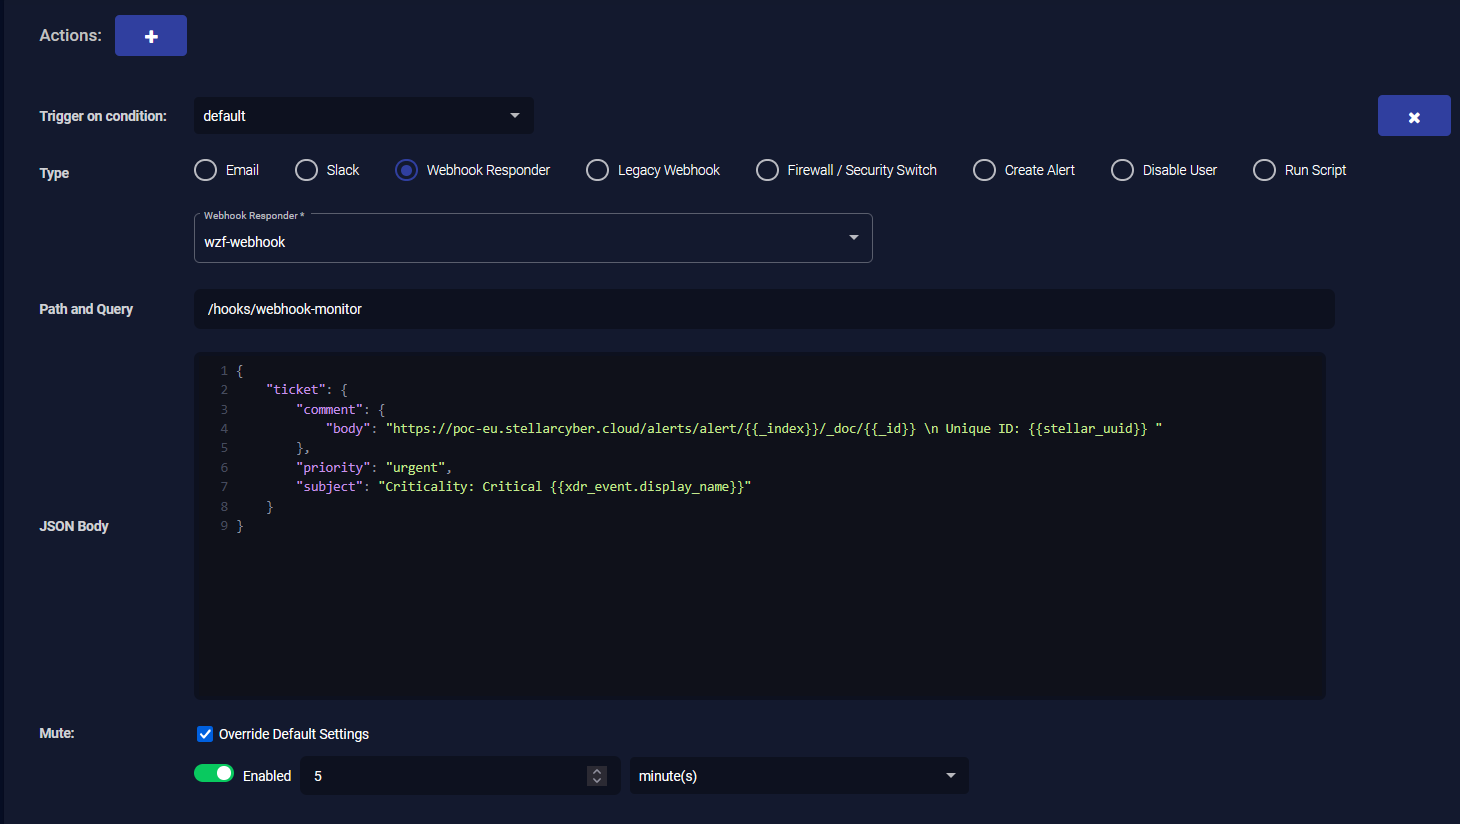
When you select a preconfigured Custom Webhook Responder, the system prepopulates the JSON Body field with a structure designed to match the expectations of the receiver. You can modify this body to include additional fields if needed.
When you do modify it, use direct field references with Mustache syntax. Do not use iteration tags such as
{{#ctx.payload.filtered}}and{{/ctx.pay load.filtered}}. Webhook Responders process one result at a time and do not require iteration. The system automatically flattens field names, so you do not include_source.in any field reference.The Webhook Responder differs from other playbook actions that operate on a list of results. This action triggers once per result, typically one alert at a time, such as when used from the Alerts page. Because Stellar Cyber already loops through each record automatically, you do not iterate over
ctx.payload.filtered. Instead, reference fields from the current record directly using Mustache syntax, like{{dstip}}or{{stellar_uuid}}.You can reference event fields such as
{{dstip}},{{dstip_host}},{{appid_ name}}, and{{metadata.request.server_name}}, and enriched fields such as{{_id}},{{_index}}, and{{stellar_uuid}}.The system deduplicates webhook requests within a single playbook run. If multiple results in the same run render the same JSON body, the responder sends only the first and skips the rest. A new scheduled run of the playbook starts with no memory of previous results and processes all records again independently.
 Example: Basic Custom Format
Use this format when defining a simple JSON payload:
Copy{
"DST-IP": "{{dstip}}",
"Host": "{{dstip_host}}",
"Reputation": "{{dstip_reputation}}",
"Link": "https://your-tenant.stellarcyber.cloud/alerts/alert/{{_ index}}/_doc/{{_id}}",
"UniqueID": "{{stellar_uuid}}"
}Example: Adding Fields to a Prepopulated Ticket Structure
If the prepopulated JSON defines a helpdesk ticket structure, you can insert additional event data into the comment body:
Copy{
"ticket": {
"comment": {
"body": "Alert link: https://poc-eu.stellarcyber.cloud/alerts/alert/{{_index}}/_doc/{{_id}}. Unique ID: {{stellar_uuid}}. DST-IP: {{dstip}}. Host: {{dstip_host}}. Reputation: {{dstip_reputation}}."
},
"priority": "urgent",
"subject": "Criticality: Critical {{xdr_event.display_name}}" }
}Use this format when enriching a service ticket with alert details while preserving the expected structure of the receiving system.
-
Select the Override Default Settings option to override the mute settings for the playbook and mute just this action.
-
Select Submit.
Legacy Webhook Action
To create a legacy webhook rule for an action:
-
Click the button to add an action. Another action appears below the existing action.
-
Select the Trigger on condition.
-
Select Legacy Webhook for the Type.
-
Select Use Recipients if the recipient is already in Stellar Cyber, if desired and applicable for the webhook. Select the Recipient if you do so.
-
For versions prior to
-
Enter the username without the @ or period (.) characters.
-
Enter the password without any non-alphanumeric characters except for the underscore (_).
-
-
From
-
-
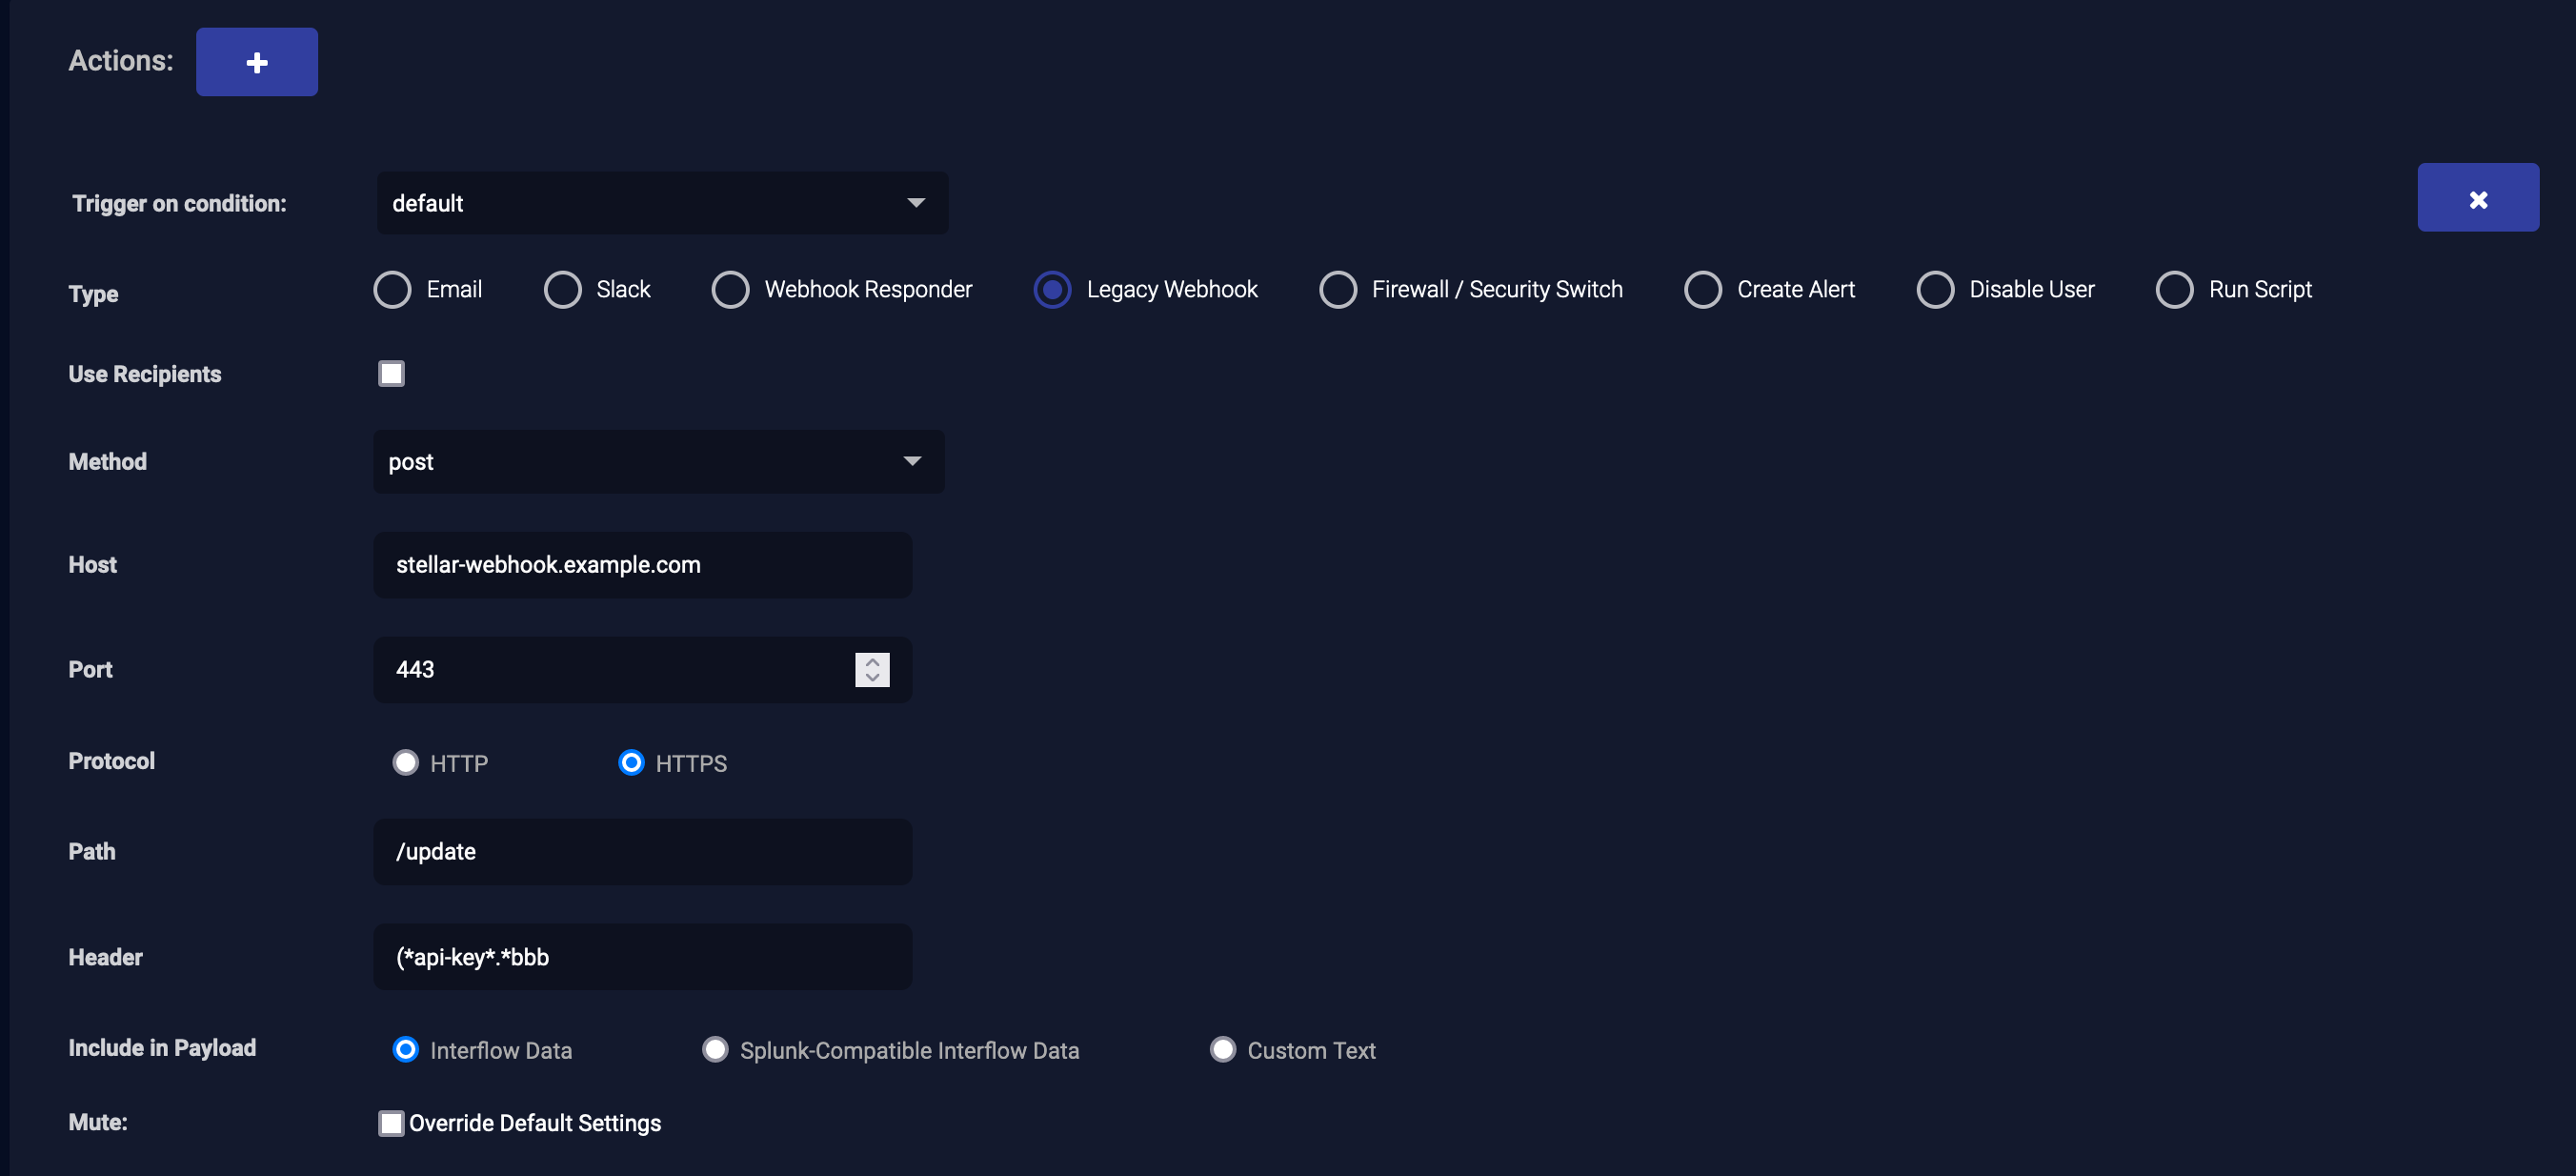
Choose the Method (Put or Post).
-
Specify the Host the webhook is accessing. Do not include the http scheme; that is specified below.
-
Specify a mandatory port number.
-
Select whether the method needs to use HTTP or HTTPS.
-
Provide the Path to the webhook action.
-
For the Header field, enter the header the webhook action expects.
-
Select the data you want to package with the webhook (Interflow, Splunk-compatible Interflow, or Custom Text.
If you select Custom Text message, enter the Body of the text. You can also use the Select a Variable and Define a Result Table options to help populate the Body of the text. Keep in mind, however, that most webhook destinations expect valid JSON and that the Define a Result Table simply creates a body with one line of text per hit. You must insert
{""}characters as necessary to create valid JSON from the text created by the Define a Result Table feature:-
The entire body of the text must be enclosed in
{ }. -
The values must be between
{{#ctx.payload.filtered}}and{{/ctx.payload.filtered}}tags. -
Commas must be used to separate lines.
-
The body is formatted using Mustache Templating.
Here is an example of properly formatted JSON for the Body:
Copy{"a":"{{ctx.payload.filtered_total}}",
"b":"{{ctx.payload.hits.total.value}}",
"c" : " test",
{{#ctx.payload.filtered}} "appid_name": "{{_source.appid_name}}",
{{/ctx.payload.filtered}} "d": " {{ctx.trigger.scheduled_time}}"}This code creates the following:
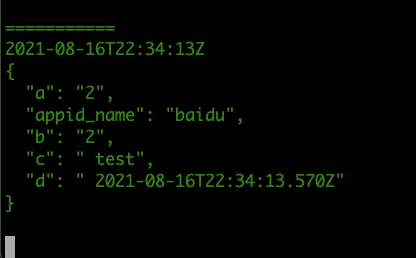
-
-
Specify whether you want to override the playbook's mute settings and mute just this action.
-
Click Submit.
Firewall / Security Switch Action
To create a firewall rule as an action:
When you create a correlation for use in a Firewall action, Grouping must be toggled OFF in the correlation query editor. In addition, that query must include srcip and dstip for the host on which you want to perform the Firewall action. You must ensure that the Active box is enabled for this same host in the list displayed below the connector selection menu.
-
Click the button to add an action.
Another action appears below the existing action.
-
Select the Trigger on condition.
-
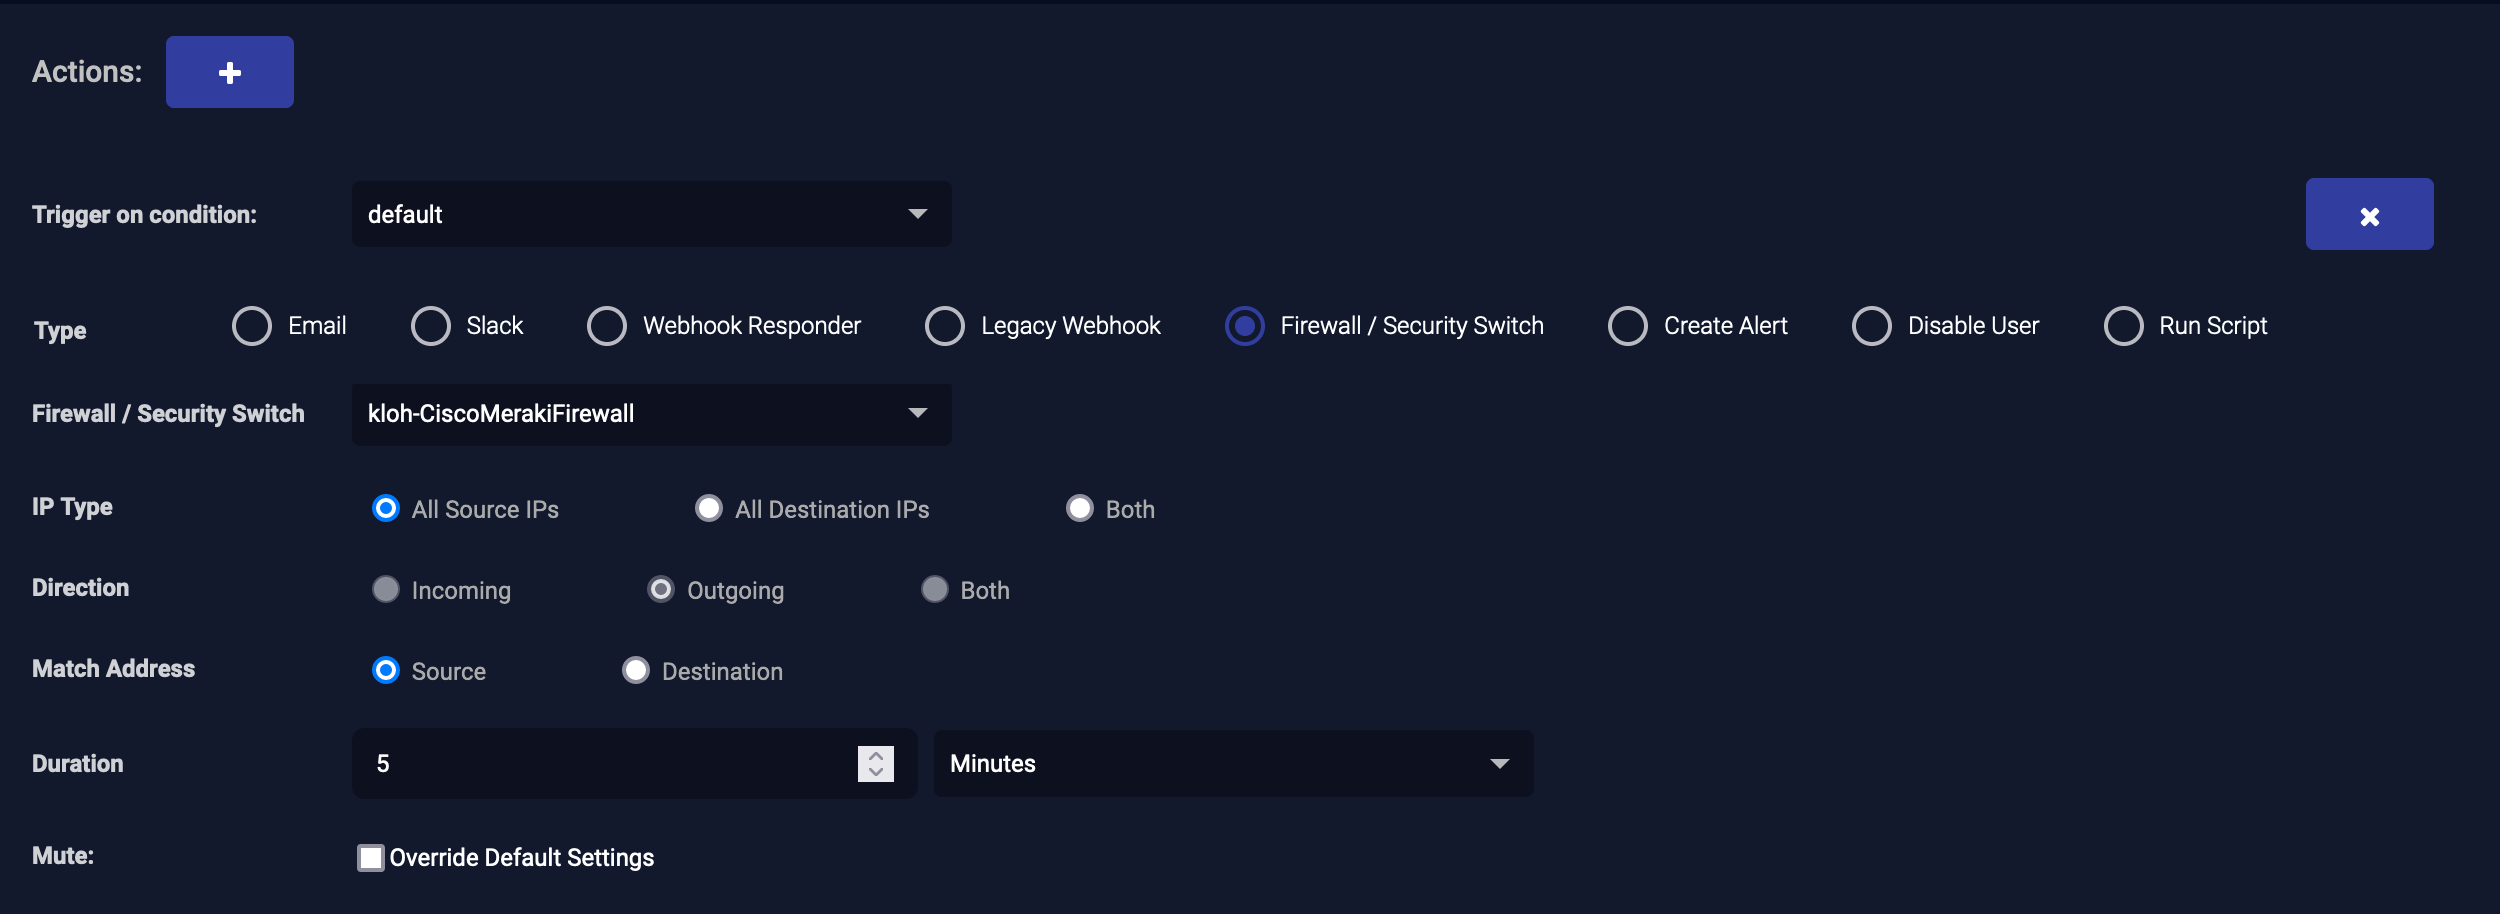
Select Firewall / Security Switch for the Type.
-
Select the desired connector from the Firewall / Security Switch drop-down.
The query objects with host addresses are listed below with an Active check box.
-
Enable the Active check box to make the addresses from that query object active for response actions. You may see more than one query object listed here. If so, you need only enable the Active boxes that include the extracted
srcip/dstipon which you want to perform the action. -
Adjust the directional selectors needed, depending on the type of firewall you choose, the IP address/traffic configuration options are automatically adjusted. For example, with Meraki Firewall actions, the Incoming and Both fields are disabled for Direction because the firewall rules that Stellar Cyber enforces on Meraki firewalls always apply to Outgoing traffic.
-
Set a duration for the rule.
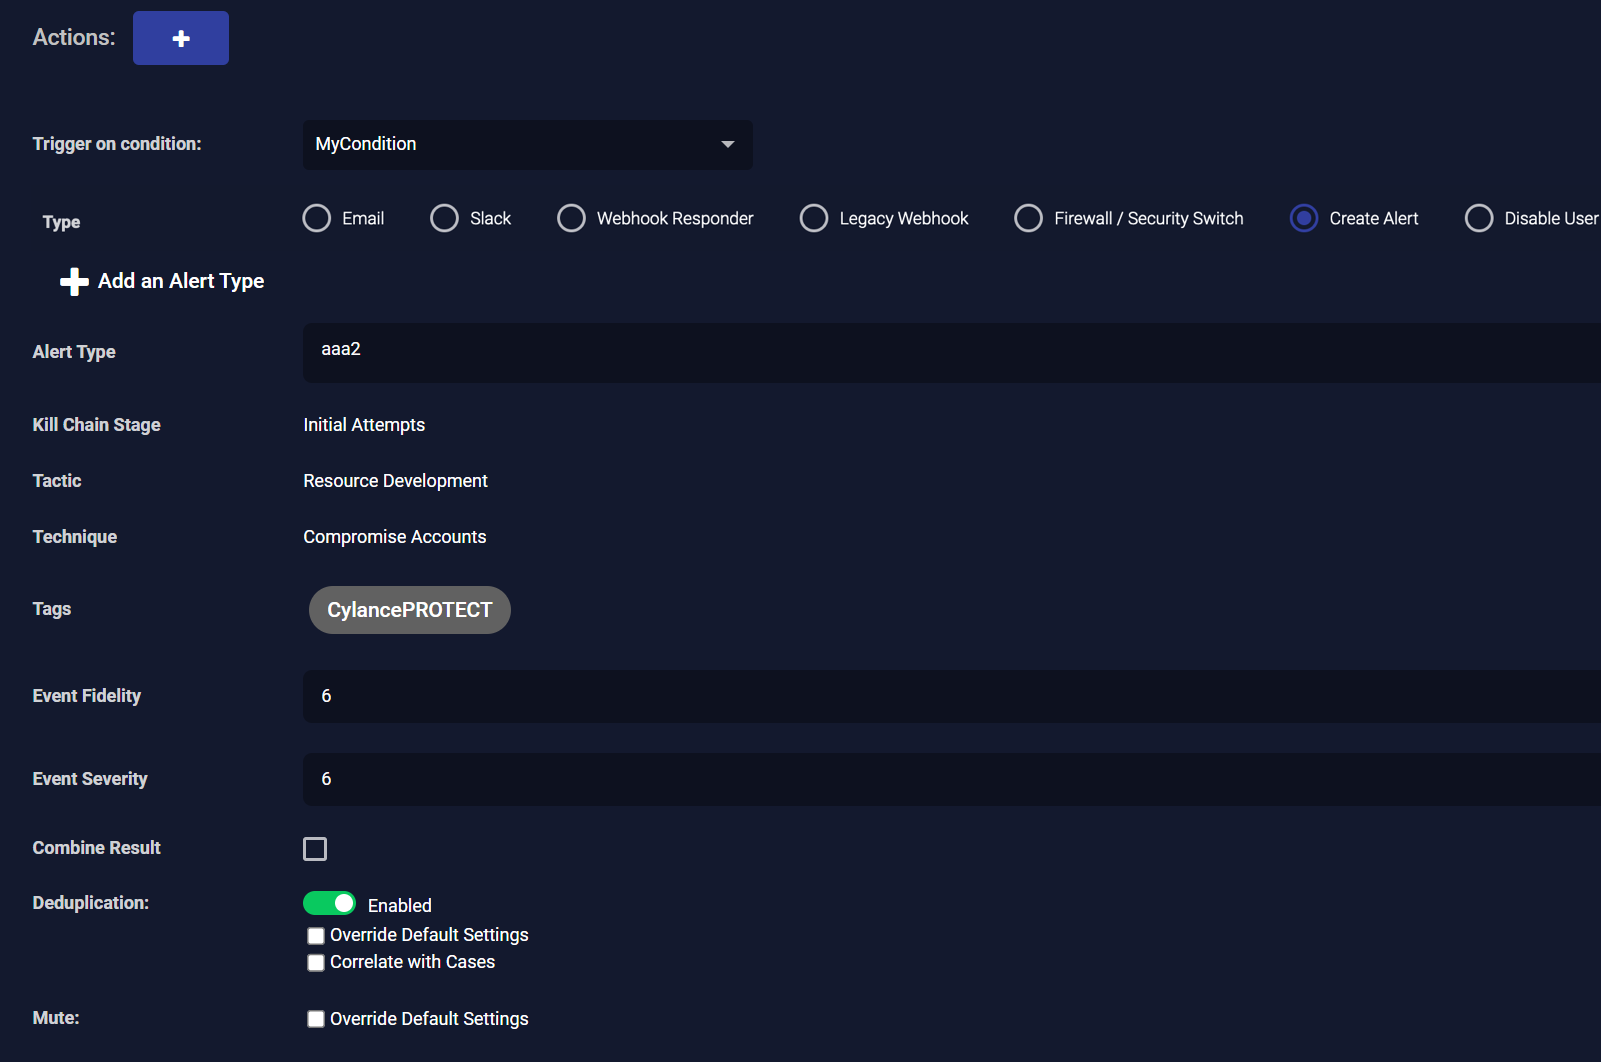
Create Alert Action
If you configure a playbook with the Create Alert action and add calculations, make sure the scope is set to a single tenant. If the scope is All Tenants with multiple tenants, alerts aren’t created because Stellar Cyber can’t assign a valid tenant ID to them. Other actions, including email notifications and webhook responders, still work because they don't require a tenant ID.
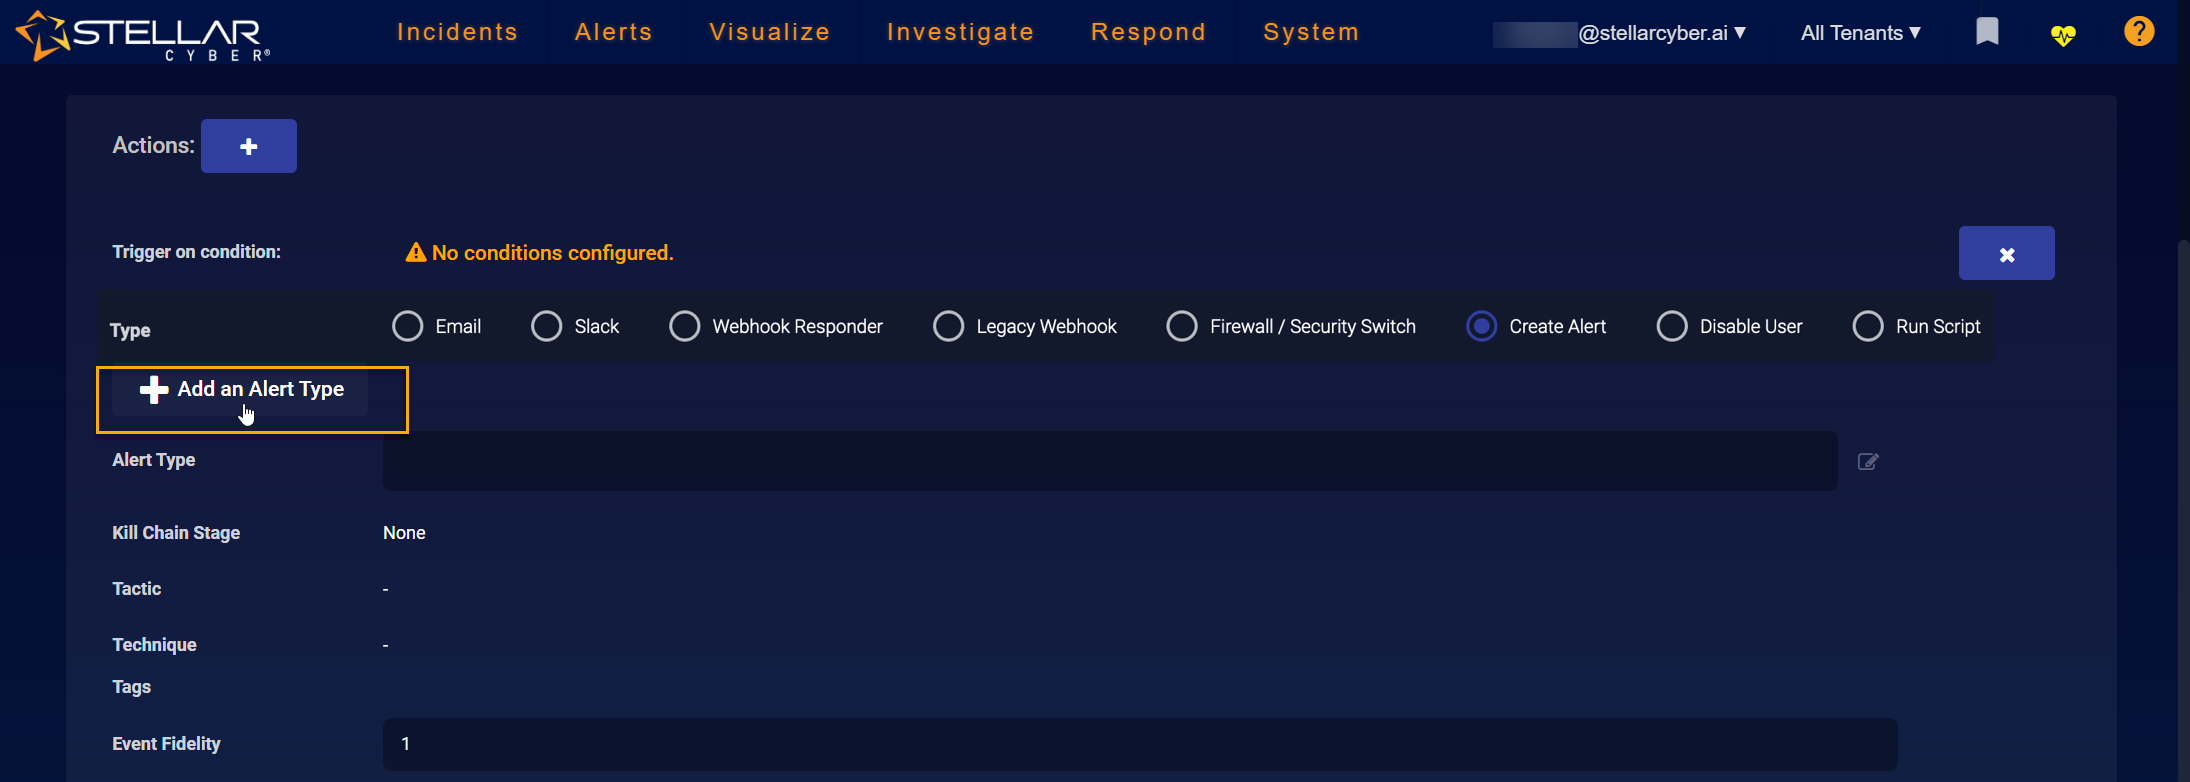
You can either select an existing alert type from the Alert Type drop-down or create a new one using the procedure below.
If you drilled to the ATH Playbook workflow from a custom alert type in the Alerts page, the Type is already set to Create Alert and the Alert Type, Kill Chain Stage, Tactic, Technique, and Tags fields are all pre-filled based on the custom alert type settings. Refer to Creating New Alert Types for details.
-
Click the button to add an action.
Another action appears below the existing action.
-
Specify the Trigger on condition.
-
Set the Type to Create Alert.
-
Specify the Alert Type.
If you launched the ATH Playbook workflow from a custom alert type in the Alerts list, you do not need to perform this step. These settings are already configured based on the custom alert type from which you launched the workflow.
You can either select an existing alert type from the drop-down or add a new one by clicking the Add an Alert Type button to launch the standard workflow to add a new custom alert type.
-
Enter the Event Fidelity and Event Severity.
Make sure that you configure an Event Fidelity greater than or equal to 1 in order for alerts triggered by the playbook to appear in the Alerts list. Alerts with an Event Fidelity of zero are not listed in the Alerts display.
-
Click Combine Result to combine multiple records in that time period into a single event. This reduces the number of events generated for a single actual event.
Refer to How Deduplication Works with the "Combine Result" Option for details on the interaction between these two options.
-
Use the Deduplication options to specify how multiple instances of this alert within a small time window are deduplicated.
To reduce noise and focus attention, by default, Stellar Cyber deduplicates multiple instances of the same custom alert that fire within the rule's Run every time window (that is, from the time the rule ran last to the time of its current iteration).
As illustrated below, you can set the following options for deduplication of custom alerts:
-
Toggle the feature on (Enabled) or off (Disabled). By default, it is enabled.
-
Use the Override Default Settings option to specify a custom time window within which multiple instances of the same alert are deduplicated.
By default, custom alerts are deduplicated within a rule's Run every time window. The Override Default Settings options let you specify a custom time window.
 Stellar Cyber performs this deduplication by discarding fields that are always different between separate alerts, calculating a hash, and monitoring future events for matches.
 Refer to About Deduplication of Custom Alerts for details on which fields are not considered for deduplication, how to identify deduplicated alerts in JSON and how the deduplication timer works together with both the Run every setting for the ATH Playbook as a whole and the Combine Result option.
-
Check the Correlate with Cases option if you would like Stellar Cyber to create a new case based on the alert.
-
Check the Deduplicate based on fields option if you would like to consolidate records based on specific matching fields. Once you enable this option, a dropdown appears where you can select the specific fields to use for deduplication. You can also type in your own custom fields manually, including nested fields by adding a period between fields (
field.subfield, for example).
This option is useful in situations where a particular connector is sending a new alert record every time an alert is updated on the connector source. You can use it together with the Override Default Settings option to consolidate records with specified matching fields within a given window.
When choosing fields for deduplication, choose fields that are not likely to be unique between records. For example, timestamps are very likely to have different values in different records. If you try to deduplicate records based on a timestamp, you are not likely to find matching records to consolidate. This deduplication option is supported with all Stellar Cyberindexes.
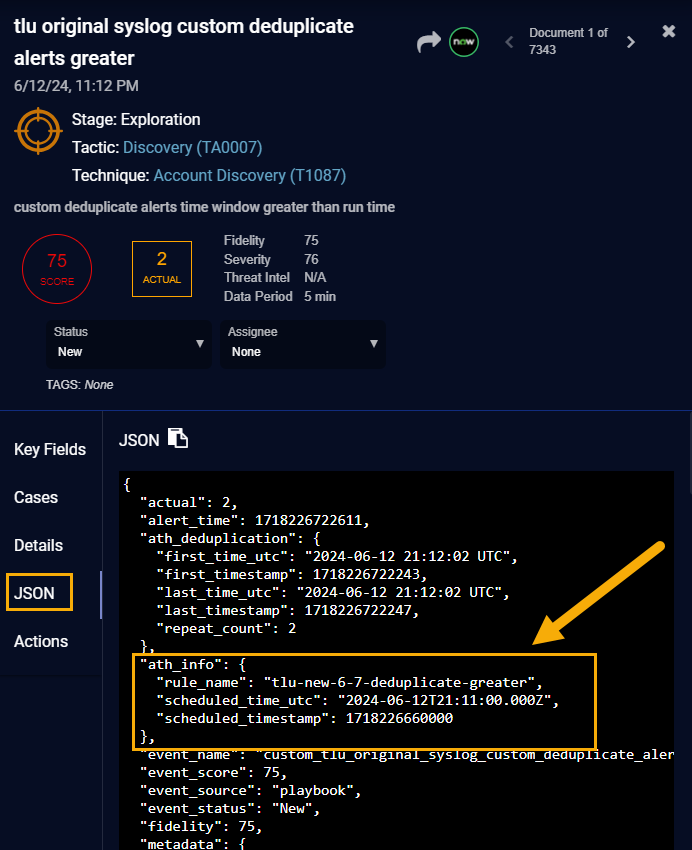
Viewing Deduplication Information in Alert Displays
You can add the ATH Deduplication Last Time UTC column to an Alerts table to see the timestamp of when an alert record was deduplicated. In addition, the JSON for a consolidated alert record includes an ath_info section with details on the deduplication, including the name of the ATH Playbook that produced the consolidated record and when it took place. For example:
Specifying Multiple Fields for Deduplication
Click here to see details on how Stellar Cyber handles situations where multiple fields are specified for deduplication.
If you specify multiple fields for the Deduplicate based on fields option, they are joined with a logical AND when looking for matched records to deduplicate. If specified fields are present in multiple records, they must all match in order for records to be deduplicated. Not all fields need to be present in both records, but the ones that are there must match in order to be deduplicated.
Consider a sample scenario where we have defined the following three fields for the Deduplication based on fields option:
[field_1, field_2, field_3].All Records Present and Matched
In our first example, we have two records,
Record XandRecord Y, each with matching values for all three of these fields. In this case, the two records will be deduplicated and consolidated to a single record:CopyRecord_X = {
"field_1": "value_1",
"field_2": "value_2",
"field_3": "value_3",
"other_field": "other_value_1",
"timestamp": 11111111,
}
Record_Y = {
"field_1": "value_1",
"field_2": "value_2",
"field_3": "value_3",
"other_field": "other_value_2",
"timestamp": 22222222,
}Partial Matches Across Three Records
In our second example, we have three records –
Record X,Record Y, andRecord Z:CopyRecord_X = {
"field_1": "value_1",
"other_field": "other_value_1",
"timestamp": 11111111,
}
Record_Y = {
"field_1": "value_1",
"other_field": "other_value_2",
"timestamp": 22222222,
}
Record_Z = {
"field_1": "value_1",
"field_2": None, # <-----------
"other_field": "other_value_2",
"timestamp": 22222222,
}In this example, the records are deduplicated as follows:
-
Record XandRecord Yboth have identical values forfield_1(value_1). In addition,field_1is the only field from our list that appears in the two records. Because of this, they are consolidated to a single record. -
Record Zalso has the same value as the first two records forfield_1(value_1). However, becausefield_2is also present inRecordZ and is not the same as eitherRecord XorRecord Y, it is not deduplicated.
-
-
Specify whether you want to override the playbook's mute settings and mute just this action.
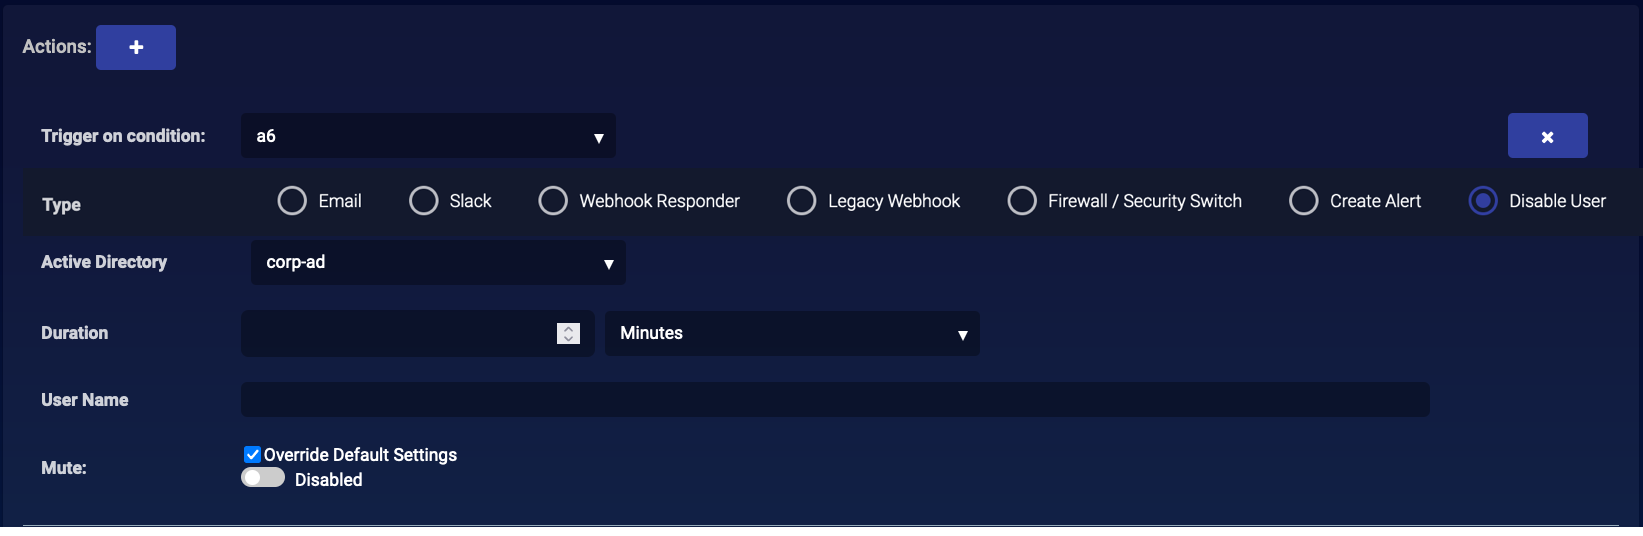
Disable User Action
To disable a user as an action:
-
Click the button to add an action. Another action appears below the existing action.
-
Specify the Trigger on condition.
-
Select Disable User for the Type.
-
Select the Active Directory connector for the action from the Active Directory drop-down.
-
Set how long you want to disable the user in the Duration field. You can choose Minutes, Hours, Days, or even Forever.
-
Use the User Name field to specify one or more users to block. You can specify users with a combination of the following techniques:
-
Select one or more users from the prepopulated dropdown list.
-
Type a username or objectSID directly into the User Name field.
An objectSID typically appears in a format similar to the following example:
S-1-5-21-1068523723-946037408-1232828536-51066
Note: You can only block users in the same domain as the selected Active Directory connector.Check the success of User Disable actions in the User Actions tab of the Respond | Actions page.
-
-
Specify whether you want to override the playbook's mute settings and mute just this action.
Script Action
To run a script via SSH as an action:
-
Click the button to add an action. Another action appears below the existing action.

-
Select the Trigger on condition.
-
Select Run Script for the Type.
-
Select the Target from the drop-down. Stellar Cyber fills in the details for that target. The target must be a remote host already in Stellar Cyber. If not, you can create a new remote host.
-
Select the Script to Execute. The script is automatically entered in the Script Body. The script must already be in Stellar Cyber. If not, you can create a new script.
-
Select Run for each if you want the script to run for each hit the playbook finds. If there are many hits, running the script for each of them can take a significant amount of time. Leave this unselected to run only once each time the playbook runs.
Do not select Run for each if your script uses variables for the execution time (
ctx.execution_time) or variables that include the results of an executed query such asctx.payload.filtered_totalorctx.payload.hits.total. However, it's safe to select Run for each if your script uses any other types of variables within an Interflow record.If your script produces an event list with multiple results and an action instance for each result, it's important to select Run for each. If it's not selected, the script renders all results in a single action and Stellar Cyber only runs that action, which might not be the one you want for all results. However, when you select Run for each, Stellar Cyber runs an individualized action for each and every result.
In addition, when Run for each is enabled, it's unnecessary to include start and end instructions in the script; that is,
{{#ctx.payload.filtered}}for starting an iteration and{{/ctx.payload.filtered}}for ending an iteration. For example, instead of this—{{#ctx.payload.filtered}}
block_one_ip {{srcip}}
{{/ctx.payload.filtered}}
—the script only needs this single statement:
block_one_ip {{srcip}}
-
You can edit the Script Body.
-
Click Submit.
The playbook is added. Stellar Cyber automatically enables the new playbook and displays the playbook list.
Muting Actions
You can use the Mute feature in the Actions panel to temporarily halt specific individual actions associated with a playbook. Select Override Default Settings and toggle Mute | Disabled to Enabled. Then use the adjacent fields to specify for how long you would like to stop the action from triggering.
Trace an Alert to Its Underlying Event Records
If you want to trace an alert back to the original events that triggered it, the alert record includes reference fields and values that allow you to locate the source records. The method differs depending on whether the alert was generated by a simple query or a correlation query.
-
Simple query alerts: Original records can be found through the values of the
orig_idandorig_indexfields. -
Correlation query alerts: Original records can be found through the values of the
correlation_info:_idandoriginal_eventfields. -
In both cases, the alert record provides a reference to the
_idvalue of the records of the original events that triggered the alert.
Finding the original records for an alert generated by a simple query:
-
Search for the alert in the Alerts index using its
_idvalue. -
Check the alert details in the search result.
If the alert was generated by a simple query, locate the
orig_idandorig_indexfields. -
Use
orig_idandorig_indexto find the original event record:orig_idcontains the_idvalue of the original record.orig_indexindicates which index the original record is stored in. -
Perform a new search in the specified index (
orig_index), but replaceorig_idwith_id.
Example:
-
Search the Alerts index for an alert with
"_id": "ser2222".In the alert details, you find:
"orig_id": "adr1111""orig_index": "aella_adr-"This tells you that ID of the original event record is adr1111 (
"_id": "adr1111") and is stored in the Traffic index (aella_adr-). -
Search the Traffic index for
"_id": "adr1111"to retrieve the full details of the original event.
Finding the original records for an alert generated by a correlation query:
-
Search for the alert in the Alerts index using its
_idvalue. -
Check the alert details in the search result.
If the alert was generated by a correlation query, note the values of the
index,_id, andoriginal_eventfields for each related event in thecorrelation_infoarray. -
Find the original records using one of two methods:
Search for the
_idvalues in the specified index for each related event.or
Check the
original_eventfield, which contains the full content of the correlated event record.
This structure ensures you can efficiently investigate alerts by accessing their source data, whether they were identified by a single query match or multiple correlated events.
About Deduplication of Custom Alerts
Stellar Cyber deduplicates custom alerts by discarding fields that are always different between separate alerts, calculating a hash, and monitoring future events for matches. Because the following fields are always different between separate records, they are not considered when calculating the hash used for deduplication:
Exact matches between:
-
stellar_index_id
-
stellar_uuid
-
timestamp
-
timestamp_utc
-
write_time
-
xdr_event
-
index
-
id
-
type
Fields containing the following substrings:
-
stellar
-
time
-
date
-
index
Identifying Deduplicated Alerts
If an alert has been deduplicated, there are additional fields in its JSON record indicating that the document represents multiple alerts firing repeatedly over a period of time. The key field to look for is ath_deduplication. For example:
"ath_deduplication": { // <-- if this field exists, the alert has been deduplicated
  "first_time_utc": "2023-01-25 07:34:49 UTC",
  "first_timestamp": 1674632089999,
  "last_time_utc": "2023-01-25 07:59:50 UTC",
  "last_timestamp": 1674633590521,
  "repeat_count": 6 // <-- repeat count in the time window ^
},
This record indicates that there have been six identical alerts in the time window. Note that Stellar Cyber continues to update this document if new instances of the same alert arrive in the time window. You can also see the timestamps for the first and last identical alerts represented by this document.
How the Deduplication Interval Works with the "Run every" Setting
When you configure an ATH Playbook, you supply a Run every setting that specifies how often the rules in the playbook run. The two settings work together as follows:
|
Settings of "Run every" and Deduplication Time Window |
Results |
|---|---|
| "Run every" is greater than deduplication time window |
Deduplication is performed over the configured time window. Because the deduplication window is smaller than the "run every" window, that means there can be multiple alerts over the "run every" interval. In this case, because alerts are deduplicated over a time window that is smaller than the ATH Playbook's "run every" interval, only one identical alert per deduplication window is created. For example, suppose an ATH Playbook is configured to run once a week with a deduplication time window set to one day. As you can see below, the alerts in each of the deduplication time windows (represented by dots on the timeline) would be reduced to a single identical alert per deduplication window. In this example, that would mean a total of seven alerts for the "run every" interval of one week:
|
| "Run every" is less than the deduplication time window |
In this case, because alerts are deduplicated over a time window that is greater than the ATH Playbook's "run every" interval, only one identical alert per deduplication window is created. |
|
"Run every" and deduplication time window are identical |
This is the default configuration and results in only a single identical alert per "run every" interval. |

How Deduplication Works with the "Combine Result" Option
You can enable both the Combine Result and Deduplication options for a playbook. Keep in mind the following if you do so:
-
The Combine Result option has a higher priority than Deduplication. Deduplication is not performed until after results are combined.
-
Because of this, if both options are enabled, deduplication has no effect when the deduplication window is less than or equal to the Run Every window. This is because the Combine Result feature ensures that there is only a single alert document in each Run Every window.
-
Looked at another way, if you enable both Combine Result and Deduplication, then deduplication will only take place if the deduplication window is greater than the Run Every window. In this case, the deduplication window cover multiple iterations of the rule, meaning that there would potentially be multiple combined alerts in the deduplication window to be deduplicated.
