Stellar Cyber 6.2.0 Release Notes
Software Release Date:
Release Note Updated:
The Stellar Cyber
The release notes are organized into the following sections:
Highlights
-
Adaptive Alert Filters: Expands alert filtering into dynamic, context-aware controls that let you automatically adjust severity, add business-relevant tags, or exclude low-value alerts from case scoring, turning raw detections into prioritized insights that align with real business impact.
-
New Identity-Based Detections: Expands detection logic to focus on user and entity behaviors, improving clarity and precision in detecting identity-related threats.
-
ASN Enrichment: Adds Autonomous System Number metadata for public IP addresses, enriching key fields such as
src_ipanddst_ipwith the associated number and organization to provide greater context and visibility into external network relationships. -
Object-Level Access Control: Introduces fine-grained role-based permissions, ensuring users only access specific cases, detections, or assets relevant to their role, enhancing data security and confidence.
-
TCP Reset Response Action: Adds an automated response action for sensors monitoring mirrored traffic to terminate malicious network sessions in real time, improving speed and effectiveness in active threat containment.
-
Arbor Peakflow SP Parser Enhancements: Enhances parsing precision and consistency in Arbor Peakflow SP logs, improving data accuracy and maintaining compatibility with existing integrations.
Behavior Changes
Changes that affect the way users interact with the product or interpret results are listed below.
-
DATA-2964: Updated the Arbor Peakflow SP parser to extract
alert_idvalues and normalize usage data. The fieldusage_pctnow outputs as the numeric fieldusage_pct_number, removing the percent sign for easier aggregation in dashboards and queries. Themsg_origin.categoryvalue changed fromothertotrafficfor consistent classification with other network telemetry. These updates improve parsing for additional message variants and causeusage_pctto appear as numeric data and include newalert_idfields in Arbor Peakflow SP logs, which can affect saved filters or visualizations that previously used text values. -
DATA-2957: Updated the Cynet (CEF) parser to correct field mappings and restore consistent classification. The parser no longer uses
cynet_360as the values fordev_type,dev_class,msg_origin.source, andmsg_class. Thedev_typeandmsg_origin.sourcefields now revert tocynet, whiledev_classandmsg_classvalues are determined dynamically by thecef.namefield. This change ensures Cynet 360 logs normalize to the expected schema and that detections referencingcynet_alertmatch as intended. Parsed Cynet event data now displayscynetinstead ofcynet_360, which can affect filters, queries, or custom content based on the previous field values. -
DATA-2936: Updated the NEC Indoor Unit parser to change how 419-character payloads are parsed. When a log payload contains 419 characters—419 characters being the fixed-width message format used by certain NEC IDU logs—the former
event_detailfield is no longer used. Instead, its components—event_type,slot,description, andresult—are now parsed as separate fields according to their defined widths. Payloads of other lengths continue to use the previous parsing logic. This change improves field accuracy and visibility in event views, allowing queries and dashboards to filter or group by these individual values rather than a single aggregatedevent_detailfield.
Deprecated Features
The third party alert integration for CrowdStrike based on DetectionSummaryEvent will be deprecated. Crowdstrike has deprecated DetectionSummaryEvent and replaced it with EppDetectionSummary. A new alert integration based on EppDetectionSummary will be in a future release.
Detection/ML
New Features
-
 AELDEV-60377: Improved correlation for DNS-related alerts.
Changed correlation for DNS-related alerts to pivot on the host that initiated the query instead of the DNS server. Cases now group alerts by the source endpoint, which reduces resolver-centered graphs and better reflects initiating activity. This change applies to the Recently Registered Domains and DNS Tunneling Anomaly alert types. No configuration changes are required. Existing cases remain unchanged while new cases use the updated pivot automatically.
-
AELDEV-59249: Introduced a configurable limit for alerts per case and reduced the default threshold.
Added a configurable limit for the number of alerts that can be correlated into a single case and reduced the default threshold. The limit balances analytical depth against performance: higher values provide greater context within each case but increase CPU and memory use, while lower values improve throughput and responsiveness. Adjusting this setting directly influences case formation and processing time.
-
AELDEV-58786: Added alert integration for the Microsoft Graph Security API.
Expanded alert integrations for Microsoft Defender for Cloud, Microsoft Defender for Cloud Apps, and Microsoft Defender for Endpoint to include Graph Security API alerts. The update standardizes key fields across jobs and implements cross-job deduplication to eliminate duplicate alerts when multiple Microsoft Defender products generate the same event. Existing alert names and types remain unchanged to ensure compatibility with current rules, dashboards, and automations. See Integration of Third Party Native Alerts and Configuring Microsoft Graph Security API Connectors.
-
AELDEV-58425: Added alert integration for Cato Networks.
Added alert integration for Cato Networks Security Events, including the following alert types:
Cato Networks: NG Anti MalwareandCato Networks: Anti Malware. See Integration of Third Party Native Alerts. -
AELDEV-58415: Added Sigma rules for Office 365.
Introduced new Sigma rules for Office365 Rare Operations, Suspicious Office365 Inbox Rule, and Suspicious Office365 Mail Transport Rule. The new rules detect potentially malicious inbox and rare operations from Window event logs from Microsoft 365. See Rule-Based Alert Types.
-
AELDEV-56976: Added alert integration for CyberArk EPM.
Added alert integration for CyberArk Endpoint Privilege Manager (EPM) that provides visibility into endpoint privilege management activity. The following event types are supported: AttackAttempt, AttackBlock, SuspiciousActivityAttempt, and SuspiciousActivityBlock. See Integration of Third Party Native Alerts.
-
AELDEV-56599: Introduced Suspected AS-REP Roasting Attacks alert type.
Introduced a new ML detection: Suspected AS-REP Roasting Attacks. AS-REP roasting detection analyzes Windows Security event 4768 to flag bursts of TGT requests that target accounts with Kerberos pre-authentication disabled. See Machine Learning Alert Type Details.
-
AELDEV-56597: Added Sigma rules for Suspicious AD Machine Account Creation and Suspicious Kerberos Authentication from Golden Certificate.
Introduced two Active Directory aggregation Sigma rules. The Suspicious AD Machine Account Creation rule identifies abnormal volumes of machine account creation indicative of quota abuse. The Suspicious Kerberos Authentication from Golden Certificate rule correlates unusual certificate-based Ticket-Granting Ticket (TGT) requests across accounts. These detections require ingestion of Windows Security events 4741, 4720, and 4768 from domain controllers. See Rule-Based Alert Types.
-
AELDEV-55413: Introduced alert types for unusual remote protocols and applications across internal-to-external and internal-to-internal traffic.
Added two anomaly-based alert types: Remote Access Pattern Anomaly and Internal Protocol Pattern Anomaly. The detections analyze
appid_nameusage patterns for eachsrcipanddstipto identify deviations from normal behavior. The internal-to-external model focuses on file sharing and storage services such as FTP, OneDrive, Dropbox, Discord, and Amazon Simple Storage Service (S3). The internal-to-internal model monitors remote access and administrative protocols including RDP, SSH, SMB, and WMI. See Machine Learning Alert Type Details.
Improvements
-
AELDEV-60434: Added support for searching by the Grade field for rules in Detection Management.
Enhanced table search in Detection Management to include the Grade column. Searches now return results that match rule grade text such as Experimental or Tier 1. This improvement makes it easier to locate rules by their grade. See Using the Detection Management System.
-
AELDEV-58766: Corrected alert hit counts in Detection Management.
Fixed an issue that could cause rare inaccuracies with alert hit counts displaying different values in the user interface and API. The counts now update accurately and remain synchronized across all views. This correction ensures consistent detection metrics and prevents double counting or stale values. No configuration change is required.
-
AELDEV-58030: Reduced duplicate alerts and improved source prioritization for login anomaly detections.
Removed duplicate Microsoft 365 and Microsoft Entra ID login events from the Impossible Travel Anomaly and User Login Location Anomaly alert types. When both data sources report the same login ID, the system now prioritizes Entra ID for alert generation. This change reduces redundant alerts and ensures detections use the most complete records, including MFA context and Azure location enrichment.
-
AELDEV-57238: Added filtering of high-value IoCs in the Recorded Future Premium feed.
Introduced a check box in the Recorded Future Premium threat intelligence feed for Filter to High-Value IOCs. When the check box is selected, only top-scoring IPv4 (labels: very-malicious and malicious) and top URLs are included, while lower value IPv4 and URL IoCs are excluded. See Configuring Feeds in the Threat Intelligence Platform.
-
AELDEV-56247: Added event summarization to the IP/Port Scan Anomaly alert types and subtypes.
Added port scan event summarization to the External/Internal IP/Port Scan Anomaly alert types including the Connection Spike Anomaly and Connection Failure Anomaly subtypes so that all port scan alerts have summarization. See Machine Learning Alert Type Details.
Usability
New Features
-
AELDEV-59692: Added a configuration setting to control the maximum alerts correlated into a case.
Introduced a new option in case settings that lets you configure the maximum number of alerts that can be correlated into a single case. The previous limit of 5,000 alerts is now adjustable within a range of 1 to 5,000. Setting a higher maximum increases correlation scope, providing greater context for understanding how alerts relate to each other, but also raises memory use and processing time. Setting a lower maximum improves performance and efficiency but can fragment related alerts across multiple cases, increasing the risk of missing patterns that indicate coordinated attacks. This enhancement lets you balance correlation depth with system capacity and investigative visibility.
-
AELDEV-57439: Added public API endpoints for response actions and enabled action reversion.
Added public API endpoints under
custom_response_actionsthat let you trigger response actions such as running scripts, invoking webhooks, isolating endpoints, or containing hosts. The update also unifies identity provider queries under a singleidppath for Microsoft Entra ID and Active Directory integrations. It adds the ability to revert previously executed actions through an authenticated API request, improving control and auditability of response workflows. These enhancements expand automation capabilities and simplify integration with external security platforms. To see the interactive API reference, select the Help icon (question mark in a circle) at the top of the Stellar Cyber UI and then select API Docs. Refer to Introducing the Stellar Cyber API for information on working with the API. -
AELDEV-55697: Added public API endpoints for webhook and endpoint response actions.
Added public API endpoints under
custom_response_actionsthat let you list and execute webhook and endpoint response actions. The APIs include discovery endpoints for available actions and execution endpoints that trigger webhooks or supported endpoint integrations such ascontain_host. Requests require authenticated access and use JSON payloads to define action parameters and targets. Therun_scriptaction is not included in this release. These additions expand automation coverage for response actions and simplify integration with external systems through a consistent API framework. To see the interactive API reference, select the Help icon (question mark in a circle) at the top of the Stellar Cyber UI and then select API Docs. Refer to Introducing the Stellar Cyber API for information on working with the API. -
AELDEV-54700: Added Role-Based Access Control (RBAC) privileges for managing XDR connectors and ingestion settings.
Added new RBAC privileges that let you control who can add, edit, or delete XDR connectors. The update also introduces the XDR Ingestion Only role, which limits users to ingestion configuration without broader connector management permissions. Connector visibility in the interface is now enforced by assigned privileges, hiding XDR connectors when access is not granted. These enhancements strengthen administrative control and support more secure delegation of connector management tasks.
-
AELDEV-53124: Introduced object-level sharing to manage access to dashboards.
Introduced object-level sharing and access control that let you assign granular permissions to dashboards. Dashboard owners can grant or revoke Editor and Reader access, while global settings define the default visibility for new dashboards. When a user without permission attempts to open a dashboard, the system displays an access request option and sends email notifications when access is granted. These enhancements provide a secure, flexible framework for controlling who can view and edit dashboards.
Improvements
-
AELDEV-62667: Standardized the user interface by making the new design the single experience for all users.
Completed the transition to the modern interface introduced in earlier releases. The new design provides a consistent appearance and interaction model across the Stellar Cyber Platform. This improvement provides a unified, visually streamlined experience that enhances usability for everyone.
-
AELDEV-58506: Improved CSV export handling for special characters and numeric fields.
Improved Comma-Separated Values (CSV) exports to handle special characters and numeric data more reliably. Fields containing commas, quotation marks, or line breaks now export within double quotation marks, with internal quotation marks automatically escaped. Numeric fields export as raw values without display formatting, ensuring consistent results across datasets. These changes improve data accuracy and compatibility with third-party tools that process CSV output.
-
AELDEV-58431: Added audit fields to Public API user responses for improved account tracking and consistency.
Added the
created_at,created_by,modified_at, andmodified_byfields to Public API user responses. These fields support tracking of account creation and modification history, including user and timestamp details. The formerupdated_atandupdated_byfields were renamed for naming consistency across APIs. This enhancement improves audit visibility and simplifies the analysis of account activity over time. -
AELDEV-58430: Improved navigation and progress indicators in the XDR connector setup wizard.
Updated the connector setup wizard with clearer progress indicators and consistent back navigation. Each completed step now displays a check mark, and a Back button appears at the bottom of every screen, including the initial configuration steps. These changes make it easier to track progress and move through the setup process without losing context.
-
AELDEV-57665: Expanded monthly report scheduling options to include days-before-end selections.
Expanded monthly scheduling for reports to support running reports N days before the end of the month. This option complements the existing Nth day of the month and Nth weekday of the month choices introduced in an earlier release. The new setting is available in both the user interface and the public API. This improvement provides greater flexibility for aligning report delivery with monthly business cycles.
-
AELDEV-56319: Added inline query creation in the alert customization view.
Added the ability to build queries directly within the alert customization view using the Query Builder. You can now define or modify a query inline without navigating to the full Query Builder. The Save as Query option stores your definition for reuse across the Stellar Cyber Platform. This improvement simplifies alert customization and streamlines query management.
-
AELDEV-56143: Added public API endpoints to retrieve detections with data source and rule metadata.
Introduced the
GET /detectionsandGET /detections/profileAPI endpoints, which return detections enriched with data source mappings and rule metadata. Each detection includes information about the originating data source and associated rule details, providing context for analysis and integration. This enhancement improves visibility into detection sources and supports deeper investigation through external analytics tools. To see the interactive API reference, select the Help icon (question mark in a circle) at the top of the Stellar Cyber UI and then select API Docs. Refer to Introducing the Stellar Cyber API for information on working with the API.
Stellar Cyber Platform
New Features
-
AELDEV-59806: Added username enrichment to resolve srcip_username when multiple users share the same IP address.
Introduced an enrichment workflow that maps
srcip_usersidvalues to correspondingsrcip_usernameentries through cache lookups. This workflow enables accurate username resolution in environments where multiple users may share a single source IP address. The enhancement improves the clarity of event data and strengthens correlation accuracy across user activity and network telemetry. -
AELDEV-56260, AELDEV-55826:Introduced rule-based alert actions in the Query and Filter Manager.
Added rule-based alert actions to the Query and Filter Manager, allowing you to define conditions and automatically apply actions to matching alerts. Supported actions include Filter Out, Adjust Score, Ignore in Case Score, and Add Custom Tag, each of which helps refine how alerts are processed and scored. This feature simplifies alert management, increases control over how alerts contribute to case severity, enables more targeted, context-aware detection, and improves signal-to-noise ratios in case analysis.
Improvements
-
AELDEV-61614: Added IPFIX visibility in the Ingestion Dashboard and the Sensor Monitoring index.
Added stage-output metrics for message type 39 sensor-monitoring events to include NetFlow/IPFIX data. The Ingestion Dashboard and the Sensor Monitoring index now display IP Flow Information Export (IPFIX) sources and classes, showing IPFIX traffic in the Top Log Sources and Top Log Source Classes panels. This enhancement improves accuracy and completeness of network-flow statistics in ingestion monitoring views.
-
AELDEV-60698: Improved case closure behavior to close all related alerts automatically.
Changed case closure behavior so that closing a case now automatically closes all associated alerts by default, keeping case and alert statuses synchronized. This improvement ensures greater consistency between cases and their associated alerts, simplifying post-investigation cleanup and status tracking. You can adjust this behavior in Case Settings if you prefer a different workflow.
-
AELDEV-57725: Added Autonomous System Number (ASN) metadata enrichment for public IP addresses.
Added ASN enrichment for public IP fields, including
src_ipanddst_ip. The enrichment process identifies the associated Autonomous System Number and organization for each public IP, providing fields such assrc_ip_asn,src_ip_asn_org,dst_ip_asn, anddst_ip_asn_org. This enhancement enables more precise filtering, alert suppression, and anomaly detection based on network ownership or routing domain, improving context for threat analysis and correlation.
Sensors
New Features
-
AELDEV-58332: Added TCP reset as a response action for device sensors monitoring mirrored traffic.
Added the ability for sensors that monitor mirrored network traffic to issue TCP reset actions, allowing immediate termination of unwanted or malicious sessions. The new TCP reset response can be triggered through Automated Threat Hunting (ATH) playbooks and is supported on device sensors. This capability enhances network control and enables faster containment of threats detected in mirrored traffic environments.
Two new CLI commands—
show tcpresetandexec tcpreset-stop—are also available for managing TCP reset operations on sensors.
Improvements
-
AELDEV-61389: Added Debian 13 support for Linux Server Sensors.
Updated installation scripts to support
-
AELDEV-59372: Added operating system and platform details to show version output for Windows Server Sensors.
Enhanced the
show versionCLI command for Windows Server Sensors to include Platform OS and Platform Type fields, aligning its output with Linux Server Sensors. The command now reports the Windows edition, build, and platform vendor information. This improvement provides greater visibility into sensor environments and simplifies troubleshooting. -
AELDEV-58378: Expanded Remote CLI support for top-level commands on sensors.
Expanded the Remote CLI functionality for sensors to support the
set,unset,show,copy, andexeccommands. These commands can now be executed remotely on one or multiple sensors, with authorization managed by sensor-side controls. This update improves operational flexibility and simplifies sensor management across distributed deployments. -
AELDEV-56958: Added structured parsing for Microsoft SQL Server Application logs.
Introduced structured parsing for Microsoft SQL Server Application logs to extract key-value pairs into discrete fields. This enhancement enables field-level filtering, correlation, and detection engineering on SQL Server audit events such as event ID 33205. The existing unstructured log field remains available for backward compatibility. This improvement provides richer visibility and more accurate analysis of SQL Server activity.
-
AELDEV-55655: Improved inclusion, exclusion, and depth handling for File Integrity Monitoring.
Enhanced File Integrity Monitoring (FIM) to apply inclusion, exclusion, and depth settings more accurately when tracking directory and file changes. The update ensures that FIM monitors only the specified directories and subdirectory levels, reducing unnecessary processing and false positive alerts. This improvement increases monitoring precision and efficiency.
-
AELDEV-55127: Added a CLI command to execute a factory reset on Modular Sensors.
Added the
factory_resetcommand to the Modular Sensor's local CLI to restore a sensor to its initial default state for re-enrollment. This command simplifies sensor recovery and redeployment in managed environments.
Connectors
New Features
-
AELDEV-58925: Introduced the Cisco Secure Access connector.
Added the Cisco Secure Access connector to collect DNS, Firewall, and Zero Trust Network Access (ZTNA) data through the Cisco Secure Access API. See Configuring Cisco Secure Access Connectors.
-
AELDEV-58522: Introduced the Perception Point X-Ray connector.
Added the Perception Point X-Ray connector to query scans through the Perception Point X-Ray API. See Configuring Perception Point X-Ray Connectors.
-
AELDEV-58212: Introduced the Threatlocker connector.
Added the Threatlocker connector to query for system audit logs through the Threatlocker API. See Configuring Threatlocker Connectors.
-
AELDEV-57792: Introduced the Cyble connector.
Added the Cyble connector to query alerts through the Cyble API. See Configuring Cyble Connectors.
-
AELDEV-54338: Introduced the Nodeware connector.
Added the Nodeware connector to get alerts data though the Nodeware API. See Configuring Nodeware Connectors.
-
AELDEV-40507: Introduced the Jamf Pro connector.
Added the Jamf Pro connector to collect computers and mobile devices data through the Jamf Pro API. See Configuring Jamf Pro Connectors.
-
AELDEV-36025: Introduced the FortiManager response connector.
Added the FortiManager responder to block and unblock IP addresses across managed Fortinet firewalls. Use FortiManager to manage multiple FortiGate firewalls. See Configuring FortiManager Connectors.
Improvements
-
AELDEV-59585: Expanded normalization for Cato Networks alert integration.
Added normalization for Cato Networks Alert security events to ensure consistent field mapping across event types. Parsing now standardizes key attributes including severity, category, action, rule, event time, source and destination IP and port, protocol, user, and application. Normalized fields are available for queries, detections, and dashboards after ingestion.
-
AELDEV-58919: Updated Acronis Cyber Protect Cloud connector to support webhook response actions.
Updated the Acronis Cyber Protect Cloud connector to support webhook response actions: Acronis Workload Isolate, Acronis Workload Restart, and Acronis Workload Shutdown. The webhook actions can be triggered manually or can enhance Automated Threat Hunting (ATH) actions. See Configuring Acronis Cyber Protect Cloud Connectors.
-
AELDEV-58584: Added a new content type to the Acronis Cyber Protect Cloud connector.
Updated the Acronis Cyber Protect Cloud connector to add the Incidents content type. See Configuring Acronis Cyber Protect Cloud Connectors.
-
AELDEV-58164: Updated the CrowdStrike connector to add a new content type to support Falcon Spotlight.
Updated the CrowdStrike connector to add the Vulnerability content type. Through this content type and the Vulnerability Management API, this connector supports CrowdStrike Falcon Spotlight. See Configuring CrowdStrike (Hosts/Events) Connectors.
-
AELDEV-57437: Added support for the id field as a path parameter and response field in custom response actions endpoints.
Enhanced the custom response action API endpoints under
custom_response_actionsto includeidas both a path parameter and response field. -
AELDEV-56985: Added support for Duo Security API V2.
Enhanced the Duo Security connector to use API V2 for collecting Authentication and Telephony logs. Administrator and Trust Monitor logs remain on V1 where no V2 endpoint exists.
-
AELDEV-56804: Added Microsoft Entra ID response actions to revoke existing sign-in sessions and remove user from group.
Introduced new Microsoft Entra ID response actions: Revoke Existing Sign-In Sessions and Remove User from Group. See Configuring Microsoft Entra ID (formerly Azure Active Directory) Connectors.
-
AELDEV-56754: Added support for running the MySQL connector on Modular Sensors.
Enabled the MySQL connector to run directly on Modular Sensors in both SaaS and on-premises deployments. See Configuring MySQL Connectors.
-
AELDEV-56486: Updated the Microsoft Graph Security API connector to add a new content type.
Updated the Microsoft Graph Security API connector to add the Attack Simulation content type. This content type uses the email msg_orgin.category for normalization. See Configuring Microsoft Graph Security API Connectors.
-
AELDEV-53496: Updated Cisco Meraki Firewall response to support inbound direction.
Updated Cisco Meraki Firewall response actions to support inbound direction and removed
Match Addressin favor ofDirection. TheDirectionfield now controls inbound or outbound traffic handling in supported actions.
Parsers
New Features
-
DATA-2995: Introduced a parser for ingesting BIO-key PortalGuard logs.
Added a built-in parser for ingesting BIO-key PortalGuard logs in RFC 5424 syslog format on port 5954. The parser extracts key-value pairs, normalizes keys by replacing spaces with underscores, and maps values to standard fields. Parsed data is immediately available for search, correlation, dashboards, and detections, providing unified visibility into PortalGuard authentication activity.
-
DATA-2973: Introduced a parser for ingesting GTB Data Loss Prevention (DLP) logs.
Added a built-in parser for ingesting GTB Data Loss Prevention (DLP) logs in RFC 3164 syslog format on port 5951. The parser extracts DLP-specific and network fields and flags truncated or split messages as error events. This parser improves monitoring of data-exfiltration alerts and network policy violations.
-
DATA-2969: Introduced a parser for ingesting IronWhale Eguard logs.
Added a built-in parser for ingesting IronWhale Eguard logs in RFC 3164 syslog format on port 5953. The parser extracts session fields including source and destination IP addresses, ports, and protocols, enabling accurate identification of traffic patterns and connection details. This parser enhances session-level visibility for IronWhale Eguard telemetry.
-
DATA-2961: Introduced a parser for ingesting Sangfor NDR logs.
Added a built-in parser for ingesting Sangfor NDR logs in CEF format with embedded JSON on port 5952. The parser correctly handles complex base64-like values containing = within event evidence fields to ensure accurate field extraction. This parser improves reliability and completeness in Sangfor NDR event normalization and enhances visibility into network detection telemetry.
-
DATA-2958: Introduced a parser for ingesting Hillstone NIPS logs.
Added a built-in parser for ingesting Hillstone Network Intrusion Prevention System (NIPS) logs in custom StoneOS remote syslog format on port 5949. The parser extracts core session details including source and destination IP addresses, ports, and protocols, enabling precise mapping of intrusion prevention traffic flows. This enhancement strengthens visibility into network intrusion activity and policy enforcement events.
-
DATA-2927: Introduced a parser for ingesting Elastic Stack logs.
Added a built-in parser for ingesting Elastic Stack logs in RFC 3164 syslog or JSON format on port 5950. The parser supports either RFC 3164 headers followed by JSON payloads or pure JSON inputs, providing flexibility across deployment configurations. This addition enables direct ingestion of Elastic Stack event data for centralized monitoring and correlation within Stellar Cyber.
-
DATA-2917: Introduced a parser for ingesting Wallix Bastion logs.
Added a built-in parser for ingesting Wallix Bastion logs in RFC 5424 syslog format on port 5948. The parser focuses on Bastion event logs and normalizes session-related data for privileged-access activities. This addition improves monitoring of administrative sessions and enhances audit visibility for Privileged Access Management (PAM) environments.
-
DATA-2913: Introduced a parser for ingesting ManageEngine Site24x7 logs.
Added a built-in parser for ingesting ManageEngine Site24x7 logs in JSON format on port 5946. The parser extracts service and performance data to support IT infrastructure monitoring. This parser enables comprehensive visibility into Site24x7 events, simplifying correlation between infrastructure alerts and related operational metrics.
-
DATA-2903: Introduced a parser for ingesting Segura (CEF) logs.
Added a built-in parser for ingesting Segura logs in Common Event Format (CEF) on port 5143. The parser extracts session, access-control, and governance details from Senhasegura events to normalize user and system interactions. This addition improves visibility into privileged-access operations and strengthens correlation between identity management and session activity.
-
DATA-2895: Introduced a parser for ingesting Cloudflare logs.
Added a built-in parser for ingesting Cloudflare Audit Logs v2 in syslog format with JSON payloads on port 5945. The parser extracts audit and DNS record change data, enabling monitoring and alerting on create, update, and delete actions for DNS resources. This parser enhances visibility into Cloudflare configuration changes and strengthens oversight of DNS integrity.
-
DATA-2783: Introduced a parser for ingesting GHX Vendormate logs.
Added a built-in parser for ingesting GHX Vendormate logs in RFC 3164 syslog format on port 5947. The parser extracts identity-related activity details to support monitoring of vendor access and compliance events. This addition improves visibility into authentication and onboarding actions within GHX Vendormate environments.
Improvements
-
DATA-3067: Corrected enrichment in the CheckPoint firewall parser for Check Point Connectra login fields.
Refined the enrichment logic for authentication events from Check Point Connectra to ensure accurate population of login fields. Logs with an action value of Log In now populate
login_result=successandlogin_type=vpn, while logs with an action value of Failed Log In populatelogin_result=failandlogin_type=vpn. Theevent.outcomefield now aligns with the action value for consistent parsing, correlation, and search. These corrections apply automatically to existing deployments using the CheckPoint firewall parser and require no configuration changes on the Stellar Cyber Platform. -
DATA-3030: Added support for the Seqrite Endpoint Security 8.3 log format.
Enhanced the Seqrite Endpoint Security parser to support the version 8.3 log format, which uses a CEF header variant with one omitted field and additional extension keys. The parser now maps
msg_data_nameandmsg_data_strvalueelements to normalized antivirus fields representing alerts, actions, and outcomes. This improvement ensures accurate parsing and complete normalization of Seqrite Endpoint Security 8.3 logs for correlation across detections, dashboards, and reports. -
DATA-3028: Enhanced the OPNsense parser with RFC 5424 syslog support and expanded event coverage.
Added support for RFC 5424 syslog and expanded the OPNsense parser to include additional event types such as audit,
configd.py,lighttpd, Unbound, and Zenarmor logs. The parser now recognizes structured data elements and high-precision timestamps and normalizes shared fields across event types. Filterlog events—that is, events from the firewall packet logging component in OPNsense—remain unsupported. This enhancement improves parsing consistency and visibility across a broader range of OPNsense components. -
DATA-3027: Expanded the Cisco Firepower Management Center parser to support syslog headers with year tokens.
Improved handling of Cisco Firepower Management Center headers that include a four-digit year in the
syslog_timestamp. The parser now accepts headers with or without a year and correctly extractshostname,priority,timestamp, andmessage_id. Both formats normalize thesyslog_timestampfield for consistent correlation. This update ensures reliable timestamp parsing across Firepower deployments without requiring any changes to Stellar Cyber configurations. -
DATA-3026: Added support for the new NGINX log format.
Updated the NGINX parser to recognize request lines that include quoted method and URL fields. Parsing now extracts
method,url,status,bytes, andtimestampvalues, and classifies error events withdev_classset tonginx_err_msgwhen present. Unmatched lines populateparser_err_msgto aid troubleshooting. This improvement enhances accuracy and diagnostic visibility for both access and error logs in NGINX environments. -
DATA-3022: Added netfilter log parsing with RFC 3164 headers to the Ubiquiti UDM Pro parser.
Expanded the Ubiquiti UDM Pro parser to support netfilter logs that include RFC 3164 syslog headers. The parser extracts standard connection attributes such as
src,dst,spt,dpt, andprototo improve session classification. Logs must include properly formatted RFC 3164 headers for successful parsing. UniFi Network CEF logs remain unsupported in this parser and should be routed to the corresponding CEF parser. -
DATA-3013, DATA-3012: Refined normalization in the Fortinet FortiGate CEF parser for IPS, antivirus, and VPN detections.
Enhanced the FortiGate CEF parser to ensure consistent normalization across IPS, antivirus, and VPN events. Logs using the
ad.prefix now populate threat fields, apply IPS enrichment, and are classified correctly into the IPS or Malware indices, while standard flow logs remain in the Traffic index. VPN events now normalize connect, disconnect, authentication success or failure, and tunnel state changes, populatingevent_type,category,src_ip,dst_ip, user,action,result, andsession_id. These updates improve log classification accuracy and visibility of FortiGate threat and VPN activity across the platform and apply automatically without requiring any changes to Stellar Cyber configurations. -
DATA-3008: Improved the Palo Alto Networks Firewall parser with VPN enrichments for GlobalProtect and SYSTEM authentication logs.
Enhanced the Palo Alto Networks Firewall parser to improve normalization of VPN events in GlobalProtect and SYSTEM authentication logs. The parser now enriches the
login_resultfield and setslogin_typetovpnfor VPN-related records. Parsing also correctly processes GlobalProtect logs that omittunnel_type. These updates improve rule matching and search accuracy for VPN authentication events. -
DATA-3007: Added VPN event normalization for Check Point Firewall logs.
Improved the Check Point Firewall parser to normalize and enrich VPN events. The parser now sets
login_typetovpnwhen VPN data includes alogin_result. SSL VPN events populateevent.vpn.typeasSSLVPN, and IPsec VPN events populate it asIPsec. These mappings standardize search, correlation, and rule logic across VPN variants, improving consistency in VPN-related analytics. -
DATA-3006: Expanded Fortinet FortiGate parser normalization for VPN events, user identifiers, remote IP mapping, and log identifiers.
Enhanced the Fortinet FortiGate parser to improve field mapping and normalization for VPN and user-related events. These updates ensure that key values in FortiGate logs map to the correct fields in Interflow records for consistent analysis and correlation. The updated mappings include:
-
The VPN type in FortiGate logs maps to the
event.vpn.typefield in Interflow records (SSLVPNfor SSL VPN andIPsecfor IPsec VPNs). -
The source IP (
srcip) in FortiGate logs maps to theremipfield in Interflow records. -
The
eapuserandxauthuserfields in FortiGate logs map to thesrcip_usernamefield in Interflow records, replacing the previous mapping fromuser.name. -
The
logidfield in FortiGate logs maps to thelogidfield in Interflow records after extracting the last five digits for uniform indexing.
These improvements strengthen event correlation, user attribution, and session visibility across FortiGate telemetry.
-
-
DATA-2996: Added CEF log format support in the Fortinet FortiMail parser.
Expanded the Fortinet Fortimail parser to ingest logs in CEF format in addition to its existing regex + KVP parsing. The parser recognizes FortiMail CEF headers and vendor extensions and maps their values to normalized fields for consistent correlation and search. This addition improves visibility into FortiMail security and message-delivery events within the unified analysis environment.
-
DATA-2982: Added support for the new Check Point R81.20 syslog format.
Extended the Check Point parser to support structured logs introduced in version R81.20. The parser now accepts RFC 5424-formatted syslog events containing key-value arrays in brackets and correctly parses fields such as
alert,attack,log_sys_message, and__policy_id_tag. It also handles repeated fields in Check Point logs such aslayer_name,match_id, andrule_action, which can appear multiple times in a single event when several security layers or rules are applied. The parser processes concatenated events within a single payload, ensuring complete extraction and normalization. These updates provide full compatibility with Check Point R81.20 gateways and management servers. -
DATA-2977: Expanded the coverage of the F5 BIG-IP Local Traffic Manager syslog parser.
Improved the F5 BIG-IP Local Traffic Manager (LTM) parser to recognize additional message variants and normalize key fields for consistent extraction. These updates extend support across a broader range of F5 LTM log types and ensure accurate field mapping and normalization for both existing and new deployments.
-
DATA-2964: Improved Arbor Peakflow SP parser.
Enhanced the Arbor Peakflow SP parser to extract and normalize additional fields. The parser now outputs the
usage_pctvalue as a numeric field (percent sign removed) and extractsalert_idfrom message text patterns such asalert #123456. It also recognizes additional message variants for improved field mapping and normalization of dynamic event content. These updates ensure more accurate data representation and consistency across Arbor Peakflow SP telemetry. -
DATA-2963: Added support for Sangfor IAM logs in the Sangfor Internet Access Gateway parser.
Expanded the Sangfor Internet Access Gateway (IAG) parser to include Sangfor Identity and Access Management (IAM) log formats. The parser recognizes
opr_logandflux, normalizeslog_typevariants, and extractsrecord_time,opr_type,obj_type,user_name,ip_addr,user,group,host_ip,dst_ip,serv,app,site,tm_type,up_flux, anddown_flux. Parsing handles mixed key-value tokens and spacing differences to ensure consistent field capture across messages. Previously supported formats continue to parse as before. -
DATA-2959: Improved IRONSCALES IronTraps CEF parsing for email events.
Improved parsing for IRONSCALES IronTraps events to populate email-related data. The parser now populates
email.from.address,email.to.addresses,email.subject, andemail.message_idfrom existing CEF fields (suser,duser,cs1labeled "Email Subject", andcs2labeled "Message-ID"). Parsing now applies to Phishing Email Attack, Phishing Email Attack Attachment, and Phishing Email Attack Link events. This enhancement increases visibility into email session context and supports better correlation for phishing-related detections without changing existing fields or mappings. -
DATA-2957: Corrected field mapping in the Cynet (CEF) parser on port 5143.
Corrected the
msg_classproduced by the Cynet (CEF) parser to outputcynet_alert. The update removed overrides fordev_typeanddev_classthat previously overwrote this field. Normalization and enrichment now align with the expected schema, ensuring detections that referencecynet_alertfunction as intended. Custom detection content such as custom rules, correlation logic, and dashboards built on the now-obsoletecynet_360field name must be updated to use the newcynetorcynet_alertfield values, depending on the referenced field. -
DATA-2956: Added normalization and enrichment for Check Point Firewall (FW1) UTM and VPN events.
Expanded the Check Point Firewall (FW1) parser to support Unified Threat Management (UTM) and VPN event normalization. Parsing now covers Application Control, URL Filtering, Anti-Virus, Intrusion Prevention, and VPN negotiation logs. The parser populates standardized fields including
category,application,action,disposition,signature,user,rule_name, andtunnel_id. These enhancements improve consistency in correlation, reporting, and dashboard visibility without requiring any changes to existing Check Point data sources or the Stellar Cyber Platform. -
DATA-2955: Added normalization and enrichment for UTM and IPS detections in the Palo Alto Networks Firewall parser.
Enhanced the Palo Alto Networks Firewall parser to support Unified Threat Management (UTM) and Intrusion Prevention System (IPS) detections. Parsing now recognizes UTM and IPS threat events and maps attributes to standard fields such as
file.name,event.utm.feature,action,fw_policy_id,andproto. Normalized records support consistent analytics, correlation, and alerting across sources. Existing Palo Alto Networks integrations on the Stellar Cyber Platform automatically ingest these events without additional configuration. -
DATA-2953: Expanded normalization in the Fortinet FortiGate parser for UTM and VPN detections.
Enhanced the Fortinet FortiGate parser to improve normalization for Unified Threat Management (UTM) and VPN events. The parser now standardizes mappings for fields including
event_type,category,threat_type,threat_name,severity,action,policy_id,session_id,src_ip,src_port,dst_ip,dst_port,username,app,tunnel, andvpn_type. Antivirus events parse consistently whether or not a virus identifier is present, and Voice over IP (VoIP) port handling now uses the correct field source. Subtypes for Intrusion Prevention System (IPS), Web Filter, antivirus, and VPN events align to a unified schema. These updates ensure uniform normalization across on-premises and SaaS deployments for improved correlation and reporting. -
DATA-2948: Added CEF support for the Barracuda Web Application Firewall parser.
Extended the Barracuda Web Application Firewall (WAF) parser to support Common Event Format (CEF) logs and expanded normalization coverage. The parser now recognizes CEF headers and extracts fields including
attackId,attack_type,attackDescription,actionTaken,rt,src,spt,dst,dpt,userAgent,request,requestMethod, andreferer. TheattackIdfield maps toevent.sig_id, and theattack_typefield maps toevent.reason. Whenrtis present, the parser uses it for the event time; otherwise, the syslog header supplies the timestamp. These updates improve normalization accuracy and visibility into Barracuda WAF attack and response activity. Existing Barracuda WAF sources require no changes on either the source device or the Stellar Cyber Platform -
DATA-2947: Added support for additional Apache HTTP Server error log formats in the Apache HTTPD parser.
Expanded the Apache HTTPD parser to recognize multiple Apache HTTP Server error log formats, including ModSecurity-style custom variants. The parser now handles variations in field order and separators and extracts
timestamp,severity,module,pid,tid,client_ip,vhost, andmessagewhen available. These improvements increase parsing reliability for both standard and customized Apache error logs and maintain backward compatibility with existing log formats. Existing Apache HTTP Server sources and Stellar Cyber parser settings continue to operate without needing modification. -
DATA-2945: Updated the normalization of event timestamps in the SAP Security Audit parser.
Improved how the SAP Security Audit parser handles timezones in the
event.timestampfield. When logs include timezone data, the parser now preserves it. When logs omit a timezone, the parser applies the timezone configured on the receiving sensor before converting the value to Coordinated Universal Time (UTC) during ingestion. This update ensures consistent time normalization across SAP Security Audit events for accurate correlation and reporting. -
DATA-2940: Expanded the Apache HTTP Server (HTTPD) parser to support additional log formats, including MySQL error logs.
Extended the Apache HTTP Server (HTTPD) parser to recognize new
log_typevalues and process MySQL error logs. Parsing now tolerates headers without a colon delimiter and improves pattern matching for message variants. These enhancements expand compatibility across Apache deployments that forward application and database logs together, ensuring consistent normalization without changes to existing Stellar Cyber configurations. -
DATA-2938: Improved the parser for Prisma Cloud Compute Edition audit logs.
Enhanced the Prisma Cloud Compute Edition parser to support additional fields and JSON extraction in audit logs. The parser now correctly parses fields such as
collections,image_id,image_name,labels,description, andseverityfrom raw logs and embedded JSON structures. Duplicate key entries are ignored, and the misspelledescriptionnow maps todescription. Parsing covers event types includingimage_scan,container_scan, compliance, and vulnerability, ensuring consistent extraction even when payloads contain malformed JSON segments. These improvements enhance reliability and completeness of Prisma Cloud Compute audit event normalization. These improvements apply automatically to existing Prisma Cloud Compute connectors on the Stellar Cyber Platform. -
DATA-2936: Improved the parsing of NEC Indoor Unit (IDU) logs.
Refined the NEC Indoor Unit (IDU) parser to use fixed-width column alignment for consistent field extraction. The parser now correctly identifies fields such as
Hostname,Username,Event Type,Source IP, andCategorywhen present, and treats theResultfield as optional and skips it if absent. It also ignores variable padding and enforces consistent spacing for accurate field detection. These updates increase parsing precision for NEC Indoor Unit telemetry and ensure automatic matching for events ingested through standard syslog pipelines on the Stellar Cyber Platform. -
DATA-2935: Updated IRONSCALES IronTraps CEF parser to extract additional fields and normalize the email subject.
Updated the IRONSCALES IronTraps CEF parser to parse new elements in the
msg_datasection of the log. The parser now mapssender_nameandemployee_nameinto theironscalesnamespace and normalizesemail_subjecttoemail.subject. These enhancements improve field completeness and event correlation for phishing-related logs. Newly ingested events automatically parse the additional fields; reparse historical data if you need backfilled values. -
DATA-2932: Reduced excessive field generation in the Ubiquiti syslog parser.
Refined the Ubiquiti parser to stabilize field counts and types by implementing a key allowlist and normalizing key casing. Unknown or invalid keys now route to
msg_datainstead of the vendor namespace, and embedded JSON content parses as structured data. The parser also ensures correct typing for MAC address fields. These improvements apply automatically to existing Ubiquiti syslog ingestion on the Stellar Cyber platform and require no configuration changes. -
DATA-2926: Improved Check Point Appliance syslog parsing for Action extraction and updated header format.
Enhanced the Check Point Appliance parser to improve syslog header handling and field mapping. The parser now accepts the updated key-value header format, correctly separates the hostname, and maps
Actionto the normalizedactionfield. These updates prevent hostname text from prefixing field keys and ensure consistent extraction of action values. No changes are required to existing Stellar Cyber configurations using the Check Point Appliance parser. If a custom parser override exists for this source, it must be removed or updated to inherit the new header logic. -
DATA-2912: Improved the Fortinet FortiADC parser with support for space-delimited logs and expanded field extraction.
Expanded the Fortinet FortiADC parser to support space-delimited log formats in addition to the existing comma-delimited format. Parsing now correctly extracts the
dateandtimefields and retrieves key-value pairs embedded in themsg,pkt_hdr, andmatched_partfields for search and analytics. The parser also supports configuration of key lists to extract only specific elements when required. These updates automatically apply to existing FortiADC data sources on the Stellar Cyber Platform and require no configuration changes. -
DATA-2905: Added UID and username extraction for sudo and switch-user session logs to the Tait Communications Linux Syslog (custom) parser.
Expanded the Tait Communications Linux Syslog (custom) parser to extract user identifiers (UID) and usernames from
pam_unixsession messages generated bysudoandsucommands. Parsed values now populate theuser.idfield with the initiating account UID and theuser.namefield with the target account name. Session state remains available inlinux_syslog.actionand related fields. These updates improve visibility into privilege escalation and account-switching activity in Linux environments. -
DATA-2814: Added multi-tenant support to the NXLog parser.
Enhanced the NXLog parser to extract tenant identifiers into the top-level
tenantidfield. When NXLog events contain aTenantIDkey in theevent_dataornxlogfield, the parser now populates tenantid and removes the nested key to prevent duplication. The match is case-insensitive, and both Windows and Linux JSON payloads are supported. These updates enable tenant-level separation and visibility without requiring changes to existing Stellar Cyber configurations. -
DATA-2794: Added RFC 5424 header support for the Arista Data Center Switch Router parser.
Extended the Arista Data Center Switch Router parser to support RFC 5424 syslog headers in addition to RFC 3164. The parser now detects both header formats and extracts fields including
timestamp,hostname,appname,procid,msgid,structured-data, andmessage. Configuring Arista devices to emit syslog in RFC 5424 format enables full field extraction on the Stellar Cyber Platform. Existing RFC 3164 log behavior on the Stellar Cyber Platform remains unchanged.
Early Access Program
If you're interested in testing out new features ahead of general availability, consider joining the Early Access Program (EAP) by contacting your Stellar Cyber Customer Success representative and telling them which EAP feature you want to test. Once you've agreed to the EAP terms and signed up, the EAP feature is unlocked for you.
The purpose of this program is to boost performance and reliability through real-world customer insights, giving you a hands-on role in shaping a Stellar Cyber feature. In return, you'll receive early access to upcoming releases and the chance to guide product development.
The following are the EAP features available in this release:
XDR Connect Webhook Ingestion
This is a simple webhook framework that lets you post JSON data directly from any external system into Stellar Cyber, accelerating custom integrations and expanding your visibility across the entire security stack.
Resolved Issues
-
AELDEV-58991:Resolved an issue where alert filters with a NONE operator did not work as intended.
Resolved a situation where alert filters including a NONE operator did not work as intended, regardless of the number of conditions in a group. Alert filters now trigger correctly when the NONE operator is used. Note that the NONE operator appears as a not modifier in the Conditions markup for the filter.
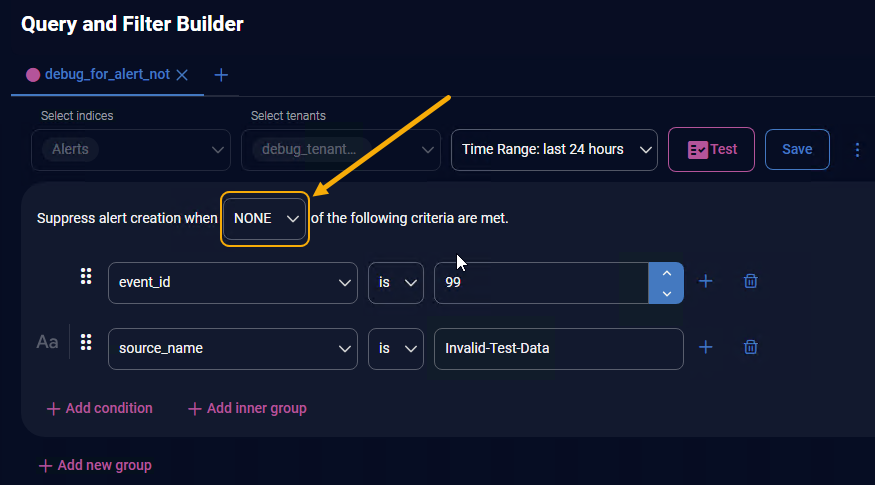
Note: Existing alert filters using a NONE operator may no longer work as intended after this fix. Check your alert filters and revise as necessary.
-
AELDEV-64359: Aligned scheduled report queries with report preview behavior.
Corrected query generation for scheduled reports so that the data returned in emailed or exported reports now matches the results shown in the on-screen report preview. While dashboards continue to apply default and global filters as designed, global filters are no longer applied to scheduled report queries. This change ensures consistency between previewed and delivered results, providing predictable report output without affecting dashboard filtering behavior.
-
AELDEV-63454: Fixed inconsistent status filtering for cases synchronized from ServiceNow.
Corrected synchronization logic so that both
statusandstatus_numvalues now update consistently when cases are imported or modified through ServiceNow integration. Previously, filtering and queries could mismatch status values—for example, returning resolved Cases when filtering forNew. The fix ensures accurate filtering on the Cases page and through the/api/casesendpoint. This improvement takes effect automatically in Stellar Cyber without requiring any changes to the ServiceNow configuration. -
AELDEV-63297: Fixed missing or incorrect lookup list options when creating alert customizations from Alert Details.
Corrected tenant context handling so that lookup lists now appear correctly in the Value drop-down list when the operator is in lookup or is not in lookup is selected in the Add Alert Filter dialog box (renamed as Add Alert Customization in 6.2.0). In previous releases, users navigating to Detections | Alerts | View | More Info | Add Alert Filter could see lookup lists from other tenants or fail to see their own. This fix restores accurate tenant-based lookup visibility and ensures reliable alert customization in multi-tenant environments.
-
AELDEV-62955: Removed an upgrade timeout and the automatic reinstallation for Windows Server Sensor upgrades.
Eliminated the 300-second execution limit for Windows Sensor upgrades and disabled the automatic reinstallation that occurred when the process was incorrectly marked as failed after a version change. Longer upgrade tasks now complete normally without forced termination or unintended uninstall. The improvement increases upgrade reliability and stability for Windows Server Sensors.
-
AELDEV-62523: Fixed the timeline in Case Analysis so that it updates in correspondence to the selection of different paths.
Resolved an issue in Cases | <case-name> | Analysis | Timeline where the timeline did not refresh after selecting a different path in the interactive graph. The timeline now updates correctly to reflect the chosen path and associated alerts, providing accurate temporal context and improving investigative efficiency.
-
AELDEV-62373: Removed support for legacy SHA-1–based host key algorithms from the SSH server on Modular Sensors.
Updated the SSH server configuration on Modular Sensors to disable the obsolete
ssh-rsahost key algorithm, which uses SHA-1. Servers now support only the stronger SHA-2–based algorithmsrsa-sha2-256,rsa-sha2-512, andssh-ed25519. Legacy SSH clients that still rely onssh-rsamust be upgraded or reconfigured because connections using the deprecated algorithm will now fail. This update strengthens encryption security and aligns Modular Sensor SSH services with current cryptographic standards. -
AELDEV-62352: Updated the Modular Sensor OpenSSH package to 8.9p1-3ubuntu0.13.
Upgraded the OpenSSH package in the Modular Sensor base image to version 8.9p1-3ubuntu0.13 to enhance security and resilience against remote exploits. This update includes security fixes for the regreSSHion remote code execution, authentication bypass, and CVE-2025-26465 vulnerabilities. The reported sensitive information disclosure issue does not apply to the Ubuntu OpenSSH package, which Stellar Cyber has included in Modular Sensors since version 6.0.0. No user action is required.
-
AELDEV-62125: Retained the configured TLS verification setting for log forwarding after sensor upgrades.
Corrected the sensor upgrade process so that the TLS certificate verification option for log forwarding remains intact after upgrades to
-
AELDEV-61995: Prevented Windows Server Sensors from being purged due to missing configuration values.
Added logic to the Windows Server Sensor to apply a safe default value when the
memory_monitor_enabledparameter is missing from theaos.yamlconfiguration file. Previously, the absence of this parameter caused the sensor to stop reporting status, leading sensors to be purged automatically and later reappear as unauthorized after reconnection. The update ensures the sensor continues communicating with the Stellar Cyber Platform without requiring manual intervention, maintaining uninterrupted sensor reporting and operational stability. -
AELDEV-61492: Restored reliable startup for Linux Server Sensors running on Debian 12.
Corrected a startup failure that could occur on Debian 12 systems, where Linux Server Sensors sometimes stopped reporting to the Stellar Cyber Platform after upgrade. The update ensures that sensors on Debian 12 start normally and maintain continuous connectivity after upgrading to 6.2.0. This fix improves operational stability for environments deploying Linux Server Sensors on Debian 12.
-
AELDEV-61391: Improved deduplication for Mimecast attachment protection events.
Enhanced event processing in the Mimecast connector to eliminate duplicate entries for
mimecast_email_attachment_protect_logevents when using API version 2.0. Previously, repeated entries could generate redundant alerts for Mimecast Attachment Protect and Mimecast Antivirus detections. Deduplication now uses theprocessingIdfield to identify and suppress duplicates, ensuring accurate alert correlation and reducing unnecessary alert volume. -
AELDEV-61288: Resolved intermittent unavailability in single-node Data Lake standby deployments.
Fixed stability issues in single-node Data Lake environments that included a standby node. Previously, users might have experienced temporary unavailability or UI readiness warnings during system joins or synchronization. This update eliminates these interruptions, allowing standby systems to synchronize smoothly and remain stable throughout operation. In doing so, this fix improves reliability and ensures consistent Data Lake accessibility during normal and standby transitions.
-
AELDEV-61265: Corrected data volume calculations and units in the Executive Summary Report and Case Report.
Updated report logic to ensure an accurate calculation of Average Daily Data Volume and consistent use of data units. Previously, the Executive Summary Report and Case Report displayed inflated values and differed from results returned by the
/daily_averageAPI endpoint. Metrics now show true daily averages using standardized byte-based values. The fix ensures that data volume information is accurate and consistent between reports and APIs, improving reporting reliability and alignment with integrated tools. -
AELDEV-51764: Prevented unintended removal of Multi-Factor Authentication enrollments when policy changed from mandatory to optional.
Resolved an issue where switching the MFA policy from mandatory to optional could disable MFA for users who were already enrolled. Under the corrected behavior, accounts with an existing MFA factor continue to authenticate using MFA, while unenrolled accounts can sign in without it and enroll later if desired. Enrolled users retain their existing factors when the policy is toggled between optional and mandatory. This change ensures consistent enforcement of MFA policies and preserves user enrollments across configuration updates.
Stellar Cyber Platform System Requirements
You must install the Stellar Cyber Platform in an environment that meets or exceeds minimum system requirements. Refer to the following sections for the minimum system requirements for different target environments:
-
Dedicated VMware ESXi (see below)
System Requirements for Cluster Installation in VMware ESXi
You can install the Stellar Cyber platform on a dedicated ESXi server running VMware ESXi 8.0, 7.0 or 6.7. The target ESXi server must have sufficient resources to support separate virtual machines for the Data Analyzer, Data Lake, and, if installing as an Integrated Data Processor, the Modular Sensor. The specifications in the table below are sufficient to support a Stellar Cyber deployment with up to 300GB of daily ingestion.
Keep in mind the following:
-
Each VM (DA, DL, and MDS) must be thick-provisioned and requires 500 GB of SSD disk space.
-
You can install all three of the VMs in the same datastore if there is sufficient space for both the VMs and the 12+ TB required for the Data Lake's ElasticSearch data. However, Stellar Cyber recommends that the Data Lake uses a dedicated datastore.
| Deployment Type | Resource | Host | DL | DA | MDS |
|---|---|---|---|---|---|
| Recommended (Production)
(DL and DA VMs) |
CPU/vCPU | 44 physical (88 cores/hyperthreads) | 40 | 44 | - |
| RAM (GB) | 256 | 136 | 64 | - | |
| OS SSD Disk Space | 1 TB | 500 GB | 500 GB | - | |
| Data Lake SSD Disk Space | 16 TB | 12+ TB | - | - | |
| Integrated Data Processor
(DL, DA, and MDS VMs) |
CPU/vCPU | 44 physical (88 cores/hyperthreads) | 28 | 28 | 28 |
| RAM (GB) | 256 | 136 | 64 | 32 | |
| OS SSD Disk Space | 1 TB | 500 GB | 500 GB | 500 GB | |
| Data Lake SSD Disk Space | 16 TB | 12+ TB | - | - | |
| Minimum Configuration for Separate DP VMs
You can still deploy separate DL and DA VMs so long as the ESXi host is provisioned with sufficient CPUs to support the following minimum configuration: |
CPU/vCPU | 16 | 16 | - | |
| RAM (GB) | 128 | 64 | - | ||
| OS SSD Disk Space | 500 GB | 500 GB | - | ||
| Data Lake Disk Space | 2+ TB | - | - | ||
Stellar Cyber supports SSD disks for both the OS and Data Lake drives (SATA, SAS, or NVMe). HDD disks introduce latency and are not supported.
Scaling Up Performance with a DP Cluster
You can configure up to ten DP servers to operate in a cluster to achieve improved Stellar Cyber performance. Stellar Cyber cluster testing indicates the following performance guidelines when adding additional DPs to a cluster:
-
With data replication disabled, the aggregated ingestion throughput grows linearly with the number of DP servers.
-
With data replication enabled (the default), the aggregated ingestion throughput is about 30% lower than the throughput without data replication.
Upgrading the Stellar Cyber Platform
You can upgrade the Stellar Cyber Platform from 6.0.0 or later to 6.2.0. You must:
-
Prepare for the upgrade
-
Upgrade the Stellar Cyber Platform to 6.2.0
-
Upgrade the sensors
-
Verify the upgrade
For more detailed instructions, refer to Upgrading Software.
Due to additional functionality and features, resource utilization (CPU and memory) might increase depending on your usage patterns. You can keep tabs on the platform's CPU and disk usage by clicking the Node List button in the System | Data Management | Data Analyzer page. If necessary, you can scale up your platform by adding DA and DL worker nodes, as described here for AWS, GCP, and OCI.
Important Note for Air-Gapped Environments: The 6.2.0 release requires connectivity to specific external URLs to enable components included in the installation image, such as Early Access Program functionality and various features and fixes. In air-gapped or dark site environments, where external network access is restricted, these components cannot be enabled after installation. Before upgrading to 6.2.0, confirm that the required connectivity to these URLs is available.
Prepare for the Upgrade
To prepare for the upgrade:
- Back up the data and configuration
- Make sure the sensors are up and running
- Take note of the ingestion rate
- Take note of the number of alerts
- Make sure the system health indicator shows
- Run the pre-upgrade check
Upgrade the Stellar Cyber Platform to 6.2.0
-
Select Settings | ORGANIZATION MANAGEMENT | Software Upgrade.
-
Choose 6.2.0.
-
Select START UPGRADE.
Upgrade the Sensors
New features, updated ML algorithms, and enhanced configurations may change ingestion and detection patterns. We recommend the following to ensure a smooth upgrade:
- Upgrade sensors with the Sandbox and IDS features enabled before sensors with the only the Network Traffic feature enabled. Sensors with Network Traffic enabled send data to sensors with Sandbox and IDS enabled for additional processing.
- Upgrade sensors in batches instead of all at once.
- For server sensors (agents):
- Upgrade a small set of sensors that cover non-critical assets.
- After 24 hours, ensure that your ingestion is as expected, then upgrade a larger set.
- After 24 hours, ensure that your ingestion is as expected, then upgrade the remaining server sensors.
CentOS 7.1 Prerequisite – Update curl to 7.29.0-59.el7_9.2 or Higher
Before upgrading any Linux Server Sensors running in CentOS 7.1, you must check your curl version and update it to 7.29.0-59.el7_9.2 or higher to use the strong encryption required by the Stellar Cyber Platform.
-
Check your curl version as shown below:
yum list installed curl
\* Loaded plugins: fastestmirror Loading mirror speeds from cached hostfile Installed Packages curl.x86_64 7.29.0-19.el7
-
If the listed version is lower than
7.29.0-59.el7_9.2(as it is in the example above), use the following commands to update the curl package:yum makecache
yum install curl
-
If installation of the curl package fails, it is most likely because CentOS is trying to use a repo that has reached its end of life. Try updating the base URL and then reinstall curl. The following
sedcommand makes the necessary changes for most environments to ensure that the updated curl package can be installed:sudo sed -i.bak -e 's|^mirrorlist=|#mirrorlist=|' -e 's|^#baseurl=http://mirror.centos.org/centos/\$releasever|baseurl=http://archive.kernel.org/centos-vault/7.9.2009|' /etc/yum.repos.d/CentOS-Base.repo
To upgrade sensors:
You can upgrade a sensor to the most recent release from the two previous releases. This means that you can upgrade a sensor to the 6.2.0 release from any 6.0.x or 6.1.x release.
If you are upgrading a Windows Server Sensor, complete any pending updates for the host Windows machine before upgrading the Server Sensor.
-
Select System | DATA SOURCE MANAGEMENT | Sensors | Sensors.
The Sensor List appears.
-
Select Manage | Software Upgrade.
The Sensor Software Upgrade page appears.
-
Choose the target software version.
-
Choose the target sensors.
-
Select Submit.
Verify the Upgrade
To verify that the upgrade was successful:
- Check the Current Software Version on the System | ORGANIZATION MANAGEMENT | Software Upgrade page.
- Make sure the sensors are up and running.
- Check the ingestion rate and make sure it is as expected.
- Check the number of alerts and make sure it is as expected.
- Check the system health indicator:
- indicates a perfectly healthy system.
- indicates minor issues. Monitor the system for 30 minutes. If the issues remain, investigate further.
- indicates major issues. Contact Technical Support.
