ITDR Workflow
 Learn more at Stellar Cyber Academy.
The following links take you to videos on the Stellar Cyber Academy technical training portal where you can learn more about a topic.
P11 ITDR: Neutralizing Lateral Movement and Non-Human Identity Threats (10m)
Discover how Identity Threat Detection and Response (ITDR) helps you identify identity-based attacks, including stolen-credential activity and compromised service accounts. Watch two demos that show how these threats appear in the Stellar Cyber Platform and learn how ITDR helps you detect and respond to them before they escalate.
The first time you access a link on the portal during a session, you must log in to access content.
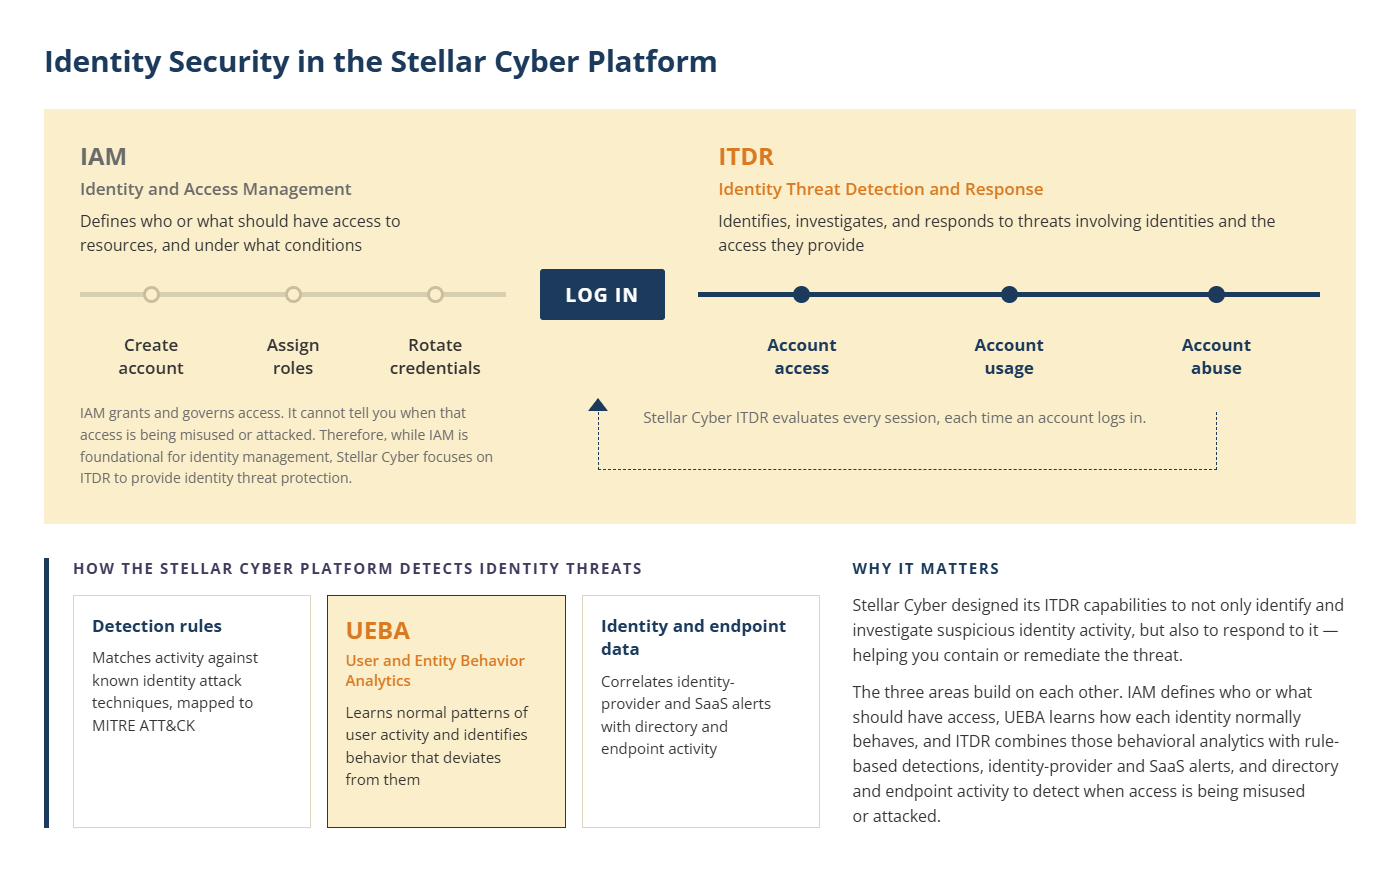
Identity Threat Detection and Response (ITDR) is the set of capabilities that the Stellar Cyber Platform uses to identify, investigate, and respond to threats involving identities and the access they provide. Where Identity and Access Management (IAM) defines who or what should have access to resources and under what conditions, ITDR focuses on detecting when identities, credentials, or access are being misused or attacked.
User and Entity Behavior Analytics (UEBA) contributes to ITDR by learning normal patterns of user activity and identifying behavior that deviates from those patterns. ITDR builds on those behavioral analytics by combining them with rule-based detections, identity-provider and SaaS alerts, directory and endpoint activity, investigation capabilities, and response actions. That response capability is a key distinction: ITDR is designed not only to identify suspicious identity activity, but also to help contain or remediate it.
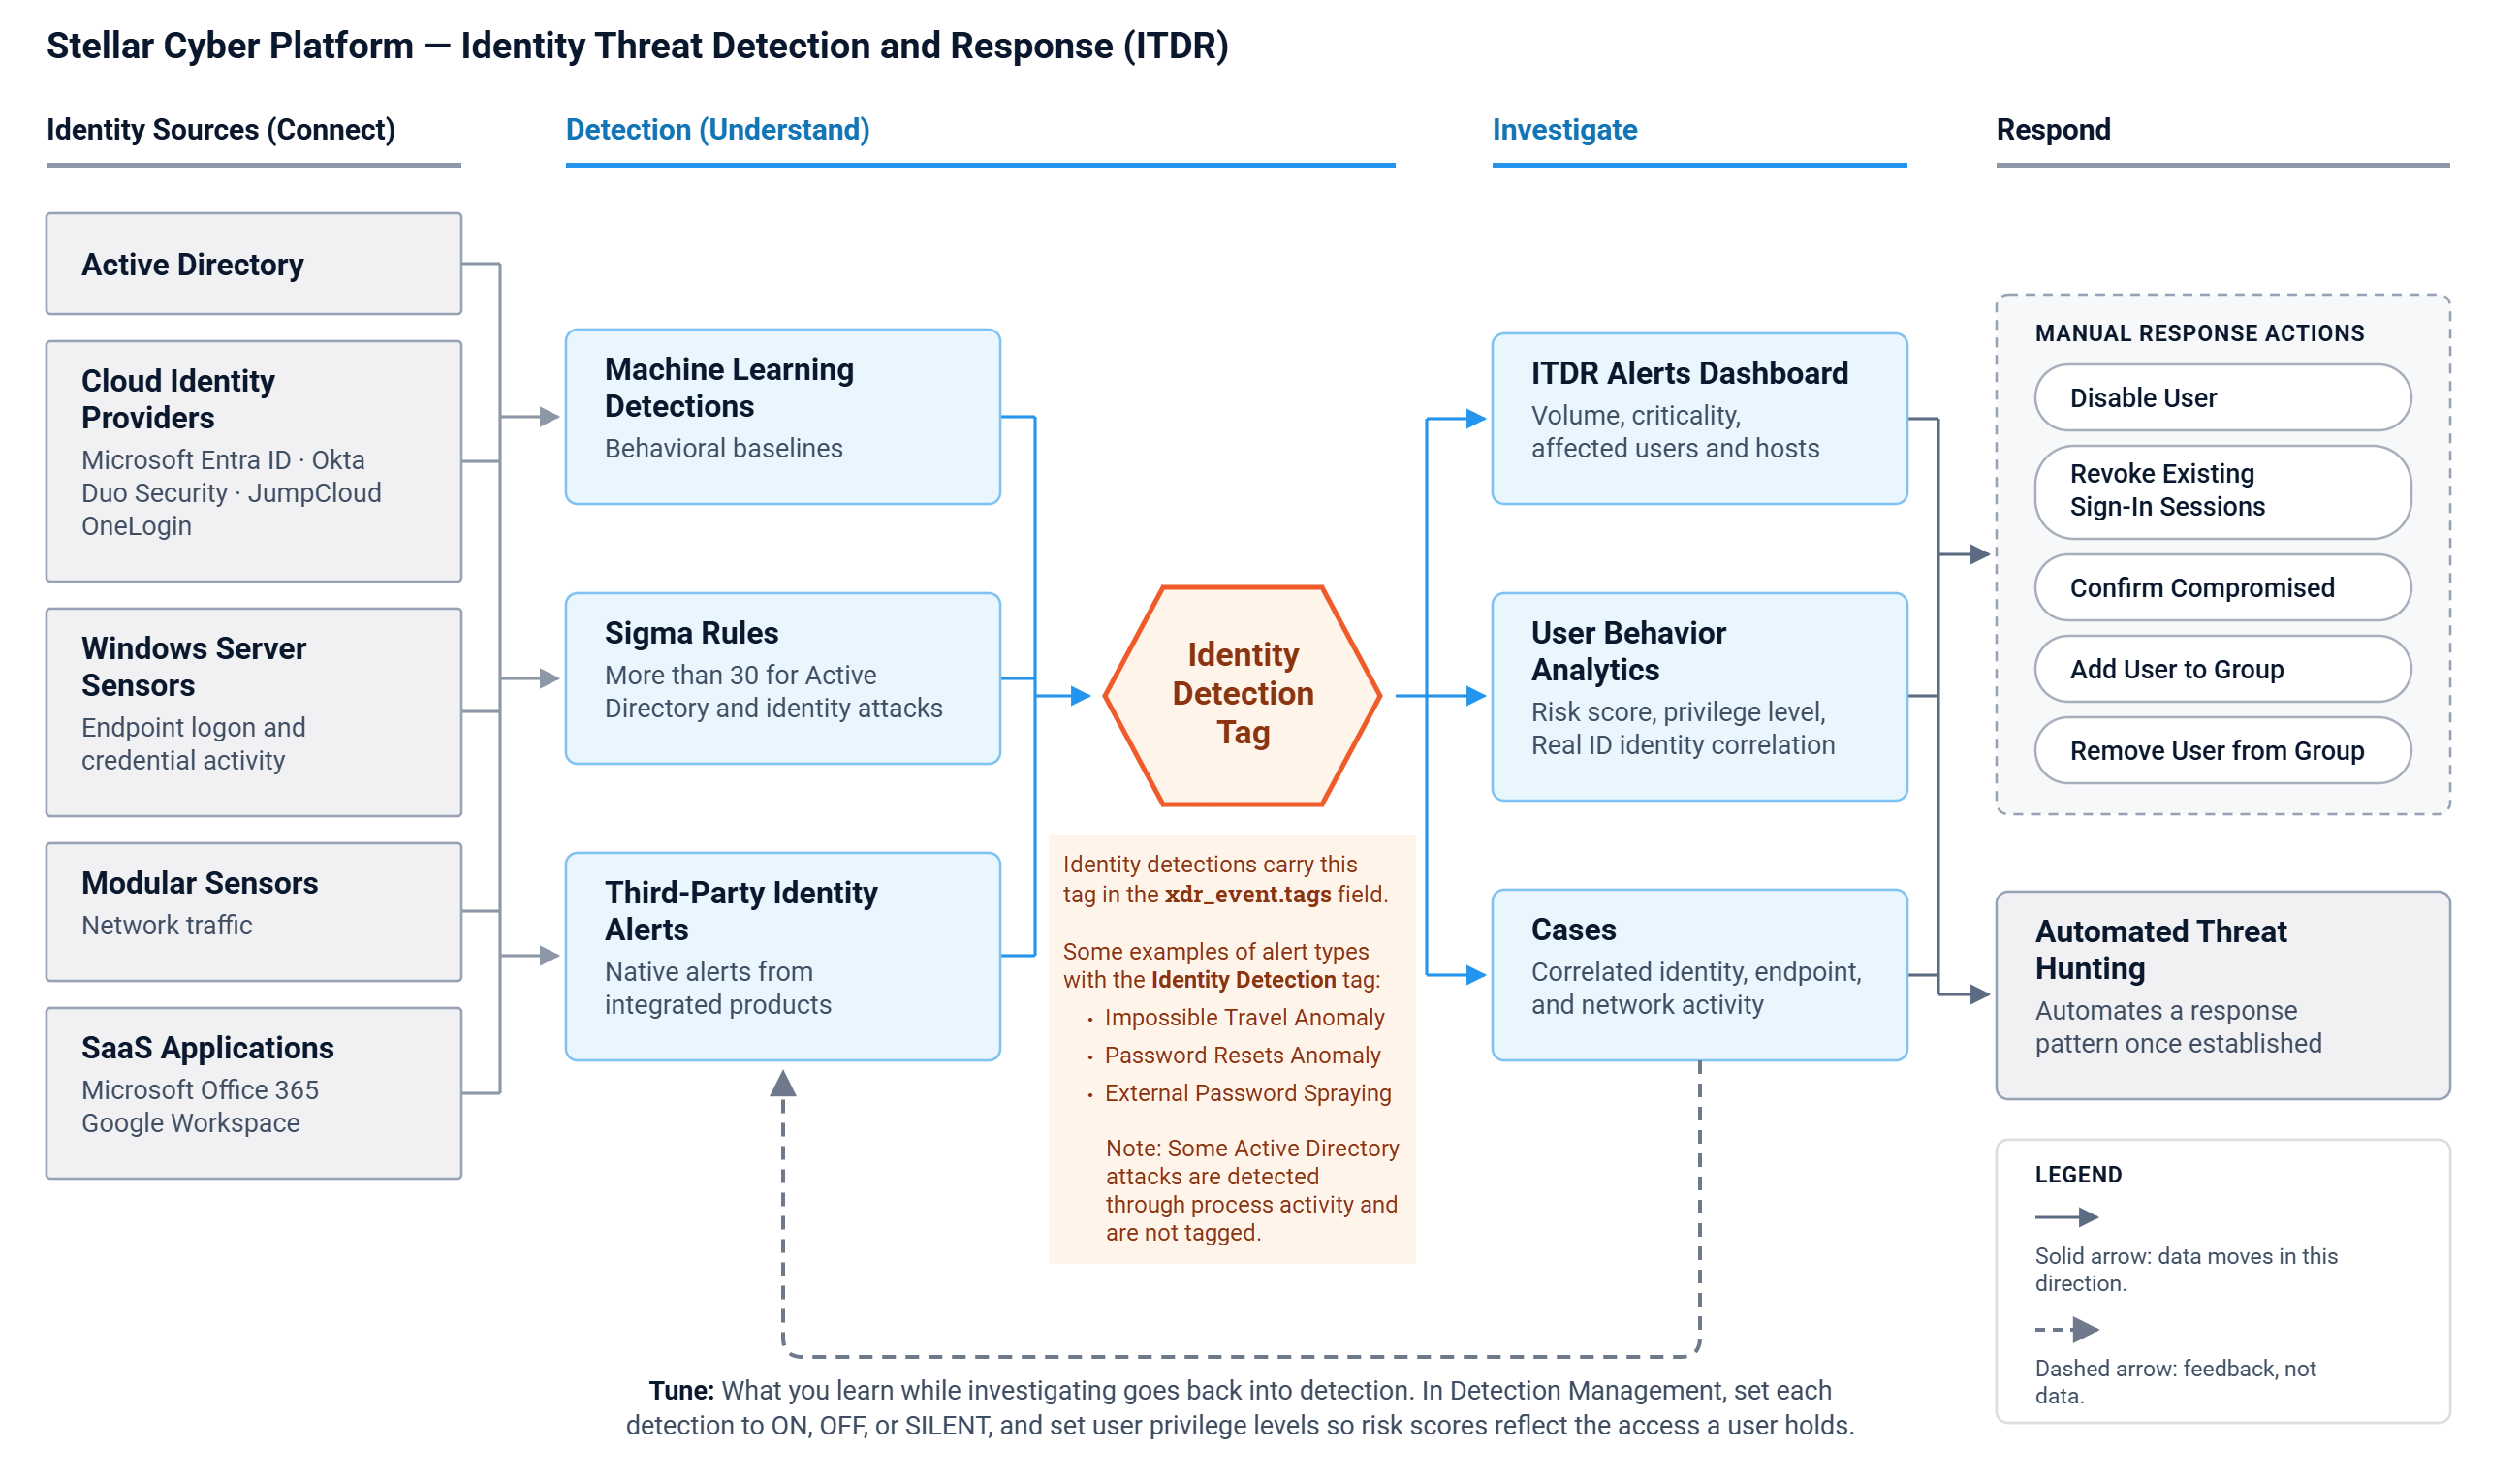
This workflow brings those capabilities together and leads you from understanding what ITDR detects through connecting the required data sources, verifying and tuning detection coverage, and investigating and responding to identity threats in daily operations.
To see ITDR in action, watch Stop Account Takeovers: Detect Identity Threats with Stellar Cyber (4m 30s) on YouTube. This short video follows an identity-based attack from the initial credential compromise to data exfiltration. It shows how the Stellar Cyber Platform correlates alerts and how you can respond to the attack.
About the Identity Detection Tag
The Stellar Cyber Platform applies the Identity Detection tag to alert types that detect threats involving user credentials and authentication, user activity, accounts, and identity-related cloud or SaaS activity. The tag appears in the xdr_event.tags field of the Interflow record for the alert.
Use the Identity Detection tag to identify and filter most identity detections throughout this workflow. However, some Active Directory attack techniques are detected through process activity rather than identity activity and do not carry this tag. When investigating suspected Active Directory attacks, review the relevant process-based detections in addition to detections carrying the Identity Detection tag.
Before You Begin
ITDR requires no add-on license and is available in both SaaS and on-premises deployments. There is no feature toggle to enable. The prerequisites are data sources rather than entitlements, and Stage 2: Connect Your Identity Sources covers them.
The stages in this workflow are:
Stage 1: Understand What ITDR Detects
Identity coverage in the Stellar Cyber Platform comes from three distinct sources. Knowing which is which helps you understand why some detections need a baseline period and others fire immediately.
-
Machine learning detections – Behavioral models that learn what is normal for each user and flag departures from it. Impossible travel and login time anomalies are examples.
-
Rule-based (Sigma) detections – More than 30 Sigma rules cover Active Directory and identity attack techniques, including Kerberos ticket theft, credential dumping, and modification of sensitive directory attributes. These fire on a match without requiring a baseline.
Some Active Directory attack techniques are detected through process activity rather than through identity activity, and surface under the Suspicious Process Creation Commandline alert type. Examples include Certipy certificate abuse, credential dumping from
ntds.dit, passwords found in Group Policy Preferences, and BloodHound directory enumeration. These alerts do not carry the Identity Detection tag, so filtering by that tag alone does not show them. Review this alert type alongside the identity alert types when you investigate a suspected Active Directory attack. -
Third-party identity alerts – Native alerts from integrated identity products, mapped into the Stellar Cyber Platform and correlated alongside built-in detections. Stellar Cyber also ingests and correlates identity posture findings reported by integrated third-party products, such as over-privileged service accounts, unrotated access keys, and stale credentials. These findings arrive as alerts and are normalized, mapped to MITRE ATT&CK techniques, and correlated in the same way as any other identity signal. See Integration of Third Party Native Alerts.
Where the Signals Come From
| Source | What It Contributes |
|---|---|
| Directory services | User and computer profiles, authentication events, and group membership changes from Active Directory. |
| Cloud identity providers | Sign-in activity and risk detections from Microsoft Entra ID, Okta, Duo Security, JumpCloud, and OneLogin. |
| Endpoints | Logon events, credential access activity, and process behavior collected by Windows Server Sensors. |
| Network traffic | Brute force attempts, credentials sent in clear text, and Server Message Block (SMB) or Remote Desktop Protocol (RDP) reconnaissance observed by Modular Sensors. |
| SaaS applications | Account manipulation and policy changes from Microsoft Office 365 and Google Workspace. |
Identity Alert Types
The following alert types carry the Identity Detection tag. Expand a category to see the alert types it contains, along with the xdr_event.name value that identifies each one in the Interflow data. For a full description of any alert type, see Machine Learning Alert Type Details.
 Credential Access and Authentication Attacks
| Alert Type | xdr_event.name |
|---|---|
| Account MFA Login Failure Anomaly | cloud_account_login_failure_okta
|
| External Account Login Failure Anomaly | external_cloud_account_login_failure
|
| External Brute-Forced Successful User Login | external_user_success_brute_forcer
|
| External Credential Stuffing | external_credential_stuffing
|
| External Password Spraying | external_password_spray
|
| External Plain Text Passwords Detected | external_clear_password
|
| External Protocol Account Login Failure Anomaly | external_protocol_account_login_failure
|
| External RDP Brute Force Attack | external_rdp_brute_force
|
| External SMB Username Enumeration | external_smb_user_scan
|
| External User Login Failure Anomaly | external_user_login_fail
|
| Hydra Password Guessing Hack Tool | hydra_password_guessing_hack_tool
|
| Internal Account Login Failure Anomaly | internal_cloud_account_login_failure
|
| Internal Brute-Forced Successful User Login | internal_user_success_brute_forcer
|
| Internal Credential Stuffing | internal_credential_stuffing
|
| Internal Password Spraying | internal_password_spray
|
| Internal Plain Text Passwords Detected | internal_clear_password
|
| Internal Protocol Account Login Failure Anomaly | internal_protocol_account_login_failure
|
| Internal RDP Brute Force Attack | internal_rdp_brute_force
|
| Internal SMB Username Enumeration | internal_smb_user_scan
|
| Internal User Login Failure Anomaly | internal_user_login_fail
|
| Mimikatz Credential Dump | mimikatz_mem_scan
|
| Mimikatz DCSync | mimikatz_dcsync
|
| Password Cracking with Hashcat | password_cracking_with_hashcat
|
| RDP Session Hijacking | rdp_session_hijacking
|
| RDP Suspicious Logon Attempt | rdp_suspicious_logon_attempt
|
| SMB Impacket Lateralization | smb_impacket_lateralization
|
| Successful Login After Brute Force | brute_force_success
|
| Suspected AS-REP Roasting Attacks | kerberos_roasting
|
| Suspicious Kerberos Authentication from Golden Certificate | suspicious_kerberos_authentication_from_golden_certificate
|
| Suspicious LDAP Search Request | suspicious_ldap
|
| certutil.exe Certificate Extraction | certutil_exe_certificate_extraction
|
Anomalous User Behavior
| Alert Type | xdr_event.name |
|---|---|
| Cloud Drive Data Exfiltration Anomaly | cloud_drive_data_exfiltration_anomaly
|
| Dormant Account Anomaly | dormant_account
|
| External User Application Usage Anomaly | external_user_uncommon_app
|
| External User Data Volume Anomaly | external_user_bytes_sum
|
| File Creation Anomaly | file_creation
|
| Impossible Travel Anomaly | user_impossible_travel
|
| Internal User Application Usage Anomaly | internal_user_uncommon_app
|
| Internal User Data Volume Anomaly | internal_user_bytes_sum
|
| Login Attempt Location Count | login_location_count
|
| Login Time Anomaly | user_login_time
|
| User Asset Access Anomaly | user_asset_access
|
| User Login Location Anomaly | user_login_region
|
| User Process Usage Anomaly | user_uncommon_process
|
Account Manipulation
| Alert Type | xdr_event.name |
|---|---|
| Account Created and Deleted in Short Timeframe | account_created_deleted_in_short_timeframe
|
| Account Creation Anomaly | account_creation_anomaly
|
| Google Workspace Account Manipulation | gsuite_account_manipulation
|
| Google Workspace Attack Warning | gsuite_attack_warning
|
| Google Workspace Suspicious Activities | gsuite_suspicious_activities
|
| Google Workspace User Suspended | gsuite_user_suspended
|
| Password Resets Anomaly | password_resets_anomaly
|
| Suspicious AD Machine Account Creation | suspicious_ad_machine_account_creation
|
Cloud Identity and SaaS Abuse
| Alert Type | xdr_event.name |
|---|---|
| Microsoft Entra Apps Modified to Allow Multi-Tenant Access | azure_ad_add_app_multitenant
|
| Microsoft Entra Custom Domains Changed | azure_ad_change_domain
|
| Office 365 Admin Audit Logging Disabled | office365_admin_audit_logging_disabled
|
| Office 365 Content Filter Policy Changed | office365_content_filter_policy_changed
|
| Office 365 File Sharing with Outside Entities | office365_outside_entity_file_sharing
|
| Office 365 Malware Filter Policy Changed | office365_malware_filter_policy_changed
|
| Office 365 Multiple Files Restored | office365_multi_file_restore
|
| Office 365 Multiple Users Deleted | office365_multi_user_deleted
|
| Office 365 Network Security Configuration Changed | office365_security_conf_changed
|
| Office 365 Password Policy Changed | office365_password_policy_changed
|
| Office 365 Sharing Policy Changed | office365_sharing_policy_changed
|
| Office 365 User Network Admin Changed | office365_user_network_admin_changed
|
| Office365 Rare Operations | office365_rare_operations
|
| Suspicious Office365 Inbox Rule | suspicious_office365_inbox_rule
|
| Suspicious Office365 Mail Transport Rule | suspicious_office365_mail_transport_rule
|
Certain machine learning models learn the data distribution in your environment automatically and require two weeks of observation before they begin reporting. Behavioral identity detections such as impossible travel and login time anomalies fall into this group. See All Alert Types Model Summary.
Stage 2: Connect Your Identity Sources
ITDR detects only what it can see. Each source you connect activates a different portion of the identity alert coverage described in Stage 1. Work through the following in order.
-
Add an Active Directory connector. Do this first. The user information from Active Directory enriches Interflow records and supplies the user profiles that User Behavior Analytics depends on, so most other identity content is more useful once it is in place. See Configuring Active Directory Connectors.
-
Add the cloud identity provider connectors that match your environment. The identity provider (IdP) category includes Okta, Duo Security, JumpCloud, and OneLogin. Microsoft Entra ID is listed under the SaaS category.
-
Deploy Windows Server Sensors on domain controllers and servers. See Installing a Windows Server Sensor.
-
Apply a Windows sensor profile. The Windows Detect Profile (Low Volume) covers the minimal events required for all native detections. The higher-volume profiles add events used by third-party detection rules and increase ingestion without adding native identity detection coverage. See Templates for Windows Server Sensors.
-
Add SaaS application connectors for Microsoft Office 365 and Google Workspace when those services are in use.
-
Enable the Respond function on the Active Directory or Microsoft Entra ID connector if you intend to take response actions on users. Stage 4 describes the actions available.
Stage 3: Verify Coverage and Tune Detections
Connecting a source does not confirm that the detections depending on it are active. Use this stage to verify coverage and reduce noise before you rely on identity alerts in daily work.
Verifying Detection Coverage
-
Select System | Detection Management.
-
Filter by the Identity Detection tag to see the identity detections available to you.
-
Select a detection to open its panel, then select the Possible Data Sources tab. A green check mark indicates that the data source has been active in the past five days and has contributed an event to the detection. A detection with no active source is not producing alerts.
-
Set each detection to ON, OFF, or SILENT as appropriate. Use SILENT while you assess a noisy detection, since it continues to record without adding to your alert volume.
See Detection Management.
Setting User Privilege Levels
Privilege level is the most direct tuning control that ITDR offers, and it is easy to overlook. The default privilege level is Medium. A higher privilege level increases the risk score, so that two users with identical activity are scored differently according to the access they hold.
-
Select Assets | User Behavior Analytics and select the Users tab.
-
Select the check boxes next to the users whose privilege level you want to change.
-
Choose privilege level in the bulk actions drop-down list, choose the level to apply, and select Apply.
Set your domain administrators, service accounts, and executive accounts before you begin relying on risk scores. See User Behavior Analytics.
Stage 4: Investigate and Respond
This stage describes the path through an identity investigation, from the overall picture to a response action on a single account.
Starting from the ITDR Alerts Dashboard
Begin with the overall picture rather than an individual alert. The ITDR Alerts Dashboard shows identity alert volume, criticality, affected users and hosts, and the tactics and techniques involved. To open it, select Dashboards | CREATION | Dashboards and locate ITDR Alerts Dashboard in the Explore section.
The Event Origins section of the dashboard is also the fastest way to spot a coverage gap. If an identity source you connected in Stage 2 does not appear there, that source is not contributing events.
Investigating an Identity Alert
-
Filter the Alerts list by the Identity Detection tag in
xdr_event.tags, or select an alert directly from the dashboard. -
Open the alert and review the key fields and the XDR Kill Chain placement. Activity that has progressed beyond the earliest stages of the extended detection and response (XDR) kill chain suggests that an identity has already been used rather than merely targeted.
-
Pivot to the user. Select Assets | User Behavior Analytics, select the Users tab, and select the name of the user to open the User Details page. Review the risk score, activity status, logon history, and bad password count.
-
Correlate the identities of the user with the Correlating Identities with Real ID tab.
-
Review the associated case if one exists. Identity alerts frequently correlate with endpoint and network activity that is not visible from the alert alone. See Working with Cases.
Correlating Identities with Real ID
One person often holds several accounts: a standard account, an administrative account, and perhaps a service account. To an investigator looking at alerts one at a time, those accounts appear as unrelated users. An attacker who compromises a standard account and escalates to an administrative account exploits exactly that blind spot.
The Real ID tab in Assets | User Behavior Analytics resolves it. The identities are imported from Active Directory and correlated with a single security identifier (SID), and that SID links all identities belonging to one person.
Use Real ID whenever an identity alert involves an account that could be one of several belonging to the same individual. Reviewing all activity for that person, rather than for one account, often reveals a progression that is invisible account by account.
Taking a Response Action
Response actions on users are available from the Event Details display for an alert. The action you can take depends on the connector supplying the identity data.
| Action | Active Directory | Microsoft Entra ID |
|---|---|---|
| Disable User | Yes | Yes |
| Revoke Existing Sign-In Sessions | No | Yes |
| Confirm Compromised | No | Yes |
| Dismiss Risk | No | Yes |
| Add User to Group | No | Yes |
| Remove User from Group | No | Yes |
Disabling a user account stops the session but does not always stop the attacker. Where Microsoft Entra ID is the identity source, consider Revoke Existing Sign-In Sessions alongside Disable User, since an existing token can otherwise remain valid.
For a full description of each response action and the fields it requires, see Taking Action on Events.
After you take an action, confirm the outcome in Automation | Action History | User Actions. This tab shows the status of each action and lets you revert some of them. See Viewing User Actions.
Automating a Response
Once you have handled the same identity pattern manually several times, automate it. Automated Threat Hunting lets you trigger a response when data matches conditions that you specify, including disabling a user. See Automated Threat Hunting and the worked example in Detecting Pass the Hash Attacks.
