Parser Studio – Parsers
Parser Studio is a management workspace for controlling how raw logs are ingested and parsed for each tenant. It consists of two tabs. The Parsers tab is where you manage the parsers available to a tenant. The Log sources tab is where you route logs sent to generic syslog ports to a specific parser based on the source tenant (see Parser Studio - Log sources). The following sections describe the tasks you can perform on the Parsers tab:
Parser Studio
Parser Studio  is a management workspace for creating and managing log parsers for data ingestion. Parsers convert raw log messages that devices send to Modular Sensors into normalized fields in Interflow records. Stellar Cyber then analyzes the normalized data, enriches it, and stores the searchable records for detections, correlations, and investigations. You can use Parser Studio to do the following:
Root-level users, partners, and tenant users
-
View built-in parsers provided by Stellar Cyber and custom parsers that you or others on your team create
Root-level users
-
Create custom parsers from scratch (
 ) or by cloning an existing parser
 -
Configure log parsing rules
-
Download modular parser configurations for reuse in another tenant or on another Stellar Cyber Platform instance
-
Upload parser definitions
-
Test parser behavior before deployment
-
Enable or disable parsers for each tenant individually or
in bulk), including built-in parsers, to control which logs a tenant ingests and to manage sensor memory consumption
To access Parser Studio:
-
Log in as a root-level user, partner, or tenant user and navigate to System | DATA SOURCE MANAGEMENT | Parser Studio | Parsers.
Parser Studio opens to a landing page with a table of built-in and previously created parsers.
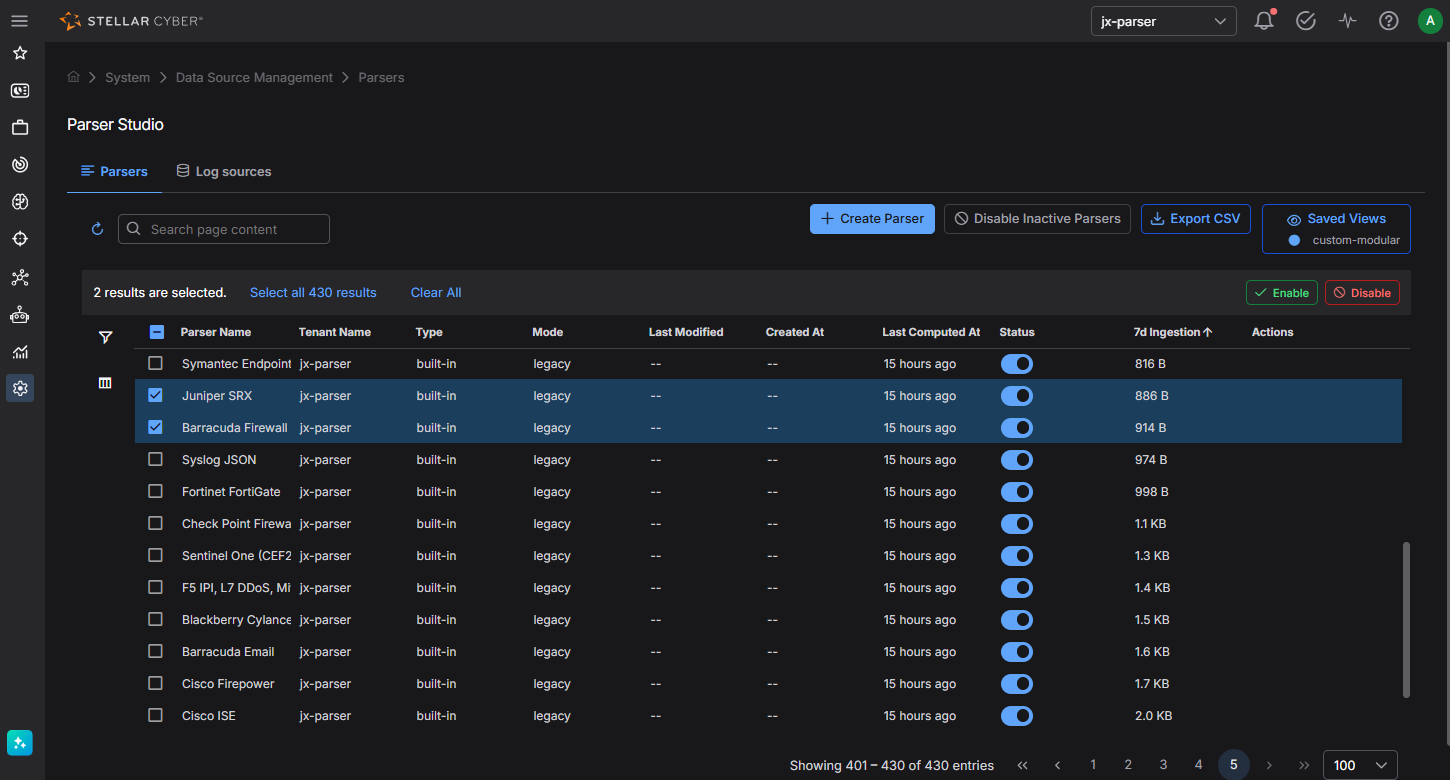
The Type and Mode of a parser can be in one of these four combinations:
-
Built-in parsers in legacy mode can be enabled and disabled per tenant after you first select a specific tenant. They cannot be enabled or disabled when you view parsers in All Tenants mode, and they cannot be downloaded, cloned, edited, or deleted.
-
Built-in parsers in modular mode can be downloaded for reuse by another tenant
when you view All Tenants or an individual tenant. After you select a tenant, you can enable/disable, download, and clone them. They cannot be edited or deleted.There are five built-in modular parsers with the following port numbers:
-
Fortinet Fortigate (8517) and NetScout Omnis (9063)
-
 SonicWall Firewall (8512), Sophos Firewall (8520), and WatchGuard Firewall (8557)
-
-
Custom parsers in legacy mode can be edited and deleted when you view All Tenants or an individual tenant. They cannot be enabled/disabled, downloaded, or cloned. A custom legacy parser uses the same port as the corresponding built-in legacy parser and is available only to the customer who requested it. These are custom parsers that Stellar Cyber Customer Success provides in response to customer requests and that are uploaded to the Stellar Cyber Platform.
-
Custom parsers in modular mode can be downloaded for reuse in another tenant
when you view All Tenants or an individual tenant. When you select a specific tenant, they can be enabled/disabled, downloaded, cloned, edited, and deleted.
-
-
If you are a root-level user or partner, use the tenant selector at the top of the page to choose an individual tenant whose parsers you want to manage. In on-premises deployments, the tenant selector also includes Root Tenant
, which you can select to view and manage the parsers that the root tenant owns.You cannot enable/disable, create, clone, edit, or delete a parser when the tenant selector is All Tenants. You must first select an individual tenant before taking these actions. However, you can download a parser when All Tenants or a specific tenant is selected.
Parser Studio displays a table of built-in and previously created parsers for your selection.
The table is intended to support day-to-day management—quick visibility into configuration, and actions to maintain parsers over time. It contains the following column headings:
Column
Description
Parser Name
Name of the parser
Tenant Name (visible to root-level users and partners)
Tenant with which a parser is associated
Type
Whether the parser was created by Stellar Cyber (built-in) or by a user (custom)
Mode
legacy or modular (Legacy parsers use the original parser architecture and cannot be edited in Parser Studio. Modular parsers use a newer architecture and can be.)
Last Modified
(Custom parsers) Timestamp of the last modification
Created At
(Custom parsers) Timestamp when a parser was created
7d Ingestion
The volume of data that the parser ingested over the past seven days for the selected tenant. Stellar Cyber computes this value periodically, approximately every three days, rather than in real time. Hover over the value to see when it was last computed. The value is available only after you select an individual tenant.
Use this column to confirm whether a parser is actively used before you disable it. A parser that was disabled for most of the seven-day window shows low ingestion regardless of the traffic it receives when enabled, so consider recent enable and disable changes when you interpret the value.
Status
A toggle that enables or disables the parser for the selected tenant. An enabled parser runs and binds to its configured port. A disabled parser does not run and does not consume sensor resources on that port.
The toggle is available only for the parser types that support enabling and disabling, and only after you select an individual tenant. Disabling the parsers that a tenant does not need is the recommended way to manage sensor memory consumption.
For each custom parser in the table, there is a set of common actions that you can perform:
-
Download
the configuration of a modular parser as a JSON file for reuse in another tenant or on another Stellar Cyber Platform instance. For information, see Download a Parser Configuration for Reuse. -
Clone a custom parser (useful to copy a working configuration)
-
Edit a custom parser
-
Delete a custom parser
Treat deletion carefully. Removing a parser stops parsing for the data streams that depend on it.
-
Enable or Disable a Parser
You can enable or disable parsers per tenant from the Parser Studio table to control which logs a tenant ingests. Enabling a parser starts ingestion on its port, and disabling a parser stops ingestion and frees the sensor resources that the parser used. Because every running parser consumes sensor memory, disabling the parsers that a tenant does not need is the recommended way to manage sensor memory consumption.
You can change the status of one parser at a time with its Status toggle, as described in this section, or, from 7.0.0
Parsers and sensor memory usage – Enabling the full set of built-in parsers requires approximately 2 GB of parser memory on a sensor. In contrast, configuring a sensor with only a single enabled parser requires about 190 MB, and each additional enabled parser typically adds approximately 10 to 30 MB for each CPU core configured on the sensor. Although actual memory usage varies depending on the enabled parsers and sensor configuration, enabling only the parsers you need and disabling the rest can substantially reduce sensor memory usage.
Enabling and disabling parsers requires Modular Sensors running 6.6.0 or later.
You cannot disable a custom legacy parser. A custom legacy parser uses the same port as the corresponding built-in legacy parser and is provided for the specific customer who requested it, so it is expected to remain in use. For the actions that each parser type supports, see the Type and Mode combinations described earlier in this topic.
To enable or disable a parser:
-
Select the tenant whose parsers you want to manage.
You cannot enable or disable a parser when the tenant selector is All Tenants. You must first select an individual tenant.
-
In the Parser Studio table, locate the parser, and then use the Status toggle to enable or disable it.
The change applies only to the selected tenant. The same parser can be enabled for one tenant and disabled for another.
Parsers released in 6.5.0 or later are disabled by default. Enable a parser for a tenant when you want that tenant to ingest the corresponding logs.
When you upgrade the Stellar Cyber Platform, your existing parser settings are preserved. Parsers that were enabled before the upgrade remain enabled, and parsers that were disabled remain disabled.
Enable or Disable Parsers in Bulk
You can enable or disable multiple parsers in one action. Use this method when you know which parsers you want to change.
To enable or disable parsers in bulk:
-
Select the tenant whose parsers you want to manage.
-
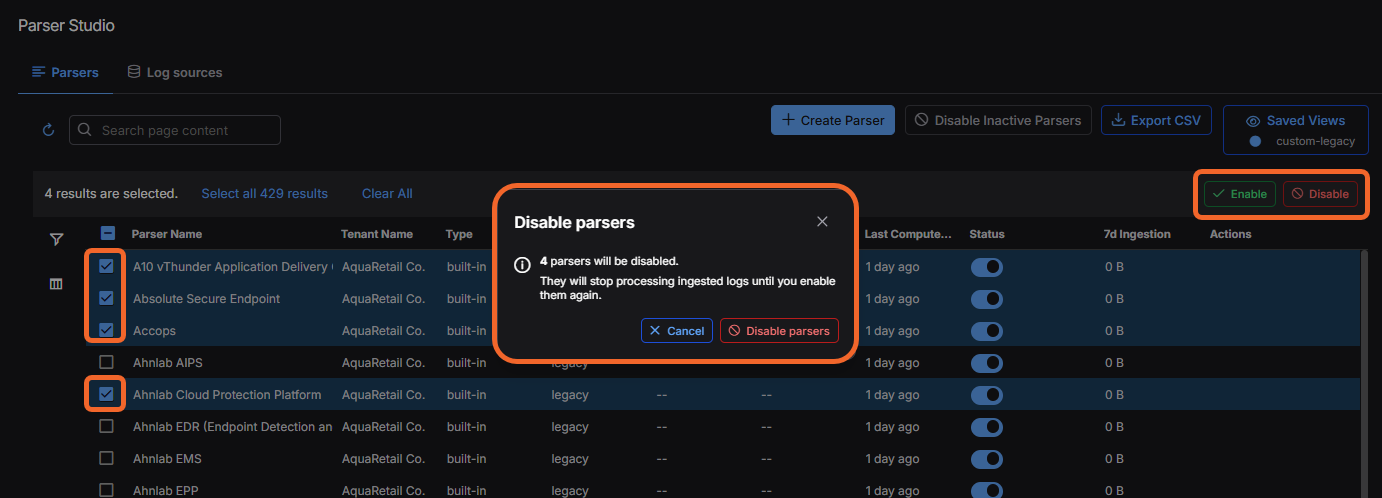
In the Parser Studio table, select the checkbox for each parser that you want to enable or disable.
-
Select Enable or Disable at the upper right of the table.
-
Review the confirmation message, and then confirm the action.
When you disable parsers, the confirmation message warns you if any of the selected parsers are currently ingesting data. Disabling a parser that is actively ingesting data stops ingestion for the data streams that depend on it.
Disable Inactive Parsers
You can disable all parsers whose recent ingestion falls below a threshold that you set. Because every enabled parser consumes sensor memory, disabling inactive parsers is an effective way to relieve sensor memory pressure, particularly when a tenant has many enabled parsers that no longer receive data.
To disable inactive parsers:
-
Select the tenant whose parsers you want to manage.
-
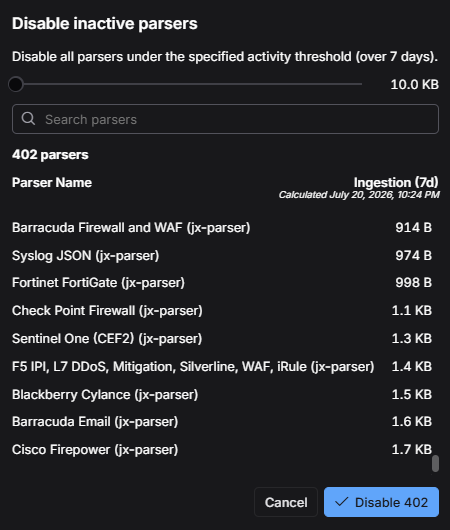
Select Disable Inactive Parsers.
A dialog box opens with a slider that sets an ingestion-size threshold based on the 7d Ingestion value.
-
Adjust the slider to the ingestion size below which you consider a parser inactive.
As you adjust the slider, the parser list in the dialog box updates dynamically to show only the parsers with ingestion below the threshold.
-
Review the filtered list, and then disable all of the listed parsers in one action.
-
Review the confirmation message, and then confirm the action.
The 7d Ingestion value is a periodic snapshot, computed approximately every three days, not a real-time measurement. A parser that was disabled for most of the seven-day window shows low ingestion regardless of the traffic it receives when enabled. Consider your knowledge of recent enable and disable changes before you disable a parser based on this value.
Create a Custom Parser
Root-level users
Custom parsers let Stellar Cyber ingest logs from data sources that do not already have built-in parser support. Parser Studio provides the following methods for creating a custom parser:
-
Create from Scratch
– Start with a blank configuration: enter a parser name and then complete the guided four-step configuration workflow. See Create a Parser from Scratch. -
Clone a Parser – Start from an existing modular parser and modify it through the same guided four-step configuration workflow. See Clone a Parser.
-
Upload Custom Parser – Upload a parser configuration file: either a file that Stellar Cyber Customer Success has provided in response to a custom parser request or, from 7.0.0
The following sections walk through each method. The from-scratch and cloning methods share the same four-step configuration workflow, described in Configure a Parser. The walkthrough—including examples, troubleshooting techniques, and tips—uses a cloning example, but the concepts and practices it illustrates apply equally to parsers created from scratch and to uploaded parser configurations.
Requirements
-
Root-level user access with read-write privileges
A sample raw log entry that is representative of the logs you want to parse
-
Knowledge of the protocol that your devices use to transmit logs to an external system
-
Knowledge of the log format that your devices use (Stellar Cyber supports custom parsers in Syslog, CEF, and LEEF formats.)
-
(Upload method only) A parser configuration file in JSON format provided by Stellar Cyber Customer Success. The file defines all five pipeline steps: routing, parsing, normalization, enrichment, and output. For instructions on uploading the file, see Requesting and Uploading Custom Parsers.
The
cust_idvalue in the routing step of the configuration file must match the Stellar Cyber tenant ID for the tenant to which you are uploading the parser. You can find a tenant ID on the Tenants page (System | ORGANIZATION MANAGEMENT | Tenants). -
(Optional, if using Tenant Mapping) A tenant map owned by the same tenant you select in the Tenant field for this parser. The tenant map must exist in Tenant Mapping (System | ORGANIZATION MANAGEMENT | Tenant Mapping) before you configure the parser. See Tenant Mapping.
-
(Optional, if using Tenant Mapping with a Stellar Cyber ID field) The Stellar Cyber tenant ID value that the sending system embeds in its log messages.
Create a Parser from Scratch
You can create a custom parser without cloning an existing parser and without a configuration file. Use this method when no similar parser exists to clone.
-
When logged in as a root-level user, select or confirm the tenant for which you want to create a parser, and then select + Create Parser.
The landing page of the custom parser configuration workflow appears.
-
Select the Create from Scratch tab, enter a name for the parser, and then select Next to continue to the configuration workflow.
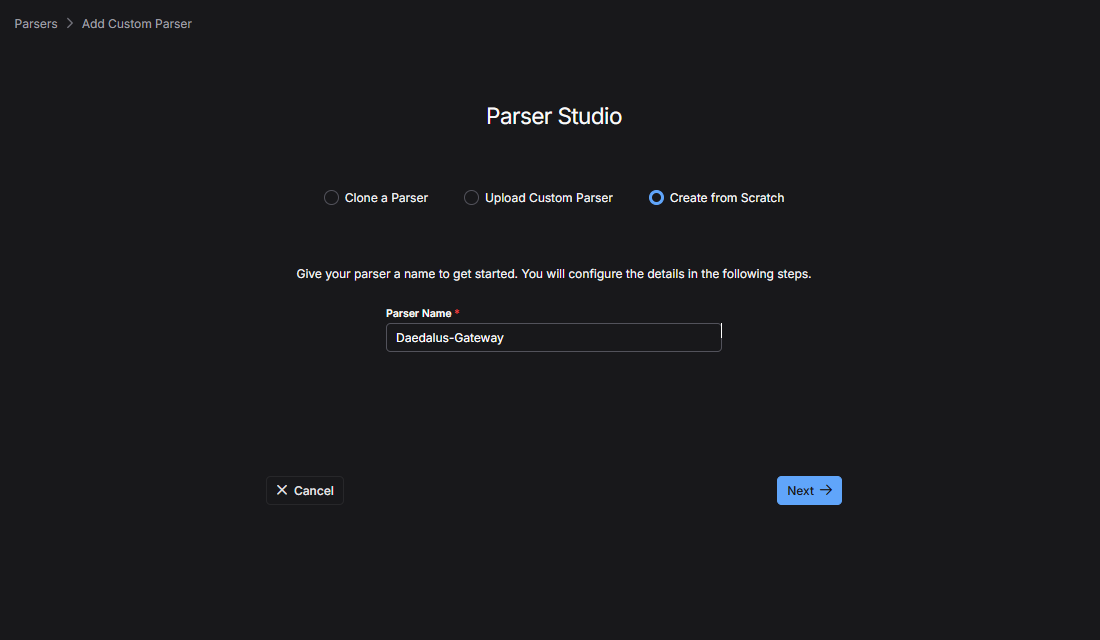
Parser Studio opens the four-step configuration workflow with a blank configuration.
-
Configure the parser as described in Configure a Parser.
Clone a Parser
You can clone another custom parser or one of the following built-in modular parsers, which Stellar Cyber currently lets you clone to get started: Fortinet Fortigate (port 8517), NetScout Omnis (9063), SonicWall FIrewall (8512), Sophos Firewall (8520), or WatchGuard Firewall (8557).
-
When logged in as a root-level user, select or confirm the tenant for which you want to create a parser, and then select + Create Parser.
-
Select Clone a Parser and then do either of the following:
Search for a parser to clone, choose it from the search results, and then select Next.
or
Select Browse Parser Library, choose one from the list, select Clone Selected Parser, and then select Next.
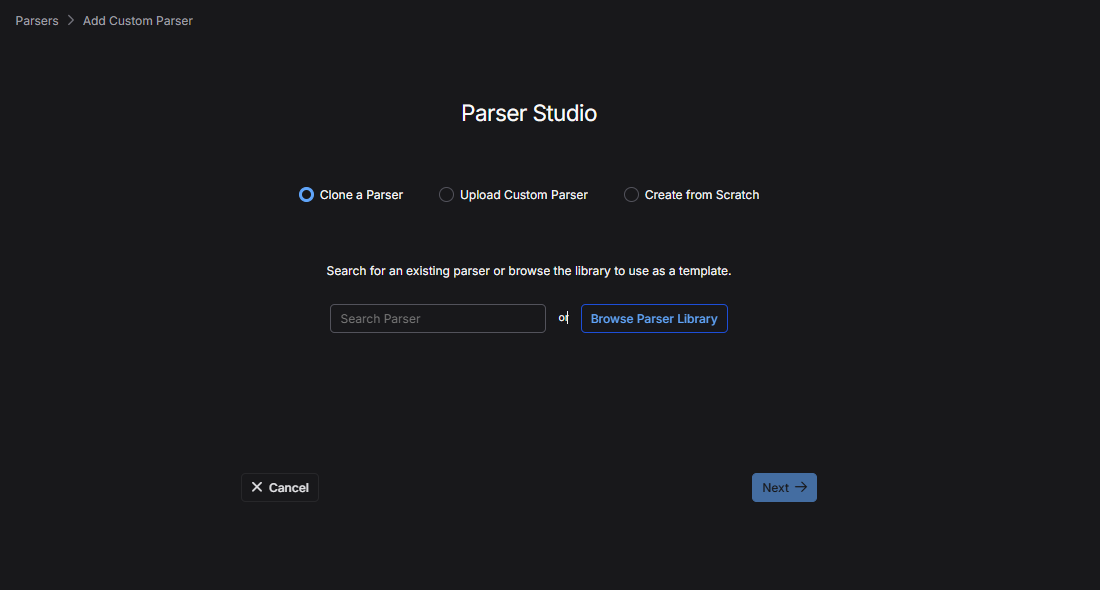
Parser Studio creates a copy of the selected parser and opens the parser configuration workflow.
-
Configure the parser as described in Configure a Parser.
Configure a Parser
Whether you create a parser from scratch or clone an existing parser, you configure it in the same guided workflow, which consists of four steps:
Stellar Cyber guides you through each step of the workflow.
In the following example, a cloned parser is modified to parse a different log format (Syslog instead of CEF) to demonstrate Parser Studio capabilities. In typical use, you would clone a built-in or custom parser for a similar product and modify it to support logs from a device that does not yet have a dedicated parser in the Stellar Cyber Platform.
Step 1: Raw Log
-
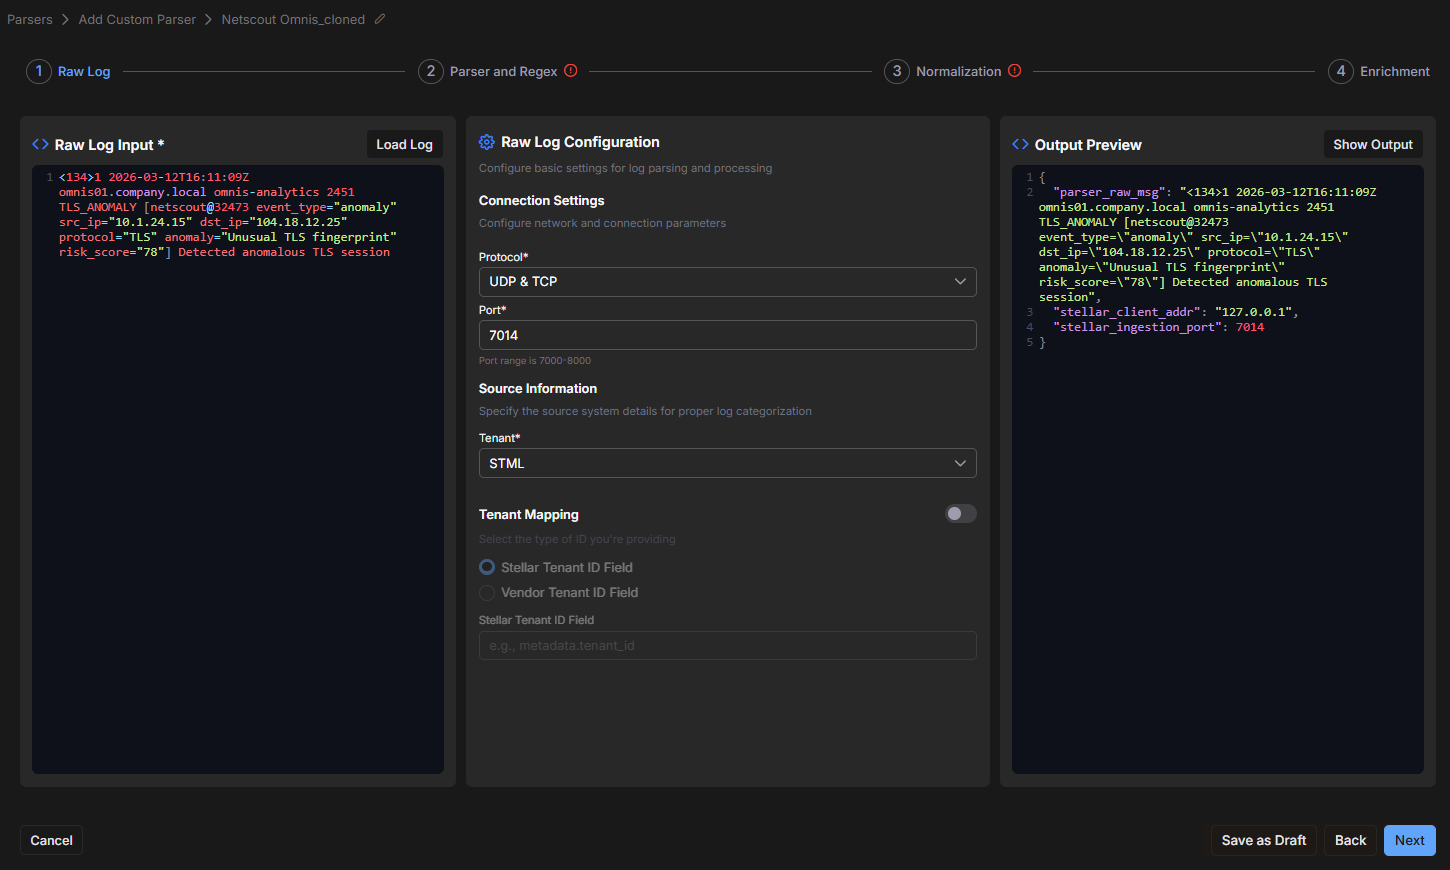
Upload or paste a raw log sample in the Raw Log Input panel.
Either copy and paste a single log entry that represents the logs that require parsing into the Raw Log Input field, or select Load Log, navigate to the file with a single log entry and select it.
Example log entry:
<134>1 2026-03-12T16:11:09Z omnis01.company.local omnis-analytics 2451 TLS_ANOMALY [netscout@32473 event_type="anomaly" src_ip="10.1.24.15" dst_ip="104.18.12.25" protocol="TLS" anomaly="Unusual TLS fingerprint" risk_score="78"] Detected anomalous TLS session
-
Enter the connection setting and source configuration.
Protocol: Choose either UDP & TCP or HTTP.
Port: Enter a port number between 1 and 65,535. Be sure to use a unique number. If you accidentally enter one that’s already in use by another custom parser, Stellar Cyber notifies you and prompts you to enter a different number.
Tenant (root-level users and partners): Choose the tenant for which you’re creating this custom parser.
If you plan to enable Tenant Mapping for this parser, the tenant you choose here also determines which tenant maps you can select. Only tenant maps owned by this tenant are available.
In on-premises deployments, the tenant list includes Root Tenant when you create a parser, so you can create a modular parser for the root tenant. A modular parser deployed to the root tenant applies only to root tenant sensors. This differs from legacy parsers, for which a root tenant parser applies to the sensors of all tenants.Tenant Mapping (optional): Enable this toggle if the logs that this parser will process include a tenant ID field, and you want the parser to assign each log to the correct Stellar Cyber tenant based on that field. This is useful in multi-tenant environments where a single log stream contains logs belonging to different tenants.
When you enable Tenant Mapping, select one of the following options:
-
Stellar Tenant ID Field – Select this option if the sending system embeds a Stellar Cyber tenant ID directly in each log. In the Stellar Tenant ID Field, enter the path to the field that contains the Stellar Cyber tenant ID (for example,
metadata.tenant_idorcustomer_id). The parser extracts the value at that path from each incoming log and uses it directly to assign the log to the matching Stellar Cyber tenant. No tenant map is required. -
Vendor Tenant ID Field – Select this option if the sending system embeds its own tenant ID in each log rather than a Stellar Cyber tenant ID. In the Vendor Tenant ID Field, enter the path to the field that contains the vendor tenant ID. The parser extracts the value at that path from each incoming log and looks it up in the selected tenant map to find the corresponding Stellar Cyber tenant ID. If the lookup finds a match, the log is assigned to the mapped Stellar Cyber tenant. If no match is found, the log is assigned to the same tenant as the sensor that received it.
A parser looks up the tenant ID in the same field at the same location in every log that reaches it. If devices place the vendor tenant ID in different fields, either normalize the field location at the source or configure a separate parser for each field location.
To select a tenant map, click or tap Select Tenant Mapping. The Select Tenant Mapping Table dialog box opens and lists the tenant maps owned by the tenant you chose in the Tenant field, along with the number of entries each tenant map contains.
Select a tenant map to preview the mappings that it contains from Vendor Tenant ID to Stellar Cyber Tenant ID, and then tap or click Select. The name of the selected tenant map appears in the Raw Log Configuration panel. To change the tenant map, select Change Tenant Mapping.
The tenant map must already exist before you configure the parser. If a tenant map that you expect to see is not listed, it might be owned by a different tenant. To create or manage tenant maps, navigate to System | ORGANIZATION MANAGEMENT | Tenant Mapping. Note that after tenant maps are created, they cannot be reassigned to another owner. For information, see Tenant Mapping.
-
-
Preview the output of the parsed log by selecting Show Output.
-
To continue to the second step, select Next.
If you want to save the custom parser configuration done so far and resume later, select Save as Draft and then select Cancel. Stellar Cyber saves it to the Parser Studio table as a custom parser with “Draft” appended to its name in the Parser name column. To resume, select Edit for the custom parser configuration.
Step 2: Parser and Regex
-
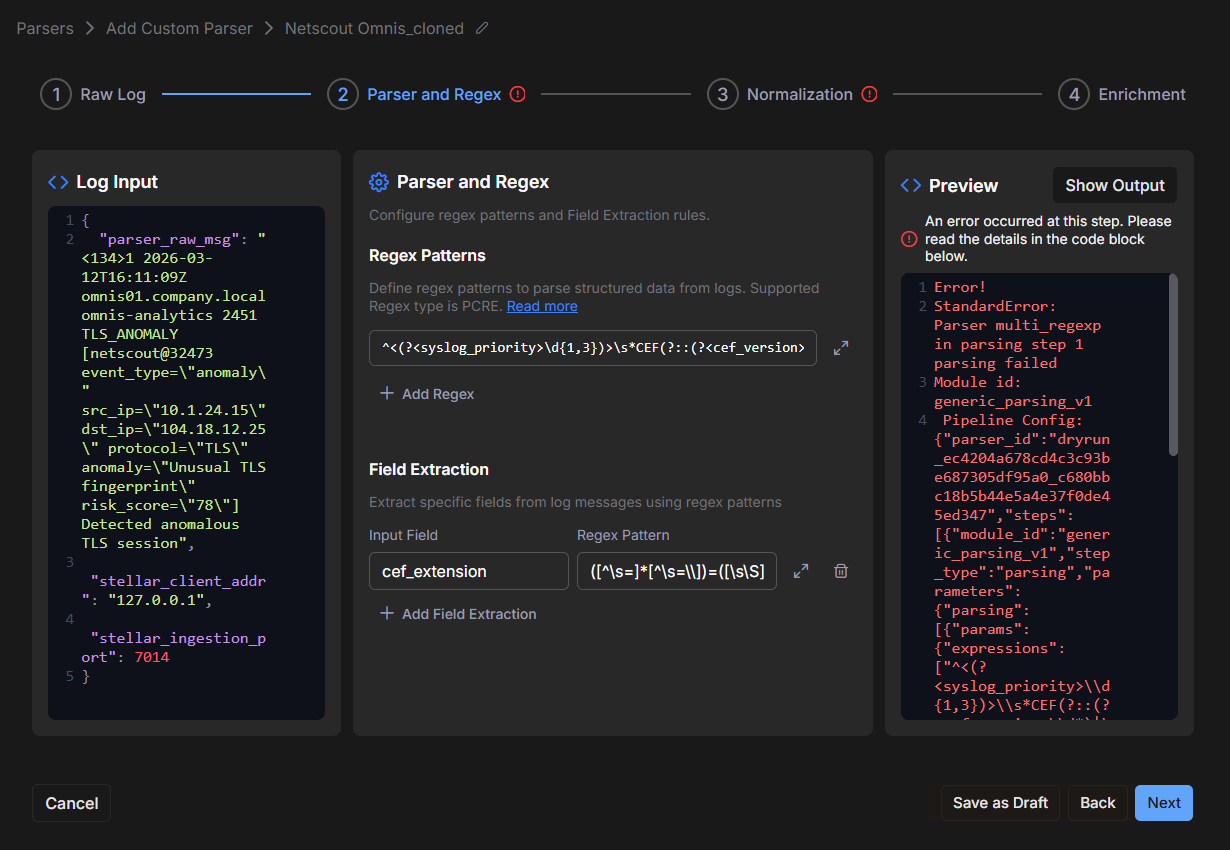
For a cloned parser, review the Regex pattern that Stellar Cyber generated and check the Preview panel for any error messages.
or
For a parser created from scratch, define a regex pattern to parse the data in logs into Interflow record fields.
You can use a regex generation and debugging tool such as those at regex101.com or regexr.com, or you can work with an AI assistant by providing the sample log, the generated regex (available for cloned parsers), and the error output.
In this example, there is an error. The sample log uses Syslog format; therefore, the parser should generate a Syslog-style regex. However, here the generated pattern reflects CEF instead of Syslog. When this happens, the Preview panel displays an error because the regex does not match the sample log.
-
When there’s an error, diagnose the issue by comparing the sample log format with the generated regex.
-
To correct the error in this example, replace the regex with a Syslog pattern that matches the sample log structure. For example:
^<(?<syslog_priority>\d{1,3})>(?<syslog_version>\d)\s+(?<raw_time>\S+)\s+(?<host>\S+)\s+(?<app_name>\S+)\s+(?<procid>\S+)\s+(?<syslog_msgid>\S+)\s+\[(?<sd_id>\S+)\s*(?<syslog_structured_data>[^\]]*)\]\s*(?<message>.*)$
Some tools or AI assistants might return regex in an escaped form that is suitable for JSON or code but not for direct entry in the Regex Pattern Editor. If you paste it exactly as shown, the parser might fail although the regex logic is correct. For example, if you see
\\d\\s+, change it to\d\s+. In other words, review the pattern and convert double backslashes to single backslashes.Also make sure the expression ends cleanly. A missing quote or an extra trailing backslash can cause the parser to fail even when the rest of the pattern is correct. For example, if you see this escaped regex—
(?<key>\\w+)=\"(?<value>[^\"]+)\"
—change it to this for the Regex Pattern Editor version:
(?<key>\w+)="(?<value>[^"]+)"
-
Under Field Extraction, set the Input Field to
syslog_structured_dataand extract the key-value pairs from the structured-data block using the following pattern:([^\s=]+)="([^"]*)"
This second pattern extracts fields such as
event_type,src_ip,dst_ip,protocol,anomaly, andrisk_scorefrom the structured-data portion of the message. -
Select Show Output to verify that the parsing now succeeds.
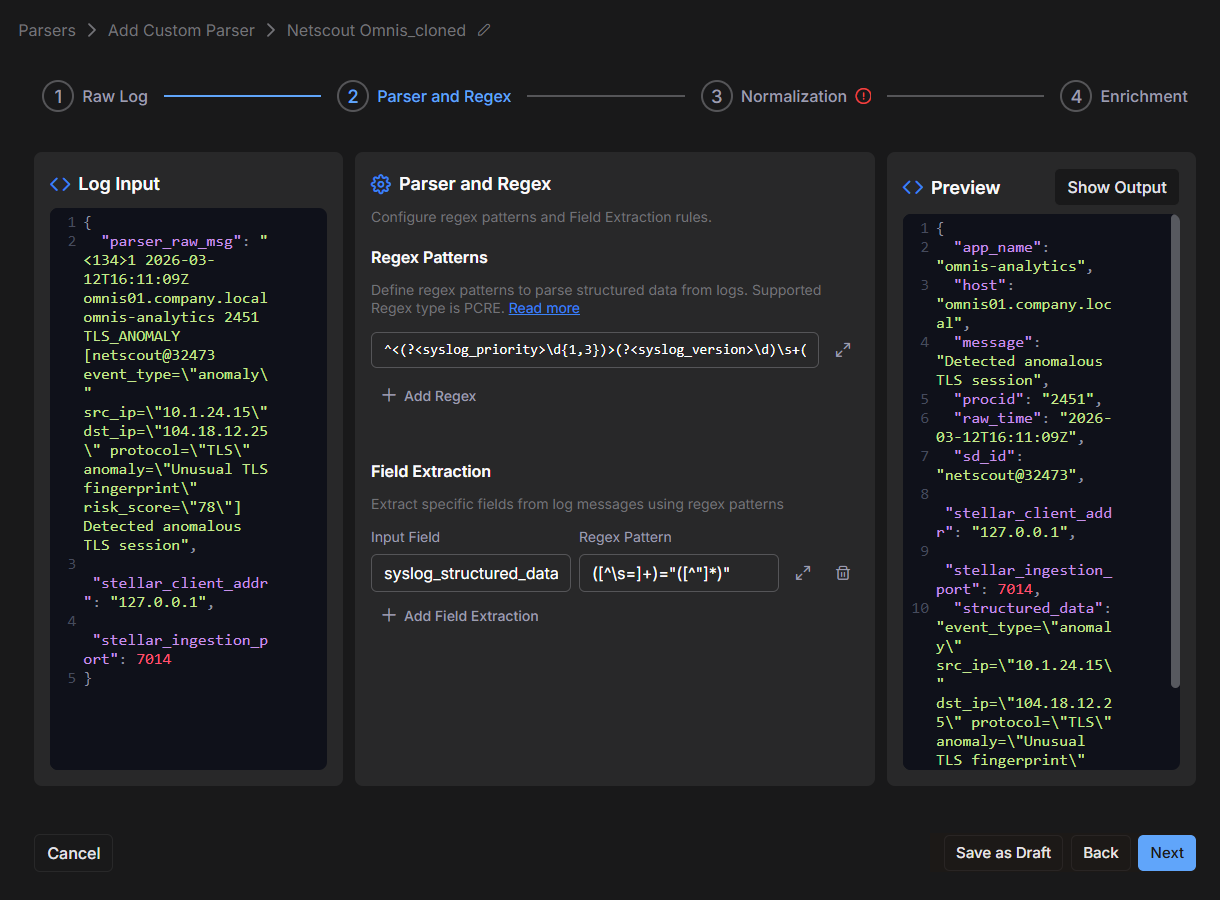
The Preview panel no longer shows a parsing error, and the output includes the extracted Syslog fields and the parsed structured data.
The parser first extracts the RFC 5424 syslog header fields and the structured-data block. It then parses the structured-data block into individual key-value fields, which are used to populate the JSON output.
-
-
To continue to the third step, select Next.
Step 3: Normalization
The Normalization page contains three tabs:
-
Vendor – Defines vendor and product metadata used to populate the
msg_originsection in JSON-formatted Interflow records. -
Ignore Values – Specifies placeholder values to drop during normalization such as
(empty string),-, ornull. -
Field Mapping – Maps parsed fields to Stellar Cyber schema fields and optional namespaces. To identify the correct schema field for each mapping, select Metadata Dictionary. This opens the Standard Metadata Dictionary, which lists the standard Stellar Cyber metadata fields with their data types and descriptions.
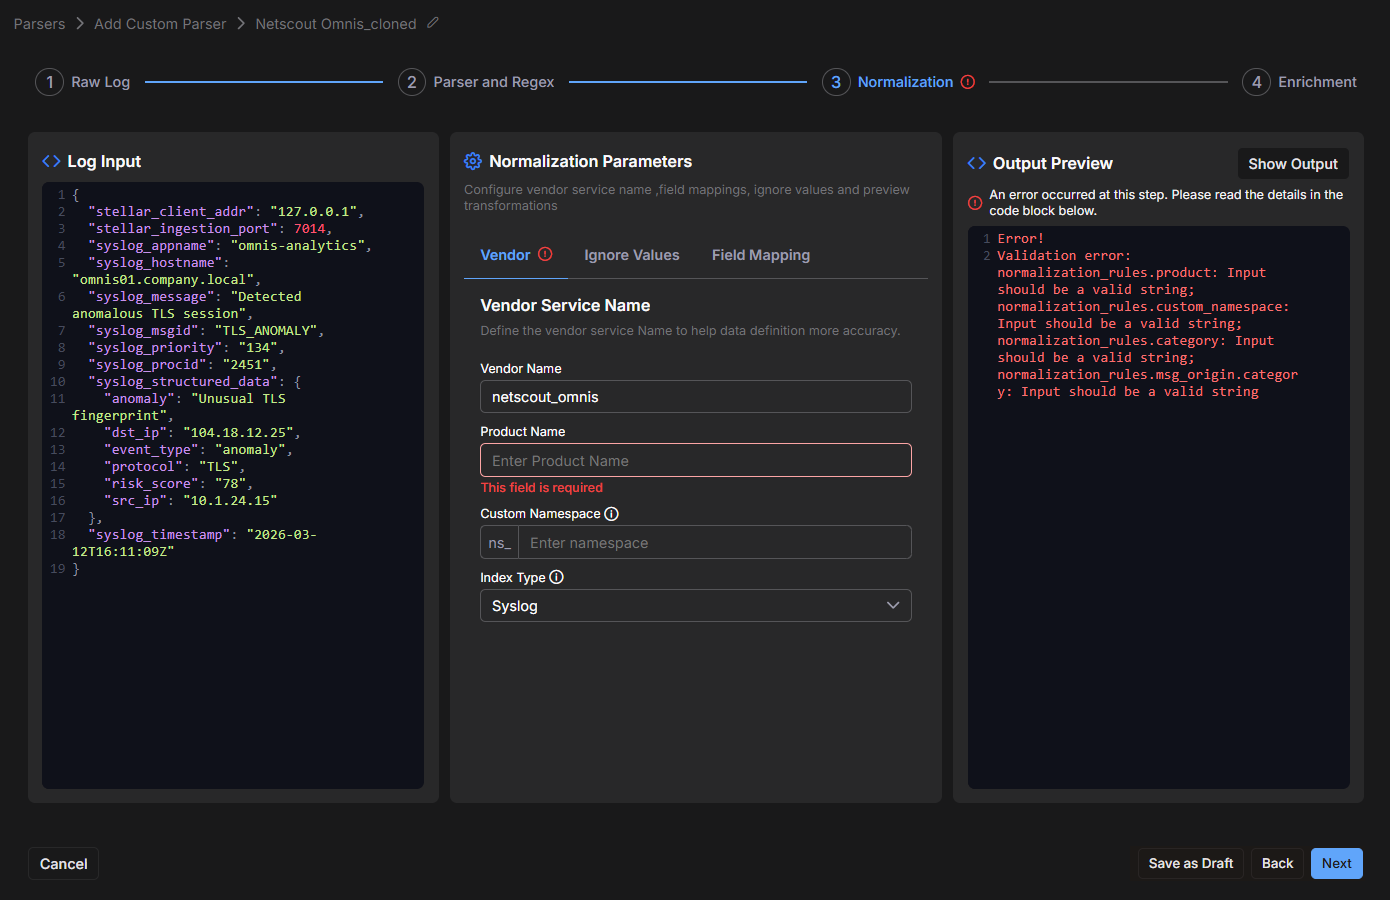
If required values are missing, the step indicator displays a red exclamation point. The Output Preview panel also lists validation errors. In this example, the Vendor tab contains a missing value that must be completed before continuing.
-
Rename the fields in the Vendor Service Name section with meaningful values, and then select Show Output.
For the example here, enter the following values:
-
Vendor Name:
netscout -
Product Name:
omnis -
Custom Namespace:
netscout_omnis -
Index Type: Choose an appropriate index for the type of data being parsed. For the example here, choose Network session data.
This populates the
msg_origin.categoryvalue.The renamed fields appear in the
msg_originsection in the Output Preview panel:"msg_origin": {
"category": "traffic",
"product": "omnis",
"source": "netscout_omnis",
"vendor": "netscout"
},
Choose values for Vendor Name and Product Name carefully, and avoid placeholder or test values. Stellar Cyber builds
msg_origin.sourceautomatically by concatenating these values. Usingnetscoutandomnisproduces the clear source valuenetscout_omnis. Whether the parser is cloned or created from scratch, themsg_origin.sourcevalue appears in detection management pages on the Stellar Cyber Platform. -
-
If necessary, enable Timestamp Mapping and modify the Raw Field and Type settings.
Use this setting when the parsed log includes a time field that needs to be converted to the format that Stellar Cyber requires, which is a Unix epoch in milliseconds.
Leave this disabled to let Stellar Cyber detect the source timestamp format automatically, or enable it and set a field and format to override detection when needed.
If you do not configure a custom timestamp, Stellar Cyber uses the ingestion time as the event timestamp. If you configure timestamp normalization and the configured Raw Field is missing from an event, the event continues processing and uses the ingestion time. If the Raw Field is present but its value does not match the selected Type, Stellar Cyber drops the entire event during normalization..
Timestamp normalization is important because incorrect timestamps can cause events to appear outside the expected time range or appear to be missing from time-based analysis.
-
Raw Field: Identify the source field in the parsed log that contains the event time, such as
created_atorcreated_time. In the example here, the field name israw_time. -
Stellar Cyber Schema (Read only):
timestamp -
Type: Choose the timestamp type listed in the drop-down list for the format used in the logs being parsed. For the example here, it's
ISO8601_EXTENDED.The selected type describes the raw input format, not the output format. Stellar Cyber converts the value to the normalized timestamp field in epoch milliseconds.
 Supported Timestamp Types
Compare the timestamp in your log source with the examples below to determine the appropriate format to select.
Timestamp Type
Example Timestamp
How to Identify the Format
Notes
UNIX_EPOCH 177333186910-digit integer with no separators Unix epoch time in seconds since 1970-01-01 00:00:00 UTC. UNIX_MILLIS 177333186900013-digit integer with no separators Unix epoch time in milliseconds since 1970-01-01 00:00:00 UTC. ISO8601_EXTENDED 2026-03-12T16:11:09ZContains hyphens in the date, colons in the time, a T separator, and often a Z or timezone offset ISO 8601 extended format. Common in cloud services, APIs, and security products. ISO8601_BASIC 20260312T161109ZSimilar to ISO 8601 but contains no date or time separators ISO 8601 basic format. RFC3339 2026-03-12T16:11:09.123Z2026-03-12T16:11:09.123-07:00Similar to ISO8601_EXTENDED but RFC3339 timestamps have fractional seconds. RFC3339 timestamps often include a timezone offset such as -07:00Internet timestamp format commonly used in APIs and JSON data. RFC2822 Thu, 12 Mar 2026 16:11:09 +0000Begins with a weekday name and contains a textual month abbreviation Common in email headers and messaging systems. POSTGRESQL 2026-03-12 16:11:09.123456Date and time separated by a space, followed by fractional seconds PostgreSQL timestamp format. MYSQL 2026-03-12 16:11:09Date and time separated by a space, without a T separator Standard MySQL DATETIME format. WINDOWS_FILETIME 134170278690000000Very large integer, typically 17–18 digits Number of 100-nanosecond intervals since 1601-01-01 00:00:00 UTC. SYSLOG Mar 12 16:11:09Begins with a month abbreviation and does not include a year Traditional syslog timestamp format. SYSLOG_YEAR 2026 Mar 12 16:11:09Similar to SYSLOG but includes the year at the beginning Syslog timestamp format with year included. APACHE_COMMON 12/Mar/2026:16:11:09 +0000Contains slashes in the date and a colon immediately before the time Apache Common Log Format timestamp.
-
-
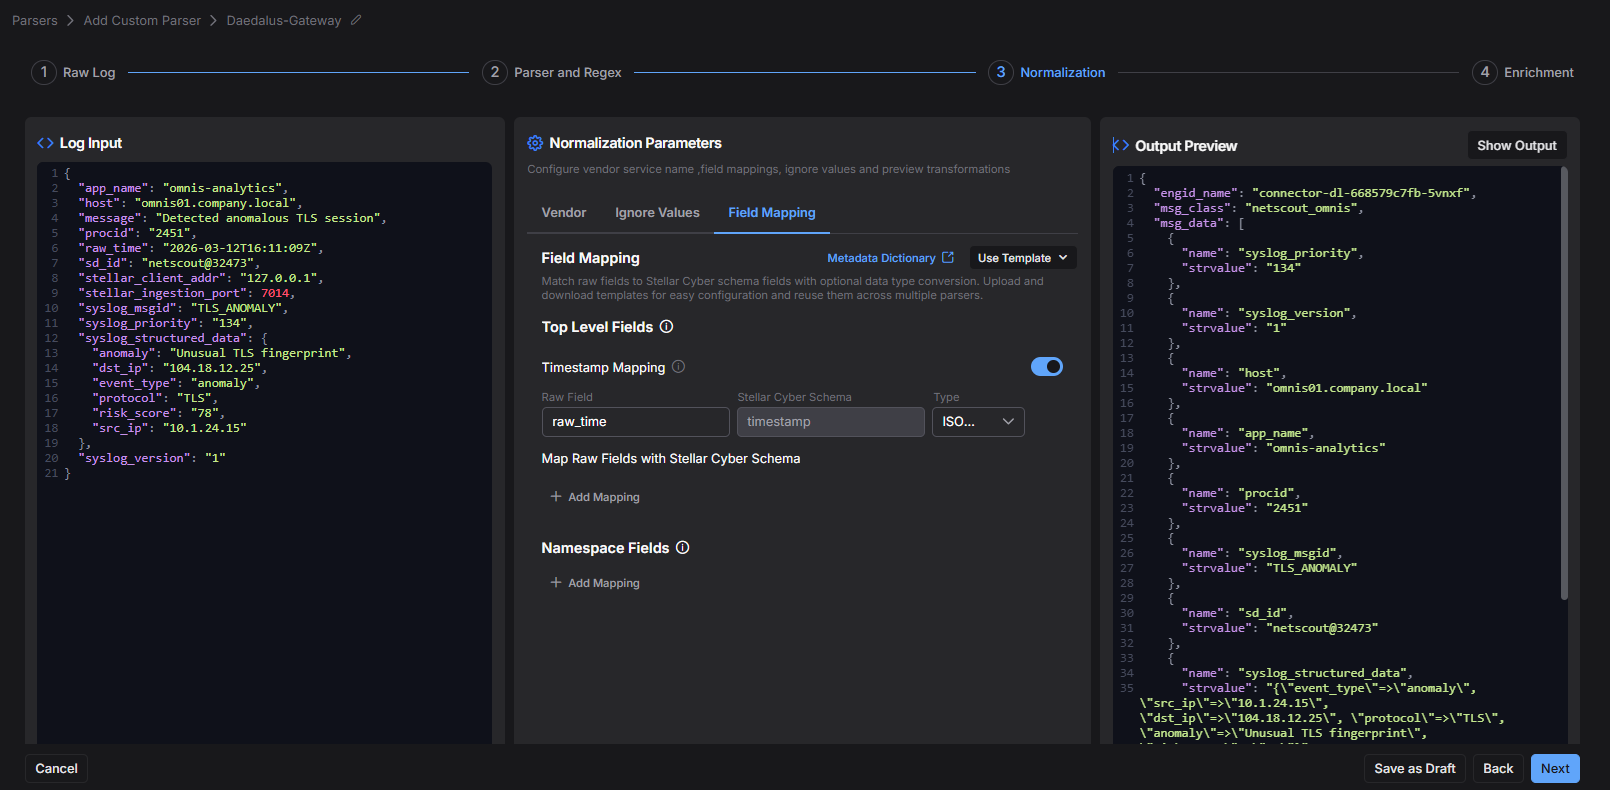
Either leave the mappings in Top Level Fields or delete them.
In the example, the template in the Field Mapping tab includes many
cef_mappings. Because this example parses RFC 5424 Syslog data rather than CEF, these mappings go unused. It’s safe to leave unused mappings in place. They don’t affect parsing because normalization only applies mappings to fields that exist in the parsed record.However, removing unused
cef_mappings can simplify the configuration. Cleaning up the list makes it easier to review active mappings and reduces confusion for future updates.You can map one Raw Field to multiple Stellar Cyber Schema fields in the Top Level Fields section. This is useful when you want one parsed value to populate more than one top-level normalized field; for example, you might want to normalize syslog_timestampto bothlog.syslog.timestampandtimestamp. There is no maximum limit to how many mappings you can configure. -
Select Show Output.
The Output Preview panel no longer shows normalization errors.
-
To advance to the fourth step, select Next.
Step 4: Enrichment
The Enrichment page lets you apply custom post-processing logic to the normalized record by using a Ruby function. Every parser requires an enrichment function, even when that function does not modify the record.
-
Review the Ruby Function panel and check the Preview panel for any error messages.
For a cloned or uploaded parser, the Ruby Function panel might contain enrichment code inherited from the original parser. If that code refers to fields that the current parser does not produce, the Preview panel displays an enrichment error.
or
For a parser created from scratch, the Ruby Function panel is empty. Enter the pass-through function shown in the next step even when the parser does not require custom enrichment logic. A parser that has an empty enrichment function can pass validation and deploy successfully, but it might not produce output after deployment..
In this example, the parser was cloned, and the inherited Ruby function expects CEF-specific fields such as
cef_extensioninside a vendor namespace. However, the current parser uses Syslog fields instead. As a result, the inherited function does not match the current record structure. The error occurs because the function tries to readrecord["netscout_omnis"], but that field does not exist in the normalized output. Because the function receivesnilinstead of a record object, the next line fails.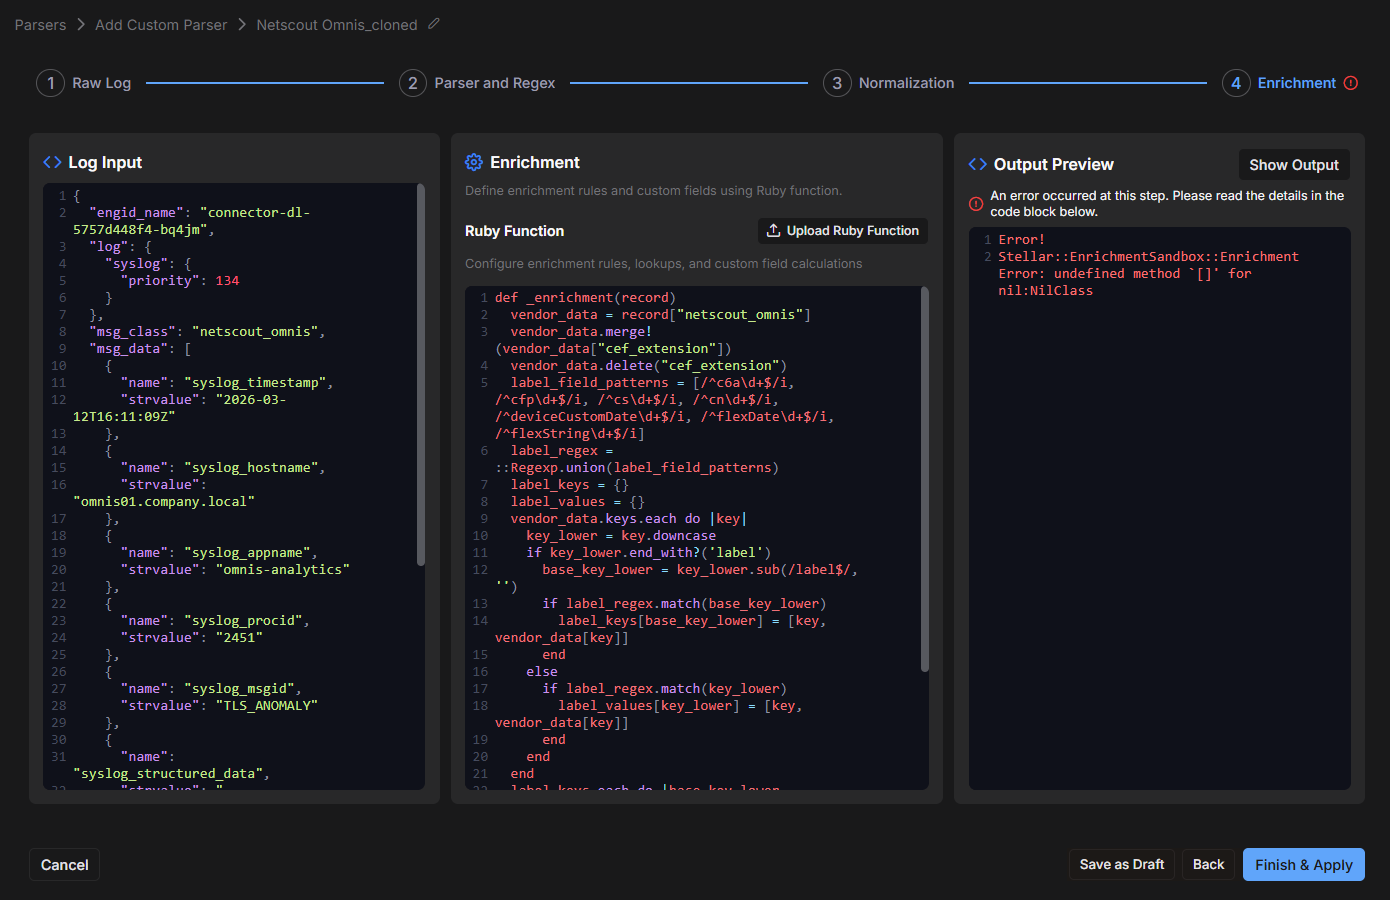
-
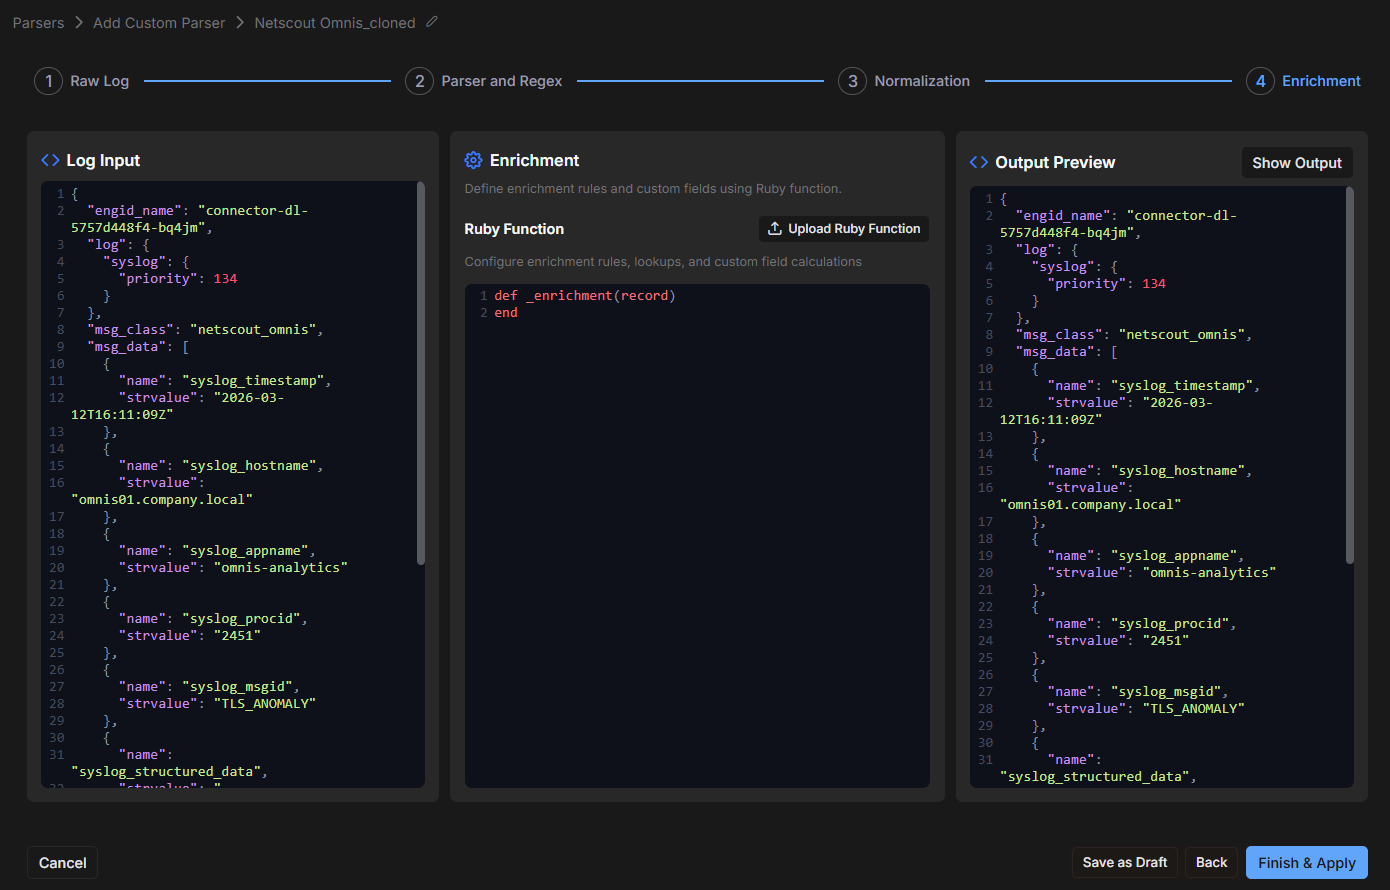
To clear the error, or to populate an empty panel, supply a simple pass-through function, and then select Show Output.
In the Ruby Function panel, replace any inherited code with the following. If the panel is empty, enter the same code.
Copydef _enrichment(record)
endThis function satisfies the required method signature for enrichment and does not modify the record. The enrichment step succeeds, and the output remains the same as it was after normalization.
This is a useful troubleshooting technique. First, make the Enrichment step succeed with a minimal function. After that, if you need custom enrichment logic, add it gradually and test each change.
Enrichment Safety Restrictions
When you write an enrichment function, Stellar Cyber validates the code and blocks any operation that could compromise the sensor or the Stellar Cyber Platform. You can work with the record and with standard data types, such as strings, arrays, hashes, and numbers, along with the libraries that Stellar Cyber provides, such as JSON. However, you cannot do the following:
-
Run shell or system commands.
-
Access the file system, the network, or other processes.
-
Use techniques such as
evalor reflection to reach restricted Ruby modules, such asFile,IO,Process, andThread.
If a function contains a blocked operation, Stellar Cyber rejects it when you validate or save the parser, and you must revise the code first. A function that runs for too long, such as one that contains an infinite loop, stops automatically.
For an example showing how to add enrichment, see Optional: Add a Derived Field Using Enrichment.
-
-
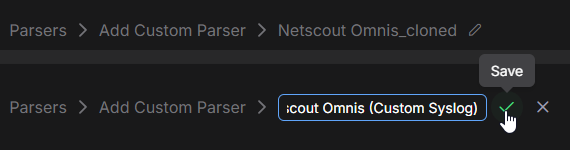
To rename the parser, select the Edit icon (pencil) next to the parser name at the top of the page, enter a descriptive name, and select the Save icon (green checkmark).
-
To finish creating the parser, select Finish & Apply.
-
If you are ready to use the parser in production, enable it in the Parser Studio table.
Optional: Add a Derived Field Using Enrichment
The Enrichment step adds value after parsing and normalization by calculating derived fields that do not exist in the original message.
After confirming that the pass-through function works in the previous example, you can add enrichment logic. For example, you can derive a severity value from the parsed risk_score.
-
Replace the pass-through Ruby function with the following example:
Copydef _enrichment(record)
data = record["msg_data"]
return record unless data.is_a?(::Array)
fields = {}
data.each do |item|
next unless item.is_a?(::Hash)
name = item["name"]
value = item["strvalue"]
fields[name] = value if name && value
end
risk_score = nil
structured = fields["syslog_structured_data"]
if structured
m = structured.match(/"risk_score"=>"(\d+)"/)
risk_score = m[1].to_i if m
end
severity =
if risk_score.nil?
"unknown"
elsif risk_score >= 75
"critical"
elsif risk_score >= 50
"high"
elsif risk_score >= 25
"medium"
else
"low"
end
data << { "name" => "derived_severity", "strvalue" => severity }
record
endThis function reads the normalized
msg_dataarray, extracts therisk_scorevalue fromsyslog_structured_data, evaluates the score, and appends a new field namedderived_severity. -
Select Show Output again.
The Output Preview now includes the
derived_severityfield. For this sample, therisk_scorevalue is78, which maps to theCriticalseverity level:{ "name": "derived_severity", "strvalue": "critical" }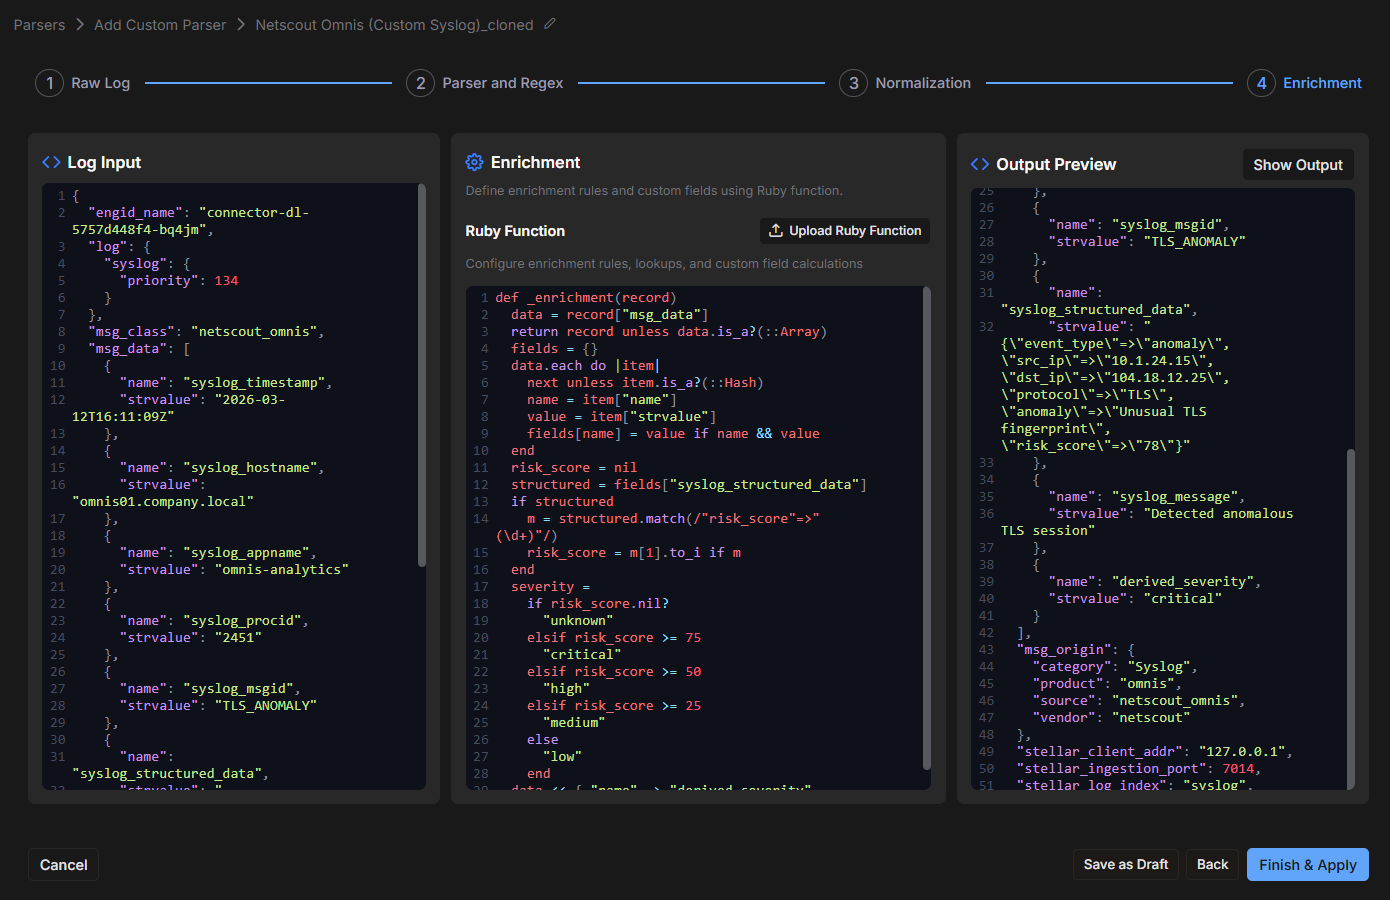
-
To complete the parser setup, select Finish & Apply.
Stellar Cyber saves the parser and returns you to the Parser Studio table. The parser appears as a custom parser for the selected tenant.
-
After saving, review the parser in the table and confirm the following:
-
The parser name clearly identifies its purpose.
-
The assigned port does not conflict with another custom parser.
-
The parser is configured for the correct tenant.
-
The parser status is appropriate for testing or production use.
-
-
If you are ready to use the parser in production, enable it in the Parser Studio table.
Download a Parser Configuration for Reuse
You can download the configuration of a modular parser as a JSON file and then upload the file to create a new parser in another tenant. The file also works across platforms: you can upload a parser that you downloaded from one Stellar Cyber Platform instance to a separate instance, such as moving a parser developed in a lab environment to an on-premises deployment.
Review the entire file for sensitive content before you share it. The parser name, enrichment labels, and any customized step content can contain customer-identifying information. Whoever shares the file is responsible for reviewing it.
To download a parser configuration:
-
Select the tenant that owns the parser.
-
In the Parser Studio table, locate the modular parser, and then select Download in the Actions column.
Stellar Cyber downloads a JSON file that contains the configuration of the parser in the customer-facing parser schema. The same schema is used for uploads, so the downloaded file requires no editing before reuse.
Sample of a downloaded parser in JSON format
Copy{
"parser_name": "Daedalus-Gateway",
"parser_id": "3db504732ee64afcb86dc5fb9321a0d5",
"parser_conf_id": "6bb9b93dfcc64a8f96df941f6289673e",
"version": "2026-07-21T23:38:36.936Z",
"config_json": {
"steps": [
{
"module_id": "udp_tcp_v2",
"step_type": "routing",
"enabled": true,
"parameters": {
"protocol": "udp_tcp",
"port": 7014
}
},
{
"module_id": "generic_parsing_v1",
"step_type": "parsing",
"enabled": true,
"parameters": {
"parsing": [
{
"type": "multi_regexp",
"params": {
"expressions": [
"^<(?<syslog_priority>\\d{1,3})>(?<syslog_version>\\d)\\s+(?<raw_time>\\S+)\\s+(?<host>\\S+)\\s+(?<app_name>\\S+)\\s+(?<procid>\\S+)\\s+(?<syslog_msgid>\\S+)\\s+\\[(?<sd_id>\\S+)\\s*(?<syslog_structured_data>[^\\]]*)\\]\\s*(?<message>.*)$"
]
}
}
],
"store_raw_msg": false
}
},
{
"module_id": "normalization_v2",
"step_type": "normalization",
"enabled": true,
"parameters": {
"vendor": "netscout",
"product": "omnis",
"custom_namespace": "ns_netscout_omnis",
"category": "traffic",
"msg_origin": {
"source": "netscout_omnis",
"category": "traffic",
"vendor": "netscout"
},
"msg_class": "netscout_omnis",
"ignore_values": [],
"top_fields": {},
"vendor_fields": {}
}
},
{
"module_id": "enrichment_v2",
"step_type": "enrichment",
"enabled": true,
"parameters": {
"_enrichment_fn": "def _enrichment(record)\n data = record[\"msg_data\"]\n return record unless data.is_a?(::Array)\n fields = {}\n data.each do |item|\n next unless item.is_a?(::Hash)\n name = item[\"name\"]\n value = item[\"strvalue\"]\n fields[name] = value if name && value\n end\n risk_score = nil\n structured = fields[\"syslog_structured_data\"]\n if structured\n m = structured.match(/\"risk_score\"=>\"(\\d+)\"/)\n risk_score = m[1].to_i if m\n end\n severity =\n if risk_score.nil?\n \"unknown\"\n elsif risk_score >= 75\n \"critical\"\n elsif risk_score >= 50\n \"high\"\n elsif risk_score >= 25\n \"medium\"\n else\n \"low\"\n end\n data << { \"name\" => \"derived_severity\", \"strvalue\" => severity }\n record\nend"
}
},
{
"module_id": "stellar_router_v2",
"step_type": "output",
"enabled": true,
"parameters": {}
}
]
}
}
To create a parser from the downloaded file, upload it as described in "Upload a Custom Parser" (see the next section).
Upload a Custom Parser
Use Upload Custom Parser to create a parser from a configuration file. Parser Studio accepts two kinds of files:
-
A file that Stellar Cyber Customer Success provided in response to a custom parser request. This option is generally available to all users. You cannot edit the uploaded parser in Parser Studio; to change it, request an updated file from Stellar Cyber Customer Success. For prerequisites and upload instructions, including how to configure Tenant Mapping if needed, see Upload a Custom Parser Provided by Customer Success.
-
A file that you downloaded from Parser Studio
in another tenant or on another Stellar Cyber Platform instance. The upload creates a modular parser that you can edit: change the configuration in the JSON file before you upload it, or edit the parser in the four-step workflow after you upload it. To obtain the file, see Download a Parser Configuration for Reuse.
In both cases, the upload method does not open the four-step configuration workflow. After the upload succeeds, the parser appears directly in the Parser Studio table for the selected tenant.
To create a parser from a downloaded configuration file:
-
Log in to the target Stellar Cyber Platform instance if the parser is intended for a different platform, and then select the tenant for which you want to create the parser.
-
Select + Create Parser, select Upload Custom Parser, and then upload the JSON file.
Stellar Cyber validates the schema and data structure of the file on upload. If the configured port is already in use by another active parser on the target tenant, Stellar Cyber notifies you so that you can assign a different port. Field-mapping conflict checks run when you select Show Output.
When the upload succeeds, Stellar Cyber generates a new parser ID and parser configuration ID and refreshes the parser version. The new parser is independent of the original: changes to one do not affect the other.
-
(Optional) Rename the parser.
The parser name travels in the JSON file. To use a different name, either edit the name in the file before you upload it or rename the parser from the UI after it is created.
Troubleshooting
If a custom parser does not behave as expected, use the following checks to isolate the issue. Because a Parser Studio configuration is performed in stages (Raw Log, Parser and Regex, Normalization, and Enrichment), problems often originate in an earlier step and propagate forward. When troubleshooting, validate each stage in order.
The following strategy can help you troubleshoot issues efficiently before reviewing specific symptoms.
Troubleshooting Strategy
Work incrementally and validate each stage before moving to the next:
-
Use a realistic sample log that represents actual incoming data.
-
Validate parsing before adjusting normalization settings.
-
Use regex debugging tools or an AI assistant when extraction rules do not match expectations.
-
Clear enrichment errors with the simplest possible pass-through function first.
-
Add derived enrichment logic only after parsing and normalization are stable.
This staged approach prevents changes in later steps from masking issues that originate earlier in the workflow.
Parser Studio is not visible in the UI
If you do not see Parser Studio in the navigation or cannot access the feature:
-
Confirm that you are logged in with a role that has permission to create custom parsers. Some roles do not expose Parser Studio.
-
Verify that you are working in the correct tenant. Parser Studio availability might be tenant-specific.
-
If the feature is still not visible, contact your administrator or Stellar Cyber support to confirm that Parser Studio is enabled for your environment.
A parser is enabled but data is not arriving
If a parser is configured and enabled but no events appear:
-
Verify that the log sender is using the correct protocol (UDP or TCP) and the port configured for the parser.
-
Confirm that network and firewall rules allow traffic from the log source to a Modular Sensor on the configured port.
-
Ensure that the parser is enabled for the correct tenant and that the incoming data is being sent to that tenant.
-
Use a packet capture or simple connectivity test (for example, netcat or telnet) to confirm that traffic is reaching the ingestion port.
-
Review system logs on the Modular Sensor for ingestion errors or listener binding failures.
Test results do not match expectations
If parsing succeeds but fields are missing, incorrect, or incomplete:
-
Re-check the sample log. Small format differences (extra spaces, different delimiters, optional fields) are common and can cause regex mismatches.
-
Validate timestamp extraction first. Timestamp parsing failures often prevent correct event processing and can affect downstream normalization.
-
Confirm that your regex captures only the intended fields and does not over-match. Test with multiple sample logs if possible.
-
Start with a minimal set of fields. After parsing works reliably, gradually add additional fields.
-
Check normalization mappings to ensure that captured fields are mapped to the correct destination fields.
-
If enrichment logic is used, temporarily replace it with a pass-through function to confirm that the issue originates earlier in the pipeline.
Enrichment produces unexpected results
If derived fields are missing or incorrect:
-
Confirm that enrichment logic matches the actual format of the normalized data.
-
Verify that field names referenced in the Ruby function exist in msg_data.
-
Temporarily simplify the enrichment function to isolate the issue, then reintroduce logic incrementally.
-
Confirm that the Ruby Function panel is not empty in Step 4: Enrichment. A parser that has an empty enrichment function can deploy successfully but produce no output. If the panel is empty, enter
def _enrichment(record)andendas a pass-through function, and then deploy the parser again.
An uploaded parser configuration is rejected
If the upload fails with an error:
-
Check that the
cust_idvalue in the routing step of your JSON file exactly matches the Stellar Cyber tenant ID for the target tenant. Tenant IDs are case-sensitive. You can verify the tenant ID on the Tenants page (System | ORGANIZATION MANAGEMENT | Tenants). -
Confirm that the port number in the routing step is between 7000 and 8000 and is not already assigned to another custom parser.
-
Confirm that all five pipeline steps are present in the file: routing, parsing, normalization, enrichment, and output.
-
Validate the JSON syntax of the file before uploading. A missing brace, bracket, or comma can cause the upload to fail even when the parser logic is correct.
-
If the file was downloaded from Parser Studio and then edited, confirm that the edits preserve the schema and data structure of the file, because Stellar Cyber validates both on upload. If validation continues to fail, download a fresh copy of the file and reapply the changes.
