Tenant Mapping
Root-level users
Tenant Mapping  lets a single parser route incoming log events to different Stellar Cyber tenants based on a tenant ID embedded in each event. Without it, a parser is bound to one tenant and sends all of the logs it processes to that tenant. With Tenant Mapping, a parser can examine each log event as it arrives, extract a tenant identifier from a designated field, and direct the event to the appropriate tenant automatically.
This capability is particularly useful in two scenarios:
-
Managed security service providers (MSSPs) that monitor multiple customer environments from a single platform. Customer logs from different organizations often arrive in a single stream, each event tagged with a customer identifier. Tenant Mapping lets one parser deliver them to the correct customer tenant without manual intervention.
-
Enterprises with multi-tenant deployments where logs originate from different business units, regions, or subsidiaries, each represented as its own Stellar Cyber tenant. A central parser configuration can handle the full log stream and distribute events based on the organizational identifier embedded in each log.
The practical benefit in both cases is consolidation: instead of deploying and maintaining a separate parser for each tenant, you configure one parser and one tenant map, and Stellar Cyber assigns each log to the correct tenant automatically. As the number of tenants grows, you update the tenant map rather than create new parsers.
Tenant Mapping works in conjunction with Parser Studio. When you configure a parser in Parser Studio and enable Tenant Mapping on the Raw Log step, you designate a field in the incoming log event that carries the tenant identifier. Stellar Cyber then uses that field—and, if necessary, a tenant map to translate a vendor tenant ID to a Stellar Cyber tenant ID—to assign each event to the correct tenant.
Tenant Mapping and Parser Studio are accessible only to root-level users. For information about enabling Tenant Mapping in a custom parser configuration, see Parser Studio – Parsers.
Tenant maps are created and managed on the Tenant Mapping page, which is where you define the lookup dictionary that the parser uses at runtime. A tenant map must exist before you can select it in a parser configuration.
Tenant Map Ownership
Every tenant map belongs to a single tenant, called the owner. The owner is the tenant selected in the tenant selector at the top of the Tenant Mapping page at the time the tenant map is created. You cannot change the owner after creation.
The owner is distinct from the tenants that receive log events through the tenant map. Those tenants, called the consumers, are the ones you identify in the Stellar Cyber Tenant ID column of each entry, either in an uploaded CSV file or in entries you add manually.
The owner determines the following:
-
Which parsers can use the tenant map. When you select a tenant map while configuring a parser, only the tenant maps owned by the tenant of that parser appear in the list. A parser and the tenant map it uses must have the same owner.
-
Where the tenant map appears in tenant-scoped listings on the Tenant Mapping page.
The owner can be one of the tenants listed in the tenant map, or it can be a tenant that the tenant map does not reference at all. In on-premises deployments, the Root Tenant is a valid owner and appears in the tenant selector as a choice.
The entries in a tenant map are not restricted to the owner. Each Stellar Cyber tenant ID in an entry is validated against every tenant in the Stellar Cyber Platform, not against the owner, so a tenant map owned by one tenant can direct log events to any other tenants. Directing log events from a single feed to several tenants is the purpose of the feature.
Ownership does not affect which tenant receives a log event at runtime. The tenant to which Stellar Cyber directs logs is determined entirely by the entries in the tenant map. Ownership also does not grant edit rights to the tenant that owns the map: creating, editing, and deleting tenant maps is restricted to root-level users regardless of the owner.
Best practice: Create a dedicated tenant to own the sensor, the parser, and the tenant map rather than using a tenant of one of the networks you monitor. A sensor that performs multi-tenant log parsing is typically reachable from the public internet and is often hosted in a public cloud, so keeping ownership outside the tenants of your customers reduces exposure. A dedicated tenant also means that any log event whose vendor tenant ID does not match an entry in the tenant map is assigned to the dedicated tenant rather than appearing in the data of one of the organizations you monitor.
Some service providers instead assign ownership to the tenant that represents the service provider organization. Both approaches keep ownership separate from the organizations that the tenant map routes data to.
How Tenant Mapping Works
When a parser with Tenant Mapping enabled processes an incoming log event, it performs the following steps:
-
The parser extracts the value at the configured path from the log event.
For example, if the configured field is
metadata.tenant_id, the parser reads the value of that field from the event. -
Depending on which Tenant Mapping option is configured in the parser, one of the following happens:
If the parser uses Stellar Tenant ID, the parser extracts the Stellar Cyber tenant ID value from the log. The parser uses it to assign the event to the matching tenant directly. No lookup table is needed.
or
If the parser uses Vendor Tenant ID, it extracts the vendor-assigned identifier from the log and looks for a matching entry in the tenant map. If it finds a match, Stellar Cyber assigns the event to the corresponding Stellar Cyber tenant. If no match is found, Stellar Cyber assigns the event to the tenant that owns the sensor that received the log.
If events are appearing under an unexpected tenant, review your tenant map entries.
The Tenant Mapping Page
To access Tenant Mapping, navigate to System | ORGANIZATION MANAGEMENT | Tenant Mapping.
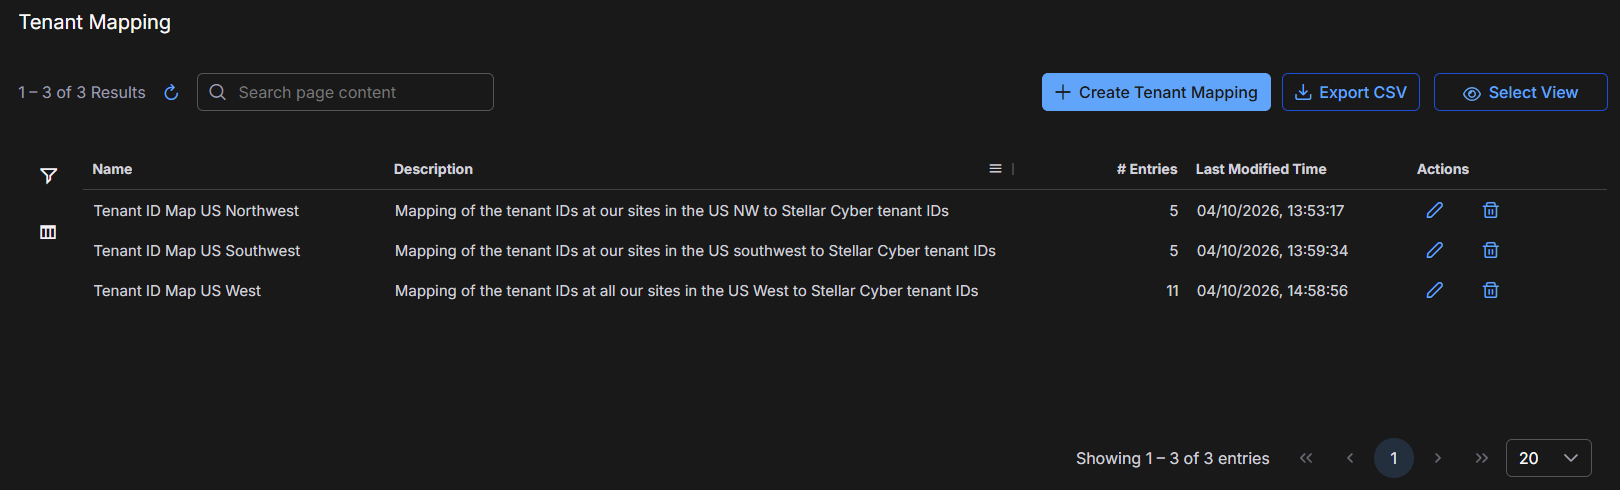
The page displays a tenant selector at the top of the page and an Entries table of existing tenant maps. The tenant selector controls both which tenant maps the table lists and which tenant owns a tenant map that you create. Selecting All Tenants lists the tenant maps owned by every tenant. Each row represents one tenant map and shows the following information:
| Column | Description |
|---|---|
| Name | The name defined for the tenant map when it was created |
|
Tenant |
The name of the Stellar Cyber tenant that owns the tenant map. Stellar Cyber automatically fills this in from the tenant chosen in the tenant selector at the top of the page when the tenant map was created. |
| Description | An optional description describing some aspect of the tenant map such as its purpose |
| # Entries | The number of vendor tenant ID-to-Stellar Cyber tenant ID mappings that the tenant map contains |
| Last Modified Time | The date and time the tenant map was last updated |
| Actions | Edit (pencil icon) and Delete (trash icon*) controls for each tenant map |
* Before deleting a tenant map, confirm that no parser configurations in Parser Studio are currently using it. Deleting a tenant map that is referenced by an active parser causes that parser to lose its tenant assignment capability. Log events that previously matched entries in the deleted tenant map will instead be assigned to the tenant associated with the sensor that receives them.
The page also provides the following controls:
-
+ Create Tenant Mapping – Opens the Create Tenant Map dialog box to define a new tenant map.
Because All Tenants is not a tenant and cannot own a tenant map, this control is unavailable when All Tenants is chosen from the tenant selector at the top of the page. You can still view, edit, and delete any tenant map while All Tenants is selected.
-
Export CSV – Exports the list of tenant maps shown in the table.
-
Select View – Opens the Saved Views panel to create or apply a customized table view.
For information about Export CSV and Select View, see Using Tables.
Create a Tenant Map
Before you begin, confirm the following:
-
You have decided which tenant will own the tenant map. The owner must be the same tenant that owns the parser that will use the tenant map. You cannot change the owner after you create the tenant map.
-
You have the Stellar Cyber tenant IDs for every tenant you want to include in the tenant map. You can find tenant IDs on the Tenants page (System | ORGANIZATION MANAGEMENT | Tenants). Each Stellar Cyber tenant ID must match an existing tenant exactly; Stellar Cyber rejects entries with an unrecognized or empty Stellar Cyber tenant ID.
-
You have the vendor tenant IDs that the third-party system uses to identify those tenants in its log events.
-
(Optional) If you are uploading a CSV file, you have prepared it with the correct two-column format: Vendor Tenant ID and Stellar Cyber Tenant ID. You can download the provided template from the + Create Tenant Mapping dialog box to use as a starting point.
To create a tenant map:
-
Navigate to System | ORGANIZATION MANAGEMENT | Tenant Mapping and then choose a specific tenant in the tenant selector at the top right of the page.
The tenant that you choose becomes the owner of the tenant map and cannot be changed afterward. Each sensor belongs to a tenant, and its parsers can only use tenant maps owned by that tenant. Be sure to select the tenant that owns the sensor where the parser runs.
+ Create Tenant Mapping is unavailable while All Tenants is selected.
-
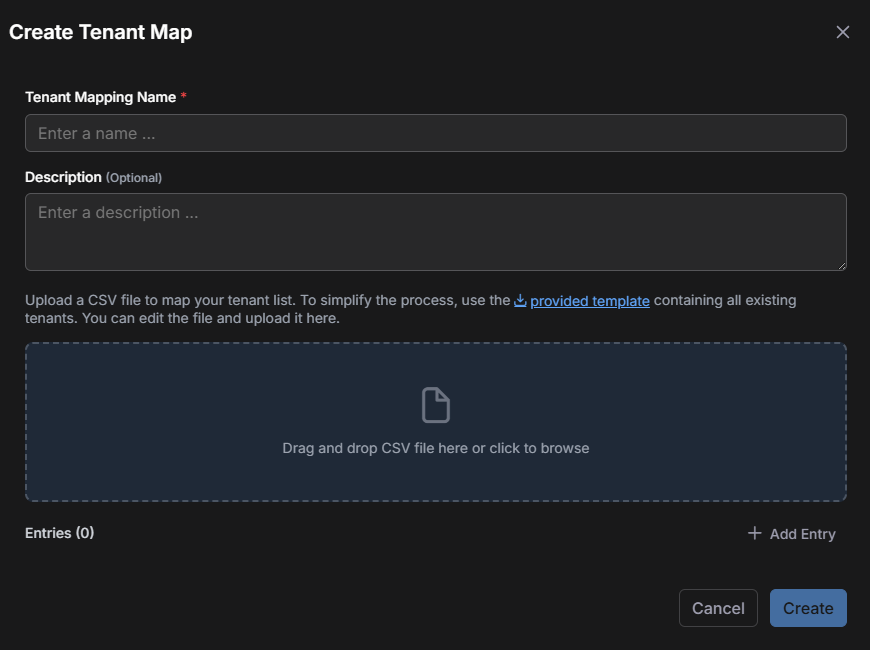
Select + Create Tenant Mapping.
The Create Tenant Map dialog box appears.
-
Enter a descriptive name in the Tenant Mapping Name field.
Choose a name that makes the tenant map easy to identify when selecting it in a parser configuration in Parser Studio.
-
(Optional) Enter a description in the Description field.
Consider including additional context, such as the vendor system the tenant map supports or the set of tenants it covers.
-
Add entries to the tenant map using one or both of the following methods:
Upload a CSV file: Drag your prepared CSV file into the upload area, or select the area to browse for the file. When the upload succeeds, a confirmation banner displays the number of entries loaded and the entries appear in the Entries table. Confirm that the count in the banner matches the number of data rows in your file.
Use the link to download a provided template, which is a pre-formatted CSV file with the correct column structure and a sample row that you can replace with your own data.
Add entries manually: Select + Add Entry. An inline row appears in the Entries table. Enter the Vendor Tenant ID and the Stellar Cyber Tenant ID in the respective fields. Repeat for each additional entry.
You can combine both methods: Upload a CSV file to load a batch of entries, and then use + Add Entry to append individual entries in the same session.
Notes:
-
Stellar Cyber validates each entry as you add it. An empty or unrecognized Stellar Cyber tenant ID produces an error on that row and prevents you from saving the tenant map. This applies both to entries you add manually and to entries loaded from a CSV file.
-
Each vendor tenant ID must be unique within a tenant map. If you add an entry whose vendor tenant ID already exists in the tenant map and then select Create or Update, the duplicate entry is silently discarded and the original is retained. The pre-save count shown in the confirmation banner won't match the post-save entry count if duplicates are staged. Check the # Entries column after saving to confirm the final count.
-
-
Review the entries in the Entries table to confirm that the Vendor Tenant IDs and Stellar Cyber Tenant IDs are correct and that the Stellar Cyber Tenant Name column reflects the expected tenant names.
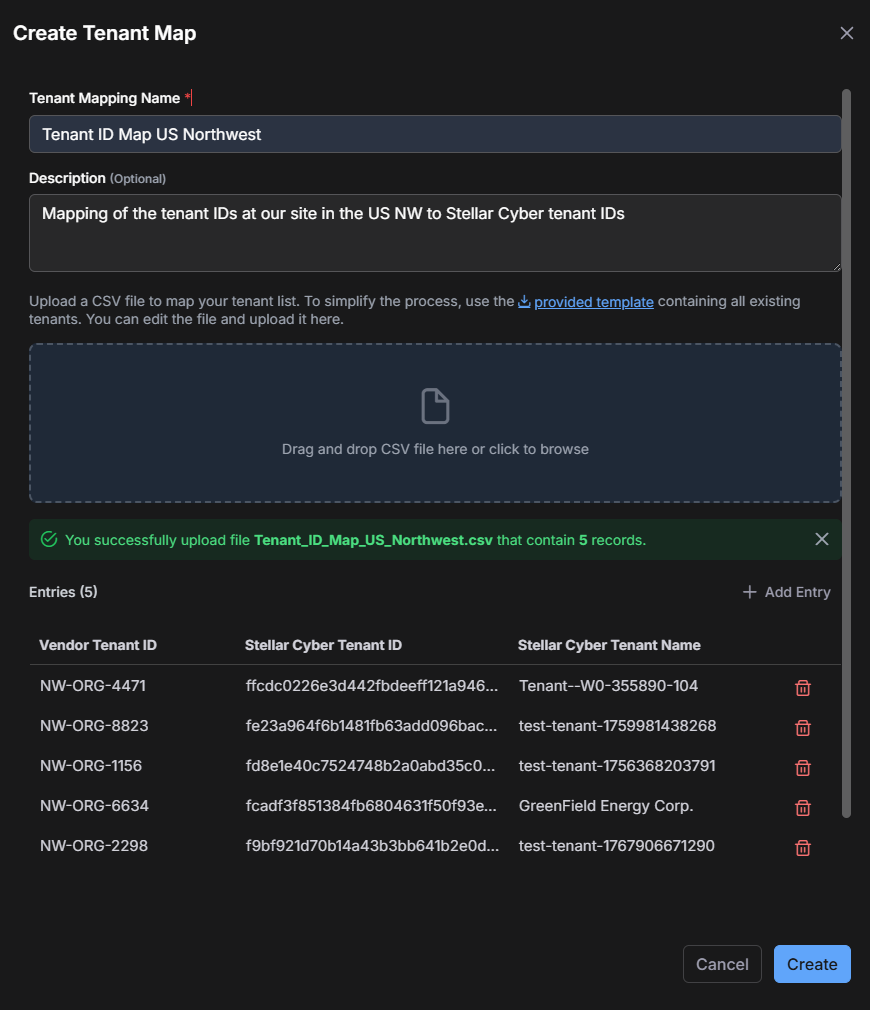
The following are some notes about the file upload and processing:
-
The Stellar Cyber Tenant column that appears in the Entries table after upload is resolved automatically from the Stellar Cyber Tenant ID. It's not a column in the CSV file and does not need to be provided.
-
After uploading, confirm that the number of entries shown in the confirmation banner matches the number of data rows in your CSV file. A count that is lower than expected can indicate that rows were removed during validation or that duplicate vendor tenant IDs were discarded. If the counts do not match, remove or correct the affected rows in your CSV file and upload the file again.
-
Uploading a CSV file to a tenant map that already contains entries replaces all existing entries with the contents of the uploaded file. The upload does not append to existing entries. Before uploading, ensure that your CSV file contains all of the entries you want the tenant map to contain, not just the new ones you are adding.
-
-
To remove an entry, select the Delete icon for that row.
-
Select Create.
The new tenant map appears in the Tenant Mapping table on the main page and is now available for selection when configuring a parser owned by the same tenant in Parser Studio. (For information, see Parser Studio.)
