Archiving and Restoring Data in Azure
Microsoft Azure offers different storage tiers depending on the time required to access. For infrequently accessed data, you may want to take advantage of a lower-cost Archive tier for Stellar Cyber data in cold storage. This topic covers the following tasks for external data management in Microsoft Azure:
-
Configure lifecycle management so that tagged data stored in Azure is automatically transitioned from the Hot Tier to the Archive Tier over time.
-
Schedule the archive-cli.py script provided by Stellar Cyber to apply tags to data in Azure Blob Storage so that it can be identified as ready for archiving.
-
Restore data from the Archive tier to the Hot Tier so that it can be imported from cold storage to Stellar Cyber when needed.
Obtaining the archive-cli.py Script
The archive-cli.py script is available on Stellar Cyber's open GitHub repository at the following link:
System Requirements
The Stellar Cyber cold storage archive script has the following prerequisites for use in Azure:
-
Python 3 (3.7 or greater)
-
Azure CLI installed on machine used to run script.
-
Azure CLI Storage Preview Extension. Install with the following command in the Azure CLI:
az extension add --name storage-blob-preview -
Prior to script usage, run az login in Azure CLI to establish connection to Azure.
Configuring Lifecycle Management to Archive Cold Storage Data
The following procedure describes how to configure lifecycle management so that data stored in Azure Blob Storage is automatically moved to the Archive Tier after a specified number of days:
-
Create an Azure blob and configure it as cold storage in Stellar Cyber.
-
Configure a lifecycle rule in Azure that automatically moves data with the archive tag from regular Azure Blob Storage to the Archive tier:
-
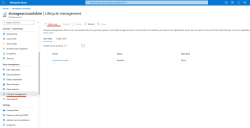
Log in to the Azure Console, navigate to Data management | Lifecycle management, and click the Add a rule option in the toolbar, as illustrated below..
-
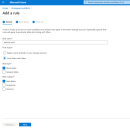
The Lifecycle rule works by moving data with the StellarBlobTier key set to Archive to the Archive tier in Azure. Set the options in the Details tab of the Add a rule wizard as illustrated below and click Next:
-
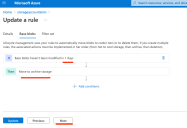
Set the following options in the Base blobs tab and click Next:
-
Set If to base blobx haven't been modified in x days. Specify a value for x that makes sense for your organization. This is the number of days data matching the archive tag exists in Azure Blob Storage before it is transitioned to the Archive tier. In this example, we have set this option to 1 days.
-
Set Then to Move to archive storage.
-
-
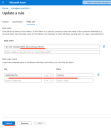
Set the following options in the Filter set tab and click Add:
-
Set Blob prefix to <container name>/stellar_data_backup/indices/
-
Set the Blob index match Key/Value pair to StellarBlobTier == Archive
-
-
Add External Cold Storage and Disable Cold Storage Deletion
-
Add your Azure blob as cold storage in Stellar Cyber.
-
In Stellar Cyber, disable the deletion of data in cold storage by navigating to the System | Data Processor | Data Management | Retention Group page and setting the cold retention times artificially high (for example, 100 years, as in the example below). You must do this in order to ensure that data can be moved back and forth between archival storage and regular storage and still imported to Stellar Cyber.
Running archive-cli.py Daily to Tag Blobs for Archiving
Now that you have a lifecycle rule that transfers data matching the archive tag to the Archive tier after a specified number of days, you need to use the archive-cli.py script to apply the archive tag to data in the Stellar Cyber cold storage backup in Azure Blob Storage.
-
Log in to the Azure CLI with the az cli command.
-
Use the device code and URL returned by the az cli command to verify your login.
-
If you have multiple Azure subscriptions, select the correct one with the following commands:
-
View your subscriptions with the
az account list --output tablecommand. -
Select the correct subscription from the returned list with
az account set --subscription "<subscription-id>" command.
-
-
Verify you can see your Azure blob with the following command:
az storage blob list --container-name <container> --account-name <account>Substitute the name of your Azure storage container and account for the corresponding fields shown in bold.
-
Type the following command to see the arguments for the archive-cli.py script:
$ python3 archive-cli.py -h -
Set up a cron job that runs the archive-cli.py script on a daily basis with the arguments below:
> python archive-cli.py azure --account-name <account> --container-name <container> tag --included-prefix 'stellar_data_backup/indices/' --src-tier hot --dst-tier archive
Verifying Tagged Data
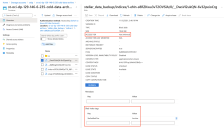
Once you run the archive-cli.py script using the syntax above, you can verify that data has been tagged with StellarBlobTier=Archive by using the Azure Console to look at the properties of any of the files in the /indices folder, as illustrated below:
Verifying Data in Archive Tier
Once data has been tagged with StellarBlobTier=Archive by the archive-cli-py script, the lifecycle management rule you configured at the start of this procedure begins to move it to the ArchiveTier in accordance with the rule you specified. So, in our example, we set a value of 1 day as the length data can sit in this bucket unchanged before transitioning to the Archive Tier. The illustration below shows data moved to the Archive Tier automatically by our lifecycle management rule:
Restoring Data from Archive Tier to Hot Tier
You can use the archive-cli.py script to restore data stored in the Archive Tier to the Hot Tier, after which it can be imported to Stellar Cyber.
Depending on your analysis needs and the volume of data to be moved, you can use either of the following techniques to restore data from the Archive Tier:
-
Restore all data from the Archive Tier. This procedure is simpler but may not be cost-efficient, depending on the volume of data to be restored.
-
Restore selected indices from the Archive Tier. This procedure is cost-efficient, but requires some effort to identify the indices to be restored.
Both procedures are described below, as well as a description of how restored data appears in the Azure Console.
Restoring Selected Indices from the Archive Tier
Use the following procedure to import data from the Archive Tier to the Hot Tier so it can be imported from cold storage in Stellar Cyber:
-
If you have a regular cron job running to tag data using archive-cli.py, stop it now.
-
Start a restore of all indices from the Archive Tier to the Hot Tier using the following command:
python3 archive-cli.py azure --account-name <account> --container-name '< container>' restore --included-prefix 'stellar_data_backup/indices/'
Substitute the name of your Azure account and storage container for the corresponding fields in bold.
-
Before the restore completes, navigate to System | Data Processor | Data Management | Cold Storage Imports and start an import from your Azure cold storage.
-
The import fails because the data has not yet been fully restored from the Archive Tier. However, the import should still show the index names it attempted to retrieve in the System | Data Processor | Data Management | Cold Storage Imports tab. You can use these external index names to retrieve the internal index IDs that the archive-cli.py script needs to restore specific data:
-
Navigate to the System | Data Processor | Data Management | Cold Storage Imports tab in Stellar Cyber.
-
Click the Change Columns button and add the Index column to the display if it is not already enabled.
-
Copy the index name to be restored from the archive tier. This is the external index name.
-
Run the archive-cli.py script with the following syntax to retrieve the internal index IDs associated with the external index IDs you copied in the previous step:
> python archive-cli.py azure --account-name <account> --container-name <container> get-prefix "aella-syslog-1624488492158-,aella-syslog-1627512494132-"
Substitute the name of your Azure account and storage container for the corresponding fields in bold. In addition, substitute the external names of the indices for which you are querying for the two
aella-syslog-...entries. You can query for multiple indices separated by commas and surrounded by double-quotation marks. The following example illustrates the internal index IDs returned by the script based on the provided external index IDs:
-
-
Once you have the internal index IDs, you can restore them from the Archive tier to the Hot Tier:
-
Restore blobs matching the specified prefix from the Archive tier with the following command:
> python archive-cli.py azure --account-name <account> --container-name <container> restore --included-prefix 'stellar_data_backup/indices/<internal_index_id>/'
Substitute your Azure account, container name, and internal index ID for the values shown in bold in the command above.
You can also run the previous commands as a script to retrieve the contents of multiple indices. For example:
Restoring from Archive Tier to Hot Tier for i in <internal_index1> <internal_index2>; do
python archive-cli.py azure --account-name <account> --container-name <container>
restore --included-prefix "stellar_data_backup/indices/$i/"
done -
-
Return to the System | Data Processor | Data Management | Cold Storage Imports tab in Stellar Cyber and delete the failed imports (those listed with a red icon in the Status column).
-
Re-import when the selected indices are restored successfully to the Hot Tier.
Restoring All Data from the Archive Tier
Use the following procedure to restore all data from the Archive tier to the Hot Tier so it can be imported from cold storage in Stellar Cyber:
- If you have a regular cron job running to tag data using archive-cli.py, stop it now.
-
Restore all indices from the Archive Tier to the Hot Tier using the following command:
python3 archive-cli.py azure --account-name <account> --container-name '< container>' restore --included-prefix 'stellar_data_backup/indices/'
Substitute the name of your Azure account and storage container for the corresponding fields in bold.
Appearance of Restored Data in Azure Console
Restoring data from the Archive Tier to the Hot Tier takes several days, depending on the volume of data to be restored. The following illustrations show how the transition from the Archive Tier to the Hot Tier appears in the Azure Console.
Initially, restored files appear with an Archive Status of Rehydrate Pending to Hot:
When rehydration completes, all files in the /indices folder show an entry of Hot in the Access Tier and no entry in the Archive Status column. At this point, the files can be imported into Stellar Cyber.
Returning Data to Archival Storage
Once you have finished your analysis of data restored from the Archive tier, you can use the steps below to delete the data from within Stellar Cyber and return it to the Archive tier in Azure:
Tagging Specific Indices as Archive
If you restored specific indices from the Archive Tier to the Hot Tier, you can use the following procedure to retag them as archive so that they are returned to the Archive Tier by lifecycle management:
-
Use the archive-cli.py script to retag the data imported to regular storage as archive so that it is returned to the Archive tier by lifecycle management:
-
Run the archive-cli.py script to retrieve the internal index IDs of the data to be returned to the Archive tier, substituting your Azure account, container name and the external index names from the user interface:
> python archive-cli.py azure --account-name <account> --container-name <container> get-prefix "aella-syslog-1624488492158-,aella-syslog-1627512494132-"
-
Run the archive-cli.py script to archive the identified indices with StellarBlobTier=Archive:
Syntax for a single index:
> python archive-cli.py azure --account-name <account> --container-name <container> archive --included-prefix 'stellar_data_backup/indices/<external_index_id>/'
Syntax using a shell script for multiple indices:
for i in <internal_index1> <internal_index2>; do
python archive-cli.py azure --account-name <account> --container-name <container> archive --included-prefix "stellar_data_backup/indices/$i/"
done
-
Tagging All Data in a Specific Container as Archive
If you restored all data from the Archive Tier to the Hot Tier, you can use archive-cli.py with the following syntax to retag it as archive so that it is returned to the Archive Tier by lifecycle management::
> python archive-cli.py azure --account-name <account> --container-name <container> tag --included-prefix 'stellar_data_backup/indices/' --src-tier hot --dst-tier archive
Deleting Imports from Stellar Cyber
Once you have completed your analysis in Stellar Cyber, you can remove the imports:
-
Navigate to the System | Data Processor | Data Management | Cold Storage Imports tab in Stellar Cyber and delete the imports.
