Analyzing Snapshot-Based Cold Storage Data
To analyze data in cold storage, you must import it to a DP. You can import to an active DP or a dedicated forensic DP. If you import to an active DP, the DP automatically enters forensic mode. Forensic mode is indicated by a  in the upper right corner.
- Preparing a Dedicated Forensic DP for Snapshot-Based Cold Storage Import
- Importing Data From Cold Storage
- Leaving Forensic Mode
Stellar Cyber also provides an archive-cli.py script that helps you move data in cold storage back and forth between regular storage and archival class storage in AWS and Azure. Refer to Cold Storage Archive Support for more information.
Snapshots or Data Sinks?
Stellar Cyber can import cold data from either snapshots or a data sink, depending on how you have configured the system. This topic describes how to import data from snapshots stored in a Cold Storage backup configured in the System | Data Processor | Data Management | Snapshot Storage Configuration tab. If you have configured a Cold Storage destination, Stellar Cyber automatically moves stored data to the destination based on your settings in the Retention Groups tab.
Starting with Version 4.3.1, you can also import data from a data sink using the tools in the Data Sink Import tab. Data will only be available for import here if you have configured and enabled a Data Sink in the System | Data Processor | Data Sinks tab. Data Sink imports do take longer than Snapshot imports, but they have the advantage of providing more fine-grained filters specifying exactly what data you want to import.
Preparing a Dedicated Forensic DP for Snapshot-Based Cold Storage Import
Before you import data from cold storage to a dedicated forensic DP for analysis, Stellar Cyber recommends that you first restore the configuration from the DP that was the source of the cold data to the forensic DP. This ensures that the tenant IDs, saved queries, and dashboards from the primary DP are all available on the forensic DP to assist with analysis once you do import data from cold storage. Use the following procedure:
-
Open one browser tab with a connection to the primary DP and one with a connection to the dedicated forensic DP.
-
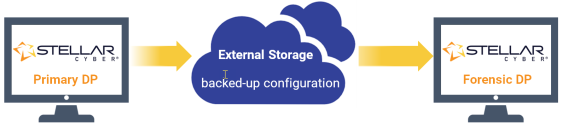
Primary DP: We will configure the dedicated forensic DP with the exact same Snapshot Backup/Restore external storage as that used by the primary DP. This way, we can import the configuration to the dedicated forensic DP directly from the backup written to external storage by the primary DP, as summarized in the figure below:
-
We'll start by identifying the Snapshot Backup/Restore external storage in use on the primary DP. Navigate to the System | Data Processor | Data Management | Snapshot Backup/Restore tab for the primary DP.
-
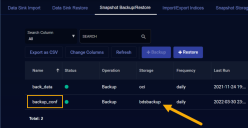
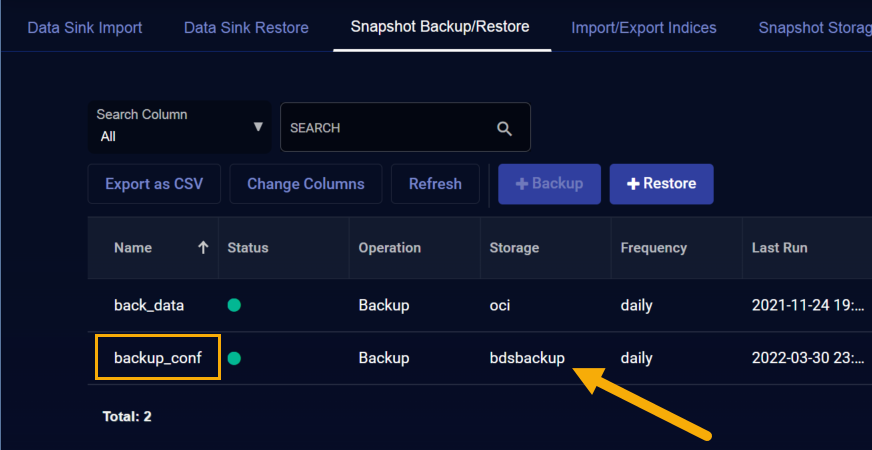
Find the job that backs up configuration data for the primary DP and take note of the name in the Storage column. For example, in the figure below, the backup_conf job backs up configuration data regularly to bdsbackup.
Note: If you're not sure which job backs up configuration data, you may need to click the Edit button for the different jobs to see their settings.
-
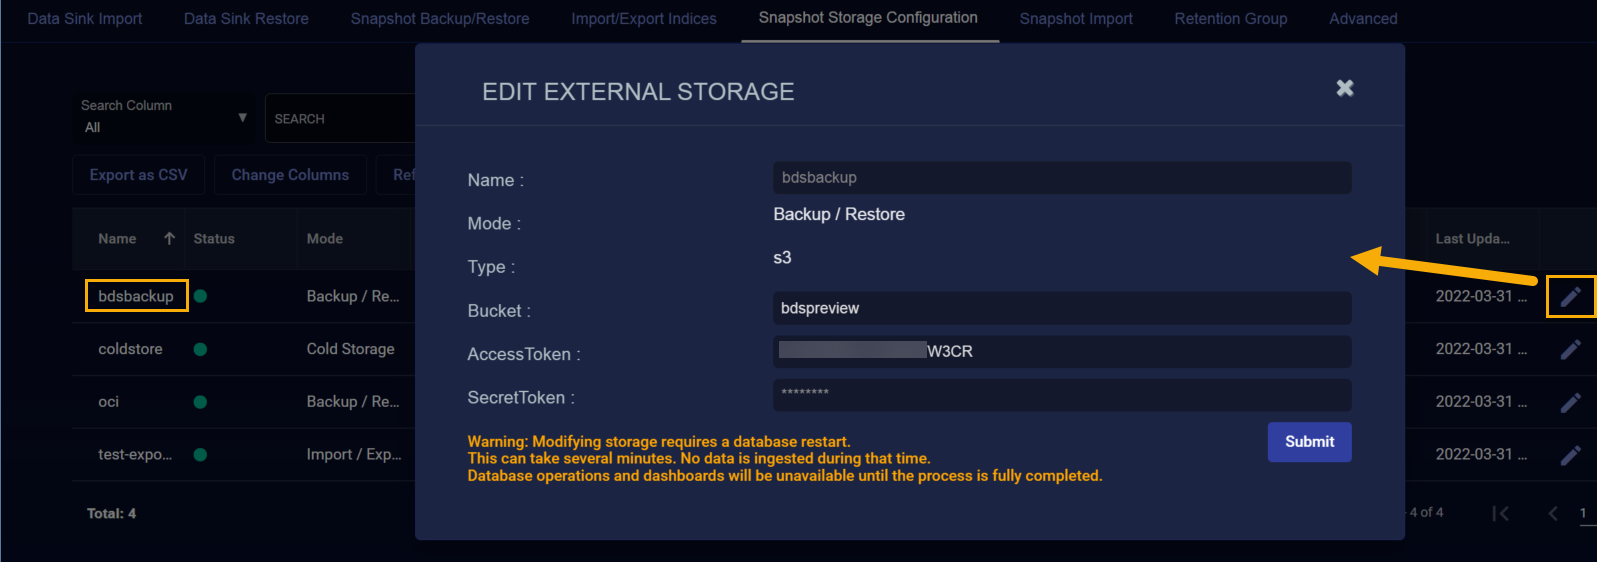
Next, we need the settings for the external storage where the configuration data is written by the primary DP. Navigate to the System | Data Processor | Data Management | Snapshot Storage Configuration tab.
-
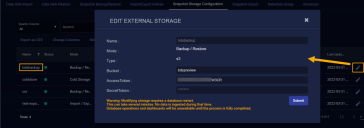
Locate the entry for the destination you identified previously and click its Edit button to see its settings. The figure below shows the settings for the bdsbackup destination we identified previously.
-
Take note of the settings for the Backup/Restore external storage configuration so you can add the exact same external storage to the forensic DP.
-
-
Dedicated Forensic DP: Navigate to the System | Data Processor | Data Management | Snapshot Storage Configuration tab and add a Backup/Restore external storage destination that is exactly the same as the one you identified in the previous step for the primary DP. Use the instructions that match the external storage type from the primary DP.
Important: Do not create any backup jobs on the dedicated forensic DP. Just add the Backup/Restore external storage matching the primary DP.
-
Dedicated Forensic DP: Restore the configuration backed up from the primary DP to the dedicated forensic DP.
-
Navigate to the System | Data Processor | Data Management | Snapshot Backup/Restore tab and click the Restore button.
-
Follow the normal configuration restore procedure to restore the configuration backed up from the primary DP to the dedicated forensic DP.
Note: You only need to choose Configuration for the Restore Mode. You'll get the data you want to analyze from cold storage later on.
Note: If the dedicated forensic DP has a different cluster configuration than the primary DP, you may notice some stale entries in the System | Data Processor | Data Analyzer and Data Lake pages. You can remove these entries.
-
-
Dedicated Forensic DP: Restoring the configuration from the primary DP changes all the settings on the dedicated forensic DP, including some you must change back right away, as follows:
-
Connect to the CLI of the dedicated forensic DP and run the following command:
DataProcessor> show modeBecause you just restored configuration from the primary DP, the entry for
Forensic modewill reportnone. -
Reconfigure the mode of the dedicated forensic DP to
forensic dedicatedwith the following command:DataProcessor> set mode forensic dedicated -
Turn off any scheduled backups created by the restore process. Navigate to the System | Data Processor | Data Management | Backup/Restore tab and use the Disable button to turn off any scheduled backup jobs.
-
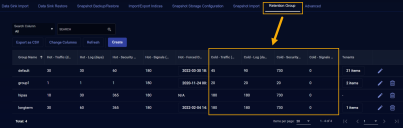
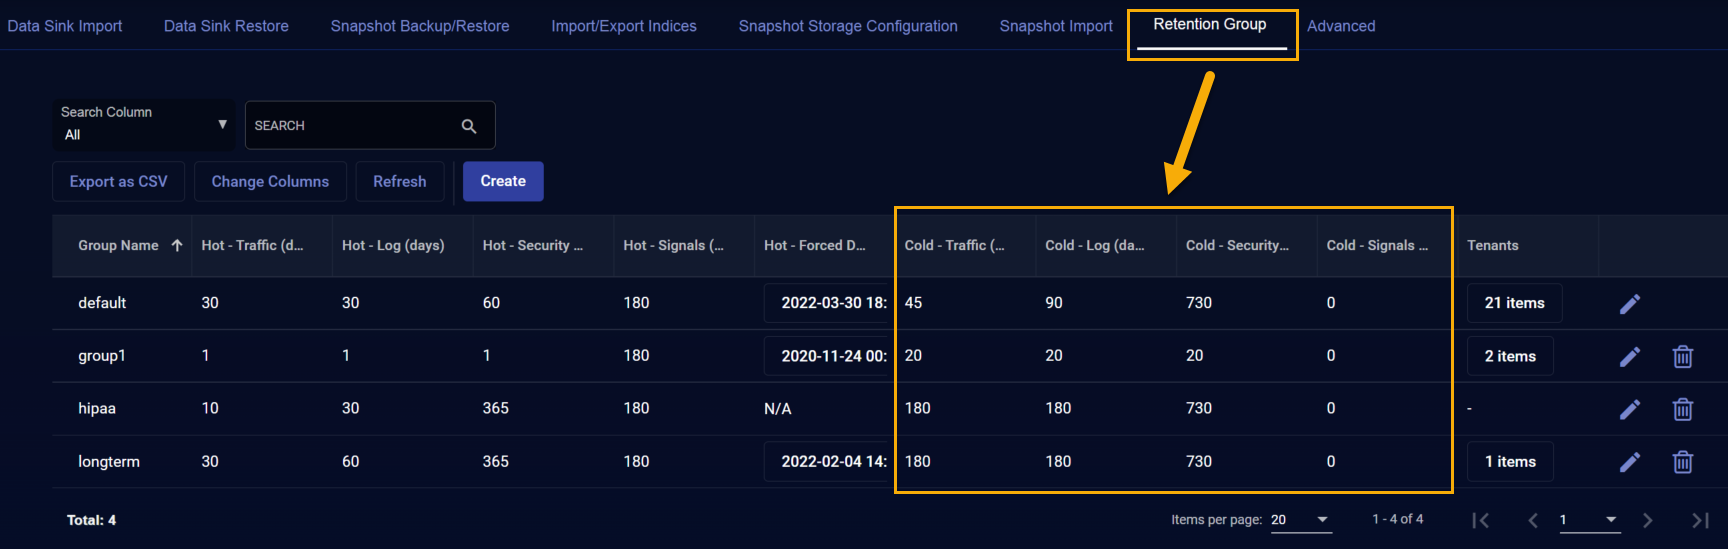
Navigate to the System | Data Processor | Data Management | Retention Groups page and use the Edit button for each individual retention group to set the values in the Cold columns to their maximum value of 9999. This failsafe measure ensures that data imported from cold storage is not aged out while performing analysis.
-

Now you are ready to continue Importing Data From Cold Storage.
Importing Data From Cold Storage
To import data from cold storage:
-
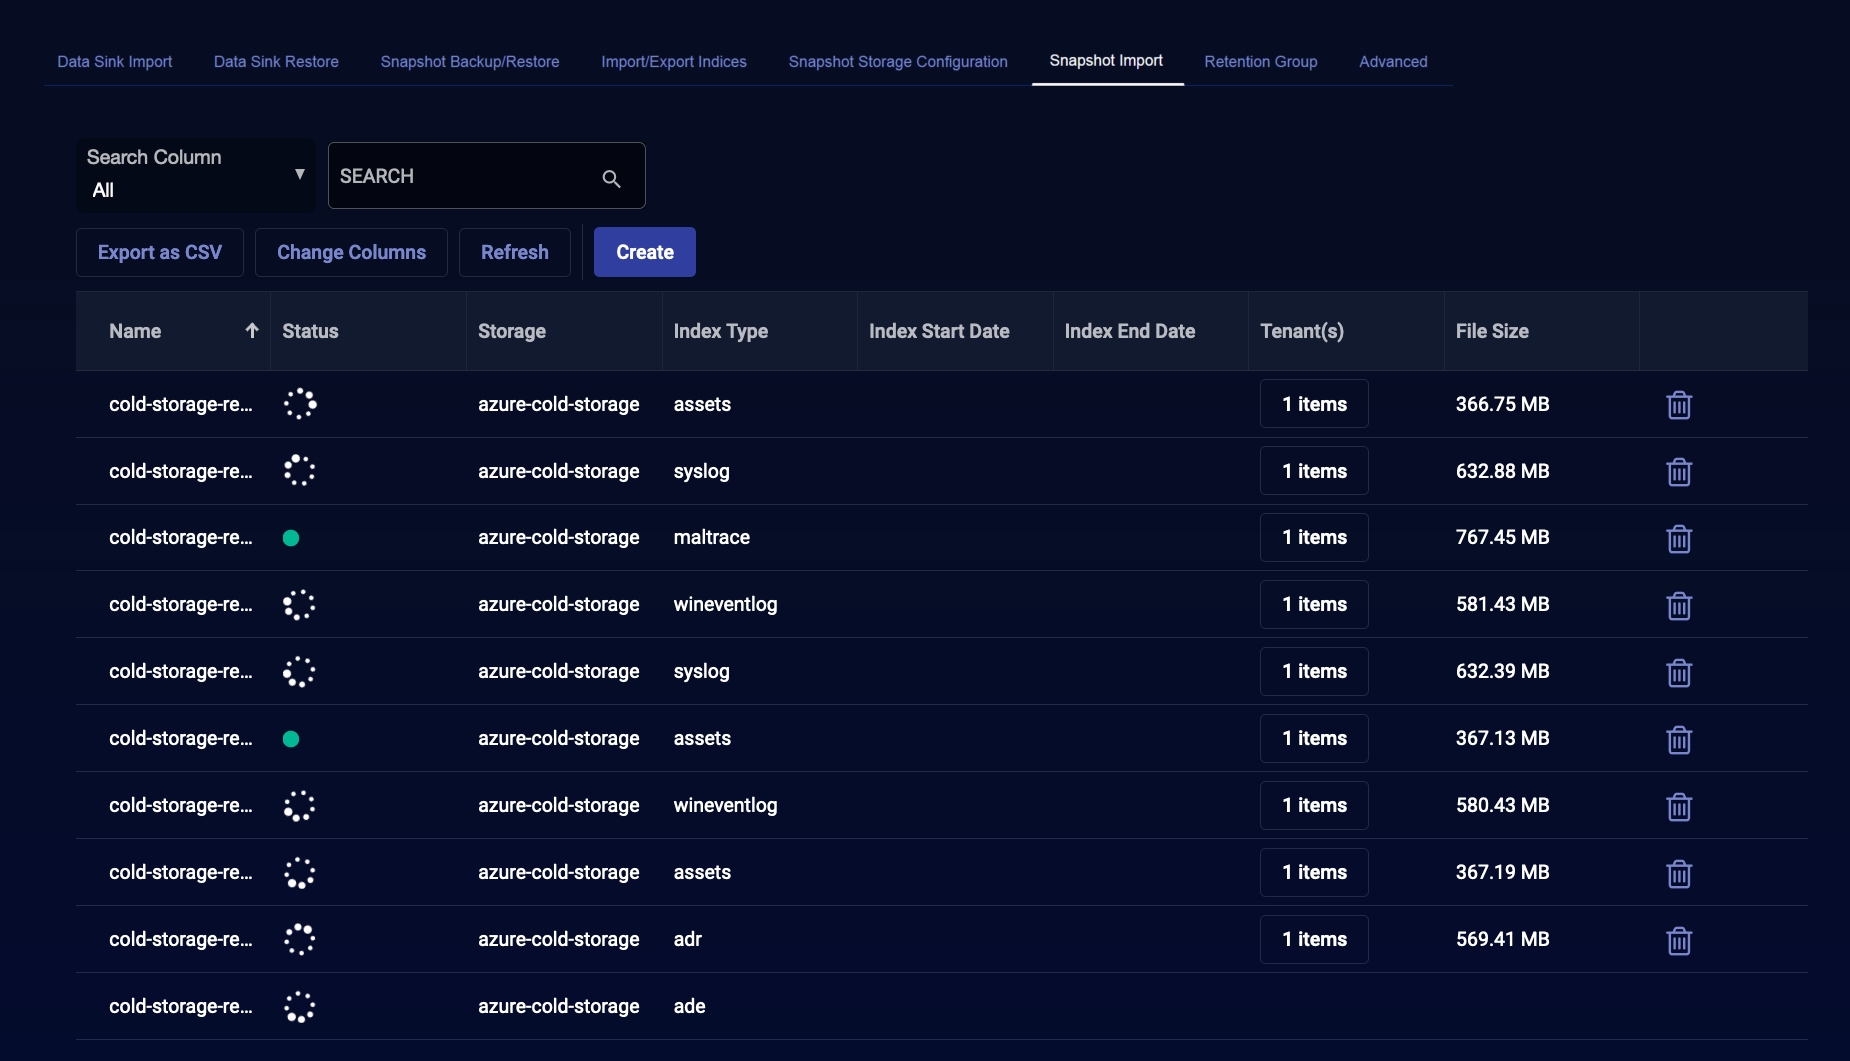
Click System| Data Processor | Data Management | Snapshot Import. A list of cold storage databases appears, if any have already been imported. In the example below, the DP is processing several imports, while two have been completed.
-
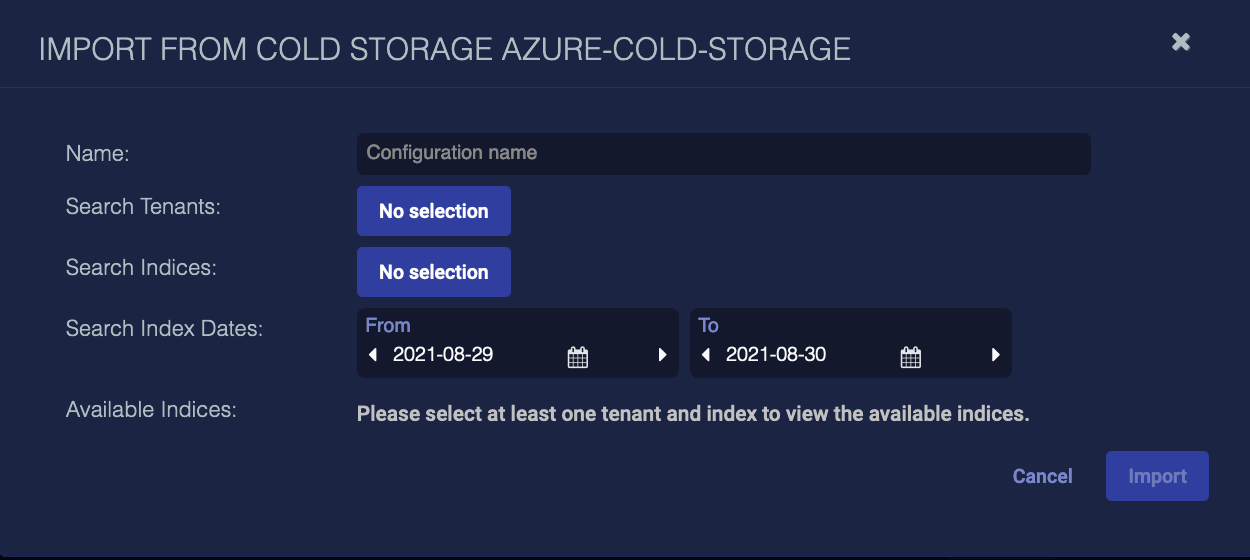
Click Create. The Import From Cold Storage screen appears. Note that the screen includes the name of the currently active cold storage; you can only have one active at a time.

-
Enter a Name.
-
Select Tenants.
-
Select the Indices to search.
-
Choose a date range for the search. The Available Indices appear.
-
Choose the indices to import. The required disk space appears.
-
Click Import. The import begins immediately.
Stellar Cyber imports data at between .5 – 2 GB per minute, depending on your network access.
Importing to an active DP impacts the performance of your system. We strongly recommend that you import during a maintenance window.
Leaving Forensic Mode
To leave forensic mode, simply remove the imported cold storage data.
