Using the Data Sink Import Tab
You must have Root scope to use this feature.
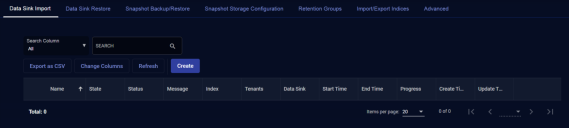
The System | Data Processor | Data Management | Data Sink Import tab lets you import specific data from storage in a Data Sink. You can filter the import on a combination of Tenants, Indices, and a date range, depending on your analysis needs.
Imports give you a way to retrieve specific data for temporary analysis needs. Imported data remains available for analysis in the DP until you delete the import task from the Data Sink Import tab. At that point, the imported data is subject to normal disk cleanup and will be removed if it is no longer in the hot tier, as specified by your retention group settings.
This is a contrast to data restored from a Data Sink (as opposed to imported) – restored data is immediately subject to removal by either Retention Group settings or regular ElasticSearch disk cleanups. Imported data stays until the task is deleted from the Data Sink Import tab.
Snapshots or Data Sinks?
Stellar Cyber can import data from data sinks or snapshots, depending on how you have configured the system. This topic describes how to import data from Data Sinks configured and enabled in the System | Data Processor | Data Sinks page.
Data Sink imports do take longer than Snapshot imports for the same amount of data, but they have the advantage of providing more fine-grained filters specifying exactly what data you want to import. If you're only importing a few days worth of data, Data Sinks are preferable to snapshots. Data Sinks also do not require the use of forensic mode. You can just import the data you need, work with it, and then delete the import task when you are done with your analysis.
Importing Data from a Data Sink
Tip: Before you import, it's a good idea to check the Data Lake Health in the System Status dashboard to make sure there's sufficient space for the amount of data you are importing. The import may fail if the disk is almost full on any of your ElasticSearch data notes.
To import data from a Data Sink:
-
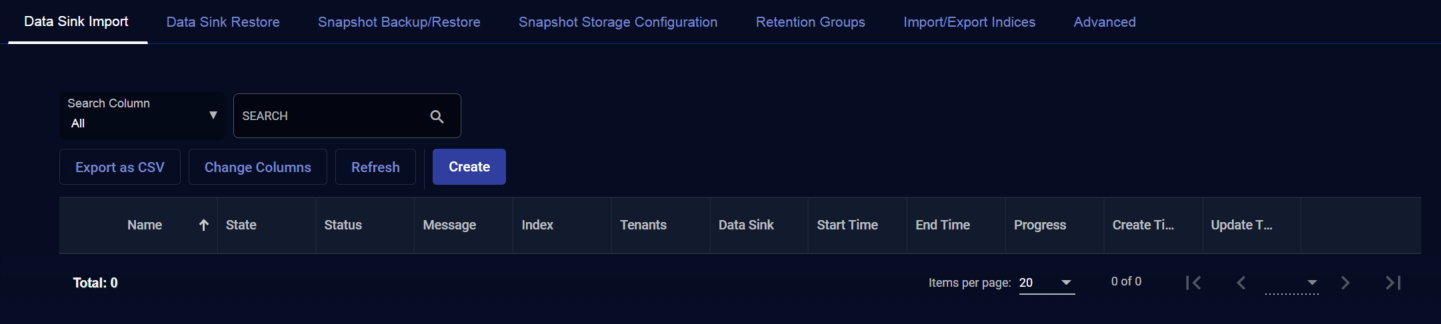
Click System | Data Processor | Data Management. The Data Sink Import tab appears by default listing any active Data Sink Import tasks.
-
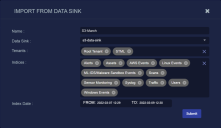
Click Create. The Import From Data Sink screen appears.
-
Enter a Name.
-
Select the Data Sink from which you want to import. The dropdown includes all data sinks configured in the System | Data Processor | Data Sinks page.
-
Select Tenants.
-
Select the Indices to import.
-
Choose a date and time range for the import.
-
Choose the indices to import.
-
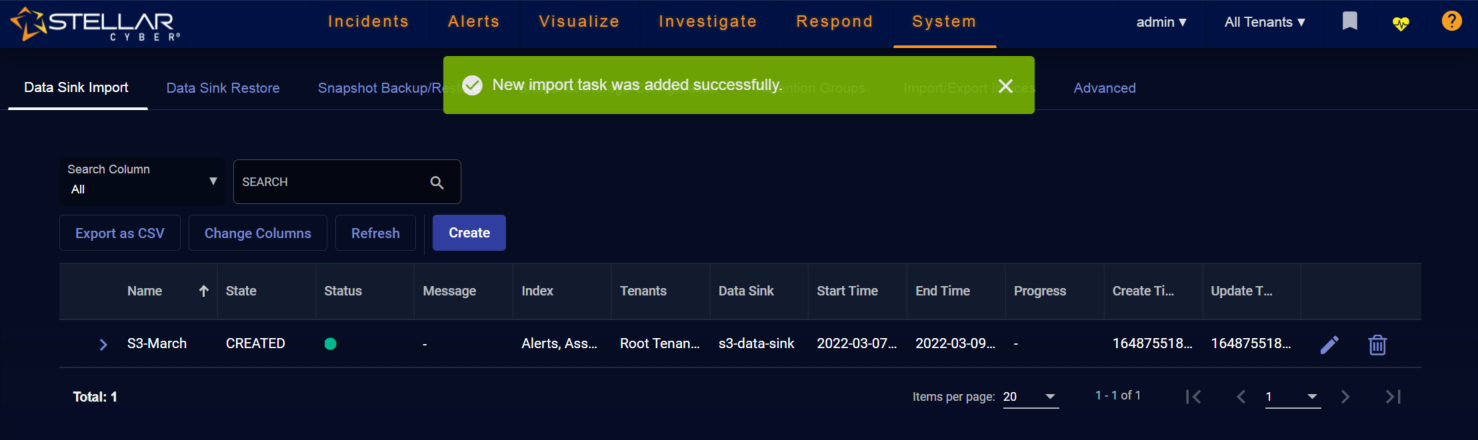
Click Submit. Stellar Cyber adds the import task to the list, as illustrated below:

The task enters the list with a status of CREATED. After a few minutes, the Status indicator illuminates green, indicating the import is in progress. You can click the Refresh button, as well as the Show Progress link in the Progress column (once it appears) to keep tabs on the status of the import.
Note that the possible values in the State column are CREATED , DELETING, and DELETED. The column only indicates whether a task is actively importing or deleting data. To keep tabs on progress, use the Show Progress link in the Progress column.

Importing to an active DP impacts the performance of your system. We strongly recommend that you import during a maintenance window.
Resuming a Failed Import
If for some reason an import fails and is listed with a red LED in the Status column, you can click the Error Message button in the Message column to see details on the failure. Once the failure is resolved, you can resume the failed task using the following procedure:
-
Click the Edit button for the task.
-
You can make changes or not. The key is to open the Edit workflow so you can click the Submit button again.
-
Click the Submit button.
Stellar Cyber attempts to resume the failed task.
How Imported Data Is Removed (Deleting Import Tasks)
Data imported from a Data Sink remains in the DP until the import task is deleted. Imported data is not subject to removal by either Retention Group settings or regular ElasticSearch disk cleanups until the task is deleted from the Data Sink Import list.
This is a contrast to data restored from a Data Sink (as opposed to imported) – restored data is immediately subject to removal by either Retention Group settings or regular ElasticSearch disk cleanups.
Data Sink Import/Restore Priority
-
You can run imports and restores from Data Sinks simultaneously. However, the import task is given higher priority.
-
You cannot run snapshot imports/restores simultaneously with data sink imports/restores.
