Archiving and Restoring Data in AWS S3
AWS S3 offers different storage classes depending on the time required to access data. For infrequently accessed data, you may want to take advantage of lower-cost archival classes such as S3 Glacier Deep Archive for Stellar Cyber data in cold storage. This topic covers the following tasks for external data management in AWS S3:
-
Create an S3 bucket and configure lifecycle management so that tagged data stored in S3 is automatically archived to S3 Glacier Deep Archive over time.
-
Add your S3 bucket to Stellar Cyber as cold storage and disable cold storage deletion.
-
Schedule the archive-cli.py script provided by Stellar Cyber to apply tags to data in cold storage so that it can be identified as ready for archiving.
-
Restore a temporary copy of data from Glacier Deep Archive to standard S3 storage so that it can be imported from cold storage to Stellar Cyber. Restored data is available for 10 days before automatically expiring, leaving the original data still in Glacier Deep Archive.
Obtaining the archive-cli.py Script
The archive-cli.py script is available on Stellar Cyber's open GitHub repository at the following link:
System Requirements
The Stellar Cyber archive-cli.py script has the following prerequisites for use in AWS:
-
Python 3 (3.7 or greater)
-
AWS CLI installed on machine used to run script.
-
Prior to script usage, run aws configure in AWS CLI to establish connection to AWS.
Configuring Lifecycle Management to Archive Cold Storage Data
The following procedure describes how to configure lifecycle management so that data stored in AWS S3 is automatically moved to Glacier Deep Archive after a specified number of days:
-
Configure a lifecycle rule in AWS that automatically moves data with the archive tag from regular S3 storage to Glacier Deep Archive:
-
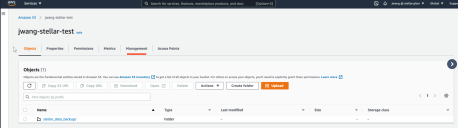
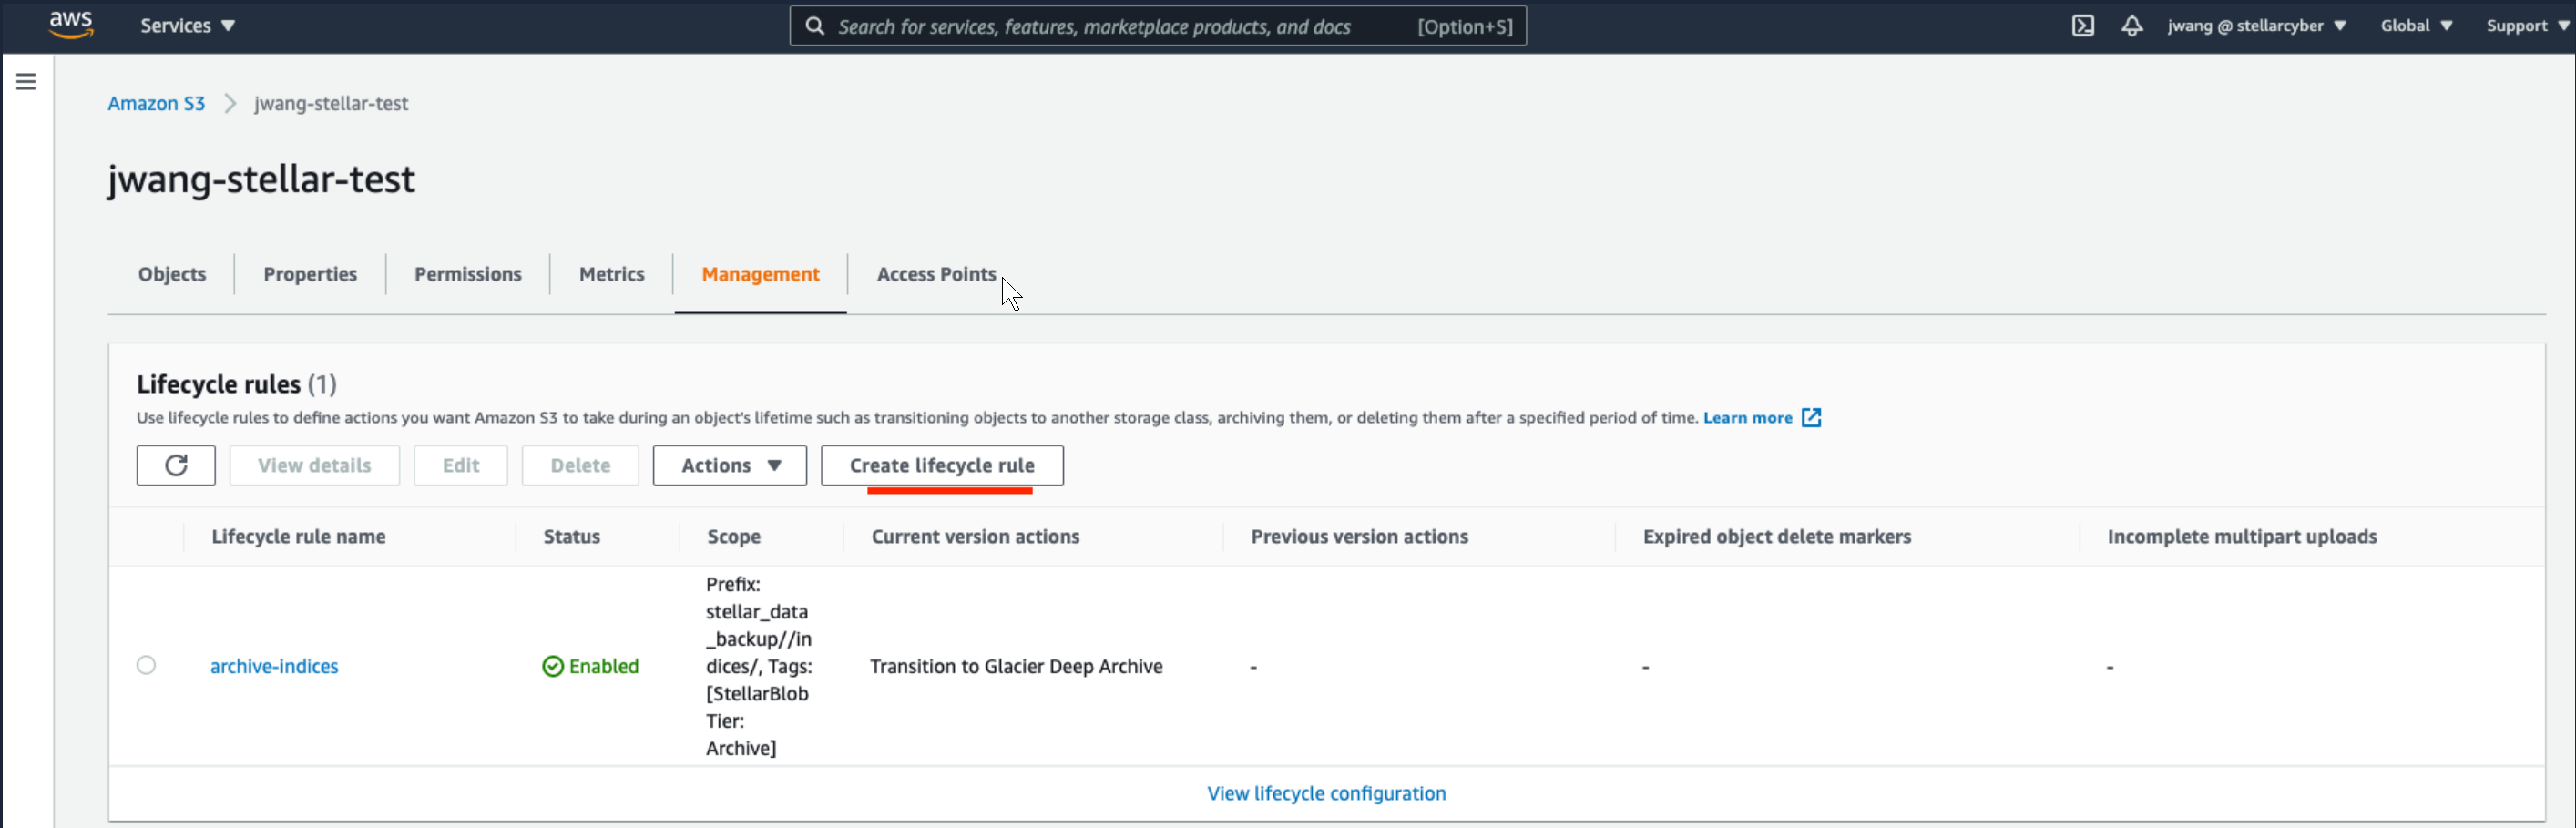
Log in to the AWS Console, navigate to Storage | S3, and select the entry for the bucket you created in the previous step.
-
Click on the Management tab underlined in the previous image.
-
Click the Create lifecycle rule button, as illustrated below.

-
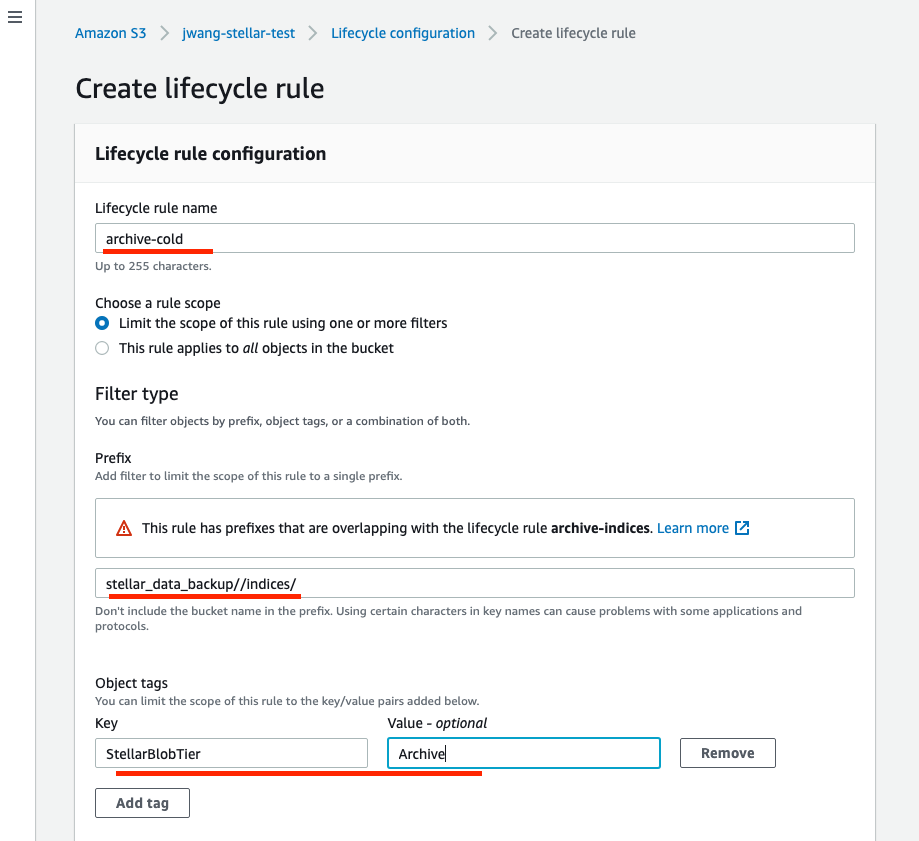
The Lifecycle rule works by moving data with the Archive tag to Glacier Deep Archive storage. Set the following options in the Lifecycle rule configuration section:
-
Lifecycle rule name: archive-cold in this example
-
Choose a rule scope: Limit the scope of this rule using one or more filters
-
Prefix: stellar_data_backup//indices/ (notice the two backslashes between backup and indices).
-
-
Click Add Tag and supply the following Key/Value pair:
-
Key: StellarBlobTier
-
Value: Archive
The illustration below shows our settings so far:

-
-
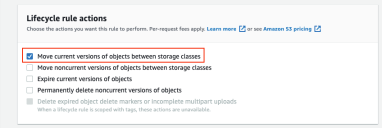
In the Lifecycle rule actions section, select the Move current versions of objects between storage classes option.
-
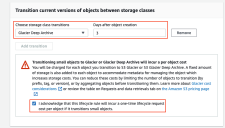
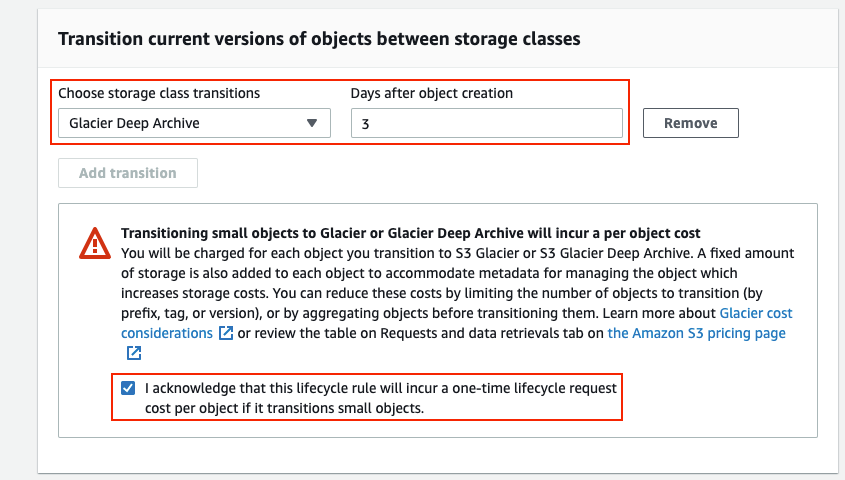
In the Transition current versions of objects between storage classes section, set the following options:
-
Set Storage class transitions to Glacier Deep Archive.
-
Set Days after object creation to a value that makes sense for your organization. This is the number of days data with the archive tag exists in S3 before it is transitioned to Glacier Deep Archive. In this example, we have set this option to 3 days.
Note the following when setting this option:
-
Stellar Cyber recommends setting this value greater than one day because ideally, the archive-cli.py script is running daily to tag data.
-
Only non-zero values are accepted.
-
Lifecycle rules run once a day at midnight UTC.
-
New lifecuycle rules can take up to 48 hours to complete their first run.
-
-
Check the box to acknowledge the costs associated with the rule.
The illustration below shows the settings for the previous two steps:
-
-
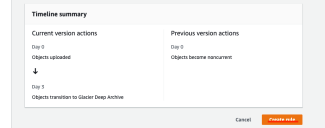
Review your lifecycle rule in the Timeline summary (illustrated below) and click Create rule when you are satisfied.
-


Add External Cold Storage and Disable Cold Storage Deletion
-
Add your S3 bucket as cold storage in Stellar Cyber.
-
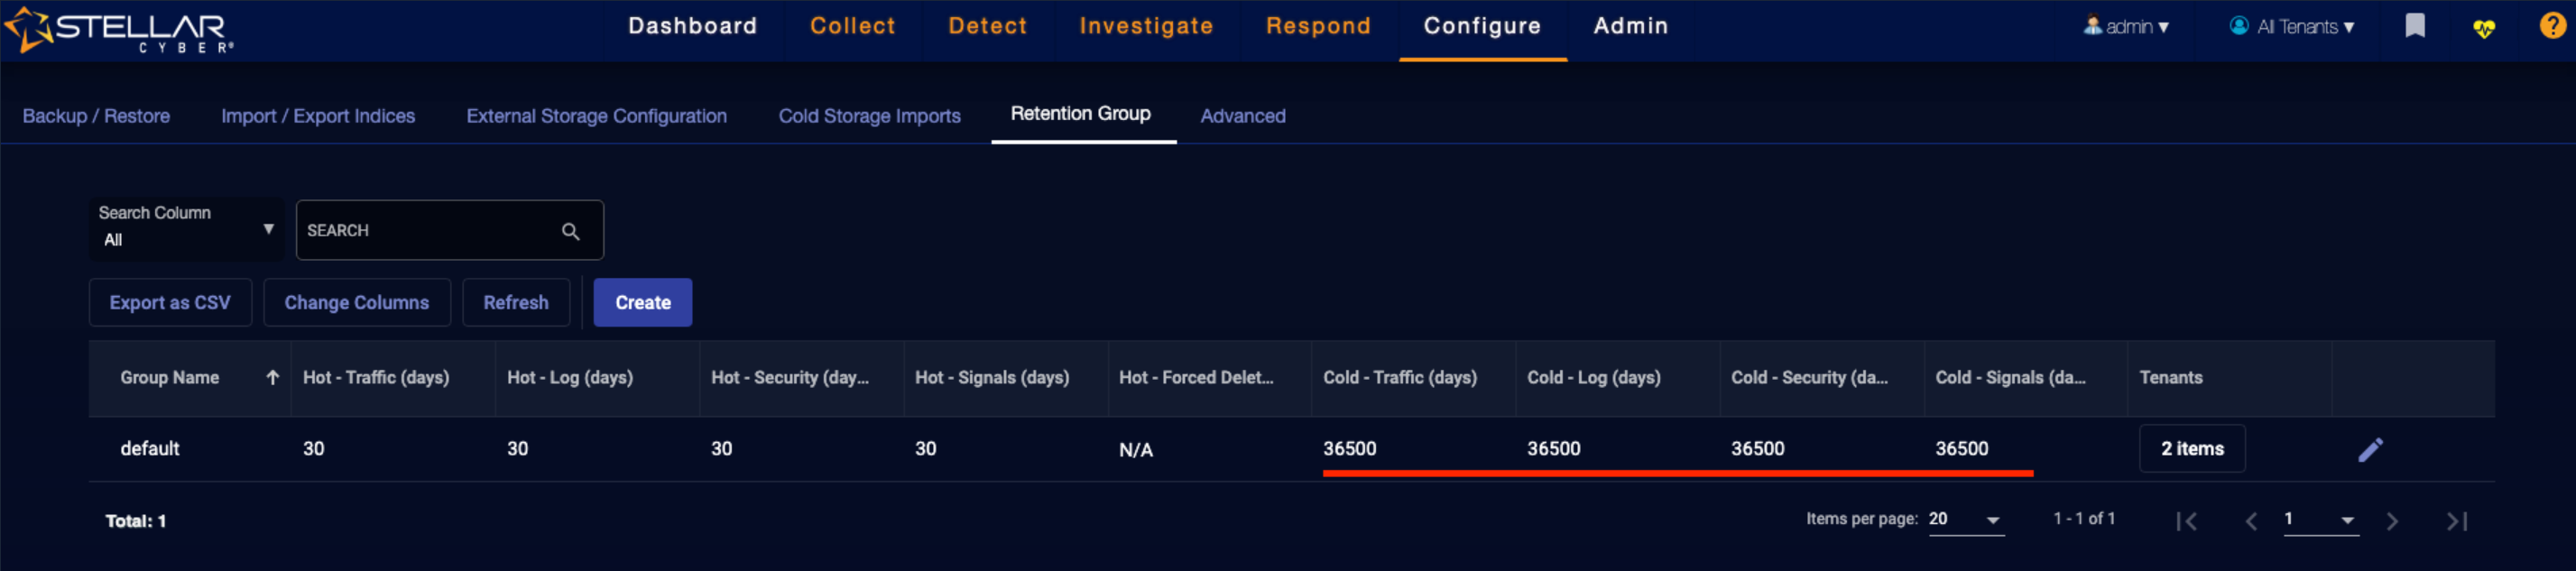
In Stellar Cyber, disable the deletion of data in cold storage by navigating to the System | Data Processor | Data Management | Retention Group page and setting the cold retention times artificially high (for example, 100 years, as in the example below). You must do this in order to ensure that data can be moved back and forth between archival storage and regular storage and still imported to Stellar Cyber.
Running archive-cli.py Daily to Tag Blobs for Archiving
Now that you have a lifecycle rule that transfers data matching the archive tag to Glacier Deep Archive after a specified number of days, you need to use the archive-cli.py script to apply the archive tag to data in the Stellar Cyber cold storage backup in S3.
-
First, verify you can see your bucket from the AWS CLI. Open a command prompt and type aws configure to log in to set some basic settings.
-
If you were not already logged in, you are prompted to supply your AWS Access Key ID and Secret Access key.
-
Set the default region name to the same region where you created your S3 bucket (for example, us-east-1).
-
Set the default output format to json.
-
Type a command similar to the following to verify you can see your S3 bucket:
$ aws s3 ls | grep <storagebucket>In response, AWS should list your S3 bucket by the specified storagebucket.
-
Type the following command to see the arguments for the archive-cli.py script:
$ python3 archive-cli.py -h -
Set up a cron job that runs the archive-cli.py script on a daily basis with the arguments below. Substitute the name of your S3 bucket for
<storagebucket>:> python archive-cli.py aws --bucket <storagebucket> tag --included-prefix 'stellar_data_backup//indices/' --src-tier hot --dst-tier archive
Verifying Tagged Data
Once you run the archive-cli.py script using the syntax above, you can verify that data has been tagged with StellarBlobTier=Archive by using the S3 Console to look at the contents of the /indices folder, as illustrated below:
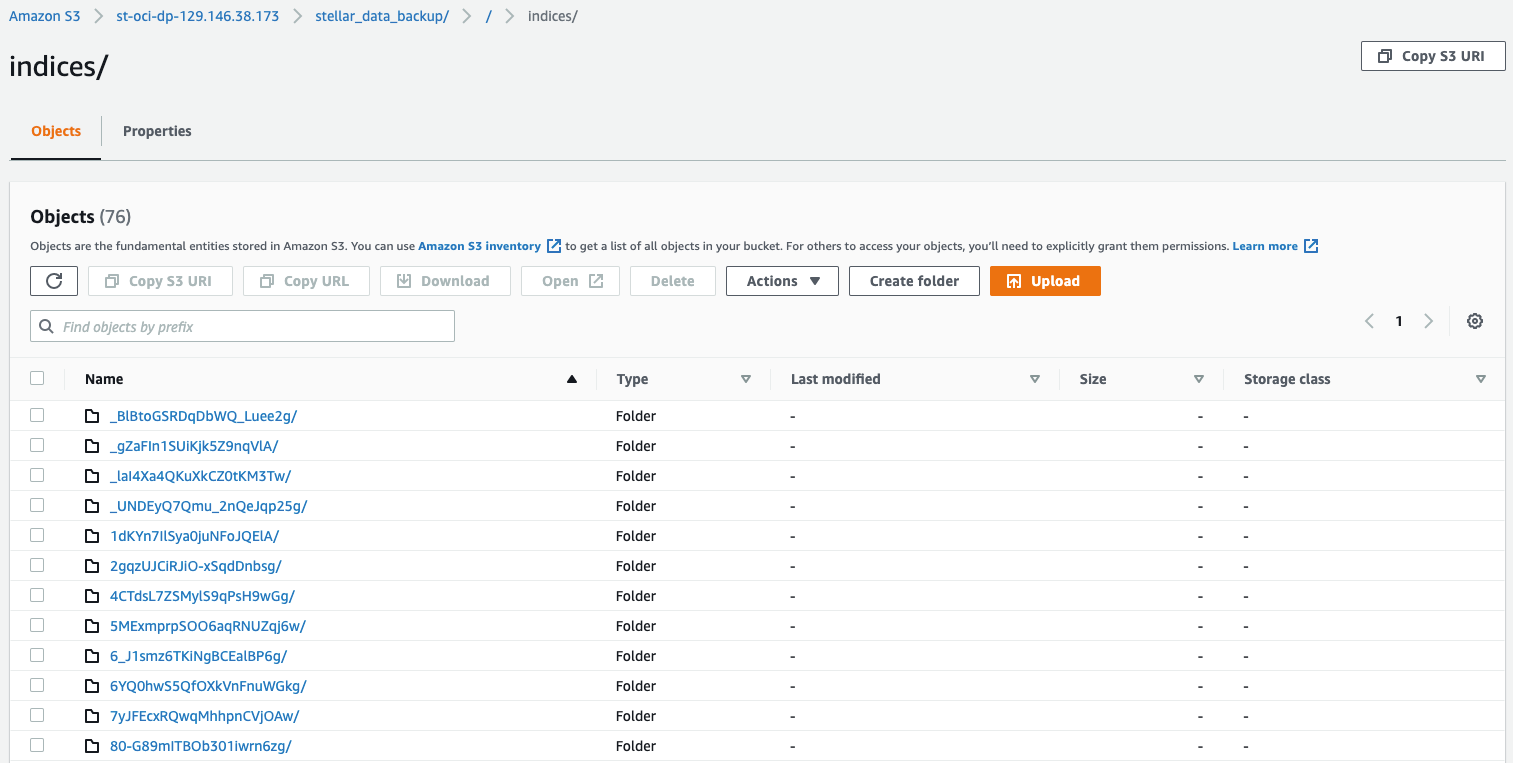
Verifying Data in Glacier Deep Archive
Once data has been tagged with StellarBlobTier=Archive by the archive-cli-py script, the lifecycle management rule you configured at the start of this procedure begins to move it to Glacier Deep Archive in accordance with the Days after object creation value you specified. So, in our example, we set a value of 3 days, which means that data begins to transition to Glacier Deep Archive in 3-5 days, as seen in the sample illustration below:
Restoring Data from Glacier Deep Archive to Regular Storage Temporarily
You can use the archive-cli.py script to restore a temporary copy of data stored in Glacier Deep Archive to regular S3 storage. The temporary copy of the data automatically expires from S3 in 10 days, leaving the permanent copy in Glacier Deep Archive. If ten days is not sufficient time to import the data from S3 to Stellar Cyber for analysis, you can also move data from Glacier Deep Archive to regular storage permanently.
Depending on your analysis needs and the volume of data to be moved, you can use either of the following techniques to restore data from Glacier Deep Archive:
-
Restore all data from Glacier Deep Archive to S3 storage. This procedure is simpler but may not be cost-efficient, depending on the volume of data to be restored.
-
Restore selected indices from Glacier Deep Archive to S3 storage. This procedure is cost-efficient, but requires some effort to identify the indices to be restored.
Both procedures are described below, as well as a description of how temporarily restored data appears in the AWS Console.
Restoring Selected Indices from Glacier Deep Archive
You restore selected indices from Glacier Deep Archive by starting a full restore with archive-cli.py and attempting to import data to Stellar Cyber before the restore to regular S3 storage has completed. The import will fail, but it will return enough data to identify the internal names of the indices you want to restore. You can then delete the failed imports from Stellar Cyber and use archive-cli.py to restore just those indices you need for analysis. Use the following procedure:
- If you have a regular cron job running to tag data using archive-cli.py, stop it now.
-
Start a restore of all indices from Glacier Deep Archive to standard S3 storage using the following command:
> python3 archive-cli.py aws --bucket '<storagebucket>' restore --included-prefix 'stellar_data_backup//indices/'
Substitute the name of your S3 bucket for
<storagebucket>. -
Before the restore completes, navigate to System | Data Processor| Data Management | Cold Storage Imports and start an import from your S3 cold storage.
-
The import fails because the data has not yet been fully restored from Glacier Deep Archive. However, the import should still show the index names it attempted to retrieve in the System | Data Processor | Data Management | Cold Storage Imports tab. You can use these external index names to retrieve the internal index IDs that the archive-cli.py script needs to restore specific data:
-
Navigate to the System | Data Processor | Data Management | Cold Storage Imports tab in Stellar Cyber.
-
Click the Change Columns button and add the Index column to the display if it is not already enabled.
-
Copy the index names to be restored from the archive tier. These are the external index names.
-
Run the archive-cli.py script with the following syntax to retrieve the internal index IDs associated with the external index IDs you copied in the previous step:
> python archive-cli.py aws --bucket <storagebucket> get-prefix "aella-syslog-1624488492158-,aella-syslog-1627512494132-"
Substitute the name of your S3 bucket for
<storagebucket>. In addition, substitute the external names of the indices for which you are querying for the twoaella-syslog-...entries. You can query for multiple indices separated by commas and surrounded by double-quotation marks. The following example illustrates the internal index IDs returned by the script based on the provided external index IDs:
-
-
Once you have the internal index IDs, you can restore them from Glacier Deep Archive to regular S3 storage:
-
Restore blobs matching the specified prefix from Glacier Deep Archive to a temporary copy with the following command:
> python archive-cli.py aws --bucket <storagebucket> restore --included-prefix 'stellar_data_backup//indices/<internal_index_id>/'
Substitute your S3 bucket and internal index ID for the values shown in bold in the command above.
You can also run the restore as a script to retrieve the contents of multiple indices. For example:
for i in <internal_index1> <internal_index2>; do
python archive-cli.py aws --bucket <storagebucket> restore --included-prefix "stellar_data_backup//indices/$i/"
done -
-
Return to the System | Data Processor | Data Management | Cold Storage Imports tab in Stellar Cyber and delete the failed imports (those listed with a red icon in the Status column).
-
Allow a day or two for the selected indices to be temporarily restored from Glacier Deep Archive to regular S3 storage and then import them to Stellar Cyber using the normal procedure.

Restoring All Data from Glacier Deep Archive
Use the following procedure to restore all data from Glacier Deep Archive to regular S3 storage temporarily so it can be imported from cold storage in Stellar Cyber:
- If you have a regular cron job running to tag data using archive-cli.py, stop it now.
-
Restore all indices from Glacier Deep Archive to standard S3 storage temporarily using the following command:
> python3 archive-cli.py aws --bucket '<storagebucket>' restore --included-prefix 'stellar_data_backup//indices/'
Substitute the name of your S3 bucket for
<storagebucket>.
Data Restoration Process and Appearance in AWS Console
Keep in mind the following notes on data restoration from Glacier Deep Archive using archive-cli.py:
-
Restoring data from Glacier Deep Archive takes several days, depending on the volume of data to be restored.
-
The script restores a temporary copy of your data from Glacier Deep Archive to regular S3 storage for 10 days.
-
During these 10 days, you can import the cold storage data to Stellar Cyber from S3 for analysis.
-
The original data is still in Glacier Deep Archive; only a temporary copy is available in S3 for import to Stellar Cyber.
-
After 10 days has passed, the temporary copy automatically expires.
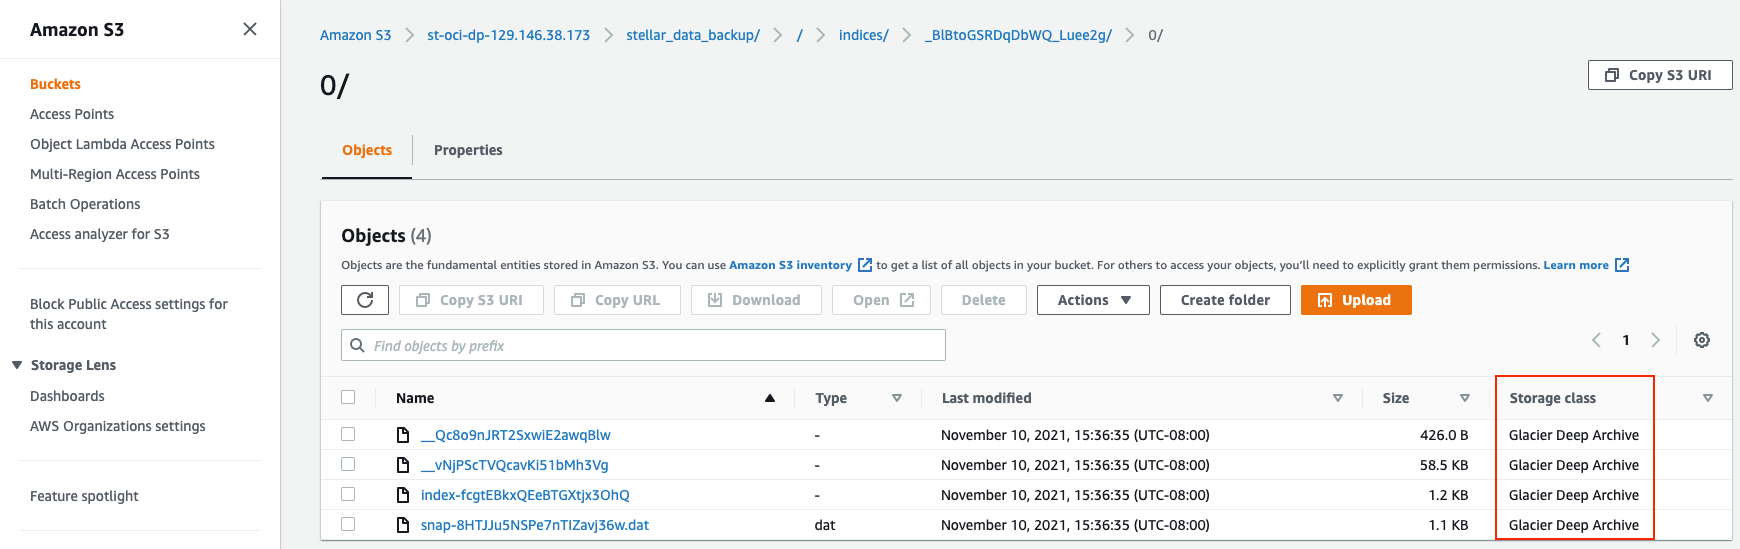
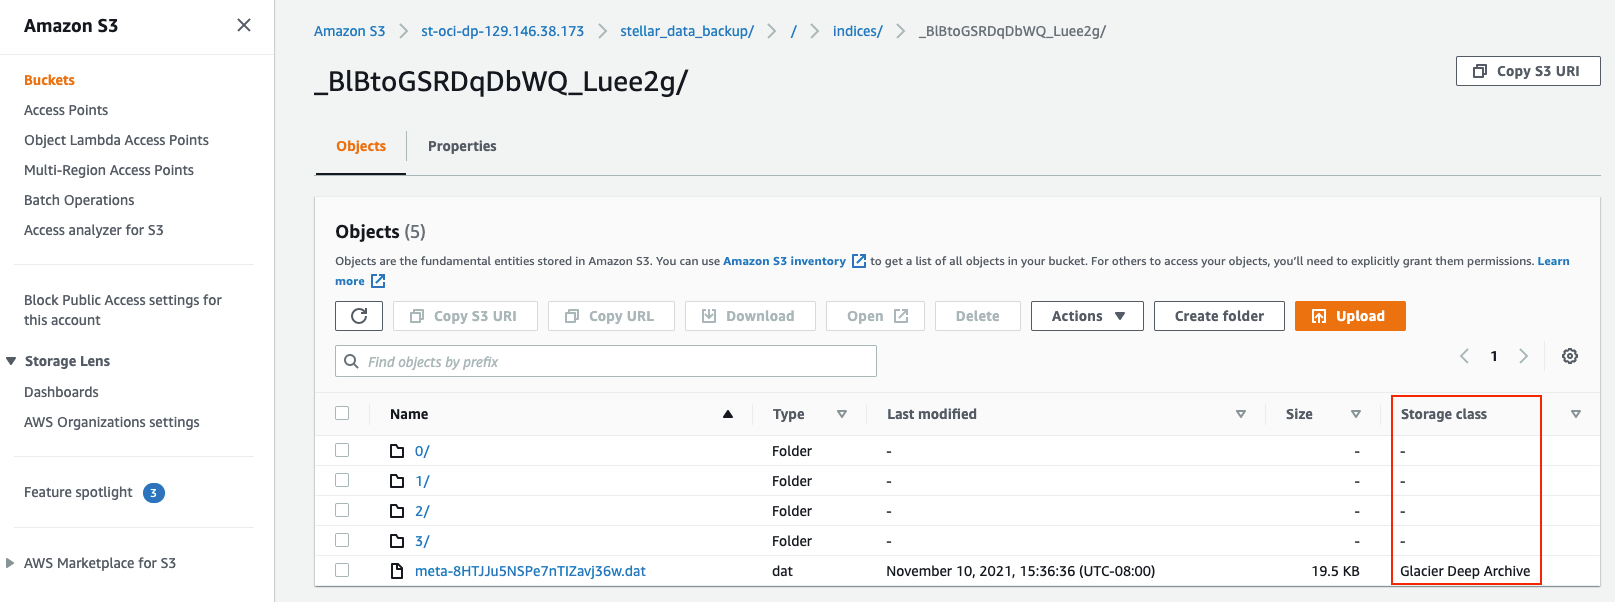
The following illustrations show how data temporarily restored from Glacier Deep Archive to S3 appears in the S3 Console. Here we see that the Storage class is still set to Glacier Deep Archive. This is because the script has only restored a temporary copy – the original data is still in Glacier Deep Archive.
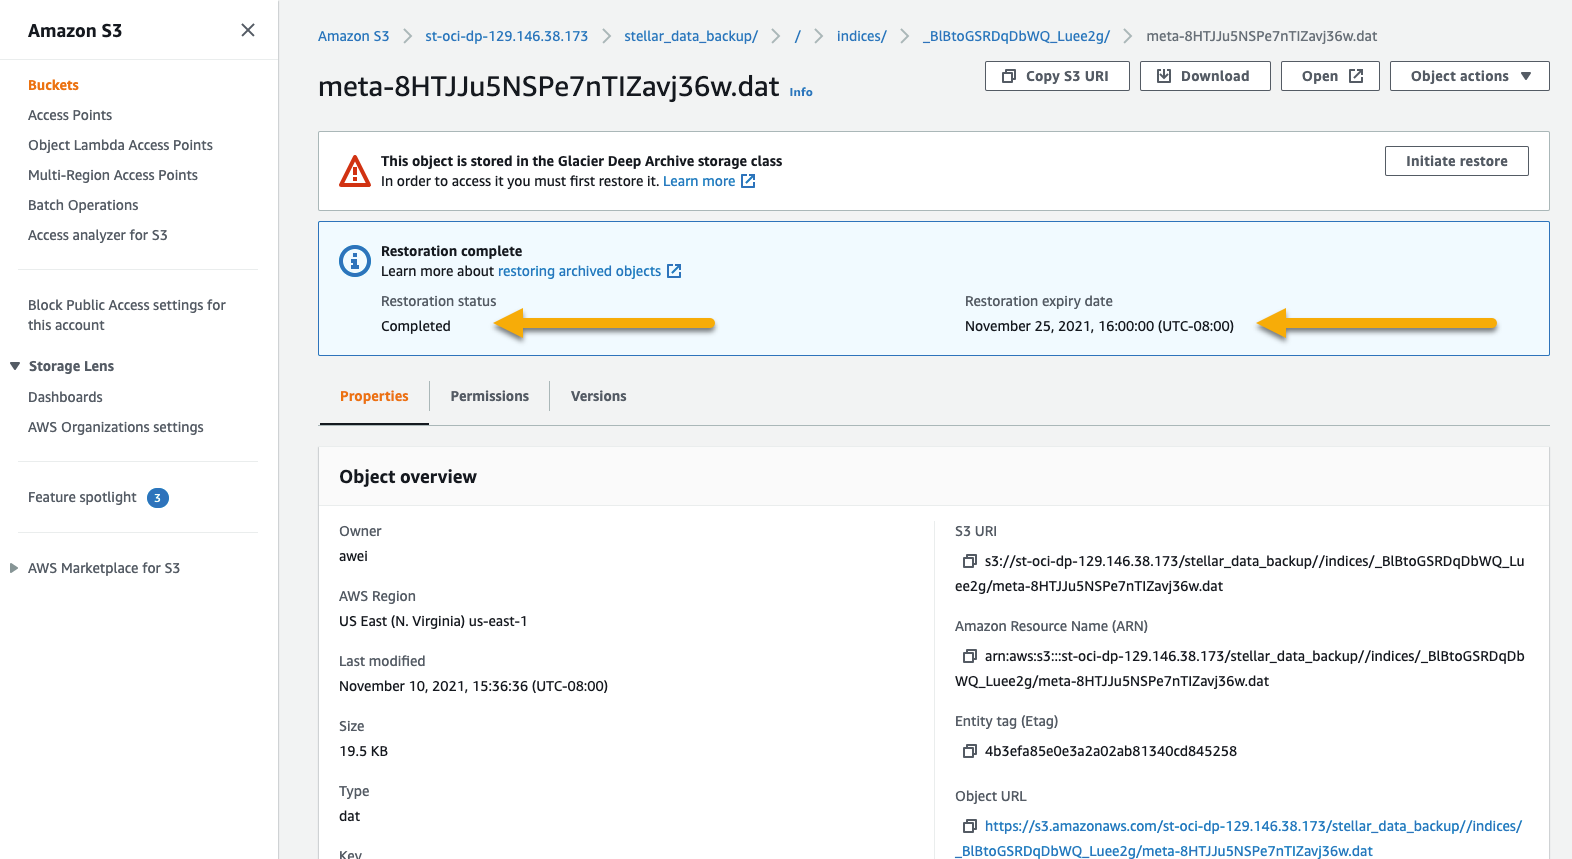
If we look at the file details, we can see that the Restoration status is Completed. You can also see the Restoration expiry date, which is when the temporarily restored data will be automatically deleted. The original data is still in Glacier Deep Archive, though; only the temporarily restored copies are deleted automatically.
Optional – Restore All Indices Permanently
If for some reason you need more than 10 days to import your temporarily restored data from standard S3 storage to Stellar Cyber or you simply want to move your data from Glacier Deep Archive to regular S3 storage permanently, you can run the archive-cli.py script with the following syntax:
> python3 archive-cli.py aws --bucket '<storagebucket>' sync --included-prefix 'stellar_data_backup//indices/'
Returning Data to Glacier Deep Archive After a Sync
If you restored data to S3 storage permanently using the archive-cli.py script with the sync argument, you can return it to Glacier Deep Archive permanently using the following procedure:
Note that you do not need to perform this procedure if you just restored data temporarily using archive-cli.py with the restore argument. The temporarily restored data automatically expires after 10 days, leaving the permanent copy still in Glacier Deep Archive.
Once you have finished your analysis of data restored from Glacier Deep Archive, you can use the steps below to delete the data from within Stellar Cyber and return it to Glacier Deep Archive in AWS. Choose the procedure that corresponds to your restore type (specific indices or a full restore):
Tagging Specific Indices as Archive
If you restored specific indices from Glacier Deep Archive to permanent storage in S3, you can use the following procedure to retag them as archive so that they are returned to Glacier Deep Archive by lifecycle management:
-
Run the archive-cli.py script to retrieve the internal index IDs of the data to be returned to Glacier Deep Archive, substituting your S3 bucket name and the external index names from the user interface:
> python archive-cli.py aws --bucket <storagebucket> get-prefix "<external_index_name>"
-
Run the archive-cli.py script to retag the indices with the archive tag:
Syntax for a single index:
> python archive-cli.py aws --bucket <storagebucket> tag --included-prefix 'stellar_data_backup//indices/<internal_index_id>' --src-tier hot --dst-tier archiveSyntax using a shell script for multiple indices:
for i in <internal_index1> <internal_index2>; do
python archive-cli.py aws --bucket <storagebucket> tag --included-prefix 'stellar_data_backup//indices/$i/' --src-tier hot --dst-tier archive
done
Tagging All Data in a Specific Bucket as Archive
If you restored all data from Glacier Deep Archive to permanent storage in S3, you can use archive-cli.py with the following syntax to retag it as archive so that it is returned to Glacier Deep Archive by lifecycle management::
python archive-cli.py aws --bucket <storagebucket> tag --included-prefix 'stellar_data_backup//indices/' --src-tier hot --dst-tier archive
Deleting Imports from Stellar Cyber
Once you have completed your analysis in Stellar Cyber, you can remove the imports:
-
Navigate to the System | Data Processor | Data Management | Cold Storage Imports tab in Stellar Cyber and delete the imports.
