Configuring Log Sources 
You use the System | Collection | Log Sources page to configure log sources, mapping logs from specified IP addresses on ports 514 or 6514 to their matching vendor-specific parsers on the sensor.
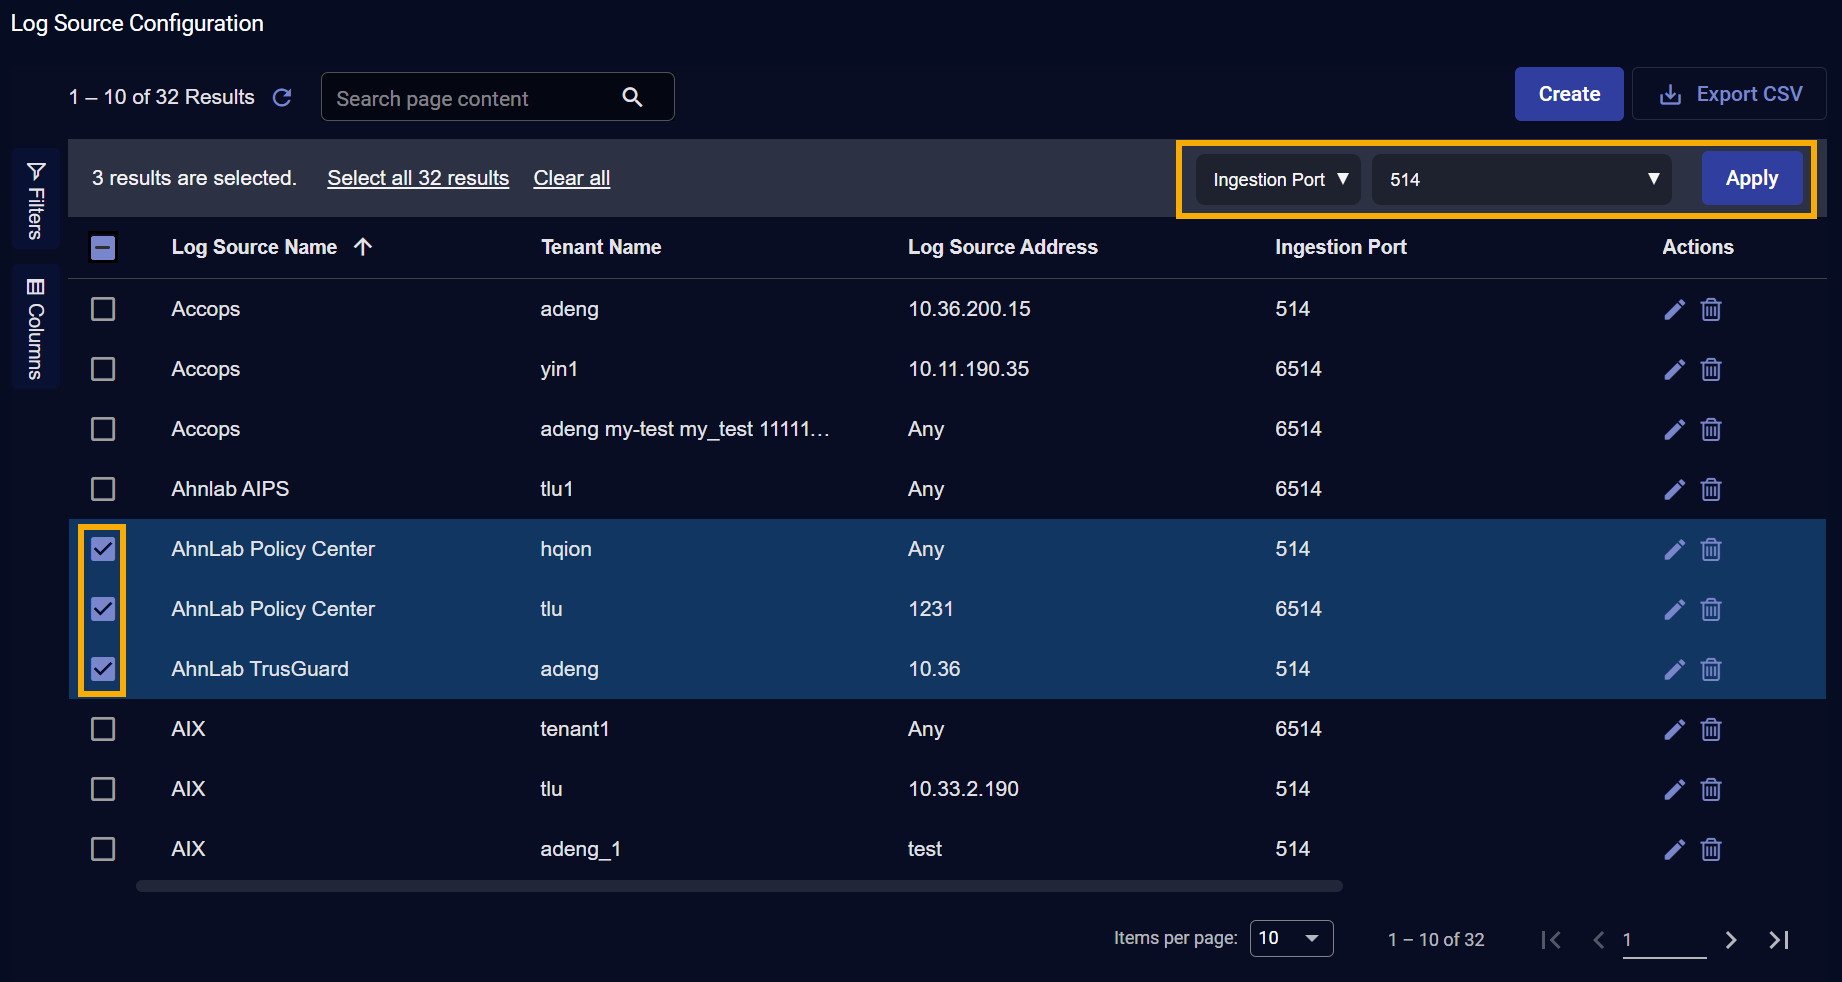
The Log Sources page lists each of the log sources you have already configured. You can check the box of a configured log source to see its Ingestion Port in the top row of the table.
Why Configure Log Sources?
It's a best practice in Stellar Cyber to send logs to their vendor-specific parsers, when available. In previous releases, this was accomplished by referring to the list of supported vendor-specific ports, pointing your log sources to that port on the sensor IP address, and opening the port in your firewall.
This approach is still available and can be used. As an alternative, however, you can use the Log Sources page to configure the sensor to relay traffic arriving on the generic syslog ports of 514 (non-TLS) or 6514 (TLS) to a specific log parser internally based on the source traffic's IP address. Using this feature has the advantage of minimizing the ports you need to open in your firewall while still ensuring that logs arrive at their native parser on the sensor.
Port Relay Prerequisites
Keep in mind the following prerequisites when configuring the port relay feature in the Log Sources page:
-
The sending log source must be on the same subnet as the receiving sensor.
-
There must be no proxy capable of changing the log source IP between the sending log source and the receiving sensor.
Observing these rules ensures that a sending log source's IP address matches with the entries in the Log Sources page.
Creating a Log Source Entry
The System | Collection | Log Sources page displays a table of the currently configured log sources. Each log source entry is displayed in the table with a summary of its configuration, including the Log Source Name (the type of traffic to be parsed), Tenant Name, Log Source Address (the source IP for the logs), Ingestion Port, and transport Protocol.

Click the Create button to add a new entry to the table. The procedure is as follows:
-
Find the IP address of your log source.
-
Navigate to the System | Collection | Log Sources page and click the Create button.
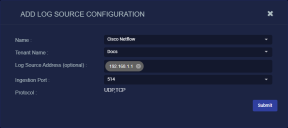
The Add Log Source Configuration dialog box appears.
-
Use the Name dropdown to select the type of log source traffic arriving from this IP address. Refer to the Log Parser Ports topic for a detailed list of the parsers available in Stellar Cyber, along with their native ports.
-
Use the Tenant Name dropdown to associate this entry with a log source for a particular tenant. Alternatively, you can assign it to the
-
Use the Log Source Address field to supply the IP addresses for this log source type. In our example, we know that logs sent from 192.168.1.1 should be parsed as Cisco Interflow.
Keep in mind the following when configuring the IP addresses for a log source:
-
You can supply more than one IP address for a given log source type.
-
You can also use the special, catch-all Any address to map any log traffic sent to a tenant's sensors from an IP address without an explicit entry in the Log Sources table to a specific parser.
You typically use this feature as a catch-all for any traffic sent to sensors on port 514 or 6514 from an IP address without an explicit entry in the table. For example, Tenant X may have multiple entries for logs sent from specific IP addresses. You could create a final Any entry for Tenant X that points any other logs arriving at the tenant's sensors from IP addresses without explicit entries in the table to, for example, the generic CEF parser.
Keep in mind that the user interface does not prevent you from having a tenant with only a single Any entry in this table. A scenario like this would send all log traffic for the tenant on 514 or 6514 to just a single parser.
-
-
Use the Ingestion Port dropdown to specify whether this entry is for logs arriving on the standard syslog port of 514 or the secure syslog port of 6514.
-
The Protocol field automatically updates based on the selected port:
-
If you selected port 514, the sensor listens for both UDP and TCP traffic from the specified source.
-
If you selected port 6514, the sensor accepts TLS and UDP protocols.
-

Notes on Configuring Log Sources
Keep in mind the following tips when configuring log sources:
-
The Log Sources page does not let you create more than one entry for a given IP address for the same tenant.
-
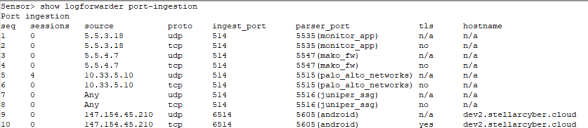
The show logforwarder port-ingestion command is also a useful tool for troubleshooting port relay entries. You can see packet and byte counts for relayed traffic and determine whether traffic is reaching the sensor. You can use this command in a CLI session connected directly to the sensor or in the remote CLI available from the Sensor List. For example:
-
The Log Source page supports standard Stellar Cyber table functionality, including edit and delete capabilities.
-
You can also perform bulk edits of the ingestion port for different log sources by checking their boxes in the list and then using the Ingestion Port dropdowns and Apply button at the top of the list.


Port Relay in Previous Releases
The Port Relay feature was introduced in the
-
If you are using
-
If you are using
Refer to Migrating 4.3.5 Port Relay Settings to 4.3.6 for details on how to move your port relay settings from the CLI into the Log Sources page in the user interface as part of your upgrade.
-
The show logforwarder port-ingestion CLI command is still available in
