Managing Server Settings
You must have Root scope to use this feature.
Use the System | Administration | Settings page to manage global settings for Stellar Cyber. You can make changes in each section independently; each section has its own Submit button. You can also make changes per tenant. Tenant configurations take precedence over the global configuration.
Use this page to understand how to:
- Configure the web server
- Change authentication settings
- Change the certificates used by the Data Processor
- Change global settings
- Change tech support settings
- Configure system notifications
- Configure Windows agents
- Configure advanced settings
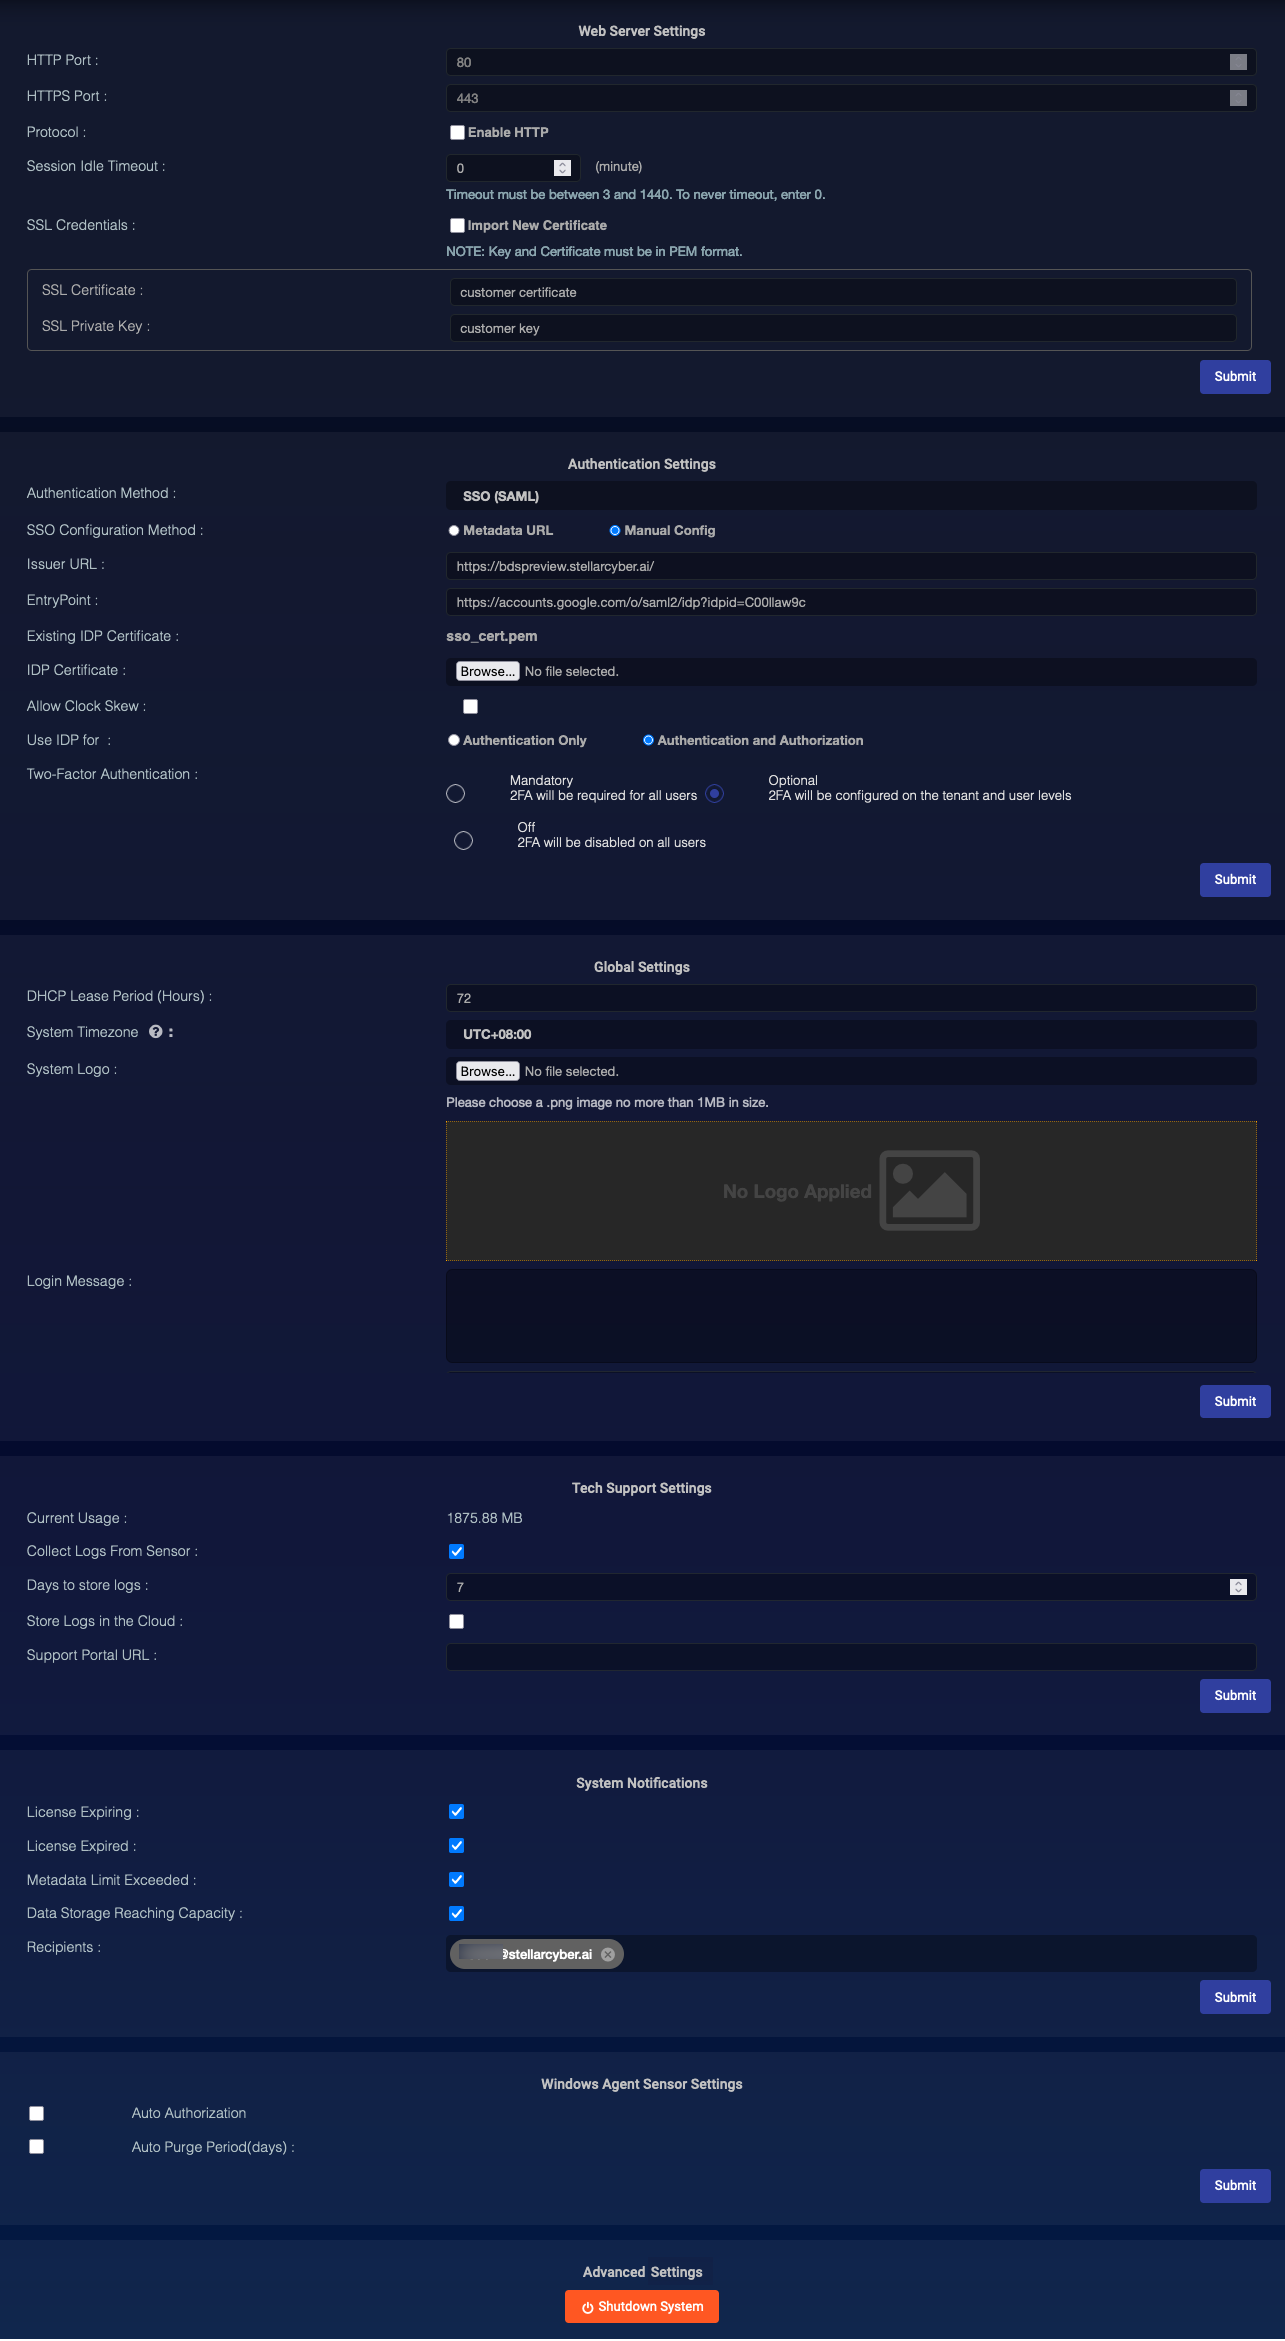
Web Server Settings
This section controls the web server, providing the following controls:
-
HTTP Port—You can use a non-standard HTTP port to access the Stellar Cyber server by substituting it for the default of 80 here. However, Stellar Cyber redirects this to the HTTPS port automatically.
-
HTTPS Port—You can use a non-standard HTTPS port to access the Stellar Cyber server by substituting it for the default of 443 here.
-
Session Idle Timeout—Set the number of minutes until the Stellar Cyber session times out. You can specify a timeout value between 3 - 1440 minutes. If you specify a timeout outside of these limits, the timeout reverts to its default value of 60 minutes.
Click Submit to save these settings and immediately make them active. You will be logged out and the UI will restart.
Data Processor Settings 
This section lets you apply the certificates uploaded in the System | Administration | Certificates page to the Data Processor. There are separate fields that let you apply different certificates to Stellar Cyber components as follows:
-
Server Certificates – Server certificates are used to validate communications between clients and Stellar Cyber. Refer to Generating Server Certificates for information on how to create a server certificate in both Linux and Windows.
You can apply different Server Certificates to the following Stellar Cyber components in the Data Processor Settings panel:
-
UI Server Certificate – Secures communications between clients and the user interface.
-
Receiver Certificate – Secures communications between clients and receivers on the DP. Data sent from sensors and log sources are sent to receivers on the DP.
-
Sensor Upgrade Server Certificate – Secures device upgrades in deployments that do not use SSL inspection on the DP firewall.
-
CM Certificate – Secures communications between clients and the CM service on the DP.
-
-
CA Certificate – CA certificates are used to enable upgrades of Stellar Cyber DPs and sensors behind firewalls that use SSL inspection. Make sure you choose the CA certificate used by the SSL inspection service on the firewall protecting the DP.
Note that it is possible that the DP may be behind a different firewall than sensors. Make sure you assign the CA certificate from the correct firewall to the DP.
Sensors behind firewalls using an SSL inspection service also require a CA certificate. You assign certificates to sensors using the Apply CA Certificate button in the System | Collection | Sensors page.
If you cannot access the Stellar Cyber user interface after applying a server certificate to the DP, it's likely that the certificate was not in PEM format. You can address this from the CLI of the Data Lake Master host:
-
Open an SSH connection to the Data Lake Master host.
-
Run the following command:
unset server_cert
The DP user interface should become available again after a few minutes. Refresh your browser, if necessary.
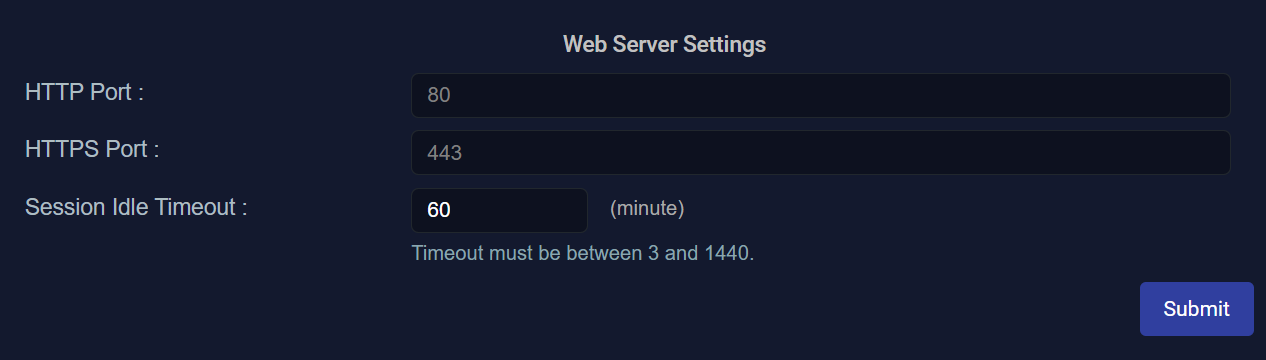
Authentication Settings
This section allows you to configure Local or SSO authentication. With local authentication, you log in directly to Stellar Cyber and user credentials are managed locally by Stellar Cyber. SSO authentication logs you in to Stellar Cyber automatically, using the IdP provider you configured. The first time you log in, your SSO login appears. After you log in to your SSO service, the SSO automatically logs you in to Stellar Cyber the next time you access the page (assuming you are logged in to the SSO service). To log out of Stellar Cyber, log out of your SSO.
For detailed procedures to configure Local and SSO authentication, including overrides for tenants, refer to the following topics:
A Global selection of Authentication and Authorization applies to all users, so the option to change authentication method for a specific tenant is not applicable when the Global method is set to Authentication and Authorization. You can not log in to Tenant SSO when Global SSO is set to Authentication and Authorization. If you want to use SSO but also allow local users and tenant override, you must set the Global authentication method either to Local or to use the IdP with Authentication Only.
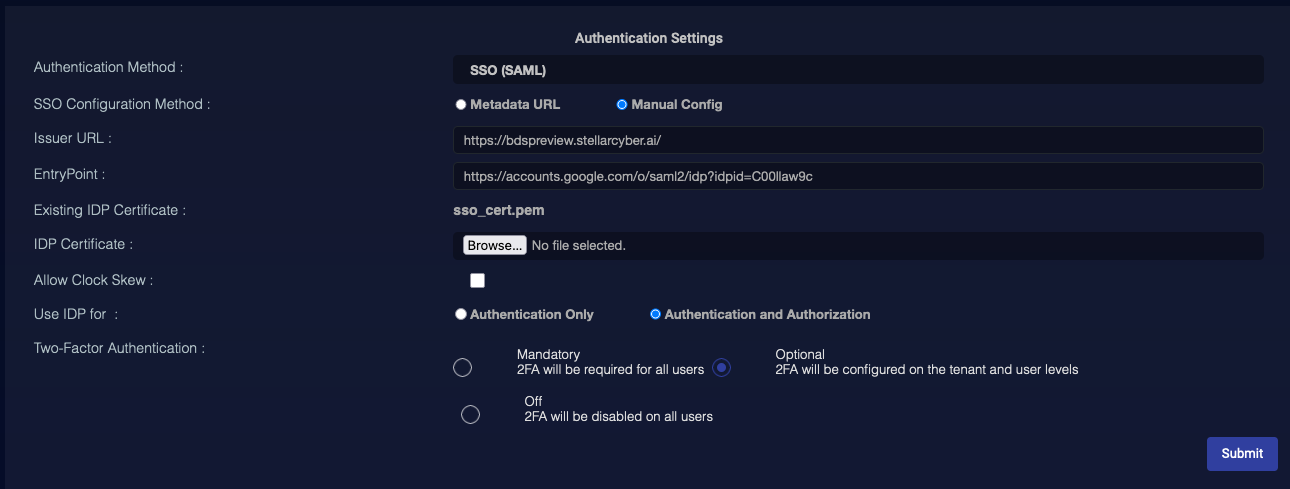
Global Settings
This section provides the following controls:
-
Publicly Accessible Authority
 – Specify the publicly accessible IP address or hostname of the DP here (the same IP address users enter in their browser to access the Stellar Cyber user interface).
 You must enter the DP's IP address here in order for links in notification emails sent from the System Action Center to work correctly. You can enter it as an IP address, hostname, or a URL (for example, www.mydp.com, 10.36.200.43, or https://10.36.200.43).
-
System Timezone—Set your timezone relative to UTC. Setting this allows Stellar Cyber to make more accurate detections.
-
-
When you click Submit, the logo is immediately visible in the UI
-
Click Delete to replace the uploaded logo with the default Stellar Cyber logo
-
The System Logo replaces a Tenant Logo uploaded when adding or editing a Tenant Group
-
To completely rebrand Stellar Cyber (removing "Powered by Stellar Cyber", adding your custom login screen, and customizing the
 menu, contact technical support.
-
-
Login Message—Supply an optional text message to display to users in a popup window upon login to Stellar Cyber. If you leave this field empty, Stellar Cyber does not display a login message. Note that this is a global message that displays to all tenants on each login.
-
DHCP Lease Period—Specify the period of your DHCP lease. Stellar Cyber uses this period to release IP addresses from the asset IDs, preventing the accumulation of multiple asset IDs for a single asset (due to changing IP addresses). If you leave this blank, Stellar Cyber might merge data for two different assets (because they have the same IP address), or split data for a single asset (because Stellar Cyber thinks the IP address was released and assigned to another asset). You can also set a custom DHCP lease period for each tenant under System | Administration | Tenants.
To keep Stellar Cyber from releasing the IP address of an asset, set it to static on the Asset Analytics | IP Identified Assets page.
Click Submit to save these settings and immediately make them active.
Tech Support Settings
You can have your sensors collect logs to help troubleshoot sensor performance. The logs contain detailed information that is not exposed on the user interface.
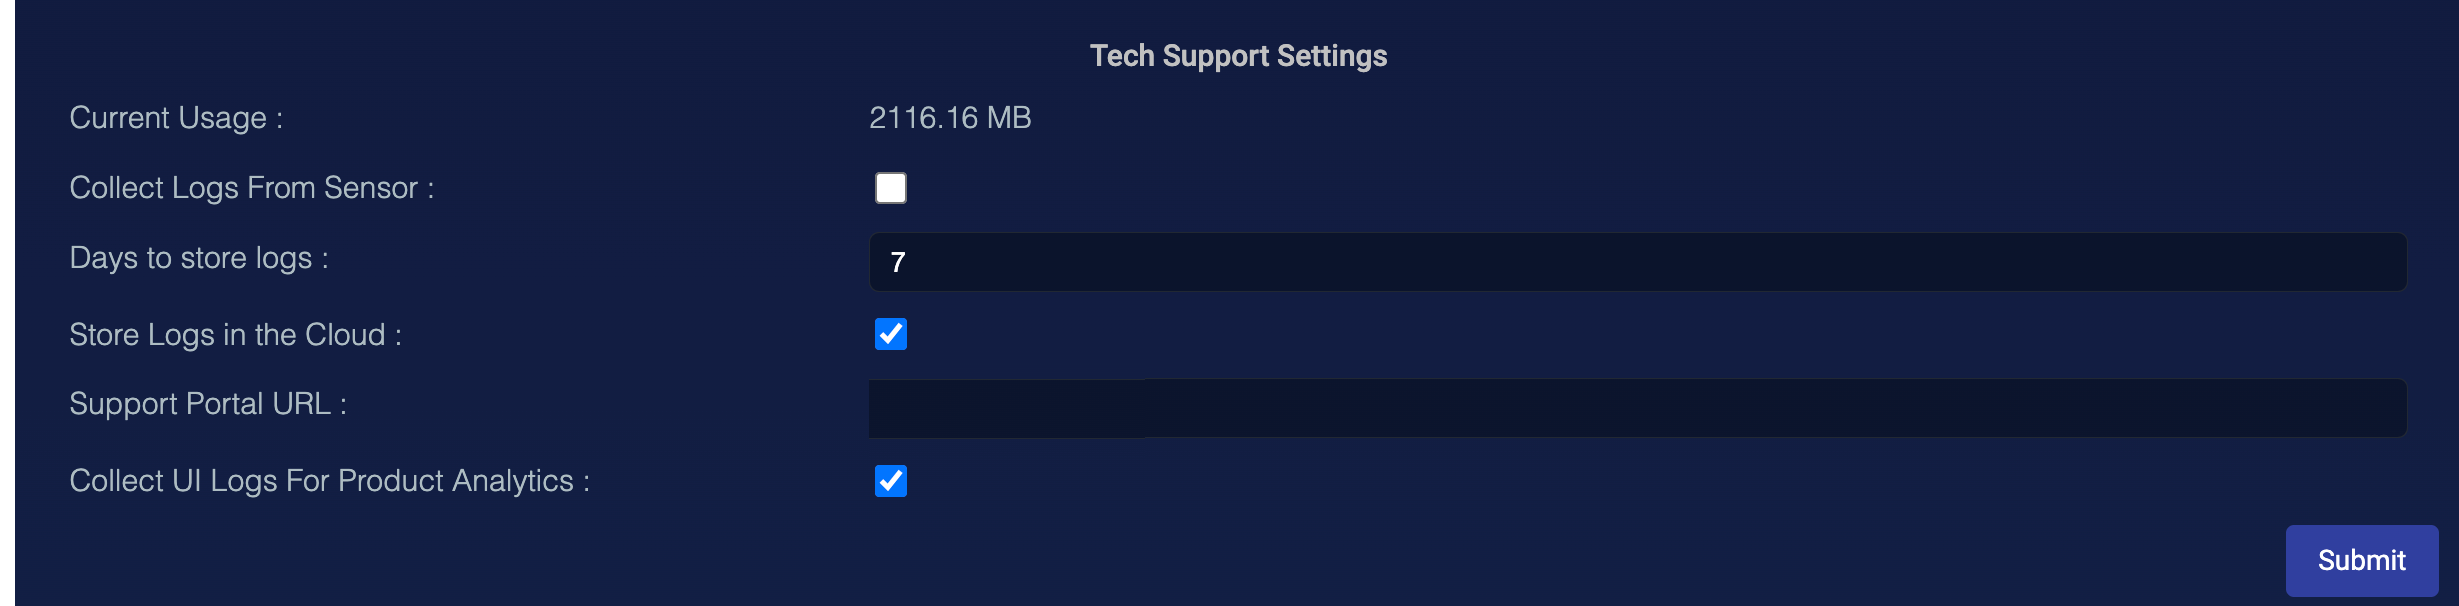
At the top you can see the current size of the tech support logs. You can configure:
-
Collect Logs From Sensor—Enabled by default. Uncheck this to stop collecting logs from your sensors.
-
Days to Store Logs—Number of days to store the logs.
-
Store Logs in the Cloud—Send the logs to our cloud service instead of to your DP. We can then access the logs from the cloud instead of accessing your DP.
-
Support Portal URL—Point the Support Portal entry in the
menu to a custom location instead of Stellar Cyber's support portal. -
Collect Usability Data for Product Analytics: This setting allows Stellar Cyber to perform usage analytics, such as access to documentation pages. The setting is on by default, but can be disabled for your environment, if needed.
Click Submit to save these settings and immediately make them active.
System Notifications
You can configure Stellar Cyber to send you notifications for these system events:
-
License Expiring—Notified every day starting 10 days before the license expires.
-
License Expired—Notified every day after the license expires. You have a grace period of 30 days in which to renew. After 30 days, data ingestion will cease, and you will not be able to access Stellar Cyber.
-
Metadata Limit Exceeded—Notified every day that your data ingestion exceeds your licensed limit.
-
Data Storage Reaching Capacity—Notified every 30 days when your disk storage approaches 80% of capacity. When disk storage reaches 80% of capacity, Stellar Cyber automatically deletes older raw data to keep space available for new data and security events.
-
Recipients—Choose notification recipients from the drop-down. You can configure additional recipients on the System | Configuration | Recipients page.
Windows Agent Sensor Settings
This section provides the following controls:
- Auto Authorization—Enable this to automatically authorize Windows Agent sensors. This is very useful when you are using a virtualized desktop infrastructure, but works with any Windows Agent sensor.
- Auto Purge Period (days)—Enable this to automatically purge Windows Agent sensors. This is very useful when you are using a virtualized desktop infrastructure, as the sensors are temporary.
Click Submit to save these settings and immediately make them active.
Advanced Settings
This section provides a single control:
- SHUTDOWN SYSTEM—Click this to shut down the Stellar Cyber data processor. This is useful to gracefully shut the system down to prepare for maintenance or reconfiguration.
When you shut Stellar Cyber down, any active Photon sensors in the network buffer data so that data collection continues while the data processor is unavailable.
