Installing a Modular, Network, or Security Sensor in KVM
A network sensor monitors the virtual environment, the physical environment if connected to the span port of a physical switch, or the LAN segment via a mirror port on a switch. The sensor monitors network and server response times and can identify applications.
The network sensor converts that information to metadata and forwards it to the DP as Interflow. The DP can then provide security, DDoS, and breach attempt detections.
A security sensor operates as a network sensor and adds:
- sandbox
- anti-virus
- IDS
You can also tunnel traffic over VXLAN from an agent sensor, network sensor, or container sensor to the security sensor so it can inspect those environments.
A modular sensor lets you easily add the features you like to your sensor. This helps simplify your deployment and lets you manage the VM requirements for the sensors based on the modular features they use.
You can install a modular, network, or security sensor on a KVM virtual machine. The overall steps are as follows:
-
Install in your target environment.
Refer to the sections below for details.
Verify Prerequisites
You can install a KVM modular, network, or security sensor on:
- CentOS 7.3 (or later)
- Ubuntu Server 16.04
- Ubuntu Server 20.04
- Ubuntu Server 22.04
Click to see the minimum system requirements for installing a modular, network, or security sensor.
You will need:
- DPDK-capable Ethernet port(s) are recommended
- One IP address with access to a default gateway
- A Stellar Cyber license that can be applied to the sensor
- Open firewall ports for a network sensor
- Open firewall ports for a security sensor
- Open firewall ports for log ingestion
Verify VM Capabilities
Before installing any software, verify whether the system has the VM capabilities required. This can be done from the command line.
cat /proc/cpuinfo | egrep"vmx|svm"
-
vmx – for Intel-based systems
-
svm – for AMD-based systems
If no lines are listed then VM hardware support is not available. It must be enabled in the system BIOS.
If VM capability is not reported by this command, do not proceed until it is enabled.
Install Required Packages
The system requires the KVM, tools, and Linux bridge tools installed. Install these as follows:
-
Ubuntu Server 16.04
apt-get install -y net-tools qemu-utils qemu-kvm virt-manager libvirt-bin virtinst virt-viewer bridge-utils -
Ubuntu Server 20.04 or 22.04
sudo apt-get updatesudo apt-get install -y qemu-kvm libvirt-daemon-system libvirt-clients virtinst bridge-utils qemu-utils virt-viewer genisoimage net-tools cpu-checker -
CentOS
yum install net-tools qemu-kvm qemu-img virt-manager libvirt libvirt-python libvirt-client virt-install virt-viewer bridge-utils
systemctl start libvirtd

systemctl enable libvirtd
Verify libvirt Daemon is Active
Use one of the following commands to verify that the libvirt daemon is active:
-
systemctl is-active libvirtd -
systemctl status libvirtd
If libvirtd is not active, start it now with the following command:
sudo systemctl enable --now libvirtd
Installing in Ubuntu 20.04 or 22.04
This section describes how to install a modular, network, or security sensor in an Ubuntu 20.04/22.04 environment. The major difference between these instructions and those for Ubuntu 16.04 is that Ubuntu 20.04/22.04 uses the netplan utility for its network configuration.
Check the Host Resources and Interfaces
Before you start installing the sensor, you should check the configuration of the host Ubuntu server's network interfaces as well as its available system resources. Use the following commands to check the current system resources:
-
lscpu– Reports the total number of CPUs. -
free -h– Reports the total system memory. -
df -h– Reports the total system disk size.
You will need to take all these values under consideration when provisioning resources for the sensor VM later on.
Sample Host Configuration
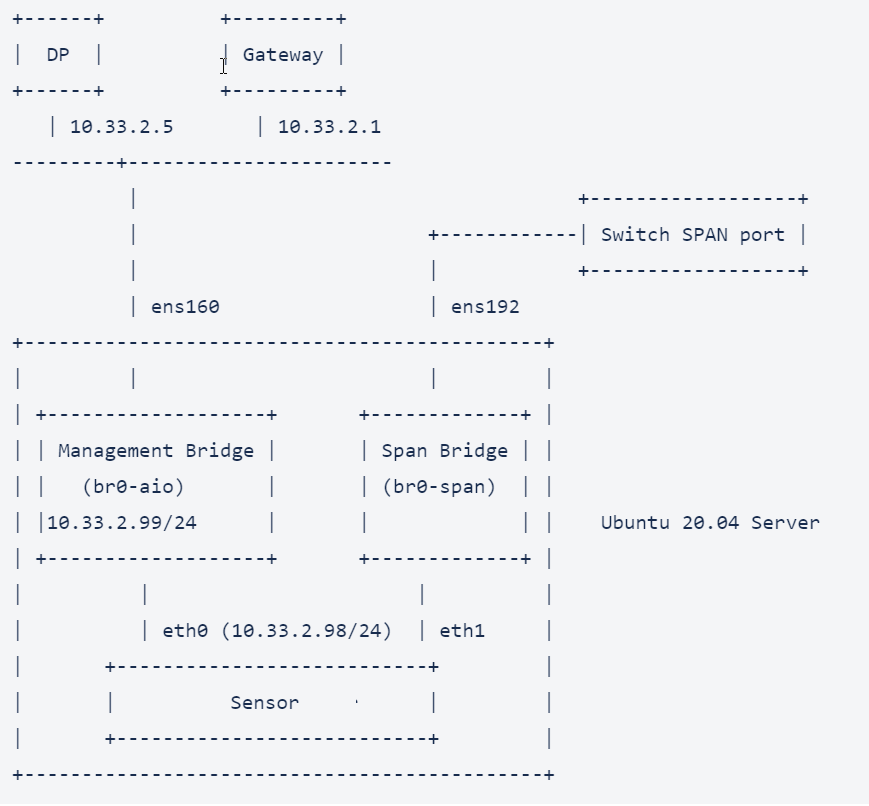
For our sample installation, the host Ubuntu server has two physical network interfaces (ens160 and ens192) and will be configured as follows:
-
ens160 – For management connection
-
ens192 – For monitoring traffic mirrored from a switch SPAN port
The figure below summarizes the sample host environment:
Create Bridges for Management and Traffic Monitoring
Use the following procedure to create bridges for management and traffic monitoring:
-
Check the current management interface configuration by viewing the contents of the YAML files stored in /etc/netplan. For example, here's how the 00-installer-config.yaml file for the ens160 management interface would look for both static IP and DHCP configurations:
-
Make a backup copy of the network configuration file. For example, for the 00-installer-config.yaml file:
cd /etc/netplan
sudo cp 00-installer-config.yaml 00-installer-config.yaml.orig -
Create bridges for the management interface and traffic mirroring interface by editing the 00-installer-config.yaml file. For our example:
-
The management interface (ens160) is configured to the br0-aio bridge.
-
The traffic mirroring interface (ens192) is configured to the br0-span bridge.
Separate examples are provided below for both static IP and DHCP configurations:
Static IP Address
 Click here to see how 00-installer-config.yaml looks for an Ubuntu server using a static IP address. In this case the management IP address is configured on the br0-aio bridge instead of ens160:
Copy
Click here to see how 00-installer-config.yaml looks for an Ubuntu server using a static IP address. In this case the management IP address is configured on the br0-aio bridge instead of ens160:
Copynetwork:
ethernets:
ens160:
dhcp4: false
dhcp6: false
ens192:
dhcp4: false
dhcp6: false
bridges:
br0-aio:
interfaces: [ ens160 ]
addresses:
- 10.33.2.99/24
gateway4: 10.33.2.1
nameservers:
addresses:
- 8.8.8.8
search: []
parameters:
stp: false
forward-delay: 0
br0-span:
interfaces: [ ens192 ]
parameters:
stp: false
forward-delay: 0
version: 2DHCP Address
Click here to see how 00-installer-config.yaml looks for an Ubuntu server using DHCP. In this case, DHCP is enabled on the br0-aio bridge instead of ens160:
Copynetwork:
ethernets:
ens160:
dhcp4: false
dhcp6: false
ens192:
dhcp4: false
dhcp6: false
bridges:
br0-aio:
interfaces: [ ens160 ]
dhcp4: true
dhcp6: false
parameters:
stp: false
forward-delay: 0
br0-span:
interfaces: [ ens192 ]
dhcp4: false
dhcp6: false
parameters:
stp: false
forward-delay: 0
version: 2 -
-
Apply your changes to the netplan configuration with the following command:
sudo netplan apply -
Use the brctl show command to make sure you can see both the br0-aio and br0-span bridges. For example:
root@ubuntu-20-04-kvm:$ brctl show<<< look here
bridge name bridge id STP enabled interfaces
br0-aio 8000.000c29226a14 no ens160
br0-span 8000.000c29226a1e no ens192
virbr0 8000.525400221195 yes virbr0-nic -
Use the ip addr command to verify that the management IP address is assigned to br0-aio.
Click here to see an example:
Copyaella@ubuntu-20-04-kvm:~$ ip addr
...
2: ens160: <BROADCAST,MULTICAST,UP,LOWER_UP> mtu 1500 qdisc mq master br0-mgt state UP group default qlen 1000
link/ether 00:0c:29:22:6a:14 brd ff:ff:ff:ff:ff:ff
...
5: br0-aio: <BROADCAST,MULTICAST,UP,LOWER_UP> mtu 1500 qdisc noqueue state UP group default qlen 1000
link/ether 00:0c:29:22:6a:14 brd ff:ff:ff:ff:ff:ff
inet 10.33.2.99/24 brd 10.33.2.255 scope global br0-mgt
valid_lft forever preferred_lft forever
inet6 fe80::402e:31ff:fe54:f037/64 scope link
valid_lft forever preferred_lft forever
6: ens192: <BROADCAST,MULTICAST,UP,LOWER_UP> mtu 1500 qdisc mq state UP group default qlen 1000
link/ether 00:0c:29:22:6a:1e brd ff:ff:ff:ff:ff:ff
inet6 fe80::20c:29ff:fe22:6a1e/64 scope link
valid_lft forever preferred_lft forever
...
9: br0-span: <BROADCAST,MULTICAST,UP,LOWER_UP> mtu 1500 qdisc noqueue state UP group default qlen 1000
link/ether 00:0c:29:22:6a:1e brd ff:ff:ff:ff:ff:ff
inet6 fe80::88a9:c7ff:feb1:9fc/64 scope link
valid_lft forever preferred_lft forever
Download the Sensor Installation Script
Use the commands below to download the installation script matching the type of sensor you are installing. Contact Stellar Cyber support (support@stellarcyber.ai) for login credentials.
To get the installation script for a Network or Security Sensor:
curl -k -u login:password  https://acps.stellarcyber.ai/release/4.3.7/datasensor/virt_deploy_device_ds.sh
 -o virt_deploy_device_ds.sh
To get the installation script for a Modular sensor:
curl -k -u login:password https://acps.stellarcyber.ai/release/4.3.7/datasensor/virt_deploy_modular_ds.sh -o virt_deploy_modular_ds.sh
To verify the downloaded script is a Bourne-Again shell script:
Use the file command to verify that the downloaded script is a Bourne-Again shell script. For example, for the Modular Sensor installation script:
aella@ubuntu-20-04-kvm:~$ file virt_deploy_modular_ds.sh
virt_deploy_modular_ds.sh: Bourne-Again shell script, ASCII text executable, with very long line
Download the Sensor Image
Use the commands below to download the image matching the type of sensor you are installing. Contact Stellar Cyber support (support@stellarcyber.ai) for login credentials.
To download the image for a Network or Security Sensor:
curl -k -u login:password https://acps.stellarcyber.ai/release/4.3.7/datasensor/aella-device-ds-4.3.7.qcow2 -o aella-device-ds-4.3.7.qcow2
To download the image for a Modular sensor:
curl -k -u login:password https://acps.stellarcyber.ai/release/4.3.7/datasensor/aella-modular-ds-4.3.7.qcow2 -o aella-modular-ds-4.3.7.qcow2
To verify the downloaded image is a QEMU QCOW2 image:
Use the file command to verify that the downloaded image is a QEMU QCOW2 image. For example, for the Modular Sensor image:
aella@ubuntu-20-04-kvm:~$ file aella-modular-ds-4.3.7.qcow2
aella-modular-ds-4.3.7.qcow2: QEMU QCOW2 Image (v2), 68718428160 bytes
Create Installation Directory for Virtual Machine
Use the following commands to create an installation directory for your virtual machine and move the image you downloaded in the previous section to it:
| Default Directory |
sudo mkdir -p /var/lib/libvirt/images/mds/images sudo mv aella-modular-ds-4.3.7.qcow2* /var/lib/libvirt/images/mds/images |
| Non-Default Directory |
sudo mkdir -p /stellar/mds/images sudo mv aella-modular-ds-4.3.7.qcow2* /stellar/mds/images/ |
Install the Sensor
This section describes how to install the sensor using the image and installation script you previously downloaded. Note the following regarding the example in this section:
-
The -span option in the installation script is not compatible with the netplan implementation in Ubuntu 20.04 and should not be used.
-
The example in this section assumes that the image has already been downloaded (the nodownload parameter is set to true). You can also set nodownload to false and have the script pull the image as part of the installation.
-
You can include installation parameters directly in the installation script's command line OR you can declare them as variables and then pass them to the script in the command line. This has the advantage of reusability and is the example provided below
-
Switch to the root user with the
sudo sucommand. -
Set the following variables, making sure to change the installdir to match the directory where you stored the image in the previous section.Note that this example creates a VM with 16 vCPUs, 32GB of memory, and a 128GB disk size. You can use the guidelines in Virtual Appliance Sizing Specifications to determine the VM size you need for your anticipated needs.
The installation example at the end of this procedure provides the exact syntax to declare and pass these variables.
Variable
Comments
version=4.3.7 hostname=mds Set as desired.
release=4.3.7 installdir=/var/lib/libvirt/images/mds Set to match the directory where you copied the sensor image in the previous section.
cpus=16 memory=$(expr 32 \* 1024) 32GB
disksize=128 # VM disk size (e.g. DO NOT put G suffix) nodownload=true When set to true, the installation script does not download the sensor image but uses the one in the specified
installdir.bridge=br0-aio Management bridge name.
ip=10.33.2.98 VM IP address.
netmask=255.255.255.0 VM netmask.
gw=10.33.2.1 VM default gateway.
dns=8.8.8.8 VM DNS server address.
-
Use the following command to verify that the installation parameters are set correctly based on the table in the previous step:
printf "\n bash virt_deploy_modular_ds.sh -- --hostname=$hostname --release=$release --CPUS=$cpus --MEM=$memory --DISKSIZE=$disksize --installdir=$installdir --nodownload=$nodownload --bridge=$bridge --ip=$ip --netmask=$netmask --gw=$gw --dns=$dns \n"
For a network or security sensor, use the same syntax but with the virt_deploy_device_ds.sh script.
-
Use the following command to start the deployment:
bash virt_deploy_modular_ds.sh -- --hostname=$hostname --release=$release --CPUS=$cpus --MEM=$memory --DISKSIZE=$disksize --installdir=$installdir --nodownload=$nodownload --bridge=$bridge --ip=$ip --netmask=$netmask --gw=$gw --dns=$dns
For a network or security sensor, use the same syntax but with the virt_deploy_device_ds.sh script.
If you already installed the libvirt-daemon-system daemon, you can ignore any errors similar to, "E: Package 'libvirt-bin' has no installation candidate".
Sample Syntax
aella@ubuntu-20-04-kvm:~# version=4.3.7
aella@ubuntu-20-04-kvm:~# hostname=mds
aella@ubuntu-20-04-kvm:~# release=$version
aella@ubuntu-20-04-kvm:~# installdir=/stellar/mds
aella@ubuntu-20-04-kvm:~# cpus=16
aella@ubuntu-20-04-kvm:~# memory=$(expr 32 \* 1024) # 32GB
aella@ubuntu-20-04-kvm:~# disksize=128              # VM disk size (e.g. DO NOT put G suffix)
aella@ubuntu-20-04-kvm:~# nodownload=true           # skip to download the modular sensor image
aella@ubuntu-20-04-kvm:~#
aella@ubuntu-20-04-kvm:~# bridge=br0-aio            # management bridge name
aella@ubuntu-20-04-kvm:~#
aella@ubuntu-20-04-kvm:~# ip=10.33.2.98             # VM IP address
aella@ubuntu-20-04-kvm:~# netmask=255.255.255.0     # VM IP netmask
aella@ubuntu-20-04-kvm:~# gw=10.33.2.1              # VM IP gateway
aella@ubuntu-20-04-kvm:~# dns=8.8.8.8               # VM DNS server address
aella@ubuntu-20-04-kvm:~# printf "\n bash virt_deploy_modular_ds.sh -- --hostname=$hostname --release=$release --CPUS=$cpus --MEM=$memory --DISKSIZE=$disksize  --installdir=$installdir --nodownload=$nodownload --bridge=$bridge --ip=$ip --netmask=$netmask --gw=$gw --dns=$dns \n"

 bash virt_deploy_modular_ds.sh -- --hostname=mds --release=4.3.7 --CPUS=8 --MEM=32768 --DISKSIZE=128  --installdir=/stellar/mds --nodownload=true --bridge=br0-aio --ip=10.33.2.98 --netmask=255.255.255.0 --gw=10.33.2.1 --dns=8.8.8.8

aella@ubuntu-20-04-kvm:~# bash virt_deploy_modular_ds.sh -- --hostname=$hostname --release=$release --CPUS=$cpus --MEM=$memory --DISKSIZE=$disksize --installdir=$installdir --nodownload=$nodownload --bridge=$bridge --ip=$ip --netmask=$netmask --gw=$gw --dns=$dns
Changing memory to user customized memory  + 32768
Changing cpu to user customized cpu size  + 16
Wed, 17 Aug 2022 00:52:31 +0000 Destroying the mds domain (if it exists)...
/stellar/mds/images/aella-modular-ds-4.3.7.qcow2: OK
Checksum for /stellar/mds/images/aella-modular-ds-4.3.7.qcow2 success
Wed, 17 Aug 2022 00:52:34 +0000 Converting Qcow2 image to RAW format...
WARNING: Image format was not specified for 'mds.raw' and probing guessed raw.
         Automatically detecting the format is dangerous for raw images, write operations on block 0 will be restricted.
         Specify the 'raw' format explicitly to remove the restrictions.
Image resized.
image: mds.raw
file format: raw
virtual size: 128 GiB (137438953472 bytes)
disk size: 2.22 GiB
Wed, 17 Aug 2022 00:52:38 +0000 Installing the domain and adjusting the configuration...

Starting install...
Domain creation completed.
checking host 10.33.2.98
Fail to ping host 10.33.2.98
Waiting for ssh ready.
.ssh - ok
\n
Domain mds defined from domain-xml

Gen uninstall scripts...
Check Host health again after restarting...
checking host 10.33.2.98
ping host - ok
Waiting for ssh ready.
ssh - ok
\n
Wed, 17 Aug 2022 00:53:34 +0000 SSH to mds using 10.33.2.98 with  username 'aella'.
Attach a virtual interface to Modular Sensor VM and connect it to the traffic monitoring bridge (br0-span)
-
Next, you need to attach a virtual interface to the Modular Sensor VM and connect it to the traffic monitoring bridge (br0-span in our example). Use the following command:
virsh attach-interface --domain $hostname --type bridge --source $spanbr --model virtio --config --live --persistent
Set the $hostname to the name you specified for your sensor VM during deployment (mds in this example).
-
Use the following command to verify that you can see the attached interface in the Modular Sensor VM. Substitute the name of your host if you did not use mds:
root@ubuntu-20-04-kvm:# virsh domiflist mds
Interface Type Source Model MAC
-------------------------------------------------------------
vnet0 bridge br0-aio virtio 52:54:00:f3:3a:63
vnet1 bridge br0-span virtio 52:54:00:38:11:80 <<< LOOK HERE
Disable TSO on Traffic Mirroring Interface
Modify the qemu script to disable TCP Segmentation Offload (TSO) on the traffic mirroring interface. You will need both the name of your VM (mds in our example) and the name of the interface (ens192 in our example) to make these modifications. If you used other values, change the values in bold in the script below to match your own deployment.
-
Make a backup copy of the qemu script:
cd /etc/libvirt/hooks
cp qemu qemu.bak -
Add the lines below to the script and save changes to the file:
#!/bin/bash # aella_hook_ds_span_mds_start if [ "${1}" = "mds" ]; then if [ "${2}" = "start" ] || [ "${2}" = "reconnect" ]; then i=0 str="ens192" for port in $str do spanbr="br""${i}""-span" brctl setfd $spanbr 0 brctl setageing $spanbr 0 ethtool -K $port lro off ethtool -K $port gro off i=`expr $i + 1` done fi fi # aella_hook_ds_span_mds_end -
Stop the VM. For example:
virsh shutdown mds
-
Wait for the
virsh list --allcommand to showshut offfor the VM. -
Restart the VM:
virsh start mds
Next Steps
Next, you'll log in to the sensor and configure it settings, followed by sensor authorization. These steps are the same for Ubuntu 20.04 as they are for Ubuntu 16.04. Proceed to Connecting the Sensor to the DP.
Installing in Ubuntu Server 16.04 or CentOS 7.3
Installation Steps: Bridge Mode
Create Bridge
This process creates a Linux bridge named br-aio to be used by the sensor. The installation script takes an existing, configured port and transfers its settings (IP address) to the bridge interface. The VM itself requires a new IP address in the same subnet.
Skip this section if the bridge has already been created due to a prior installation of a Stellar Cyber sensor, aggregator, or data processor (DP).
Contact Stellar Cyber support (support@stellarcyber.ai) for login credentials.
To get a helper script that will create the Linux bridge, use the following curl command:
curl -k -u login:password https://acps.stellarcyber.ai/release/4.3.7/dataprocessor/create_bridge.sh -o create_bridge.sh
The script is executed as follows. In this example the host port eno1 is used. Substitute the correct interface name when used.
bash create_bridge.sh eno1
Because this script reconfigures the network, any connection that uses the network port may become non-responsive for some period of time. This includes the shell session that is executing this procedure if the user is using SSH via the named port. The script will ask for confirmation that this is acceptable.
Install Sensor VM
The difference in the installation procedure between a network sensor and a security sensor is the value provided to the feature option in the command line described below.
Contact Stellar Cyber support (support@stellarcyber.ai) for login credentials.
To get the installation script for a network or security sensor:
curl -k -u login:password https://acps.stellarcyber.ai/release/4.3.7/datasensor/virt_deploy_device_ds.sh -o virt_deploy_device_ds.shTo get the installation script for a modular sensor:
curl -k -u login:password https://acps.stellarcyber.ai/release/4.3.7/datasensor/virt_deploy_modular_ds.sh -o virt_deploy_modular_ds.shTo complete the installation where the sensor will obtain its management IP address from a DHCP server use the following command. Substitute the desired value in place of ds1 for the hostname.
sudo bash virt_deploy_device_ds.sh -- --hostname=ds1 --release=4.3.7 --span=eno2 --feature=nds --bridge=br0-aio
or
sudo bash virt_deploy_modular_ds.sh -- --hostname=ds1 --release=4.3.7 --span=eno2 --feature=nds --bridge=br0-aio
To configure a static IP address, use the following command:
sudo bash virt_deploy_device_ds.sh -- --hostname=ds1 --release=4.3.7 --bridge=br0-aio|<bridgename> [--ip=192.168.1.223] [--netmask=<netmask>] [--gw=192.168.1.1] [--dns=8.8.8.8] [--dns-search=example.com] [--installdir=<imagedir>] [--span=eno2] --feature=nds
or
sudo bash virt_deploy_modular_ds.sh -- --hostname=ds1 --release=4.3.7 --bridge=br0-aio|<bridgename> [--ip=192.168.1.223] [--netmask=<netmask>] [--gw=192.168.1.1] [--dns=8.8.8.8] [--dns-search=example.com] [--installdir=<imagedir>] [--span=eno2] --feature=nds
The command parameters can be supplied as follows. Note the presence of the -- string in the first parameter position.
This is required by the script.
-
--featuredetermines the installation of a network or security sensor. If the value isndsthe installation will be a network sensor. If omitted then the installation will be a security sensor. -
--hostnamespecifies the name of the host. The VM name and the name of the sensor within Stellar Cyber are both set to this value. -
--releaseis the version number of the software to download. -
--bridgenames the bridge to use for the management interface. This will be the same bridge that was created earlier. -
--ipprovides the static IPv4 address. -
--netmaskmust be set to the net mask of the form255.255.255.0. -
--gatewayspecifies the IP address of the gateway. -
--dnsspecifies the IP addresses of the DNS servers to use. -
--dns-searchprovides the default domain name for DNS searches. -
--installdiroptionally specifies what directory will be used for the VM image installation. -
--spanprovides a list of host Ethernet ports to be included in theaio-spanbridge.
When the script is executed it will download and install the VM, and create a Linux bridge of the name aio-span. The ports in the --span parameter will be added.
Installation Steps: NAT Mode
The process for installation in NAT mode is the same as for bridge mode except that the create bridge.sh script is not run. Instead the VM will connect to the virbr0 bridge that was created by the KVM installation.
The ip and associated parameters will be set to a desired private address.
You must provide the necessary NAT services either through the host iptables system or externally to the box.
Connecting the Sensor to the DP
To connect to the DP:
- Log in to your new
-
Change the password.
After you change the password, your session closes automatically. When you log back in with your new credentials, the prompt changes to DataSensor>.
-
Set IP parameters for the management port. You can use either a static IP address or a DHCP server, if available.
Stellar Cyber recommends using a static IP address for ease of troubleshooting.
The commands are as follows:
Configuration Type
Commands
Static IP Substitute your own IP parameters for those shown in bold.
set interface management ip 192.168.14.100/255.255.255.0set interface management gateway 192.168.14.1set interface management dns 8.8.8.8DHCP set interface management ip dhcp -
Verify the IP settings with the
show interfacescommand. -
Set the host name. The host name is displayed in Stellar Cyber and should be unique for each sensor:
set hostname <new hostname> -
If necessary, set the proxy HTTP server:
set proxy http://<proxy IP address:port> -
If this
set tenant_id <Tenant ID>command to specify the name of that tenant. For example:set tenant_id MyTenant -
Use the
set cmcommand to specify the IP address to reach the management interface of the Data Processor. For a DP cluster, this is the IP address of the DL-master's management interface. For a single DP deployment, this is simply the DP's management IP address. You can specify either an IP address or a hostname. For example:set cm 192.168.44.10or:
set cm example.company.com If you specify a hostname rather than an IP address, the system attempts to verify the hostname with the DNS server. If the DNS server is not reachable, the system reports the error and lets you either proceed with the configured hostname or quit. This way, you can specify a hostname for the
 set cmdestination in an offline environment without access to a DNS server. - Verify your settings with the
show cmcommand. You should see the IP address of the DP listed as the CM Controller and the Status should be Established. - Log out with the
quitcommand.
The
Sensor Authorization
You must authorize the sensor when it appears in the network.
You can authorize multiple sensors at a time. So if you're installing multiple sensors, install them all, then authorize them all at once.
