Installing a Linux Server Sensor
This topic describes how to install a Linux Server Sensor in a supported target environment using the installation file downloaded from the Download Images tab in the System | Deployment | Sensor Installation page. Refer to the following sections for details:
About the Linux Server Sensor
A Linux server sensor is a managed background daemon that works as a network sensor without log forwarding that also monitors:
- Process info
- Command execution
- Files
- File events
The server sensor converts that information to metadata and forwards it to the DP as Interflow. The DP can then correlate traffic, processes, users, and commands for security, DDoS, and breach attempt detections.
The server sensor launches the following processes:
aella_audit—collects audit logs and provides file integrity monitoringaella_conf—handles the configurationaella_ctrl—monitors other services, and can stop or start them based on the configurationaella_flow—collects metadata in trafficaella_mon—collects system resource usage, including CPU, RAM, and disk
Supported Linux Operating Systems
The Linux Server Sensor is supported for installation in the Linux environments listed below:
-
Ubuntu 16.04, 18.04, 20.04, 21.04, and 22.04
-
Debian 8, 9, 10, and 11
-
CentOS 7 and 8
-
Red Hat Enterprise Linux 7, 8, and 9
-
Alma Linux 9
-
Amazon Linux 2
-
SUSE Linux 12-15
-
Oracle Linux 8.5
About the Self-Contained Installation Script in 5.1.0 
The 5.1.0 release introduces a new, self-contained installation script named ds_linux_install.sh that can install the Linux server sensor on all supported operating systems. The ds_linux_install.sh script offers the following benefits relative to the installers in previous releases:
-
Self-contained – The ds_linux_install.sh script does not need to download any OS packages or images from the internet. You just need to make sure that the standard
curl,ntp,and zippackages are installed on the target machine. All other OS packages are bundled with the script. -
Operating System Aware – When you execute ds_linux_install.sh in a supported environment, it automatically detects the target operating system and installs the correct image. All necessary images are bundled with the script – the installer picks the correct one based on the operating system it detects at run-time.
-
Flexible – The same installation script can be used to install in multiple different target environments, as summarized in the Installation Matrix below.
Installation Prerequisites
- Click to see the minimum system requirements for installing a Linux agent sensor.
-
All the procedures that follow require that you are logged in to an account with sufficient system storage and
sudoaccess. -
The self-contained installation script (ds_linux_install.sh) requires the
curl,ntp,andzip packages on the target machine. The installer checks for the presence ofcurlbefore installing and returns an error if it is not found.
Python Requirements
-
In contrast to previous releases, installations using the self-contained installer (ds_linux_install.sh) do NOT require Python 2.
NUMA Requirements
To prevent configuration errors, Stellar Cyber recommends that you do not install the Linux Server Sensor on target hosts with two NUMA nodes. You can use the following command to check the number of NUMA nodes in your target host:
$ lscpu | grep -i numa
For example, the following example shows the output returned by this command for a system with two NUMA nodes:
$ lscpu | grep -i numa
NUMA node(s):          2
NUMA node0 CPU(s):     0-19,40-59
NUMA node1 CPU(s):     20-39,60-79
Obtaining the Installation File
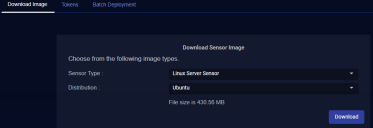
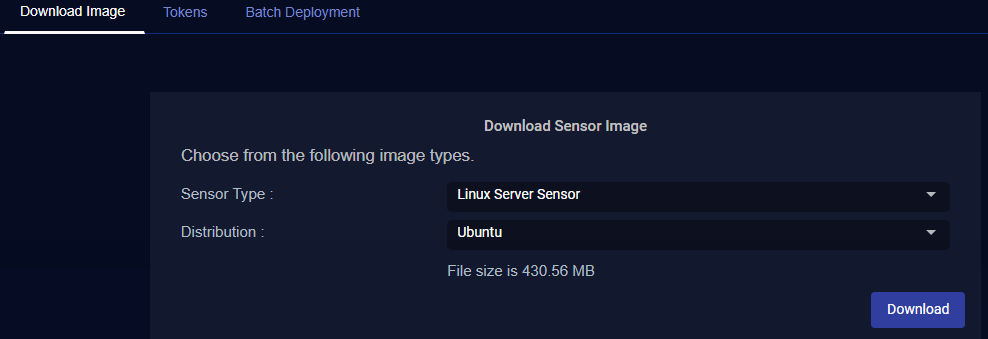
You download the installation file for the Linux Server Sensor from the Download Images tab in the System | Deployment | Sensor Installation page. Use the following procedure:
Only users with the Deployment | Sensor Installation | Sensor Image Download privilege assigned to their profile in the System | Role-Based Access Privileges interface can download images.
-
Navigate to the System | Deployment | Sensor Installation page.
-
Set the Sensor Type dropdown to Linux Server Sensor.
-
Choose the target Linux version from the Distribution dropdown.
The display updates to show you the size of the files to be downloaded.
-
Click the Download button. The system downloads the installation file for your selected target along with its corresponding SHA-1 hash file.
Available Installation Scripts
Each of the Linux distributions supported for Server Sensor installation uses the same ds_linux_install_saas.sh file from the Download Images tab in the System | Deployment | Sensor Installation page, as summarized in the table below.
| Linux Distribution | Installation File |
|---|---|
| Ubuntu 16.04, 18.04, 20.04, 21.04, and 22.4 | ds_linux_install_saas.sh |
| Debian 8, 9, 10, and 11 | ds_linux_install_saas.sh |
| CentOS 7 and 8 | ds_linux_install_saas.sh |
| Red Hat Enterprise Linux 7, 8, and 9 | ds_linux_install_saas.sh |
| Alma Linux 9 | ds_linux_install_saas.sh |
| Amazon Linux 2 | ds_linux_install_saas.sh |
| Oracle Linux 8.5 | ds_linux_install_saas.sh |
| SUSE Linux 12-15 | ds_linux_install_saas.sh |
When you execute ds_linux_install.sh in a supported environment, it automatically detects the target operating system and installs the corresponding image. All necessary images are bundled with the script – the installer picks the correct one based on the operating system it detects at run-time.
Running the Installation Script
All the procedures in this section require that you are logged in to an account with sufficient system storage and sudo access. Regardless of the Linux version the installation steps are as follows:
- Open ports on your firewall for the sensor.
- Obtain a token for the Server Sensor.
- Use the instructions below to run the installation script and apply the token you downloaded in the previous steps. The procedure to run the script is the same, regardless of your operating system. However, there are some notes specific to different operating systems following the procedure.
- Applying a token automatically points the sensor at the Stellar Cyber instance where the token was generated. Alternatively, if you have a data aggregator deployed, you can use the
set aggregatorcommand to specify the IP address of the destination aggregator.
Running the Installation Script
You run the installation script in the same way for all supported Linux distributions:
This procedure applies the token to the server sensor as part of the command used to run the installation script. You can also apply the token after the installation, if you like. Refer to Applying a Token to the Installed Sensor for details on working with tokens.
-
Copy the installation script to the target host.
-
Navigate to the System | Sensor Installation page and click on the Tokens tab.
-
Either download the token as a file or copy the string so you can include it as part of the command running the installation script. Refer to Obtaining a Token for the Installation for details.
You may find it easier to download the token as a file if you plan on reusing it with multiple sensors.
-
Open a command line session with the target host and change directories to the location where you copied the installation script.
-
Run the script with ONE of the commands below:
Option 1. Include the Token String
sudo bash ds_linux_install_saas.sh --token <token string>Option 2. Point to the Token File
sudo bash ds_linux_install_saas.sh --token_file <path to token file>Option 3. Apply a Token Later
sudo bash ds_linux_install_saas.shThis command installs the server sensor without applying a toekn. Refer to Applying a Token to the Installed Sensor for details on applying a token after installation.
-
Use the
aella_clicommand to start the Server Sensor CLI.
Installation Notes for Specific Operating Systems
This section provides some configuration notes for specific operating systems. Check the section corresponding to your target Linux distribution for details:
During installation in Ubuntu 18.04, the installation script may report a certifi package error similar to the following:
Install certifi, ver 2021.10.8
certifi exists, version 2018.1.18
Package certifi==2018.1.18 isn't sufficient to install agent sensor
Agent sensor needs certifi version 2021.10.8 or higher
You can work around this issue by manually installing version 2021.10.8 of the certifi package with the following command:
pip install certifi==2021.10.8
Once the correct version of the certifi package is installed, you can re-run the installation script to install the sensor.
CentOS 8 Prerequisite – Update the Base URL to vault.centos.org
You must update the source link for some CentOS 8 environments to vault.centos.org instead of mirror.centos.org to ensure that dependent packages can be installed.
This issue is present in CentOS 8.5.2111 but may also exist in other CentOS 8 versions. The symptom for this issue is typically a series of No URLs in mirrorlist errors when installing in CentOS 8.
The following commands make the necessary changes for most environments to ensure that dependent packages can be downloaded from vault.centos.org.:
cd /etc/yum.repos.d/
sudo sed -i 's/mirrorlist/#mirrorlist/g' /etc/yum.repos.d/CentOS-*
sudo sed -i 's|#baseurl=http://mirror.centos.org|baseurl=http://vault.centos.org|g'
/etc/yum.repos.d/CentOS-*
sudo yum update -y
CentOS 7.9.2009 Prerequisite – Enable the EPEL Repository for pip Installation
CentOS 7.9.2009 does not install pip by default because it is not available in the core CentOS 7 repositories. To ensure that pip is installed, you must enable the Extra Packages for Enterprise Linux (EPEL) repository. This repository provides additional packages (including pip) that aren't included in the standard CentOS and Red Hat repositories.
Perform the following the steps to enable the EPEL repository and install pip:
-
Add the EPEL repository with the following command:
sudo yum install epel-release -
Install pip with the following command:
sudo yum install python-pip -
Verify pip installation with the following command:
pip --version
Applying a Token to the Installed Sensor
This section provides details on working with tokens. It's generally easiest to apply a token to the server sensor as part of the command that runs the installation script. However, you can also apply a token after installation using the instructions in this section.
Obtaining a Token for the Installation
Tokens are required to authorize and configure the installation of a sensor image downloaded from the DP in the System | Deployment | Sensor Installation page. Tokens point the installed sensor to the correct DP, assign the specified tenant, and authorize the sensor installation.
Use the following procedure to obtain a token in the Tokens tab:
-
Navigate to the System | Deployment | Sensor Installation page and click on the Tokens tab.
-
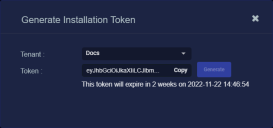
If a token already exists for the target tenant for the sensor installation, you can either use the Copy button to copy it to the clipboard or use the Download button to download it as a file.
-
Copy the token if you plan on applying it by pasting it. The token can be pasted into the command used to run the installation script or after installation using the
set token string <token>command in the CLI -
Download the token as a file if you plan on using one of the following techniques to apply it:
-
Pointing to the token file in the command used to run the installation script.
-
Uploading the file to the sensor and referring to it in a
set token file <token file>command. -
Hosting the file on an HTTP server and referring to it in a
set token url <token url>command.
-
Refer to Assigning Tokens for a summary of the different ways in which tokens can be applied to a sensor installation.
-
-
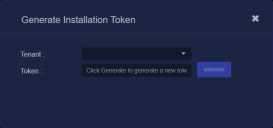
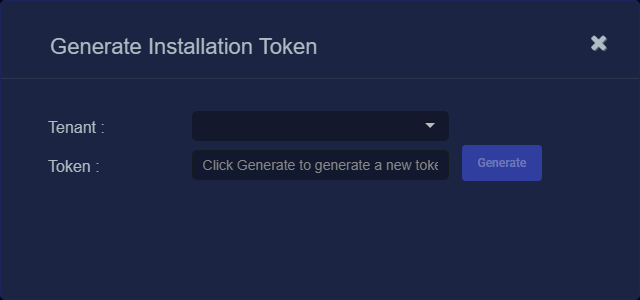
If there is not already an unexpired token for the target tenant, click the Generate button.
The Generate Installation Token dialog appears:
-
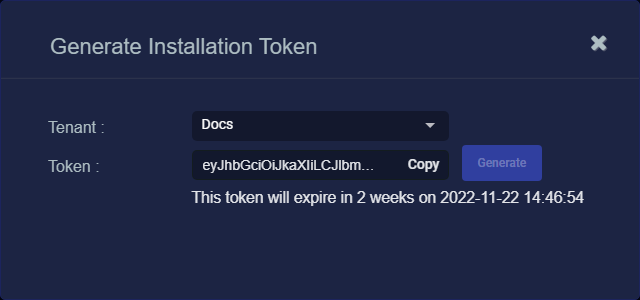
Select the tenant for the token from the Tenant dropdown. This is the tenant to which all sensors authorized with this token will be automatically assigned. The dropdown lists all tenants configured for your organization in the System | Tenants page.
-
Click the Generate button.
The system generates the token and displays its contents in the Token field. The dialog also updates to display the expiration date for the token, as illustrated below.
-
You can use the Copy button to copy the token to the clipboard immediately, or simply close the dialog and retrieve the token from the Tokens tab later on.
Applying the Token to the Linux Server Sensor
Tokens are required for the installation of a sensor image downloaded from the DP in the Download Image tab.
You apply tokens to sensors either as part of the command used to run the installation script or after installation.
-
The table below summarizes the options for applying a token after installation.
-
Refer to Running the Installation Script for instructions on including the token as part of the command used to run the installation script.
- Use the
aella_clicommand to start the Server Sensor CLI. -
Apply the token to the installed sensor from the sensor CLI with the
set tokencommand using one of the options in the table below:You only need to use one of the options in the table below. These are just different ways to do the same thing – apply the token.
Option 1. Copy and Paste the Token String
Copy the token string from the Tokens tab and paste it into the CLI command. The syntax is as follows:
set token string <pasted string>Option 2. Upload the Token as a File to the Sensor
Download the token as a file from the Tokens tab, upload it to the sensor, and reference it in the
set tokencommand. The syntax is as follows:set token file <path to local file>For example, the following command points to the
token.textfile stored in the/tmpfolder:set token file /tmp/token.textThis technique only works for Server Sensors. There isn't a way to upload the token.text file to a newly installed modular sensor virtual machine.
Option 3. Host the Token on an HTTP Server
Download the token as a file from the Tokens tab, upload it to an HTTP server, and reference it in the
set tokencommand. The syntax is as follows:set token url http://<url to token>You can also use an HTTPS server. In that case, the specified URL must also include the username and password for the server.
-
The CLI reports that the Sensor token is successfully set.
If you receive an error message instead, it's possible that the token has expired. Refer to the Tokens tab to see the expiration date. If you are using the File technique, it's also possible that an extra space or line may have crept into your text file – check the file to make sure it includes only the token text.
-
Wait a minute or so. Then, verify that the token was successfully applied using any combination of the following techniques:
-
Check the System | Sensors tab in the user interface to see that the sensor has registered itself successfully.
-
Verify that the
show systemcommand shows all services as running. -
Verify that the
show receivercommand displays a receiver. -
Verify that the
show jsoncommand reports some data sent in theBYTE_SENTcolumn.
-
Optional: Connecting the Sensor to an Aggregator
Applying a token automatically points the sensor at the Stellar Cyber instance where the token was generated. Alternatively, if you have a data aggregator deployed, you can use the set aggregator command to have the sensor send its data to the aggregator before it is sent to the managing Stellar Cyber instance. Use the following procedure:
-
Use the
aella_clicommand to start the CLI. -
Use the set aggregator command to specify the IP addresses of a primary and secondary data aggregator. For example:
set aggregator <primary IP address> <secondary IP address> -
Exit the CLI with the
quitcommand.
Uninstalling a Linux Server Sensor
Use the following procedure to uninstall Linux Server Sensors:
Debian and Ubuntu Uninstall
To uninstall a sensor on Debian or Ubuntu:
apt-get remove aellads
CentOS, Red Hat, AWS Linux Uninstall
To uninstall a sensor on CentOS, Red Hat, or AWS Linux:
yum remove aellads
