Managing Users 
The System | Users page provides the following tabs:
-
Users – Lets you view, edit, and add users.
-
Activity Log – Provides a sortable, searchable table of events broken out by user, time, and activity.
-
Current Sessions – Provides a sortable, searchable table of currently active sessions on the Stellar Cyber server.
Users List
The Users List, with all existing users, appears by default.
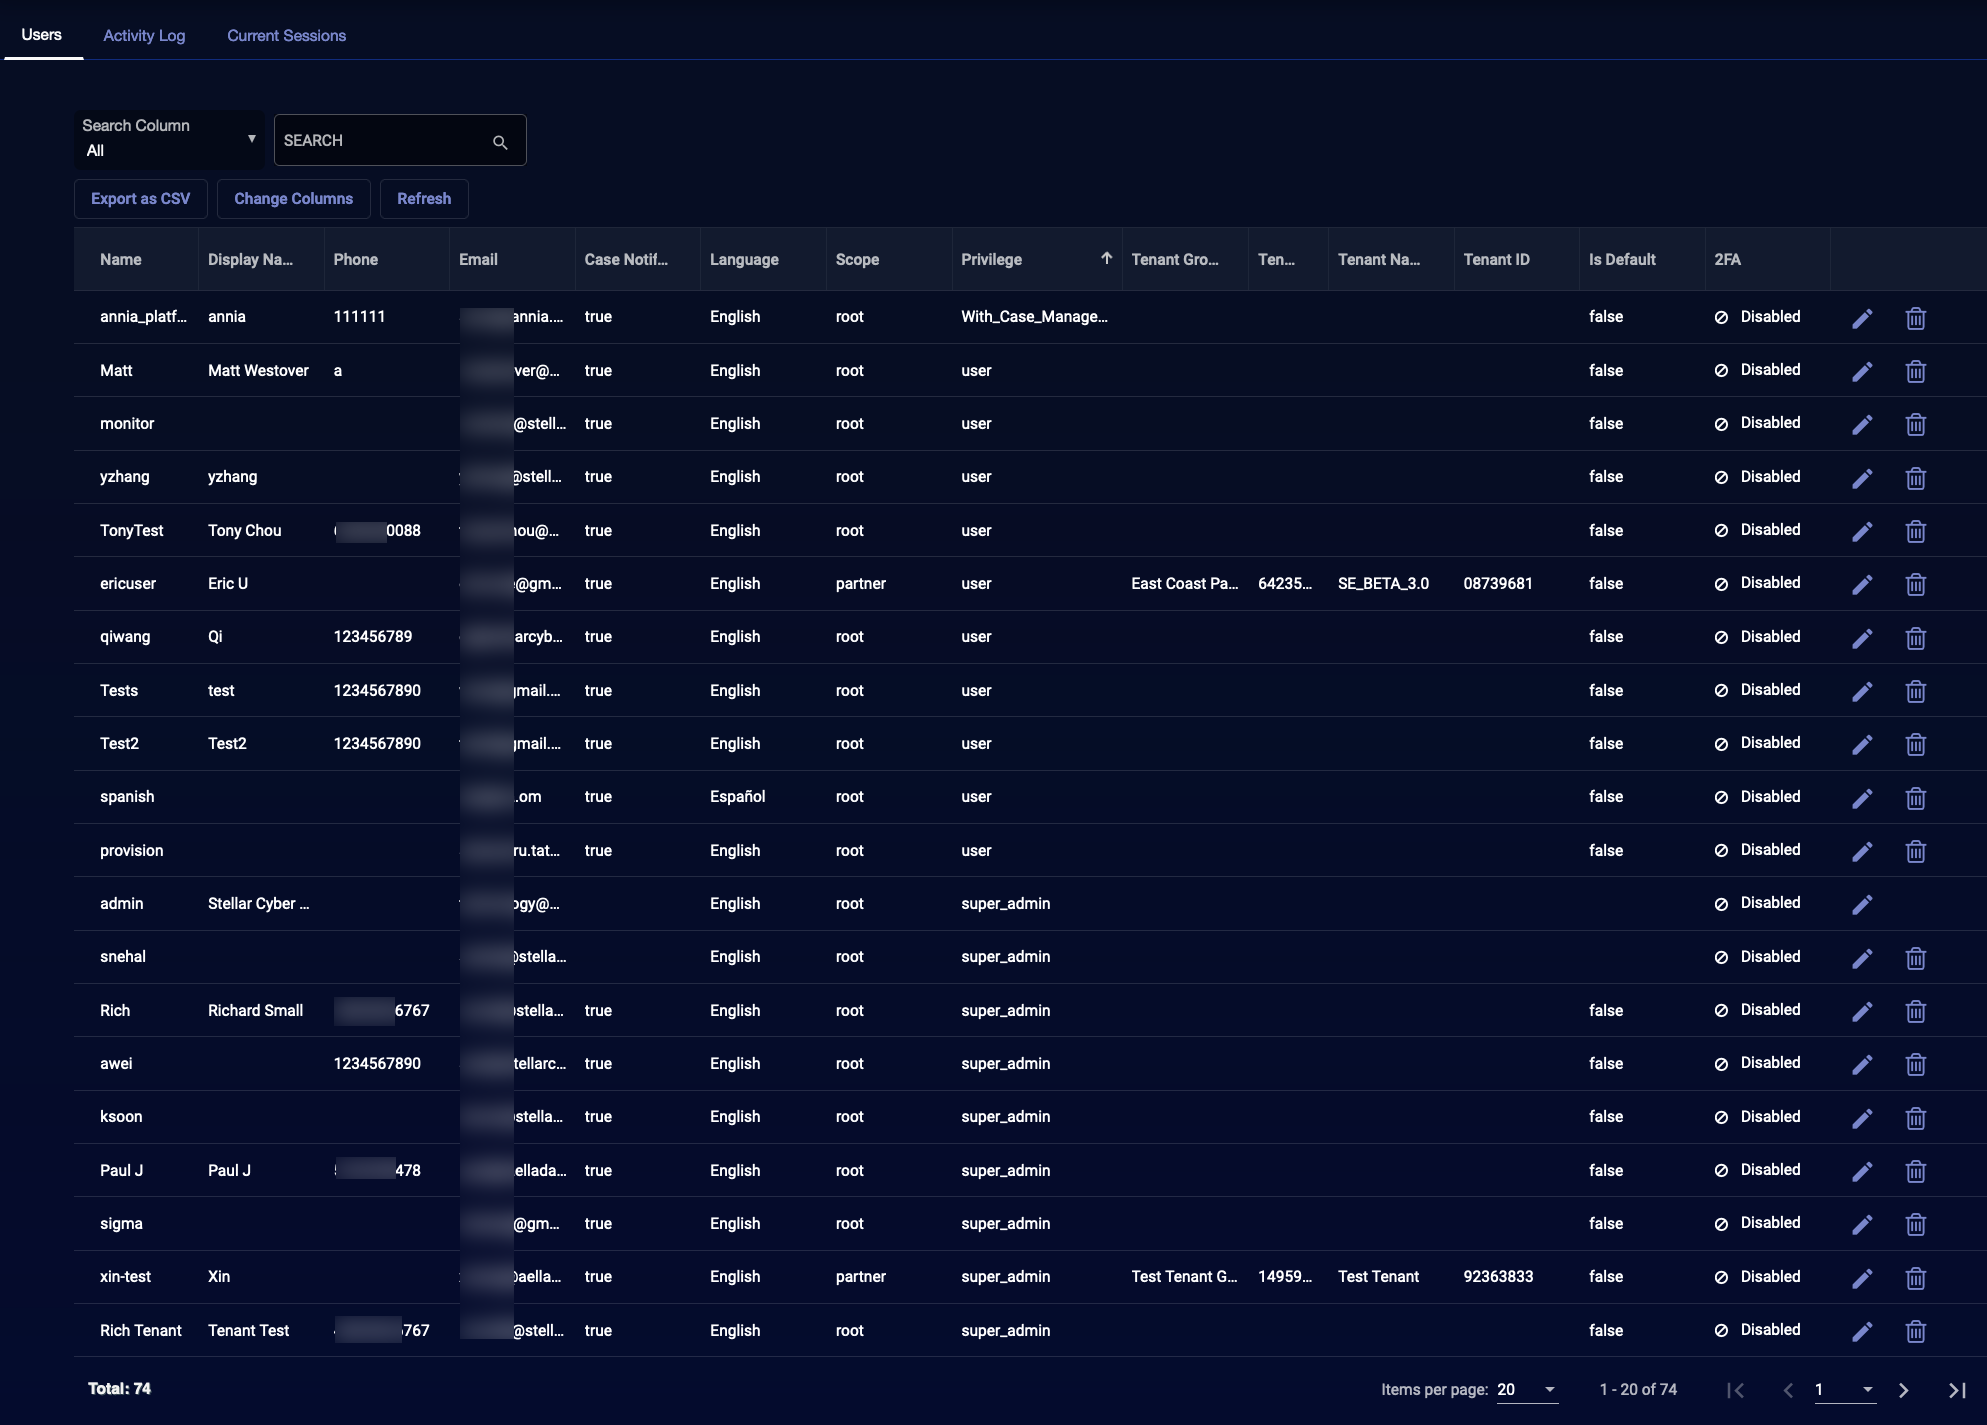
In this table you can:
- Select Create at the top of the list to add a new user. Adding a user is described in the following section.
- Select the
 icon to edit the user.
 - Select the
 icon to delete the corresponding user.
Only users with the built-in Super Admin profile assigned can edit or delete other users with the Super Admin profile. For all other users, the Edit and Delete icons do not appear next to users with the Super Admin profile assigned.
See the Tables page for more information on working with tables.
Detecting Dormant Users
The Users List includes a Last Login column that makes it easy to detect users who have not logged in for a long time and manage those accounts according to your policy.
If the Last Login column does not appear in the Users List, you can use the Change Columns feature to add it. Note that if a user has not logged in since this feature was introduced in v4.3.6, the Last Login field might simply show a dash (-).

Removing Duplicate User Accounts 
From 5.2.0, the Stellar Cyber platform is insensitive to case differences between the email addresses
In releases before 5.2.0, admin1@yourorganization.com and Admin1@yourorganization.com, for example, were acceptable email addresses for two different accounts. From 5.2.0, Stellar Cyber is insensitive to case and now considers these duplicate user accounts. If there is already one user account with an email address of admin2@yourorganization.com and you try to create a second user account with ADMIN2@YOURORGANIZATION.COM, the second account won't be allowed. Stellar Cyber considers it a duplicate and blocks its creation.
However, when Stellar Cyber detects a tenant with user accounts that differ only by case and were created in earlier releases, it continues to apply case sensitivity to all user accounts throughout the system. For example, if there already are two user accounts with email addresses admin3@yourorganization.com and ADMIN3@yourorganization.com, Stellar Cyber continues to allow them as two separate accounts. When this occurs, Stellar Cyber displays a banner to Super Admin users in the root system when they visit System | Users. The banner notifies them about duplicate users and urges them to resolve them or communicate with tenant administrators to resolve them:
Attention Admins! Duplicate accounts detected. To ensure platform integrity, take action immediately! Reach out to users for resolution by using the filter to identify accounts. Show me duplicates.
After the duplicates are resolved for all tenant, partner, and root users in the system, Stellar Cyber starts applying case insensitivity to all user accounts and stops displaying the banner to root Super Admin users.
In addition to the banner, a Duplicate Identities column appears in the Users table. Select Show me duplicates in the banner to filter the table by this column, displaying only duplicate accounts. Delete the duplicate accounts so just one account remains and notify the affected user. Until you've removed all the duplicates, the banner will continue to appear each time you access the System | Users page. When there are no more duplicates, the banner will stop appearing.
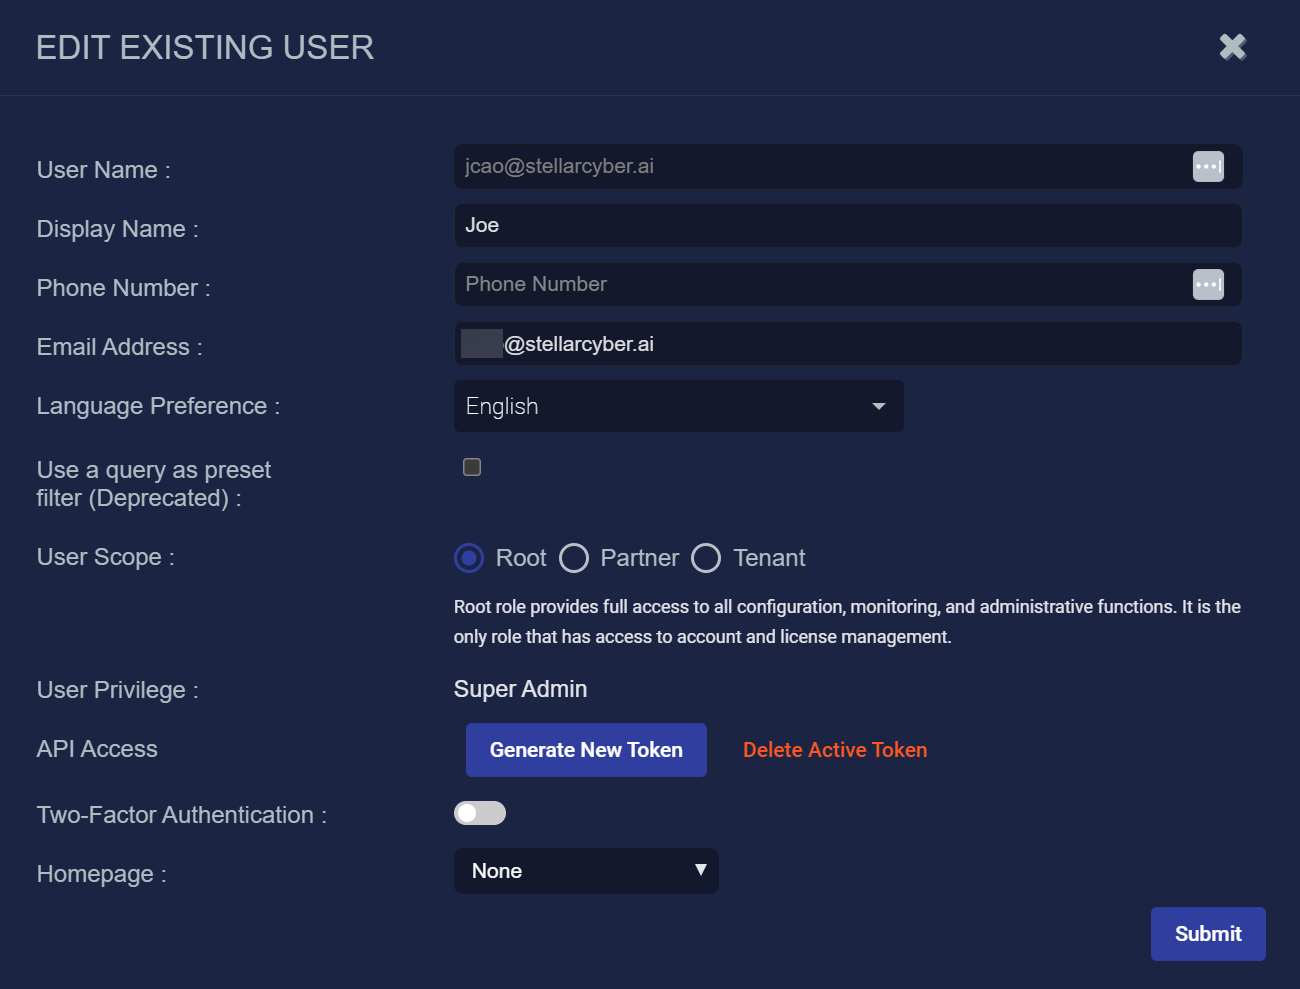
Adding or Editing a User
When you add or edit a user, a similar dialog box appears. The only difference is that you cannot change the User Name in the Edit dialog box. This example shows the Edit Existing User dialog box.
-
For Authentication Only SSO: First, manually add all users on the Stellar Cyber Platform. After this manual entry, users can log in with SSO.
-
For Authentication & Authorization SSO: Configure all users through the IdP.
You enable SSO for all users except the root admin user. The root admin user must always use local authentication (
https://your.stellar.cyber.address/login). -
For Local access (bypass) when SSO is enabled: If Stellar Cyber loses connectivity with your IdP, users configured for SSO cannot log in. As a preventive bypass method, manually create a new user in the Stellar Cyber Platform with root scope and with a valid email address that has "
+admin" appended to a valid user name, as follows:<user>+admin@yourorganization.com(joe+admin@yourorganization.com). The user you create must be able to receive a password reset email at<user>@yourorganization.com. This email alias is what Stellar Cyber uses to permit the bypass of an SSO for a local login. After you create this separate user account, the user can log in two ways:-
An SSO user with
<user>@yourorganization.comor
-
A local user at
https://your.stellar.cyber.address/loginusing<user>+admin@yourorganization.com
If SSO is configured, it's recommended to keep an active administrative account in the Stellar Cyber user management.
-
You can enter or modify:
-
User Name – Each user has a unique name, which is case insensitive. The name cannot be changed after you add the user. This field does not support multibyte characters.
-
Display Name – Can be used to represent the user in displays instead of the User Name.
-
Password – The password assigned to the user. Appears when adding a new user.
-
Reenter new password – Verification for the password.
If you're using SSO, the password fields may not appear. See Logging In for details.
-
Phone Number – A phone number for the user.
-
Email address – This email address is used to send notifications to the user for password recovery. Each user must have a unique email address, which is case insensitive. You cannot use the same address for multiple users.
-
Language Preferences – Sets the display language for the Stellar Cyber UI. After you save the setting, the user must log out and log back in for the change to take effect.
-
User Scope – Must be Root, Partner, or Tenant.
-
Root – Allows full access to all Stellar Cyber functions, including user and license management.
-
Partner – Allows access to the specified tenant group. If you select Partner the Tenant Group drop-down list appears.
Partner users can see all other partner users with the same Tenant Group assigned. Similarly, partner users can create additional partner users to manage the same Tenant Group.
-
Tenant – Allows access to the specified tenant. If you select Tenant, the Tenant drop-down and Use User as Tenant Default checkbox appear. See the Tenant overview page for information on tenants.
-
-
User Privilege – Select a profile. The profiles are defined on the Role Based Access Control page. See Role Based Access Control for details on configuring profiles.
-
Tenant Group – Appears if you choose Partner scope. Select the Tenant Group that the partner can access. The partner has write access for all tenants in this group and can view the data for those tenants. See Tenant Groups for more details.
-
Tenant – Appears if you choose Tenant scope. Select the name of the tenant. The user has read access to that tenant, and only that tenant.
-
Use User as Tenant Default – Appears if you choose Tenant scope. Set this user as the default user for the specified tenant.
-
API Access – Appears if you choose Super Admin privilege and Root scope. To create a unique API token for this user, select Generate New Token. Copy the token and send it to the user. Stellar Cyber does not save the token. If you exit before saving the token, you must generate a new token.

This is how keys for public API access were generated in releases prior to 5.5.0. These options are only available to users with Root scope and Super Admin privileges. This technique is still available for Super Admin users with Root scope in 5.5.0.
Refer to Managing Scoped API Keys in the 5.5.0 Release for details on the new API Keys tab in the Edit User dialog box that lets you configure per-user API keys, scoped to RBAC and tenancy. -
Two-Factor Authentication – Enable to require this user to use two-factor authentication (2FA) the next time they log in.
-
Homepage – Set the page that appears in Stellar Cyber whenever this user logs in. Note the following:
-
Any user with the Add User privilege can create a user with a homepage set.
-
Any user with the Edit User privilege can modify another user’s homepage.
-
Available pages are listed according the user scope and privilege selected in the Add/Edit User dialog box.
-
The Role-Based Access Control page includes a Customize Homepage privilege that specifies whether the current user is allowed to customize their own homepage, either from the controls at the top of the user interface or the Edit User dialog box.
-
A User is distinct from a Recipient. The Recipient can be used as the target of automated messages. See the Recipients page for more details.
Changing a User's Password
This option is not applicable when the server is configured for SSO.
To change a user's password (other than your own):
-
Select System | Users.
The table of users appears.
-
Select
for the user whose password you want to change.The Edit Existing User screen appears.
-
Select Change Password.
The Trigger Password Reset button appears.
-
Select Send Reset Link.
An email is immediately sent to the user from support@stellarcyber.ai. The user has 24 hours to reset their password.
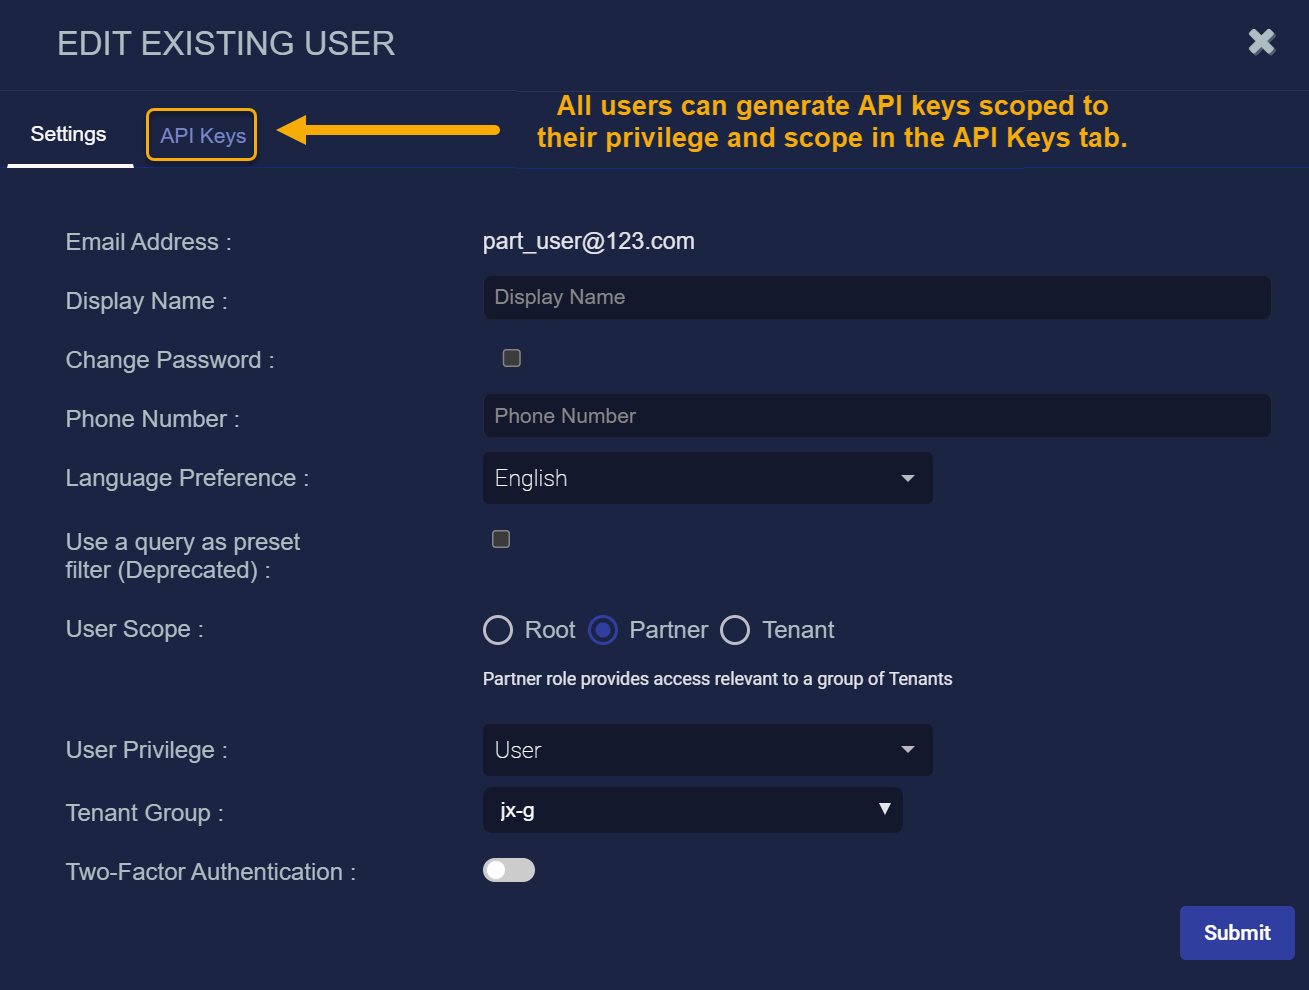
Managing Scoped API Keys in the 5.5.0 Release 
Prior to the 5.5.0 release, public API access was only available to users with Root scope and Super Admin privileges. This technique is still available in 5.5.0.
The 5.5.0 release also introduces per-user API keys, scoped to a user's RBAC privileges and tenancy. You can manage these keys in the API Keys tab in the Edit User dialog box, as illustrated below:
The new implementation of API keys in 5.5.0 has the following benefits:
-
Respects the industry-standard principle of least privilege, only granting an API key the tools that it needs to perform the job you want it to do.
-
Allows easy breach isolation, with API keys tied to specific users.
-
Enables immediate key revocation to contain exposures quickly and limit the dwell time of any unauthorized access.
Stellar Cyber recommends that you consider creating service accounts scoped with only the RBAC privileges necessary to perform specific tasks. This way you can grant personnel just the access they need to perform specific API tasks.
Using the API Keys Tab
The API Keys tab lets you create and revoke an account's API keys. The keys listed in the API Keys tab are specific to the selected account and are limited by its user scope (tenancy) and RBAC privileges:
-
An account can only make calls to the public API endpoints available to its assigned RBAC privileges.
Certain public API endpoints are restricted to Super Admin users with root scope even when Scoped API Keys are enabled. Refer to Restricted Public API Endpoints for a list.
-
An account can only access API data available to its user scope and tenancy. For example:
-
A partner user can access data for any of its associated tenants.
-
A tenant user can only access data for its own tenancy.
-
A root user can access data from the entire platform.
-
You use the API keys listed here to generate a JSON Web Token for access to the API.
Administrative users can revoke keys for users with lower privileges than their own, subject to the normal limits on tenancy and scope. They cannot, however, create a key for another user.
Creating an API Key in the Edit User Window
Use the following procedure to create an API key in the Edit User window:
-
Click on the API Keys tab in the Edit Existing User dialog box:
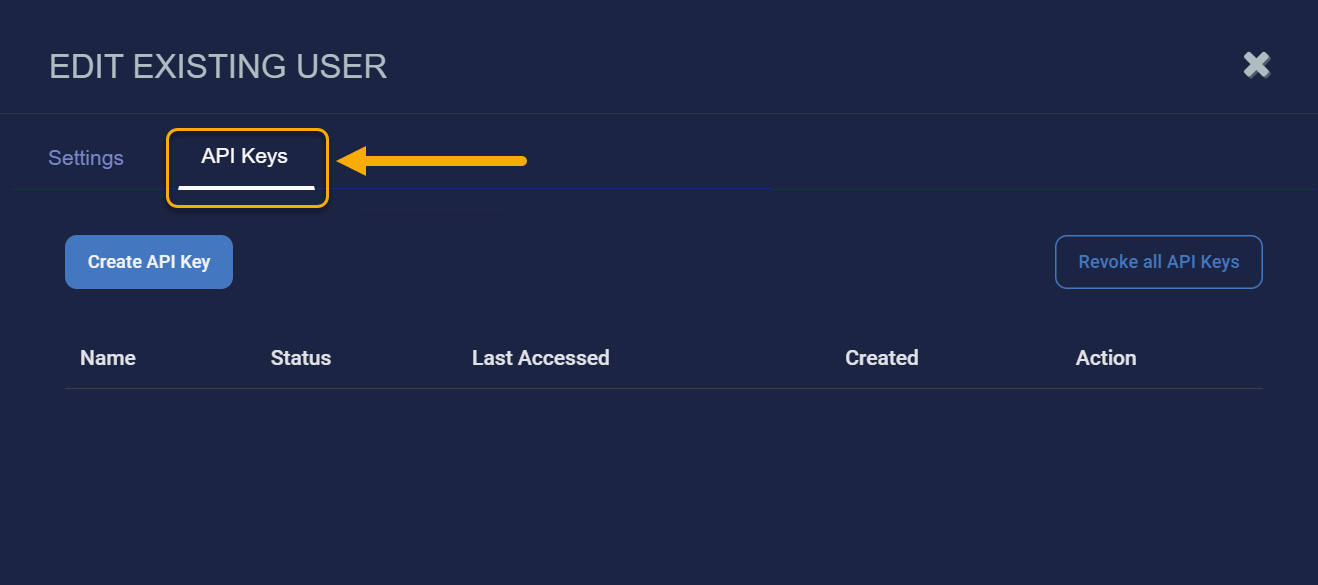
-
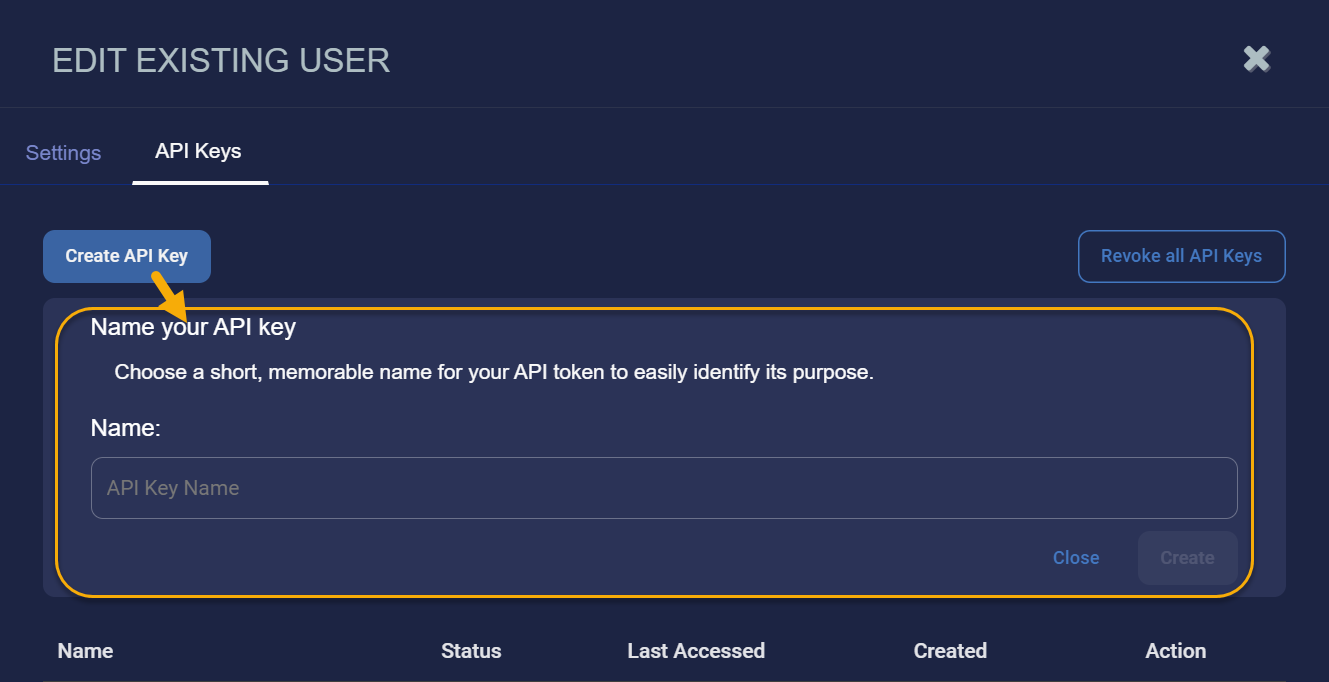
Click the Create API Key button to generate a new key for your account.
The Create API Key button only appears if you are logged in to the account you are editing. You can't create API keys for other user accounts.
-
Supply a name for your key in the window that appears and click Create. Choose a name that is short and memorable so you can easily identify the purpose of the key in Stellar Cyber displays.
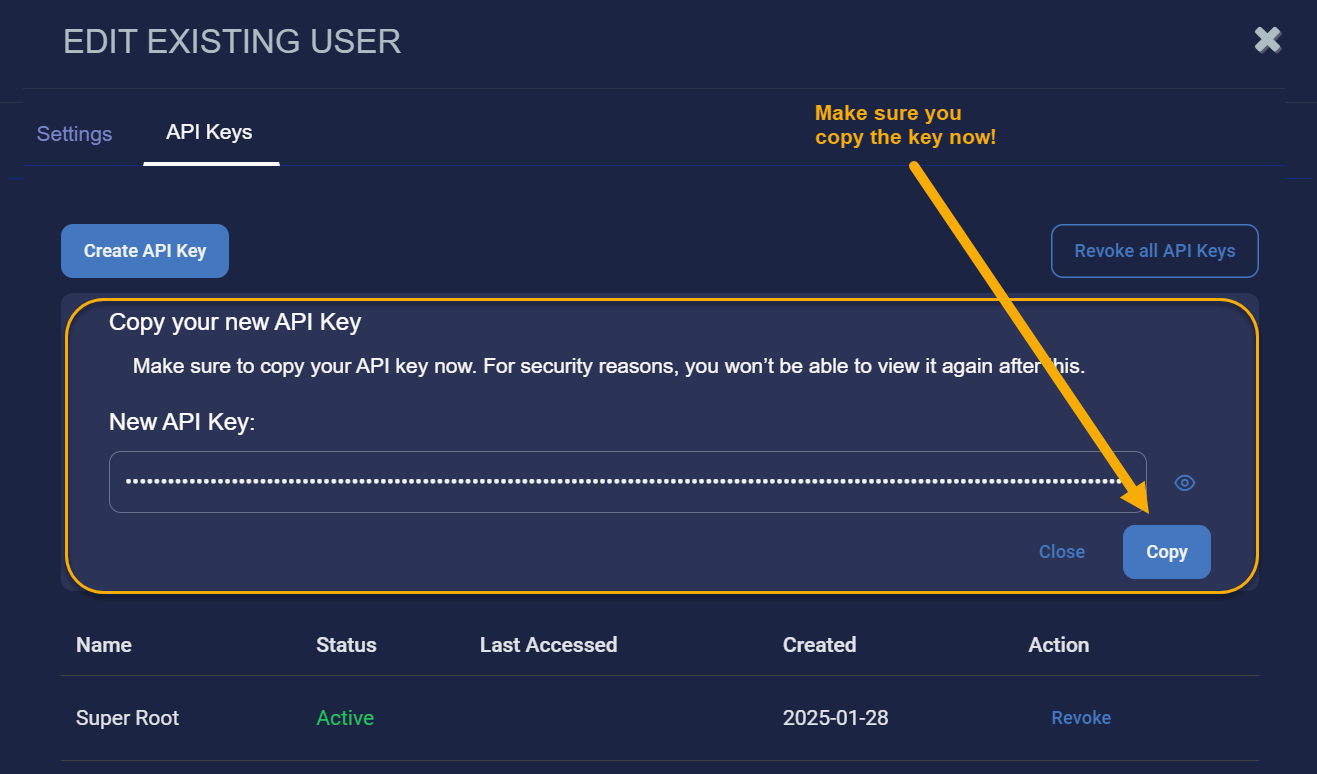
-
Use the Copy button to copy your API key now and store it somewhere safe. For security reasons, you will not be able to retrieve the key from within Stellar Cyber later on.
If you do lose or forget your key, you can always revoke it and generate a new one. However, you'll also need to update any scripts that use the old key so that they'll continue to work with the new one.
-
Click Close once you have copied the key.
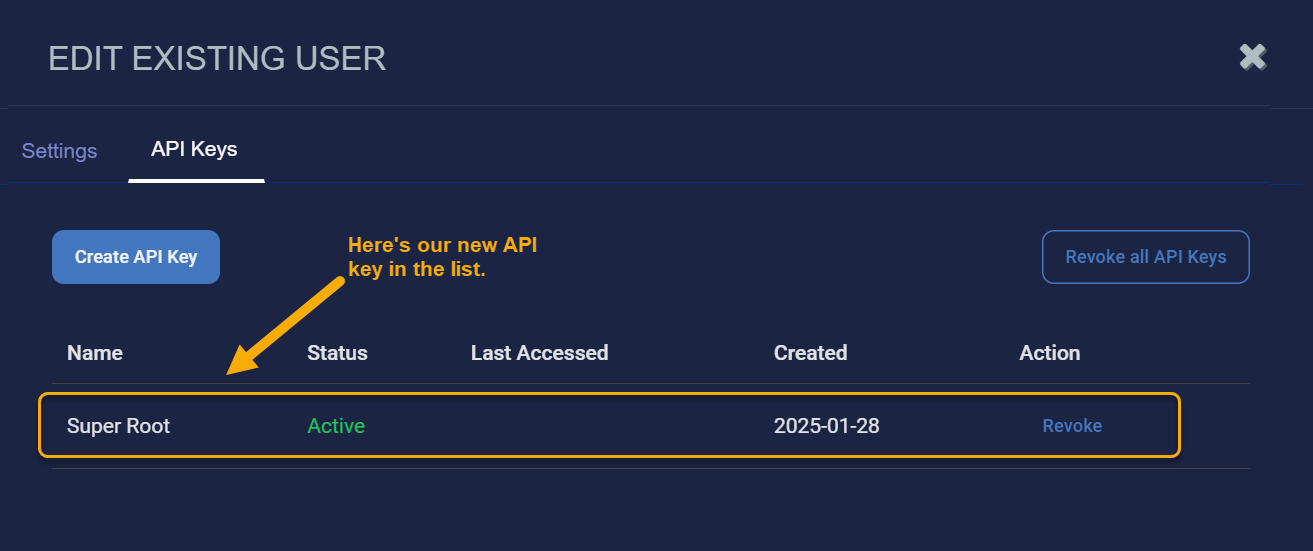
The new key appears in the list with its name, status, and the last time it was accessed. In addition, a Revoke button appears in the Action column, allowing you to revoke a specific key on demand.
Revoking an API Key in the Edit User Window
You can revoke API keys in the Edit Existing User window's API Keys tab:
-
Revoke an individual key by locating the key you want to revoke in the list and selecting its Revoke button in the Action column.
-
Revoke all of the API keys for an account by selecting the Revoke all API Keys button at the top of the API Keys tab. Then, select Revoke all in the confirmation prompt that appears.
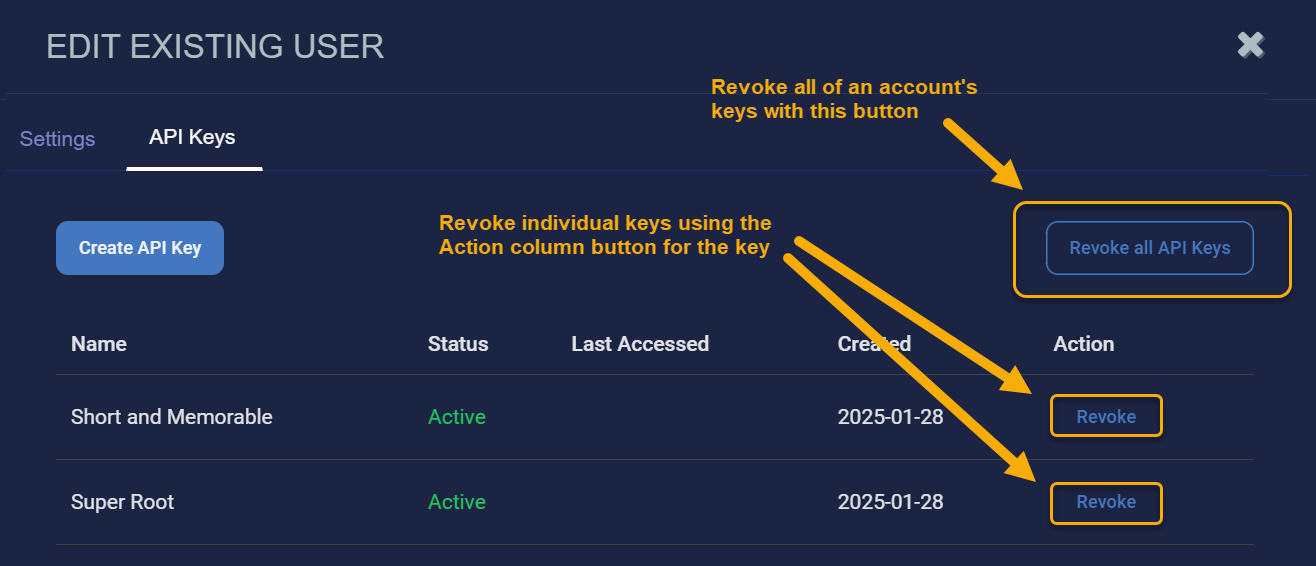
Revoking Keys for Other Accounts
You can also revoke the keys of users with lower privileges than your own, subject to the normal rules of tenancy and scope.
Revoked Keys Continue to Appear
Revoked keys continue to appear in the list of API Keys with a Status of Revoked for a few days after they have been revoked. This can be helpful when you need to remind yourself of which API keys you've revoked so you can update any scripts using the keys. Keep in mind, however, that once a key has been revoked, it cannot be reverted to Active.
API Keys and the Activity Log
Stellar Cyber records an entry in the Activity Log each time an API key is created or revoked.
Activity Log Tab
Use the System | Users | Activity Log tab to monitor Stellar Cyber activity by user account. You can see at a glance which accounts are performing which tasks in Stellar Cyber in a searchable, sortable table similar to the example below.
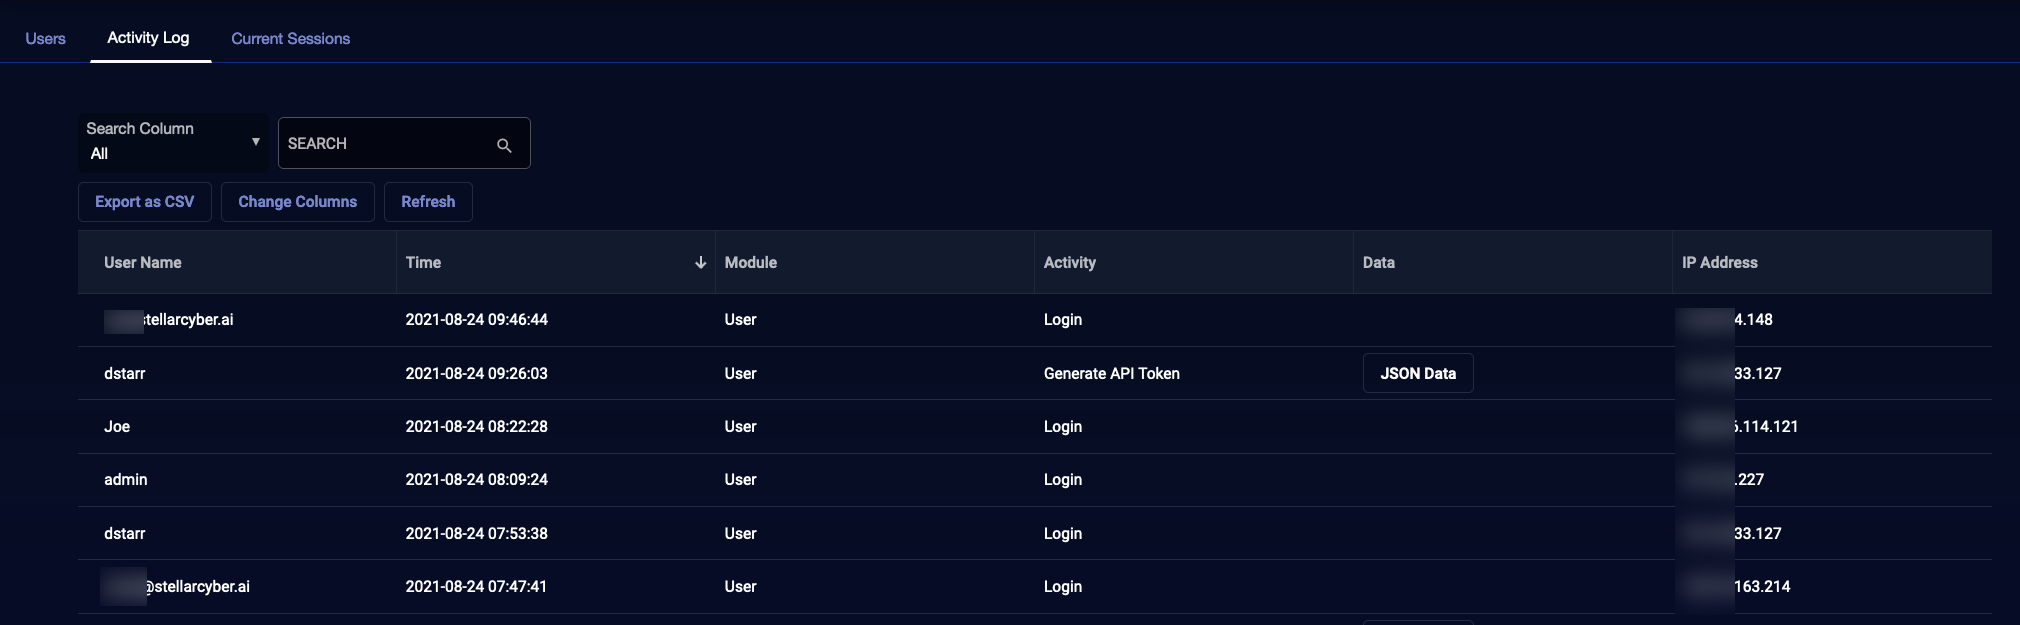
The User Activity Log is automatically reduced to the latest two million entries at 02:00 AM every Sunday in UTC time.
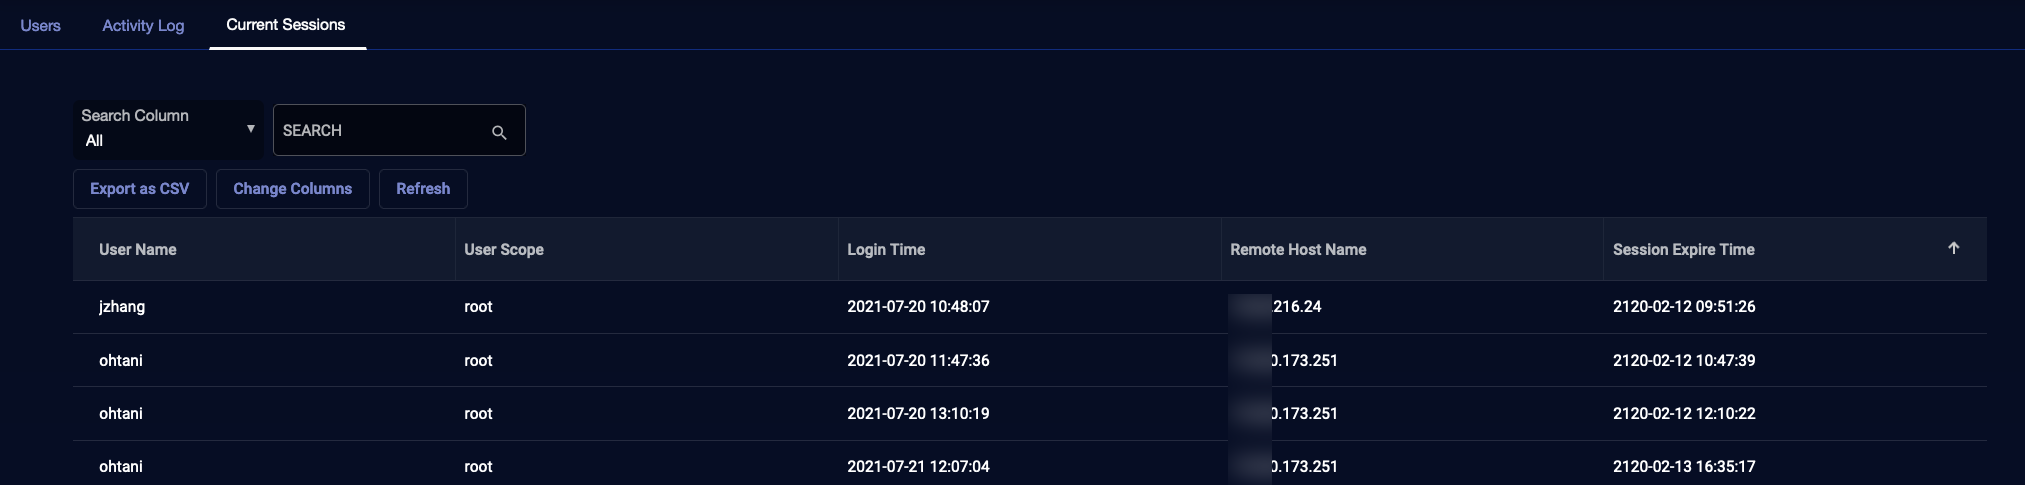
Current Sessions Tab
To see a table of active Stellar Cyber logins, select System | Users | Current Sessions. You can see at a glance which accounts are logged in to the system in a searchable, sortable table similar to the example below.