Introducing the Stellar Cyber API 
Stellar Cyber provides a public API that lets you interact with the product programmatically, allowing you to write your own scripts to retrieve data from the product or create entities within it.
-
Stellar Cyber is always adding new public APIs to the product. The Summary of Public APIs, below, shows you the types of information you can retrieve and create.
-
Once you are ready to get started working with the API, use the following steps:
-
Use the information in Configuring API Authentication to create a user with the necessary privileges and an API key.
-
Use the detailed reference material from the API's swagger.json file to create your own scripts and API calls.
-
-
Refer to the Stellar Cyber Public API Examples for a set of sample scripts and API calls that you can use as inspiration for your own work.
Access to the API is only available using local user accounts. Single-sign on (SSO) users cannot access the API with their SSO credentials.
The API replaces access to port 8889 on the DP.
Creating and Testing Public API Calls 
You can create and test sample API calls on your Stellar Cyber Platform by clicking the ? | API Docs option, as shown below:
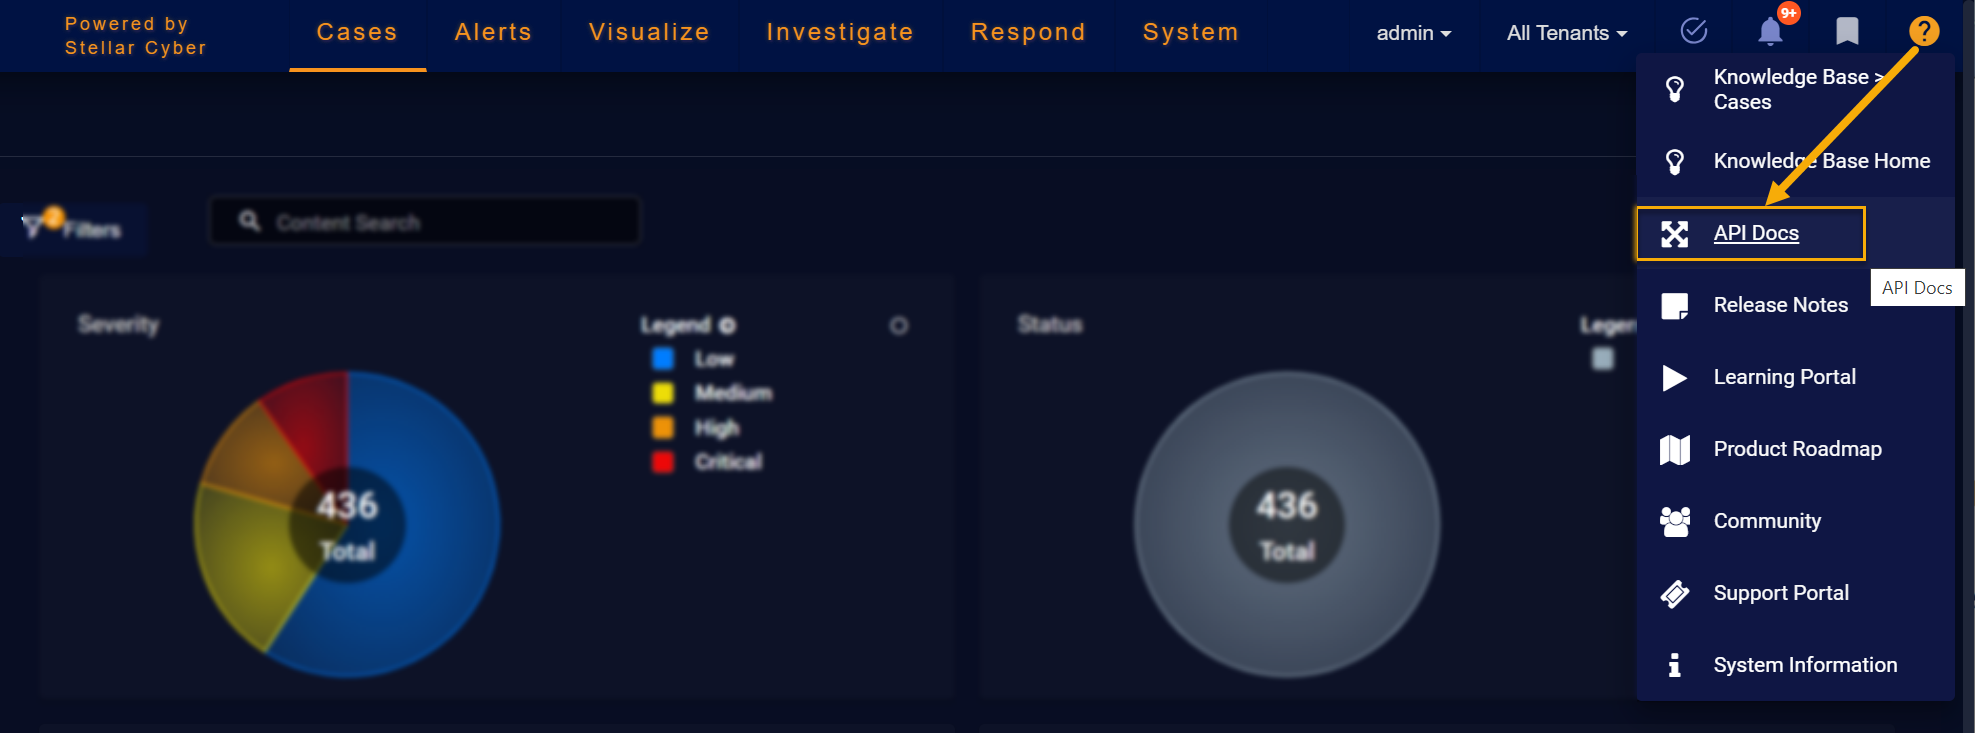
In response, a new browser tab appears with an interactive Swagger reference pre-populated to use the API on your Stellar Cyber Platform.
Authenticating with the API Test Page
Before you can test sample API calls, you need to obtain an API key from the Stellar Cyber user interface. The API key lets you log in to the API test page and generate a JWT token in the /access_token API endpoint. Then, you can log in to the API test page with the JWT token and try out all other parts of the API (only the /access_token endpoint works with simple API key authentication; everything else requires a JWT token).
The procedure is as follows:
-
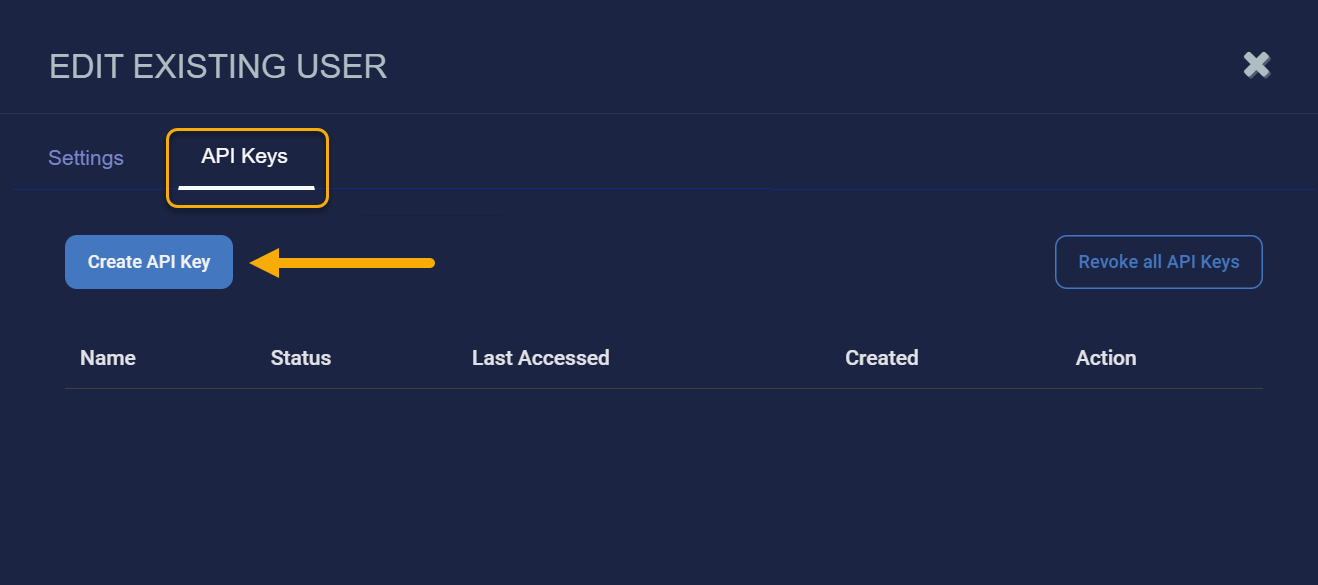
Obtain an API key from the Stellar Cyber user interface:
-
All users can generate an API key scoped to their RBAC privileges and tenancy by clicking the Create API Key button in the API Keys tab of the Edit User and User Profile dialog boxes. This is a new feature introduced in the 5.5.0 release.
-
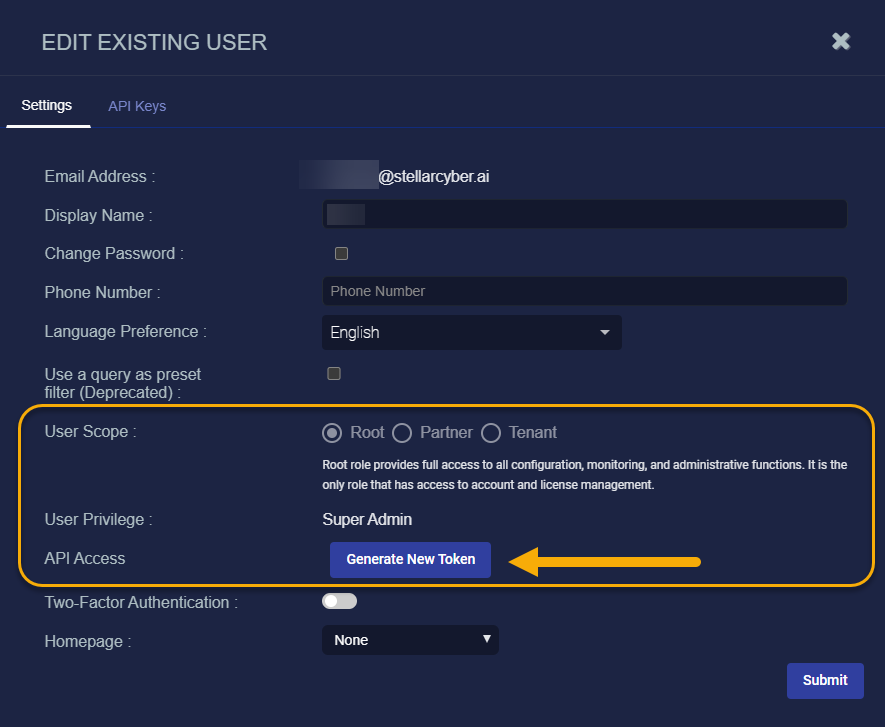
User with a Scope of root and a User Privilege of Super Admin can also use the Generate Token button in the API Access section of the Edit User dialog box to generate an API key
This is the legacy behavior from previous releases and is still available in the 5.5.0 release.
-
-
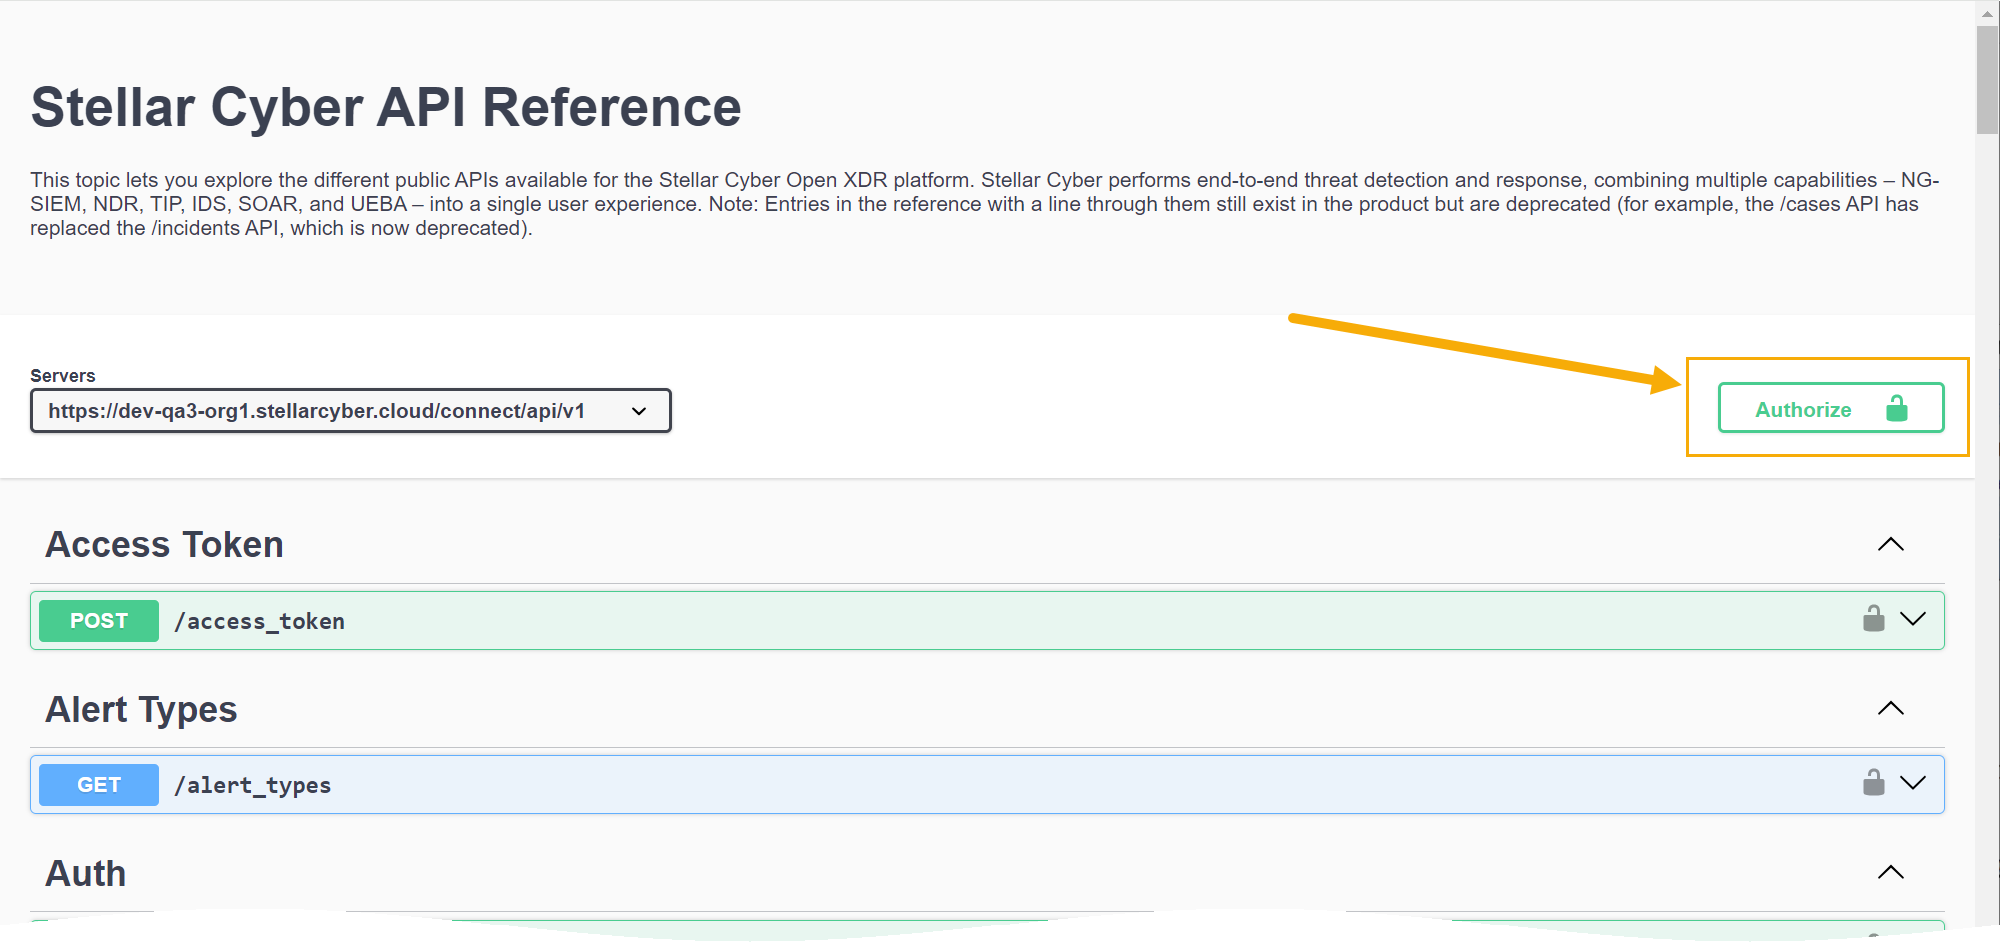
Next, you need to authorize to the API test page. Navigate to ? | API Docs and click the Authorize button at the top right, as illustrated below.
-
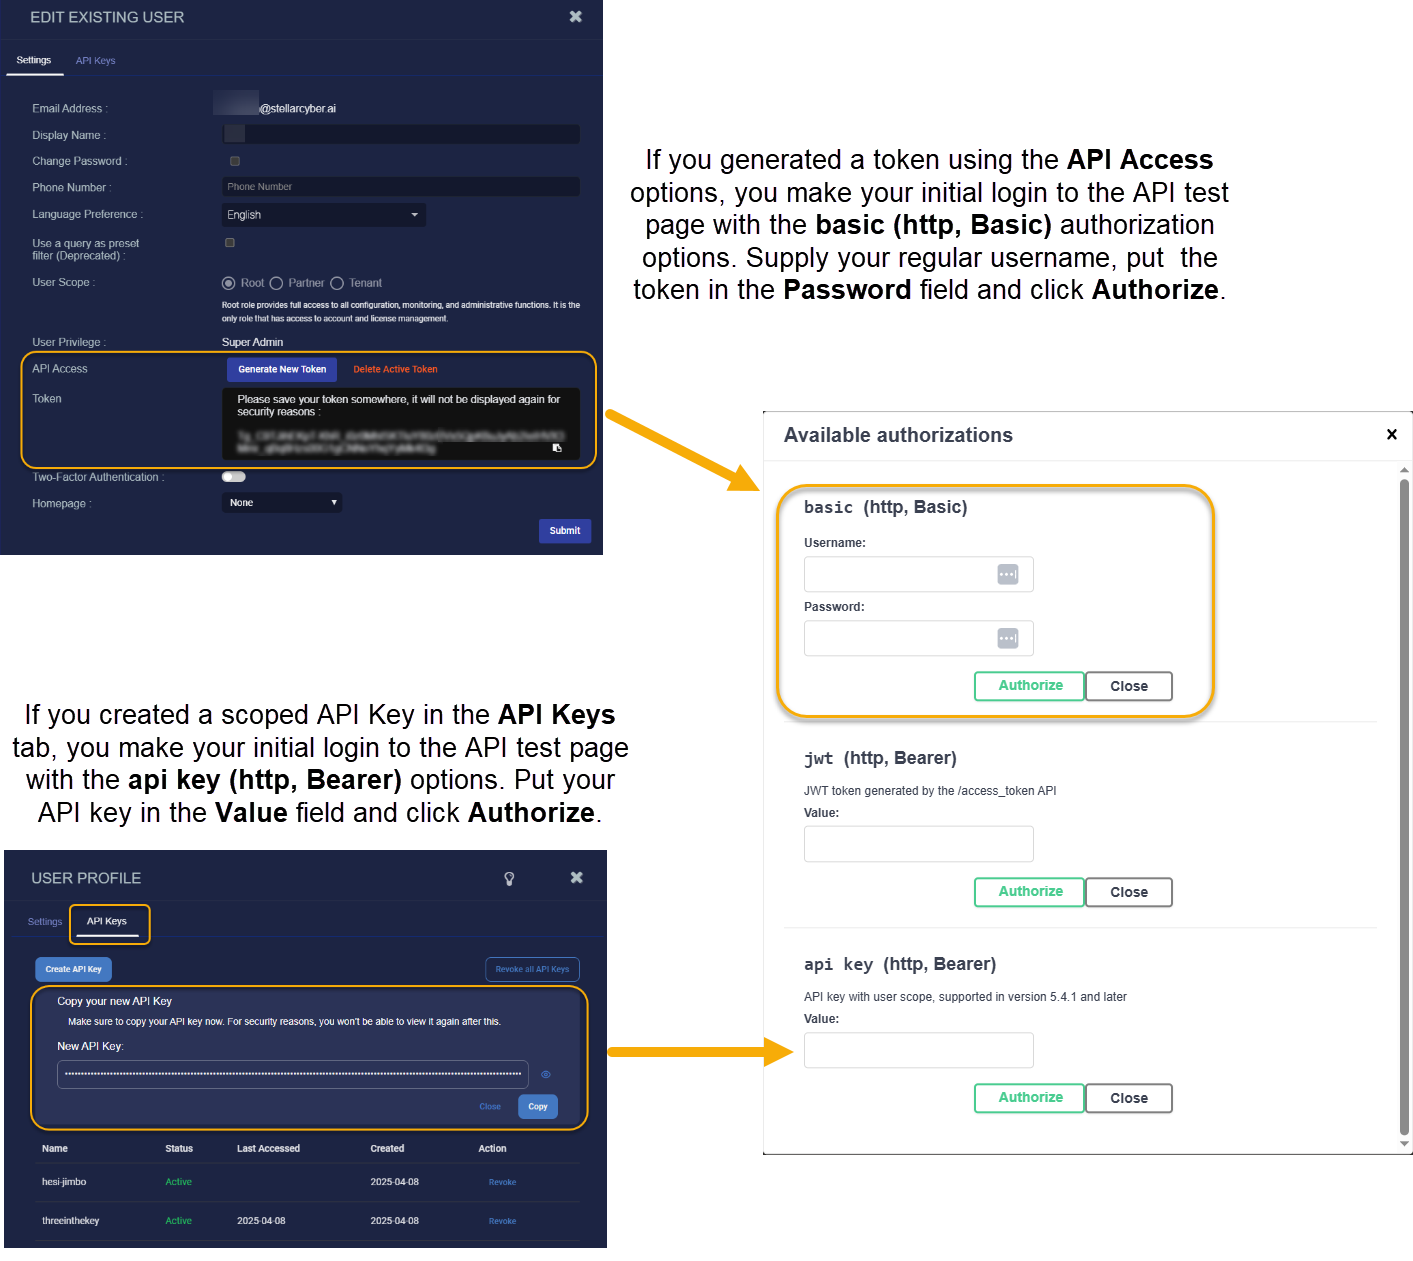
You make your initial login to the API test page differently depending on whether you are using a scoped key from the API Keys tab for your user account or you are a Super Admin with root scope using a token generated from the API Access option in the Edit User dialog box:
-
If you generated a token as a Super Admin/root scope user with the API Access options, you make your initial login to the API test page with the basic (http, Basic) authorization options. Supply the email address associated with your account in the Username field, put the token in the Password field and click Authorize.
If you typically log in with just a username, you still must supply the email address associated with your account here. A simple username will not work in this dialog box.
For example, suppose your name is Don Johnson, you log in with the username djohnson, and your account has the recovery email of djohnson@mv.com associated with it. In this case, you must supply djohnson@mv.com in the Username field, even if you normally log in to Stellar Cyber with the username of djohnson. -
If you created a scoped API Key in the API Keys tab, you make your initial login to the API test page with the api key (http, Bearer) options. Put your API key in the Value field and click Authorize.
The figure below illustrates the two different methods. Note that the tokens created with the API Access options are much shorter than scoped API keys.
The Authorize button changes to a Logout button to show you that you are logged in. In the illustration below, we are logged in using a scoped key:

-
-
Click the x in the upper right hand corner of the Available authorizations dialog box to close it.
-
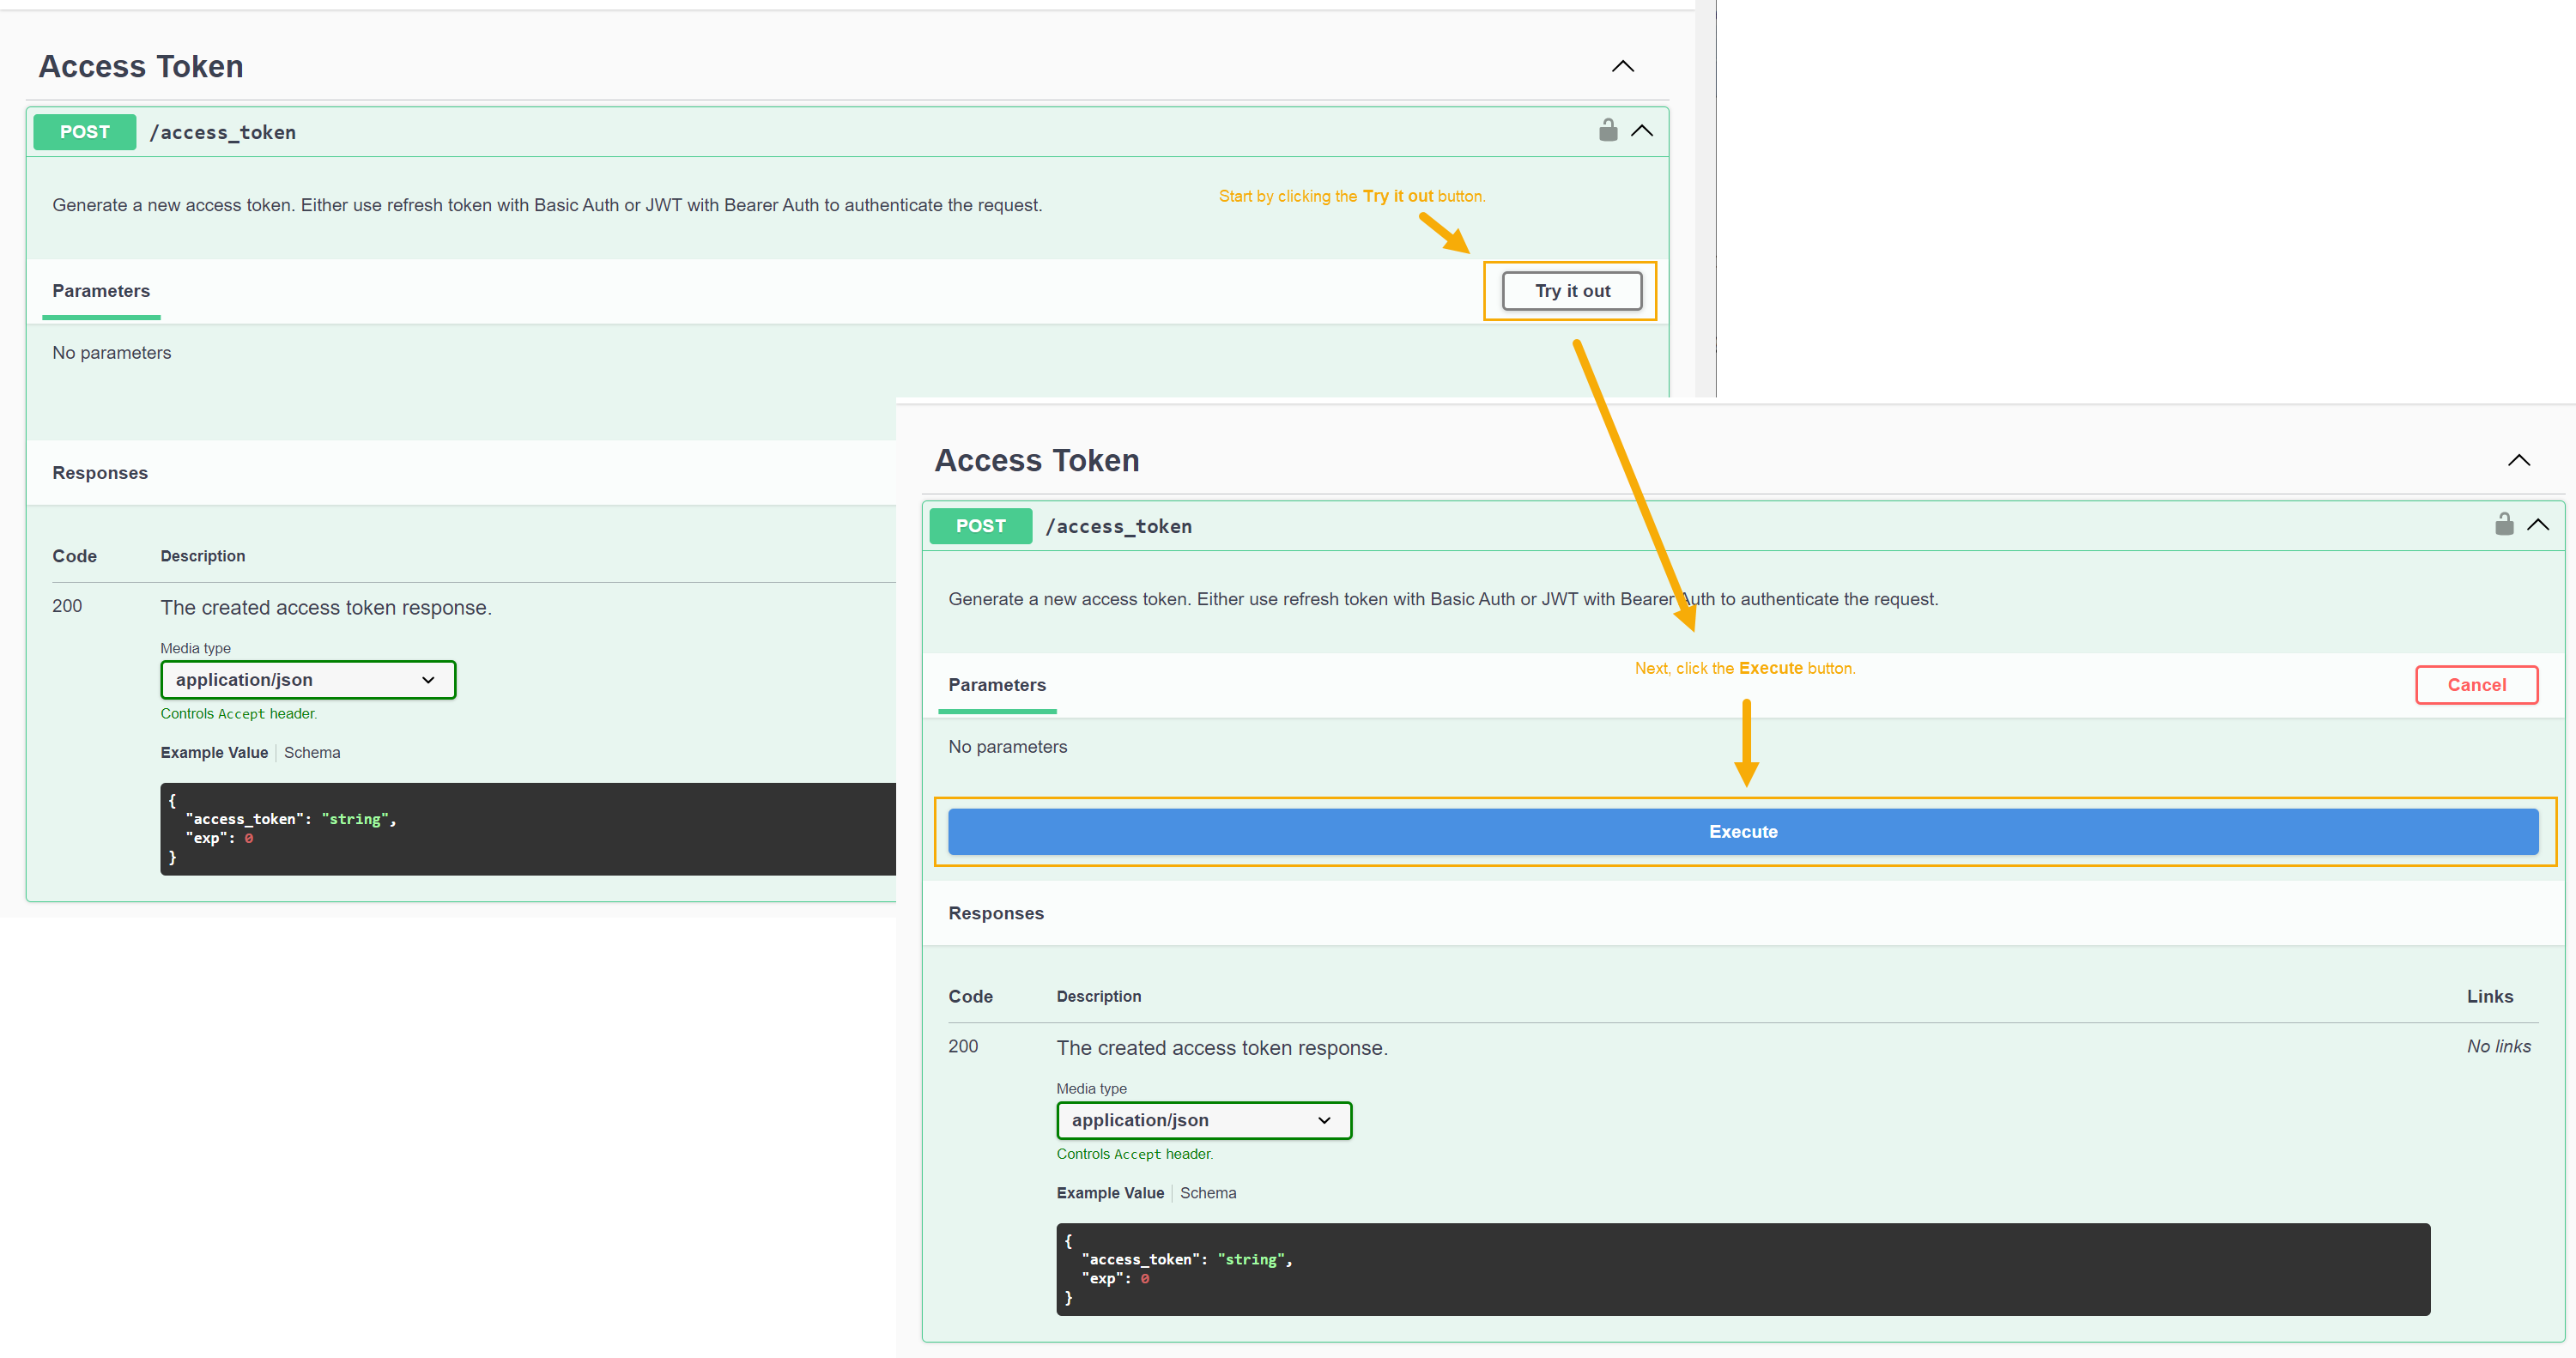
Cascade open the Access Token entry in the API Test Page. Then, click Try it out and Execute, as illustrated below:
-
In response, the
/access_tokenAPI endpoint provides us with a JWT access token, as illustrated below.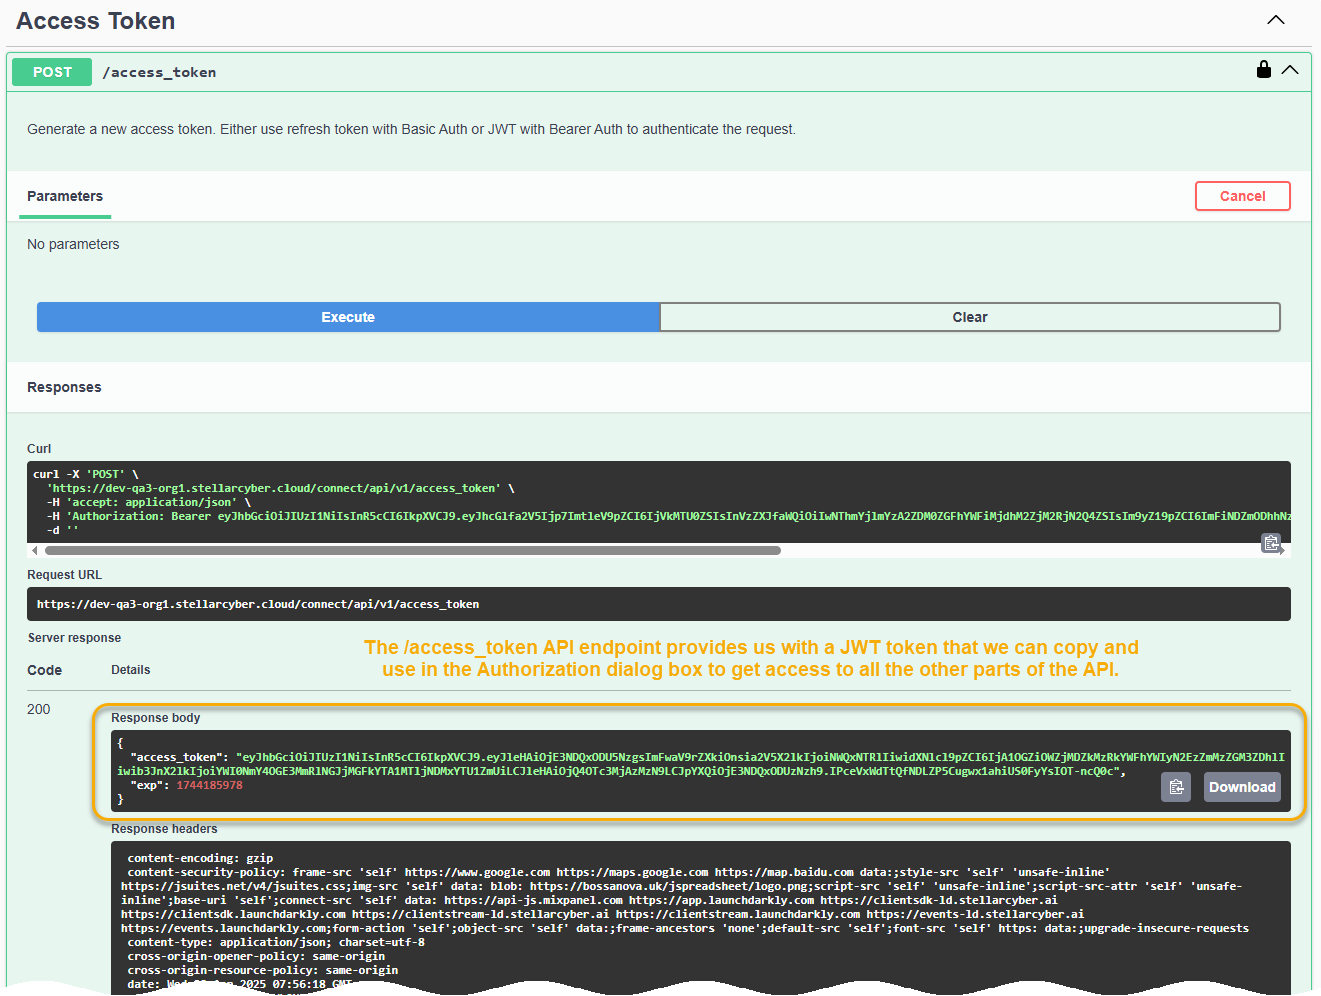
The JWT access token is the green portion of the Response body between the quotation marks. Select and copy the JWT token to the clipboard, as illustrated below.
Don't use the Copy button. It copies the entire Response body instead of just the green portion between quotation marks that is the JWT token.

-
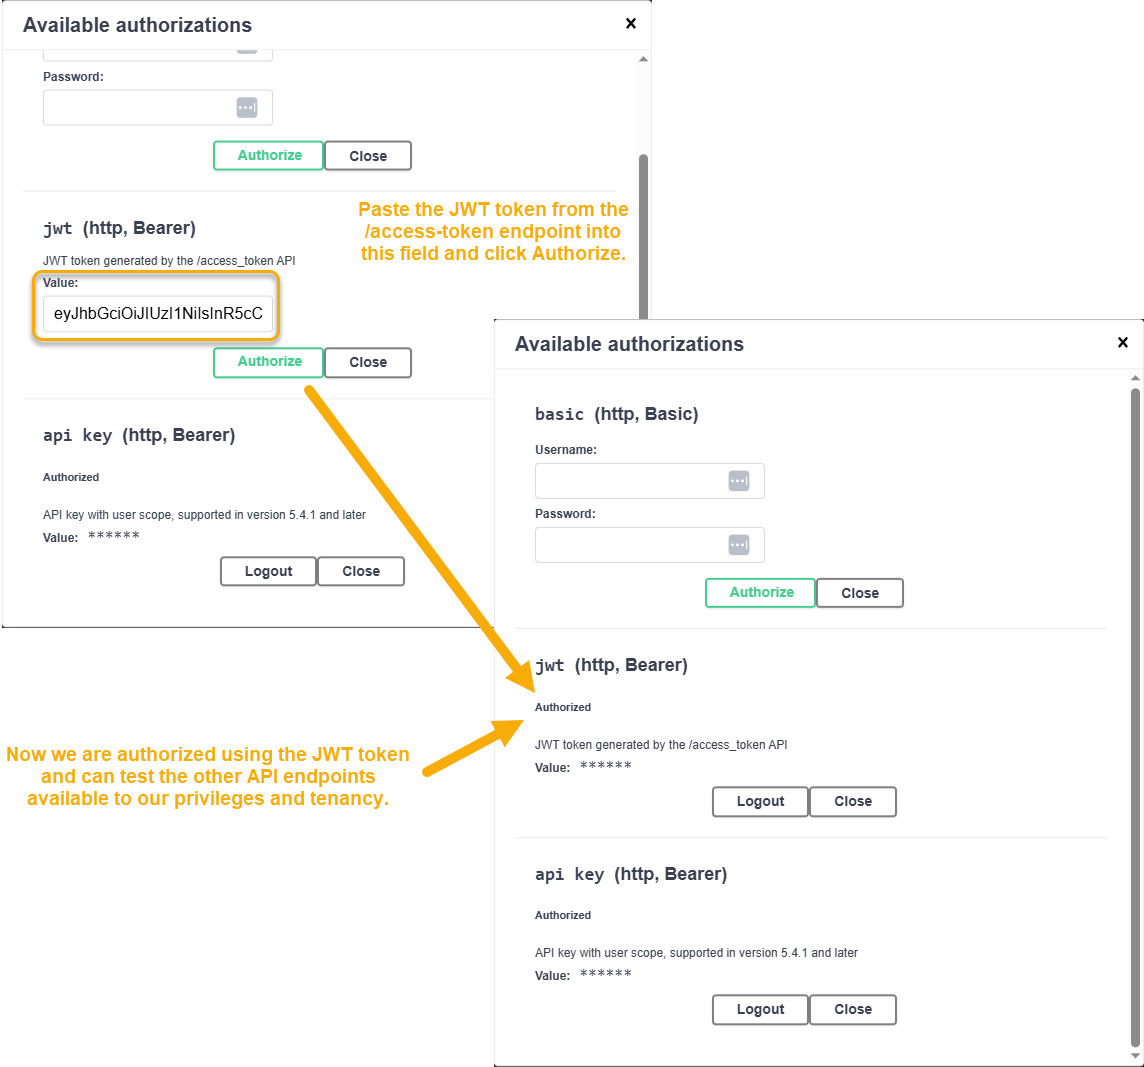
Click the Authorize button at the top right of the API Test Page again.
-
Paste the token you copied from the Response body pane into the jwt (http, Bearer) field and click Authorize, as illustrated below.
-
At this point, you are authorized to the API Test Page using a JWT token and can test out the other endpoints available to your scope and privileges in the API Test Page.
About JWT Token Expiration
Keep in mind that JWT tokens are configured by default to expire ten minutes after they are generated. If this happens while you are using the API Test Page, you may notice that your test calls are no longer working. You can fix this by generating a new JWT token from the /access_token endpoint using the steps in the procedure above. Then, click Authorize, log out of the jwt (http, Bearer) section and log back in with your new JWT token.
If you are using a script to access the API from outside of the API Test Page, you can include a block that gets a new token from the /access_token endpoint every time it's run. Refer to Generating a New JWT as Part of a Script for details.
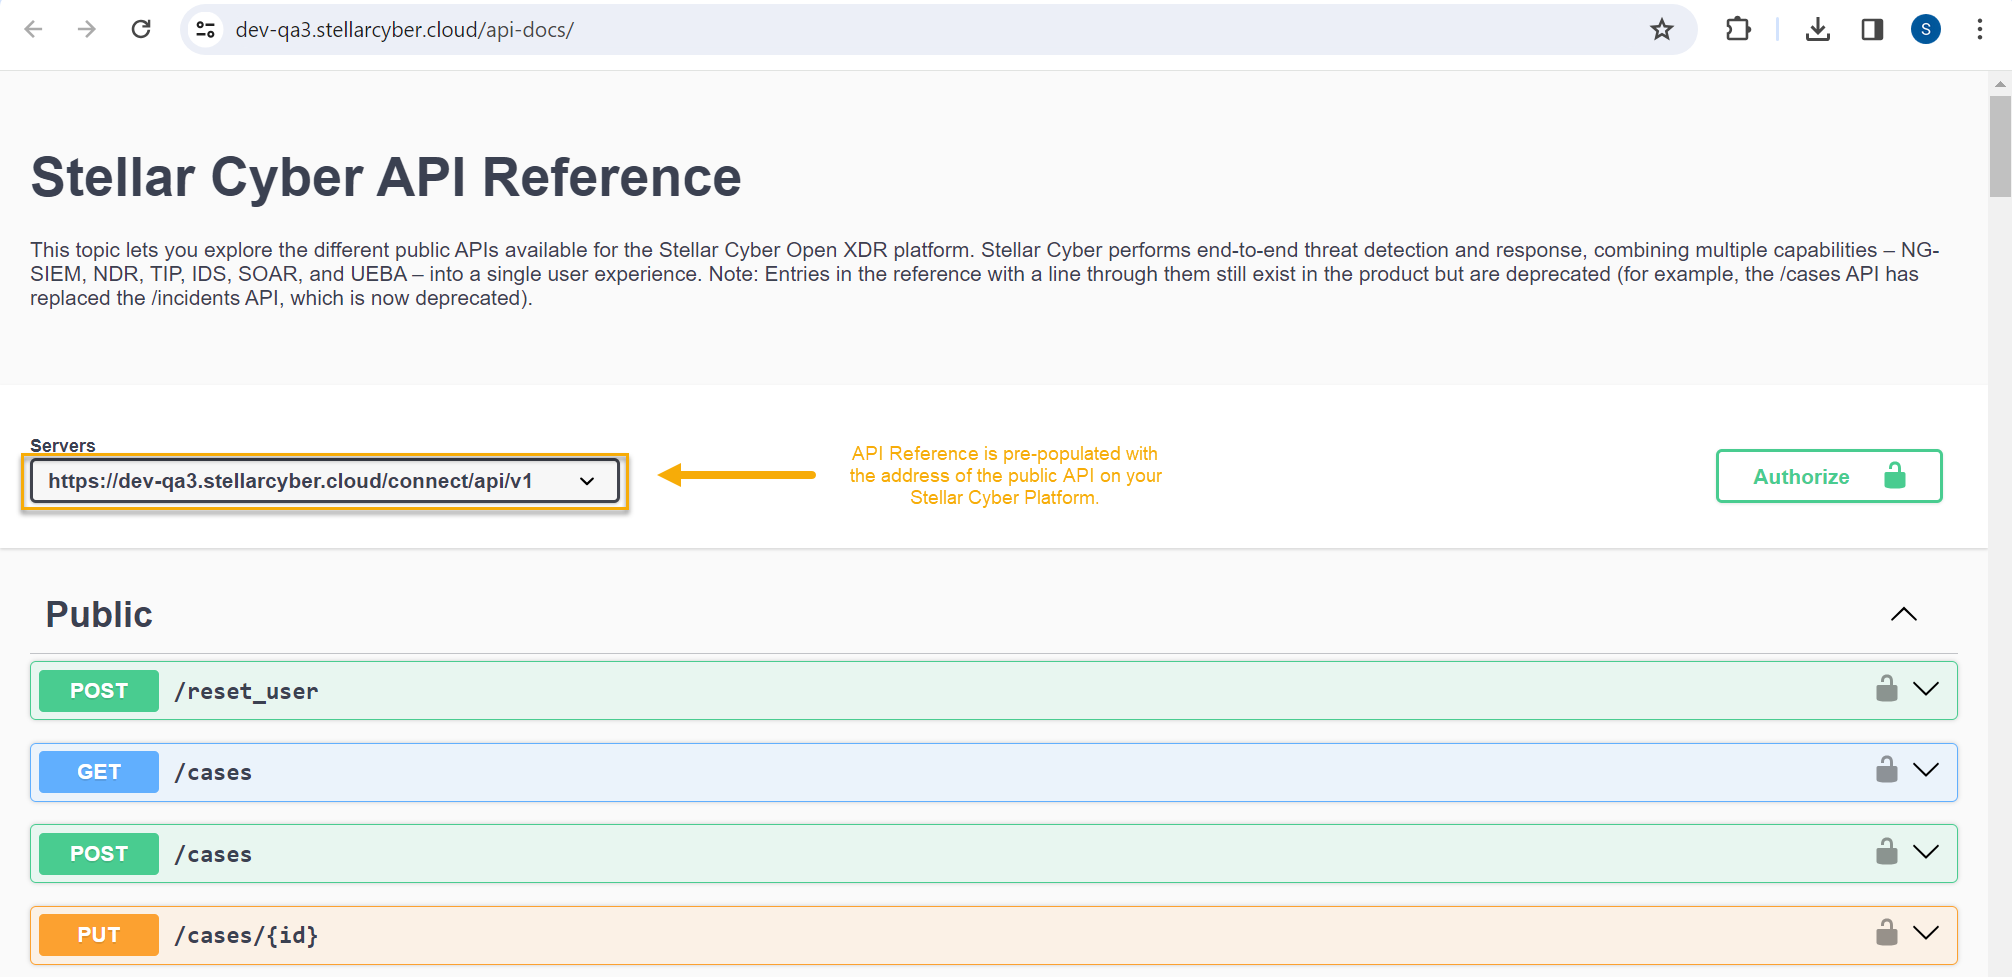
Relative Path to Stellar Cyber API Endpoints
The relative path to Stellar Cyber's public API endpoints is as follows:
-
https://<Platform Hostname>/connect/api/v1/<specific endpoint>
You can see this at the top of the Stellar Cyber API Reference in the Servers field. For example:
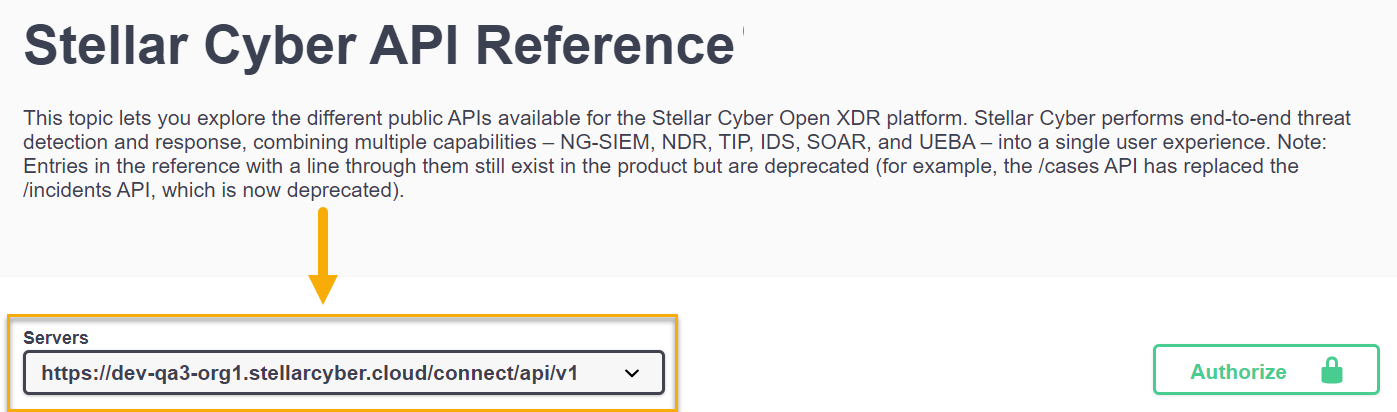
The individual endpoints shown in the API Reference do not include the relative path, but you must include it when accessing the public API outside of the swagger.json page.
Summary of Public APIs
As summarized in the interactive API Reference, Stellar Cyber provides public APIs for the following features:
-
Call custom response actions, including running scripts, firewall actions, execute webhooks, send emails, and so on.
 4
4 -
Create, delete, edit, and list queries.
-
Add tenants to a per-tenant ATH rule.
-
Create, delete, edit, and list connectors. You can also edit the checkpoint of a connector – the time from which it pulls data, which is useful in case of data loss.
When numerous connectors roll back checkpoints during regular operating hours, it can lead to increased resource consumption and potential process interruption due to circuit breakers. Consult with Customer Support for considerations regarding off-peak execution of checkpoint rollback.
-
Create, delete, update, and list queries with the
/queriesendpoint.
The
/queriesendpoint is available as part of an Early Access Program and may not be available in your version of the Stellar Cyber Platform. It will be generally available in the 5.5.0 release. -
Add Tenants to a per-tenant ATH rule with the
/alert_watchersendpoint.The
/alert_watchersendpoint is available as part of an Early Access Program and may not be available in your version of the Stellar Cyber Platform. It will be generally available in the 5.5.0 release. -
Get alert types along with their key fields

-
Retrieve phonehome logs
-
Retrieve privilege profiles so they can be used with create/update user APIs
-
Download sensor images

-
Retrieve detailed sensor information
-
Delete sensors
-
Retrieve detailed case information
-
Retrieve case observables
-
Update case information
-
Create cases
-
Close cases, including the ability to close all alerts associated with the case when the case is closed (update_alerts parameter
). -
Retrieve information on storage usage
-
Retrieve ingestion statistics
-
Retrieve information on the configuration and hits of log filters.
-
Retrieve user activity logs for Stellar Cyber user accounts.
-
Create, delete, update, and list tenants
-
Create, Delete, Update, and List Tenant Groups
-
Update Tags, Status, and Comments for Events
-
Perform an ElasticSearch Query on a Specific Index
-
Reset User Passwords
-
Add events to the Security Index (bulk or standard)
-
Create, Delete, and List Lookup Tables (by Tenant or by All Tenants)
-
Create, Delete, and List Reports
-
Create, Delete, and List Security Event Filters
-
Create, Modify, and Delete Data Analyzer Profiles
