Configuring Azure AD SSO
See also: Configuring Azure AD B2C SSO
-
For Authentication Only SSO: All users must first be added manually in the data processor (DP). Subsequent to that manual entry, the user can log in with SSO.
-
For Authentication & Authorization SSO: All users are configured through the IdP.
-
You enable SSO for all users except the root admin user. The root admin user must always use local authentication (
https://Stellar Cyber DP address/login). -
For Local access (bypass) when SSO is enabled: If Stellar Cyber loses connectivity with your IdP, users configured for SSO cannot log in. As a preventive bypass method, manually create a new user in the DP with
rootscope and with a valid email address that has "+admin" appended to a valid user name, as follows:<user>+admin@yourorganization.com(joe+admin@yourorganization.com). The user you create must be able to receive a password reset email at<user>@yourorganization.com. This process an email alias for that valid user that Stellar Cyber uses to permit bypass of an SSO for local login. After you create this separate manual user account, that user can log in two ways:-
an SSO user with
<user>@yourorganization.com -
or as a local user at
https://Stellar Cyber DP address/login)using<user>+admin@yourorganization.com
If SSO is configured, it is recommended to keep an active administrative account in Stellar Cyber's user management.
-
You can configure Stellar Cyber to use Azure AD SSO for Authentication or Authentication and Authorization using the procedure in this topic.
You will need to collect the following information as you progress through the procedure.
-
User Principal Names (email addresses for users that will log into Stellar Cyber with SSO)
-
Claim / Attribute Information (Applicable for Authorization only)
-
Identifier (Entity ID)
-
Login URL
-
Certificate
The order in which you perform these steps matters. Perform the steps in the order shown.
Create a Stellar Cyber Application for SSO in Azure AD
Set up this application to configure Stellar Cyber as an application that uses Azure AD for authentication.
-
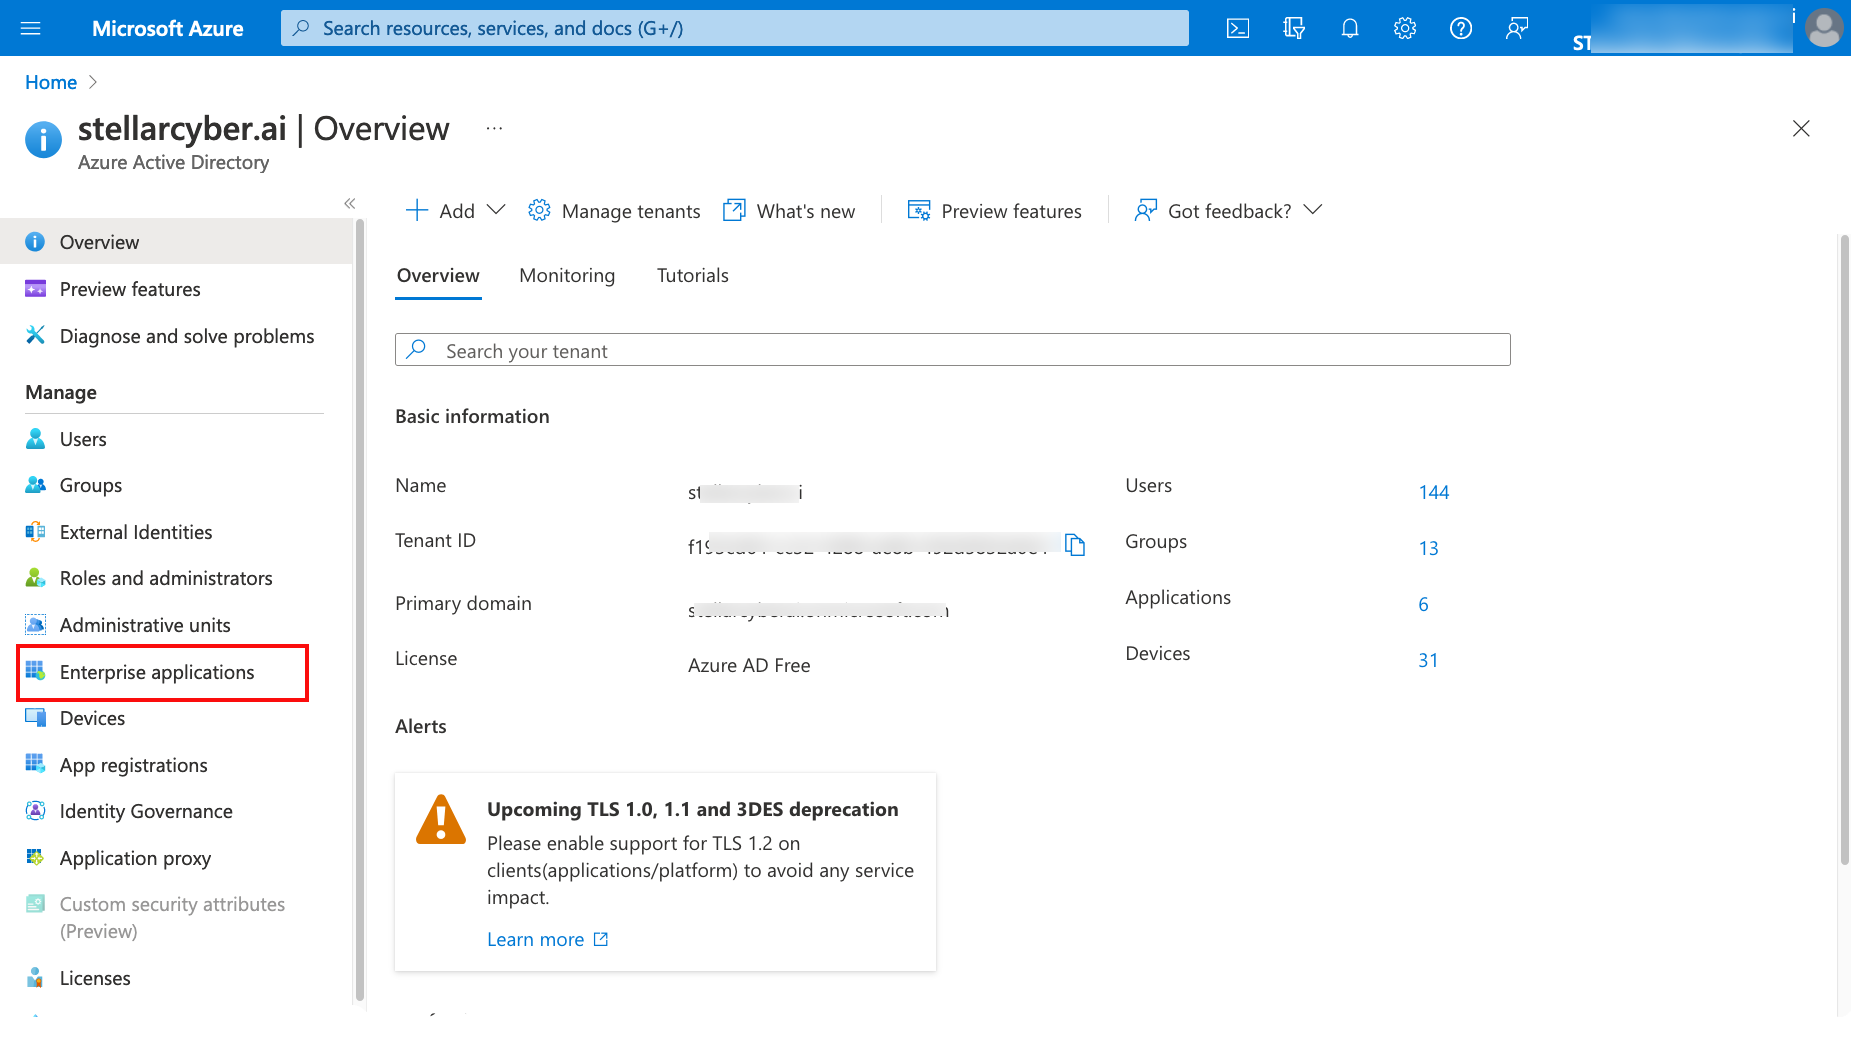
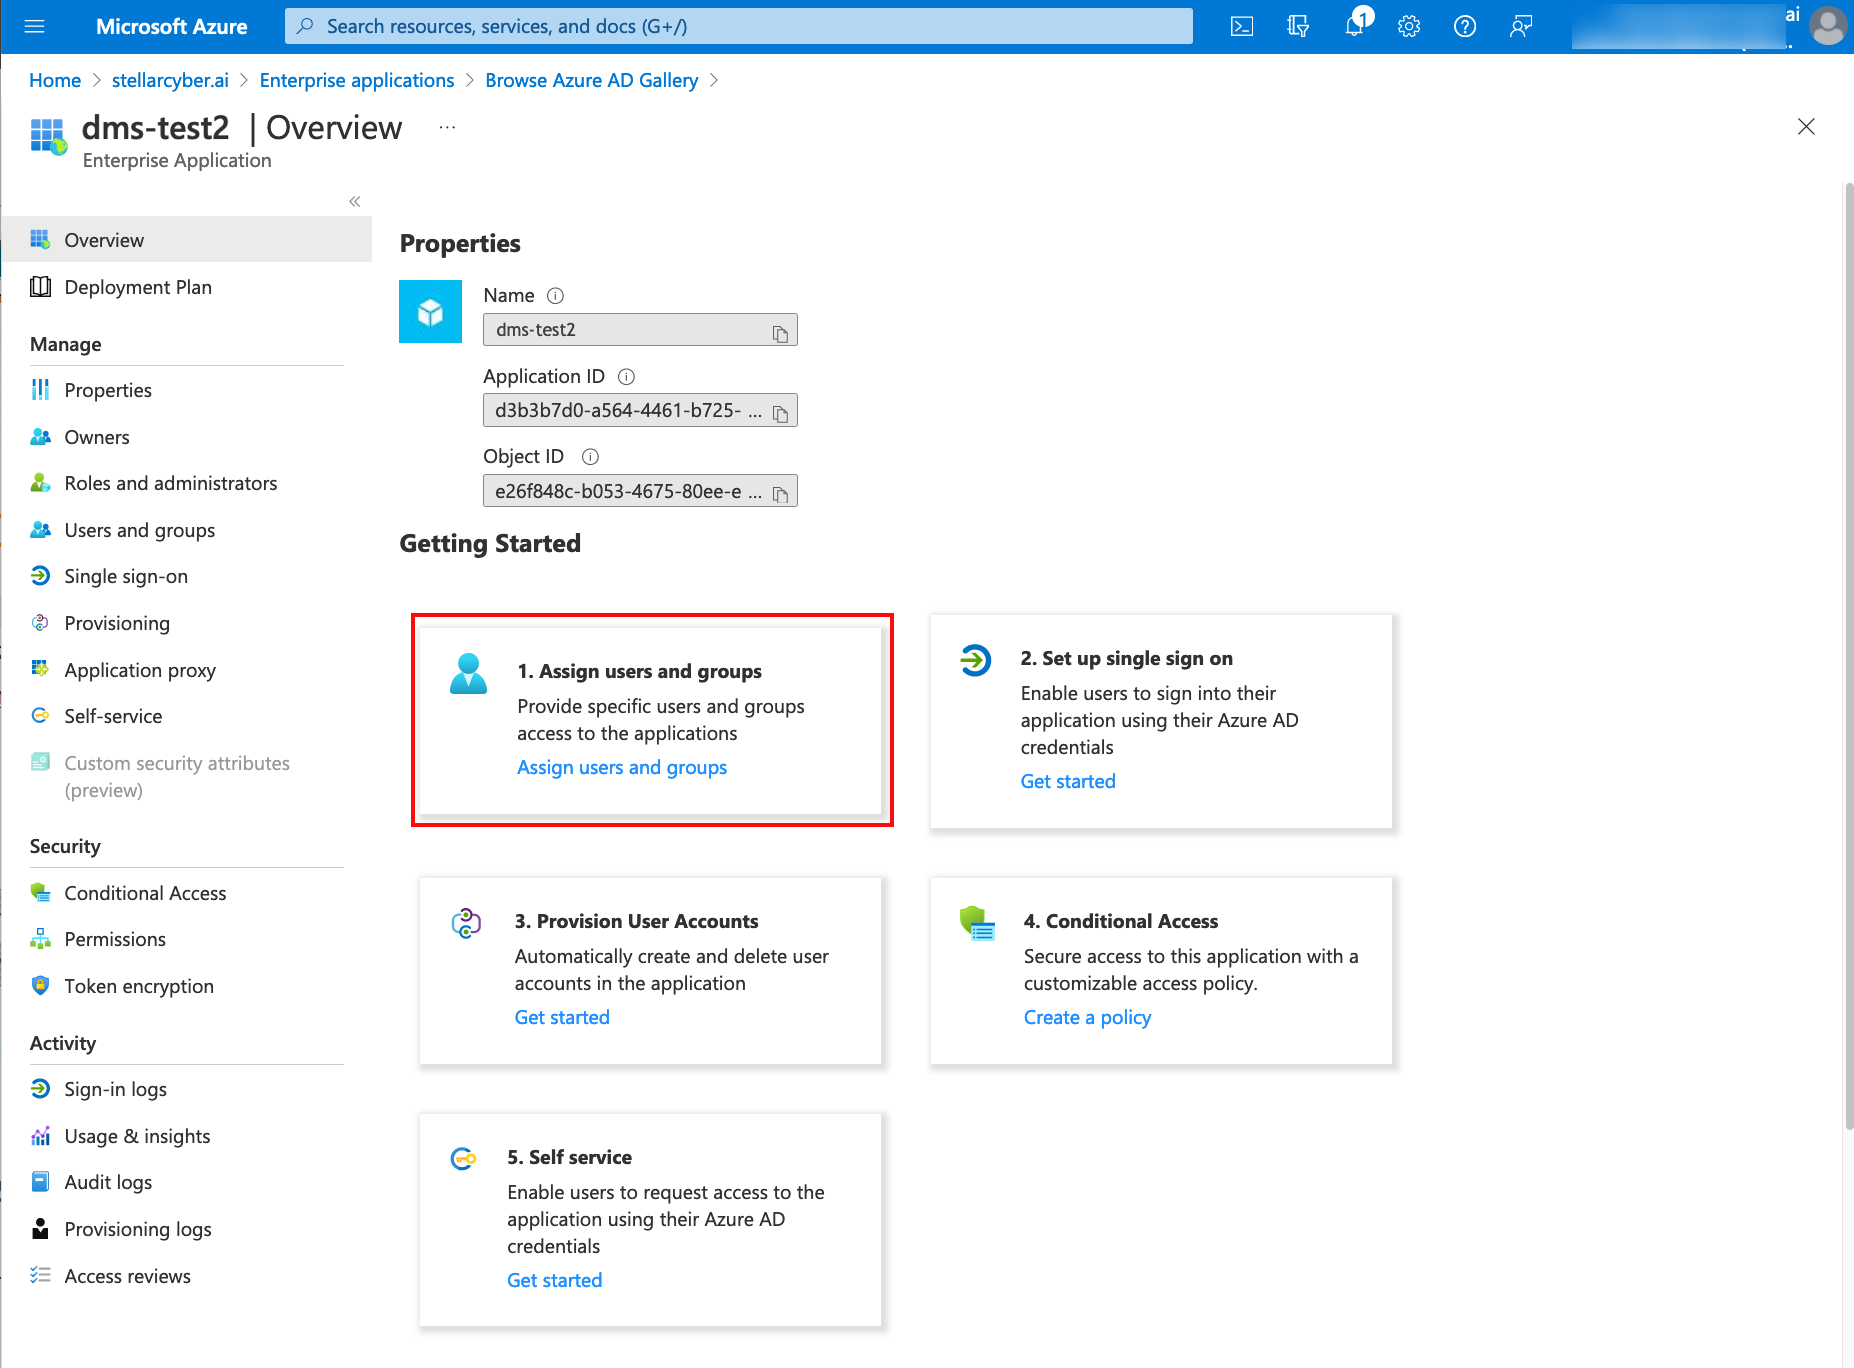
Log in to https://portal.azure.com as an administrative user and select Azure Active Directory from the navigation pane.
-
From the left navigation, select Enterprise Applications.
-
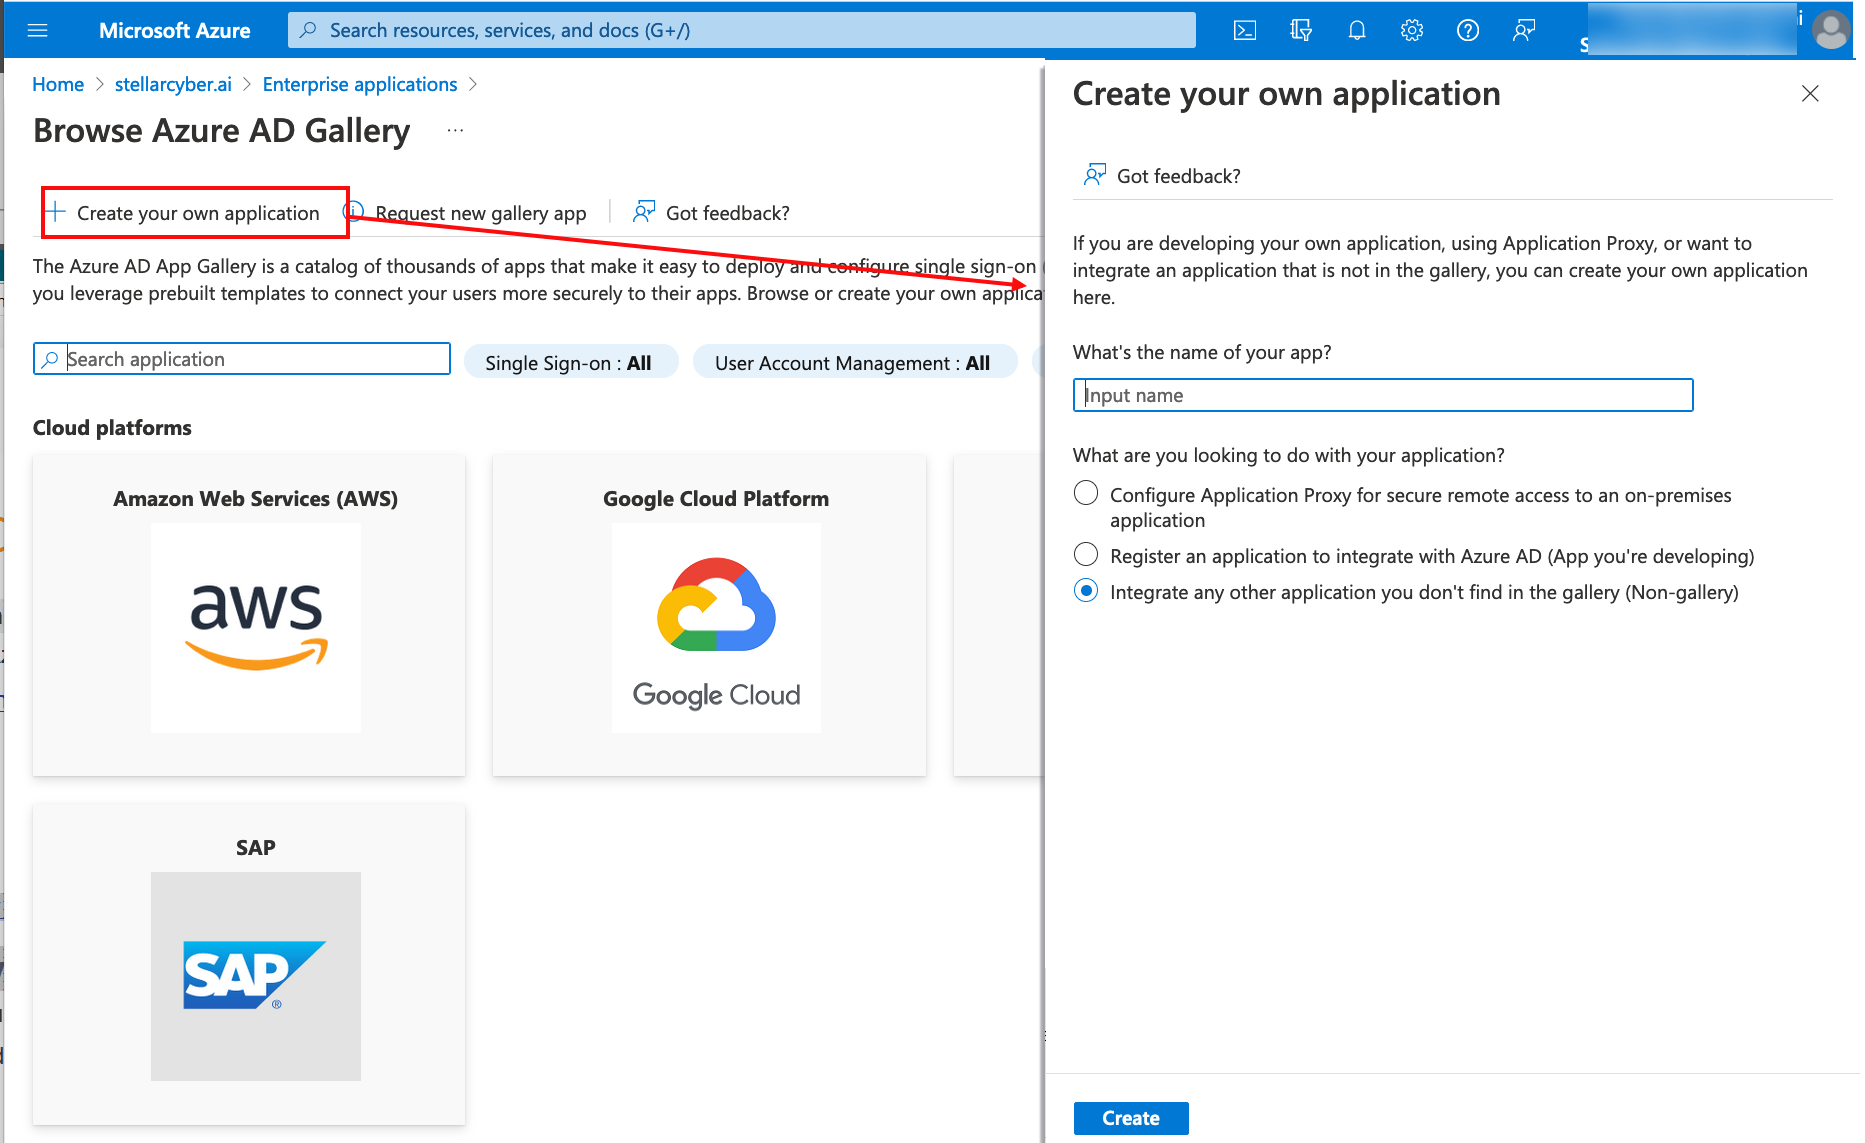
Click New application.
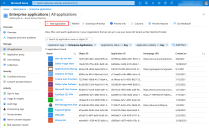
-
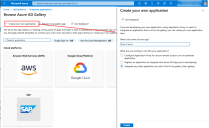
After the Browse Azure AD Gallery pane displays, click Create your own application.
-
In the Create your own application pane, specify a name for the application that will be used to manage your Stellar Cyber SSO access.
-
Select the radio button for Integrate any other application you don't find in the gallery (Non-gallery).
-
Click Create.


With your application created, you can now add users and configure SAML.
Add Users/Groups to the Stellar Cyber SSO Application
When you complete this section, you should have a list of the User Principal Names you added to this application. You will need to add these for the following purposes:
-
For Authentication Only SSO configurations: You will use these to create user accounts in Stellar Cyber.
-
For Authentication and Authorization SSO configurations: You will use these to assign values to claim attributes (not applicable for per-tenant SSO).
-
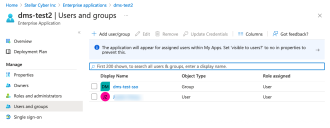
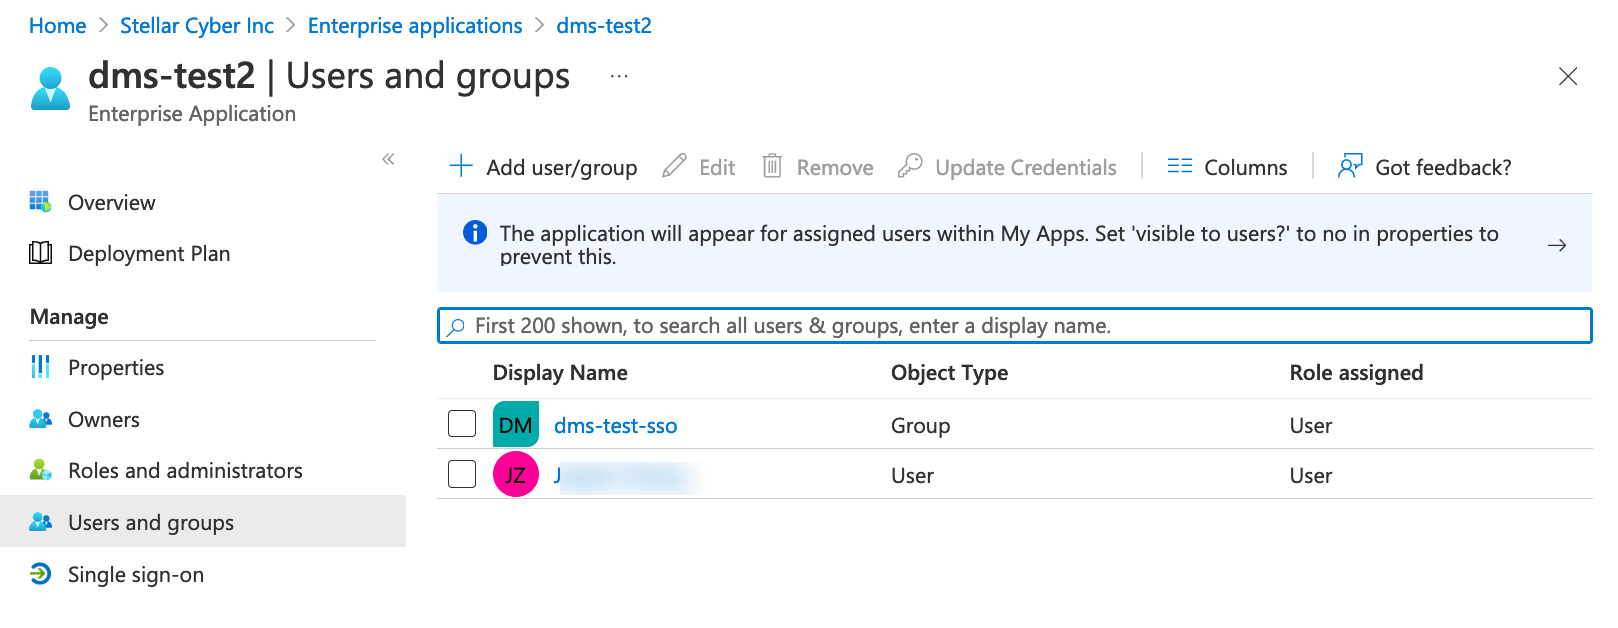
When the Overview pane of your new application displays, click the tile to Assign users and groups to the application.

-
Click Add user/group.
-
From the left side of the Add Assignment pane, click None Selected. A selection list displays.
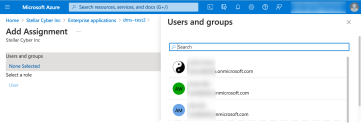
-
Pick each user or group, then click the Select button. After you pick the first the Users and Groups section is updated to show a count of your selections.
-
Repeat the process. Click that link and add each user or group, until you are finished.
-
When you have finished adding users or groups, click the Assign button at the bottom of the Add Assignment pane. The list of users/groups you selected for this application is displayed.
-
You must make note of each user's User Principal Name for these reasons:
Email addresses in Azure AD are case sensitive. The Azure user email address must exactly match the Stellar Cyber email address.
-
For Authentication Only SSO configurations: You will use these to create user accounts in Stellar Cyber.
-
For Authentication and Authorization SSO configurations: For this type of configuration, users are automatically added to Stellar Cyber. You will use the User Principal Names, though to assign values to claim attributes (not applicable for Tenant-specific SSO; Authorization configurations apply only to Global SSO).
-
For users, click the Display Name and copy the User Principal Name.
-
For groups, click the Display Name and then click the Members link in the left side of the navigation pane. This displays a list of members (users) in that group. You can now click each user Name and copy the User Principal Name.
-


Now that you have added users to the application, you can configure the SSO SAML section.
Configure SAML for the Azure AD Stellar Cyber Application
When you complete this set of steps, you will have the certificate and other information required to configure SSO in the Stellar Cyber UI.
-
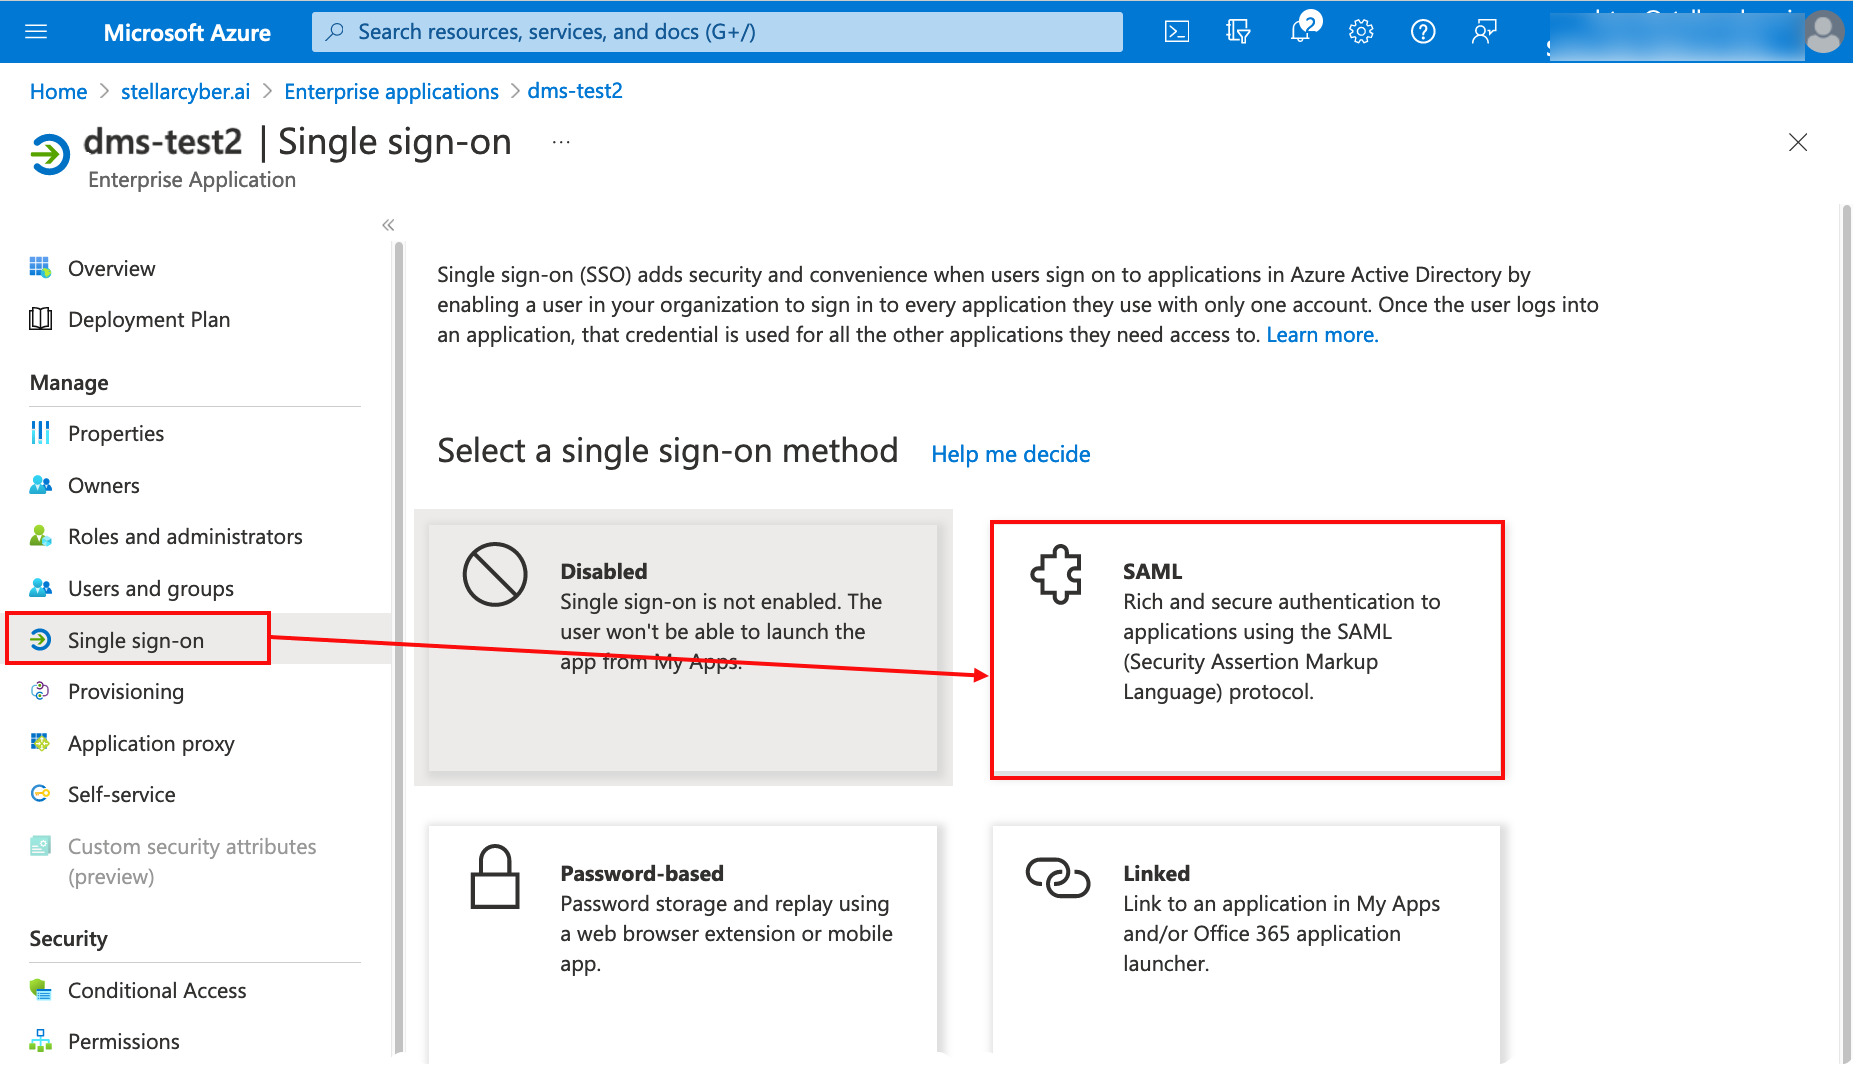
If you have navigated away from the application page, click the Home button on the portal and navigate back your organization's list of Enterprise applications.
-
Locate and display the application you created above.
-
Select Single sign-on from the left side navigation, or click the tile labeled Set up single sign on.
-
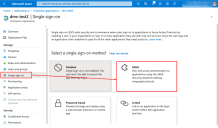
From the Single sign-on page, click the tile labeled SAML.
-
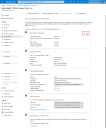
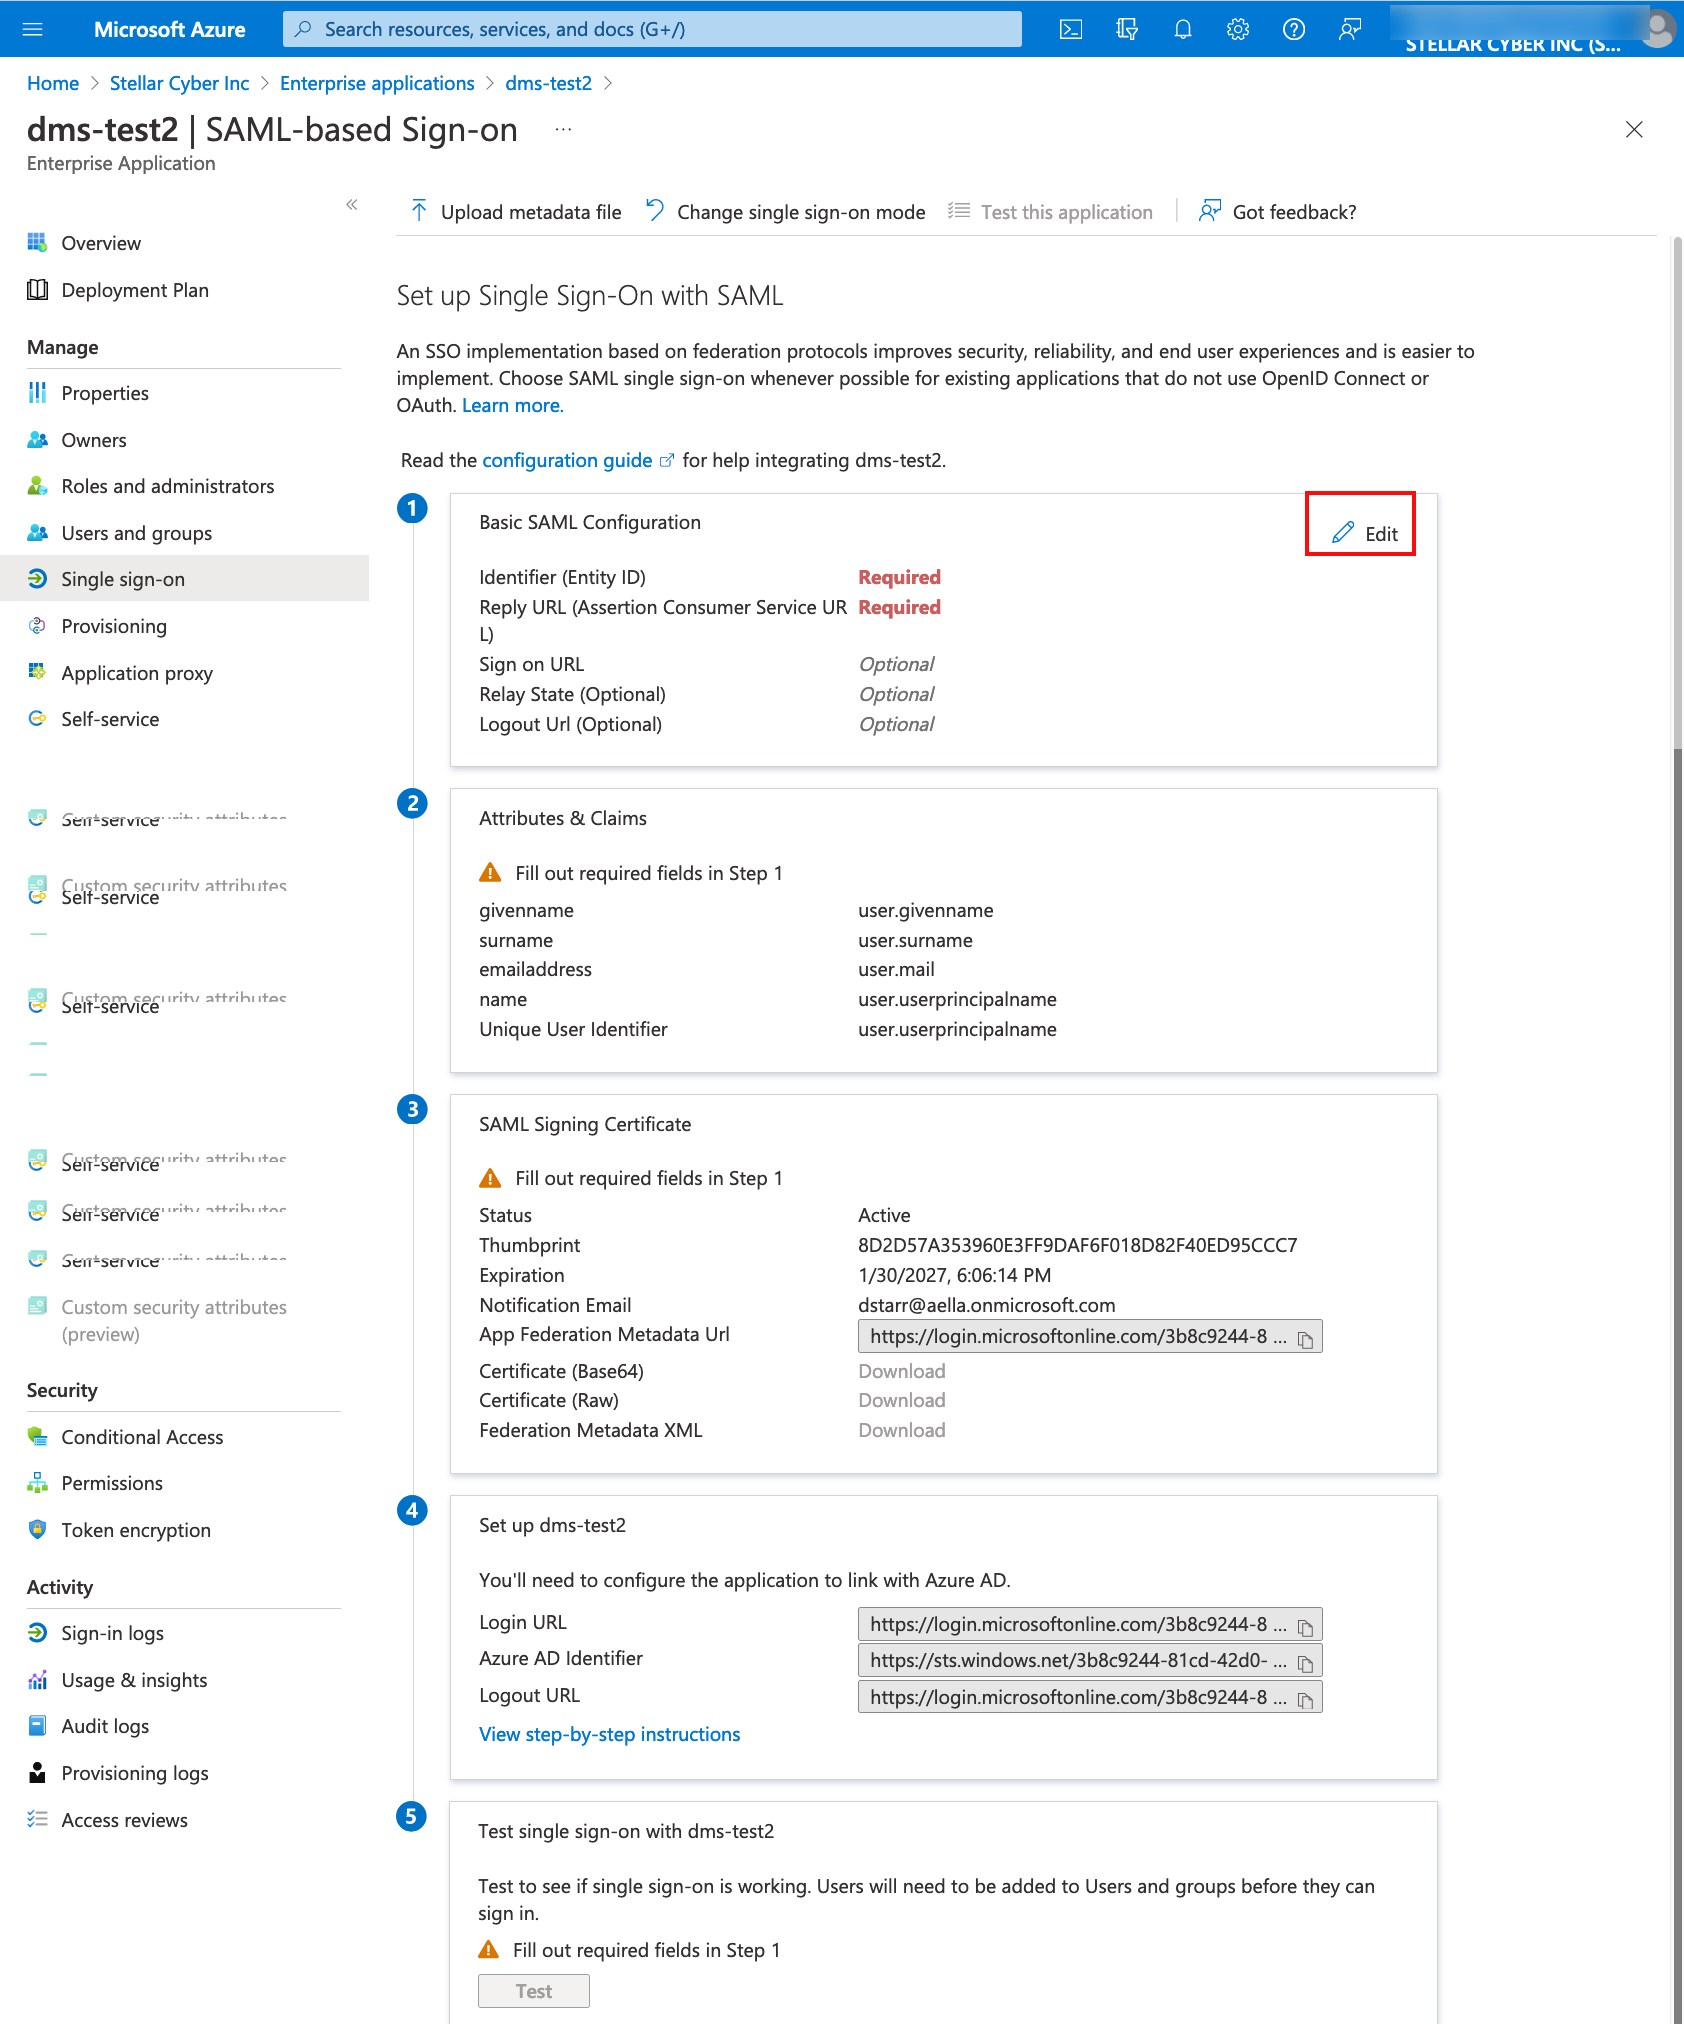
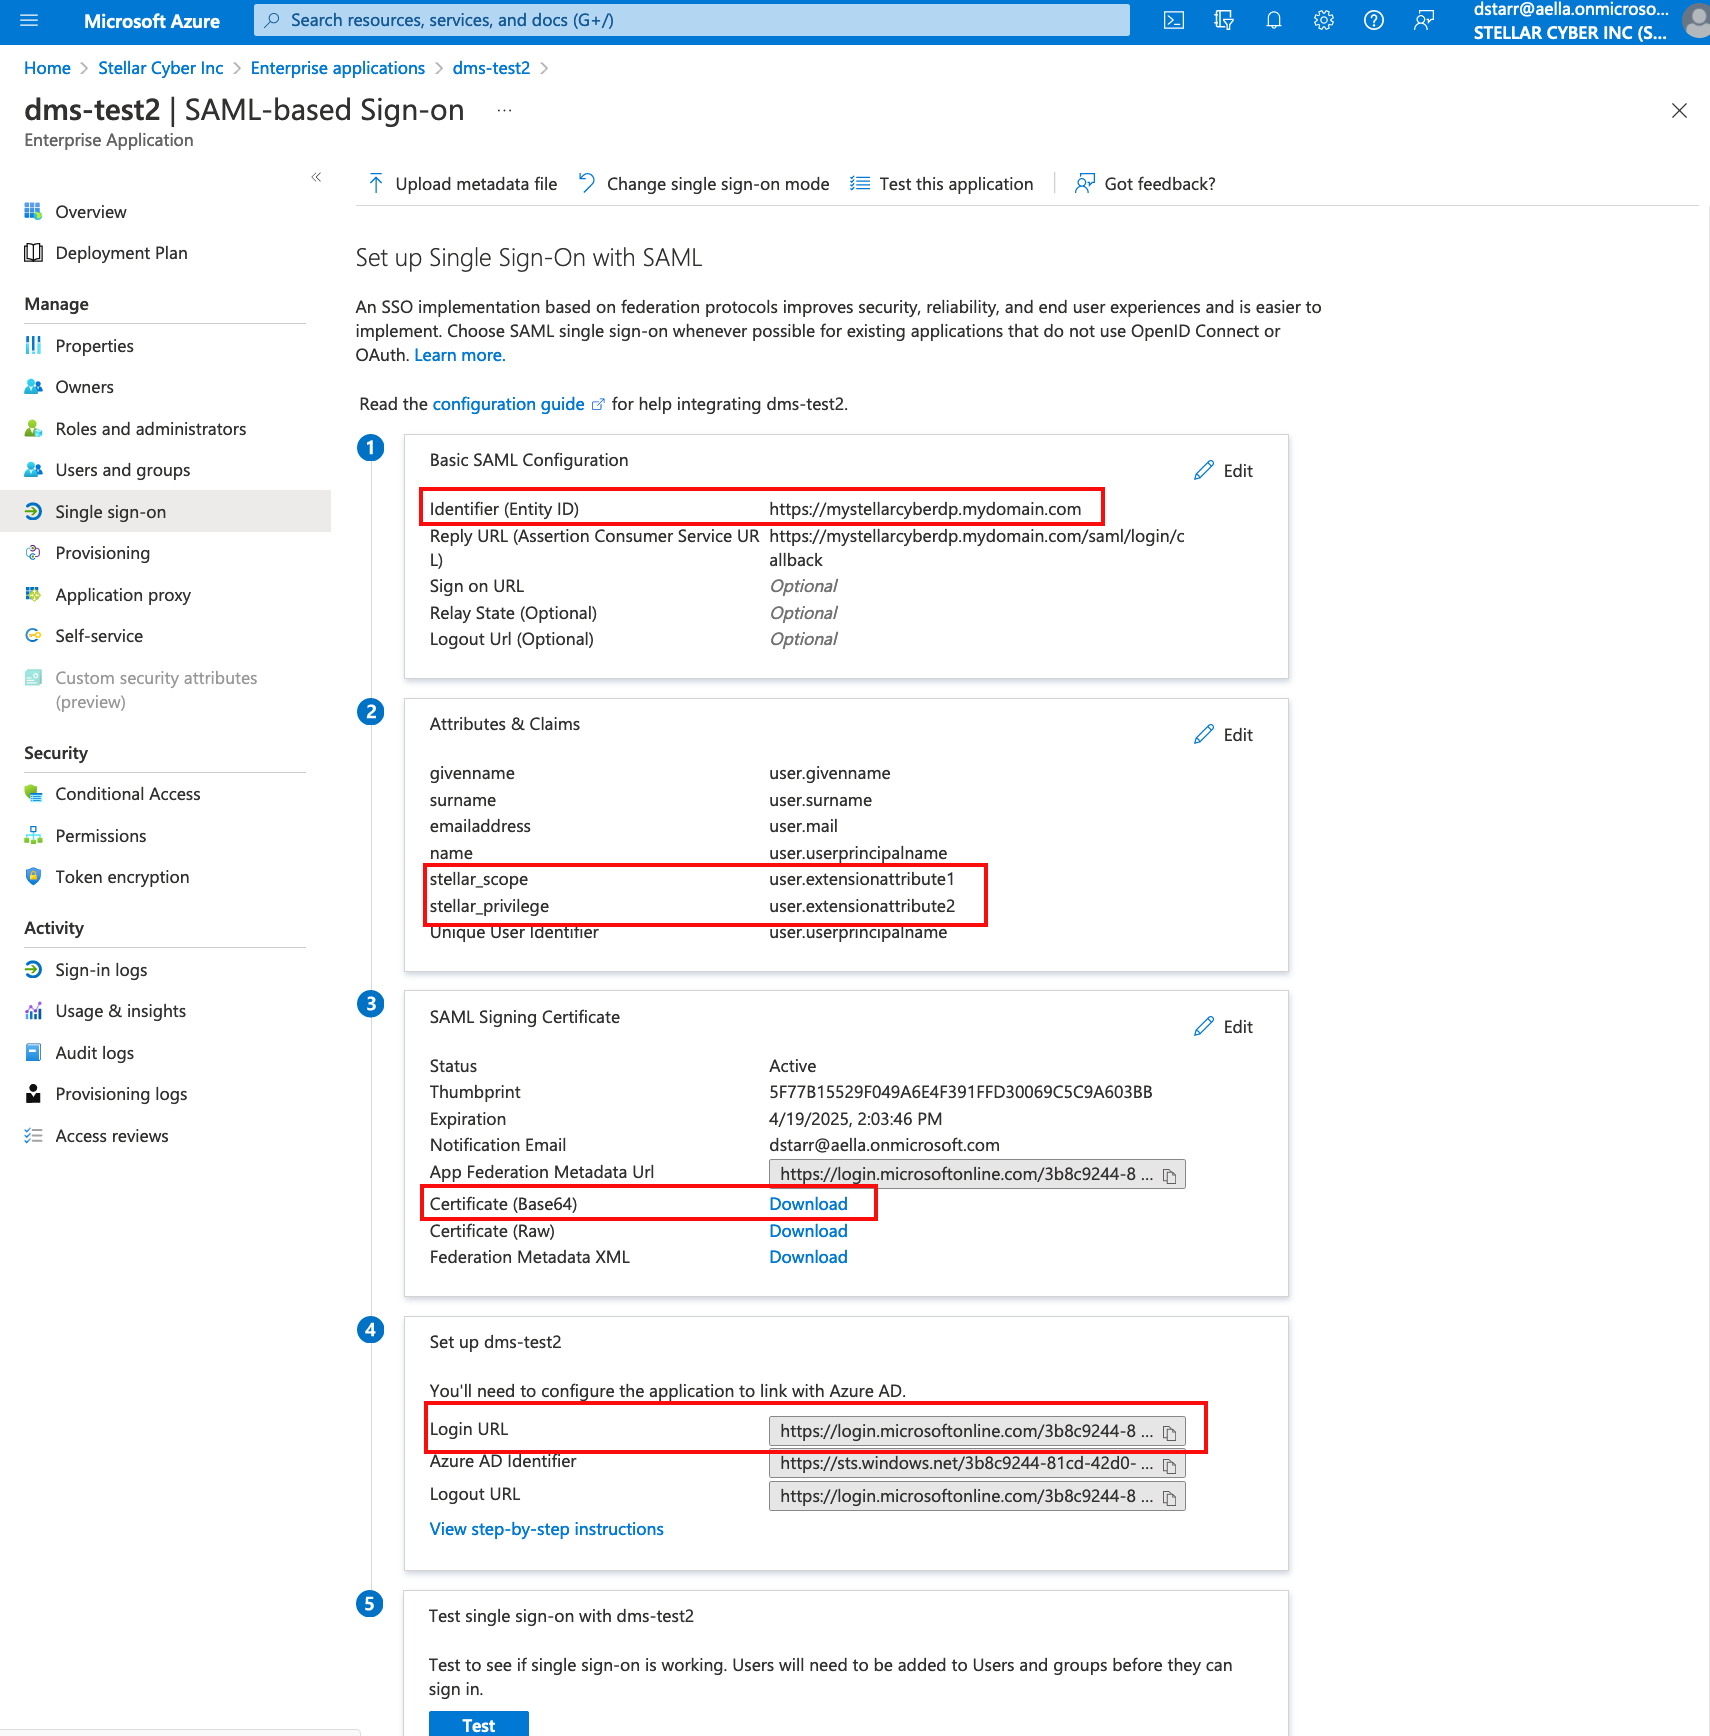
In the first block, labeled 1. Basic SAML Configuration, click Edit.
-
In the pane that opens, Add the following values:
If you are configuring SSO for the whole Stellar Cyber DP:
-
Identifier (Entity ID): This is used for the Issuer URL field in Stellar Cyber. Enter the URL to your Stellar Cyber DP. For example:
https://192.168.24.110. -
Reply URL: Use the above URL, appended with /saml/login/callback. The format is: https://<IP Address of DP>/saml/login/callback. For example:
https://192.168.24.110/saml/login/callback. -
Logout URL: (Optional) Use the above URL, appended with /logout. For example:
https://192.168.24.110/logout.
If you are configuring SSO for a specific tenant:
-
Identifier (Entity ID): This is used for the Issuer URL field in Stellar Cyber. Enter the URL to your Stellar Cyber DP. For example:
https://192.168.24.110. -
Reply URL: Use the above URL, appended with /saml/login/callback/cust_id/<tenant id>. The preferred format is: https://<IP Address of DP>/saml/login/callback/cust_id/<tenant id>. For example:
https://192.168.24.110/saml/login/callback/cust_id/59125044. -
Logout URL: (Optional) Use the above URL, appended with /logout. For example:
https://192.168.24.110/logout.
-
-
Click Save, then exit the Basic SAML Configuration editor pane. Block 1 of the SAML configuration is now complete.
Configure Authorization (Optional)
Authorization allows you to assign Stellar Cyber scopes, privileges, and tenant options within Azure AD, rather than within Stellar Cyber. If you want to configure Authorization in addition to Authentication, you must add Azure AD attributes / claims (scopes) for use in Stellar Cyber This procedure adds the required fields to the Azure AD users you associated with the application.
-
You must configure the basic identity, above, before you perform the steps in this section.
-
If you are configuring Authentication only, or per-tenant SSO authentication, skip this section.
Add Stellar Cyber Fields to User Accounts
-
If you have navigated away from the application page, click the Home button on the portal and navigate back your organization's list of Enterprise applications.
-
Locate and display the application you created above.
-
Select Single sign-on from the left side navigation, or click the tile labeled Set up single sign on.
-
From the Single sign-on page, click the tile labeled SAML.
-
In the second block, labeled 2. Attributes & Claims, click Edit.
-
When the Attributes & Claims page opens, select the option to Add new claim.
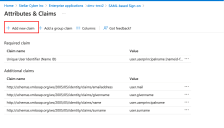
-
Use the Manage claim page to add the following attributes that correlate to the access control in Stellar Cyber. You define attributes in this UI area; values are added in a later step.
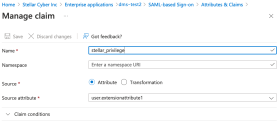
Take care when entering the required attributes and values. Typos in either mean that users are not authenticated and cannot log in. Typos in the optional attributes and values mean that users are not assigned to the appropriate tenant or tenant group (but are authenticated).
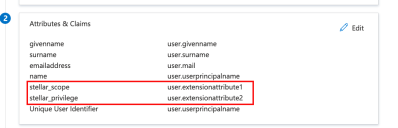
Custom Attribute Name
Source Attribute*
Values (set later) Global SSO Tenant-specific SSO
stellar_scopeuser.extensionattribute1
rootpartnertenantRequired for Authorization
Not applicable
stellar_privilegeuser.extensionattribute2
super_adminplatform_adminsecurity_adminuserRequired for Authorization
stellar_tenantuser.extensionattribute3
ID number for configured tenant (Optional) Specify an individual tenant ID, not name. The ID is available on the Tenants List page.
stellar_tenant_groupuser.extensionattribute4
ID number for any configured tenant group (Optional) Specify a tenant group ID, not name. This is typically available for use by MSSP users with the Partner role. The Tenant Group ID is displayed on the Tenant Groups page.
* Any available user.extensionattributeX (where X is 1-15) may be used
-
Values in these fields are case sensitive and syntax matters. Use the exact indicated syntax and verify that you have made no typos
-
If you have created a custom privilege with spaces or dashes, use an underscore instead. Example: A custom privilege of STML-Security Admin must be entered as
STML_Security_Admin.
-
-
Click Save, then exit the Attributes & Claims editor pane. Block 2 should now show the attributes you added


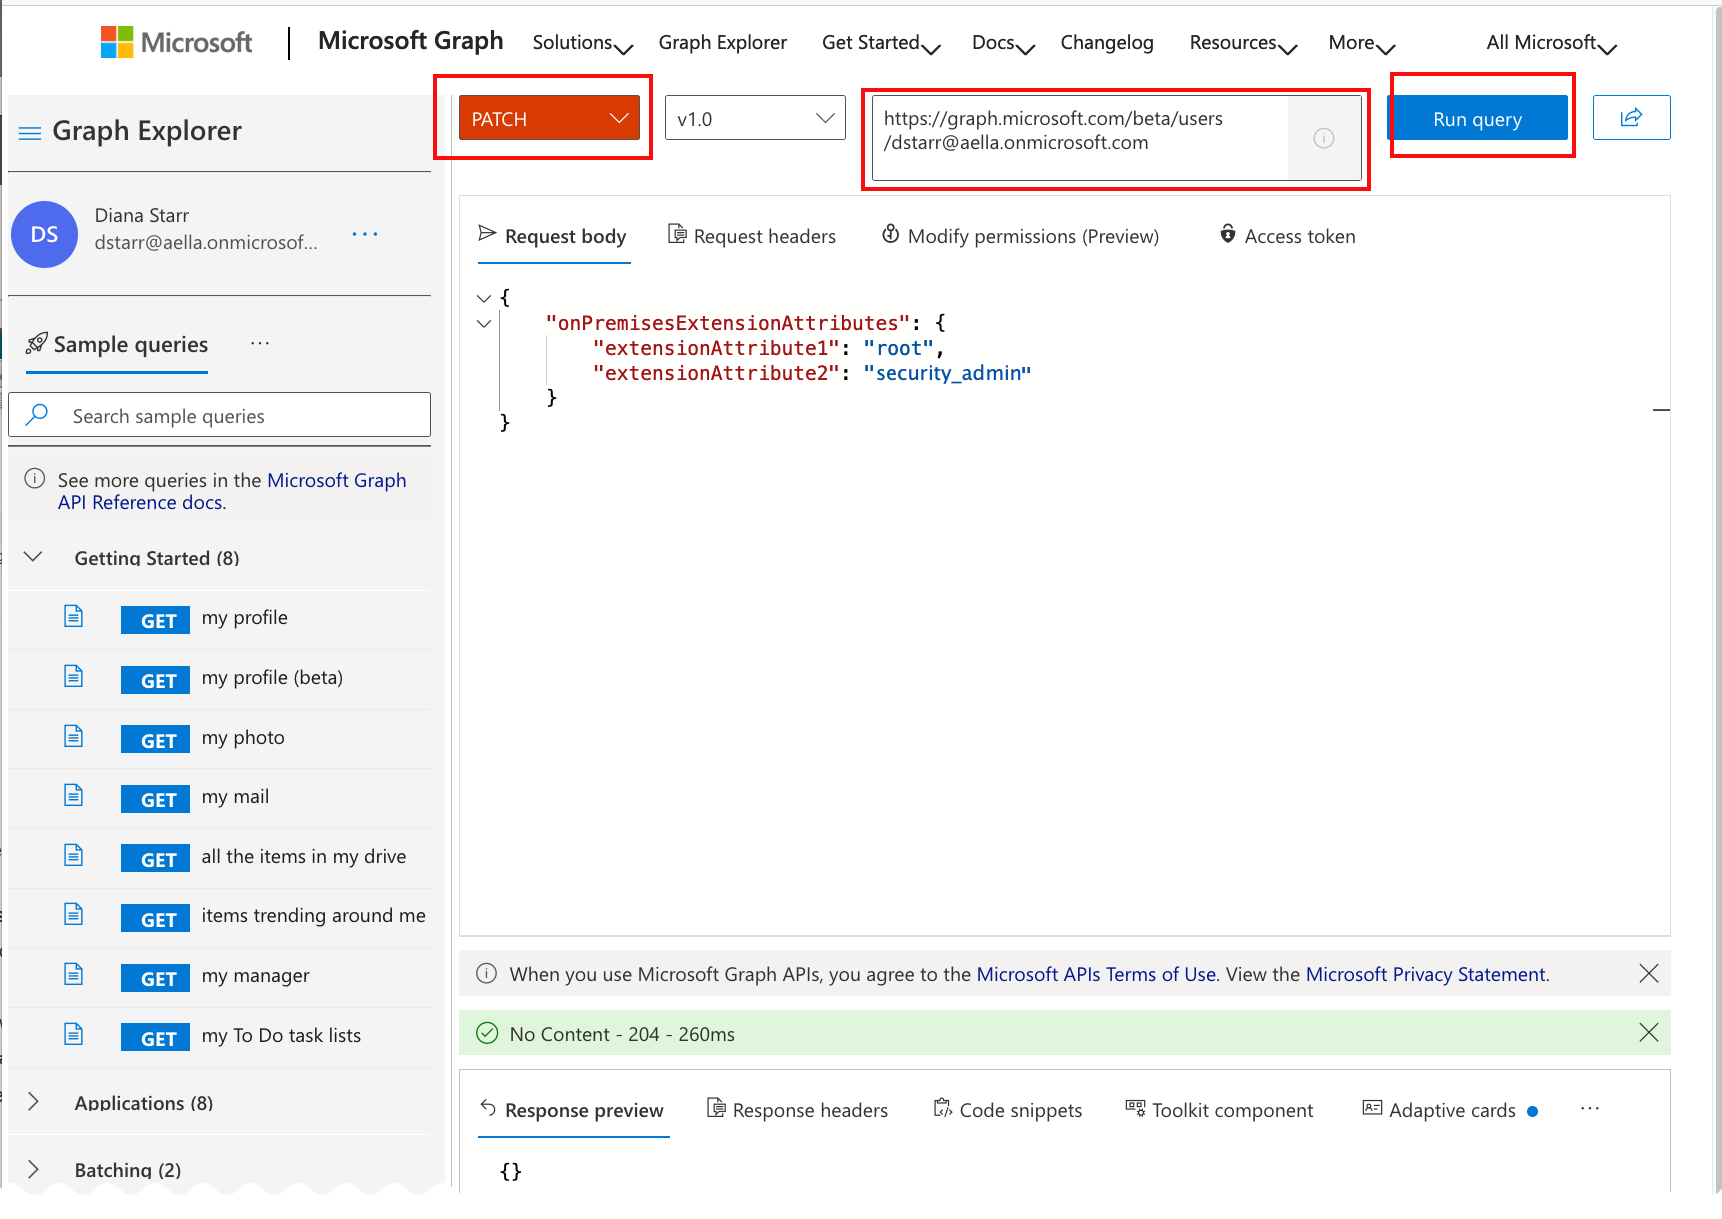
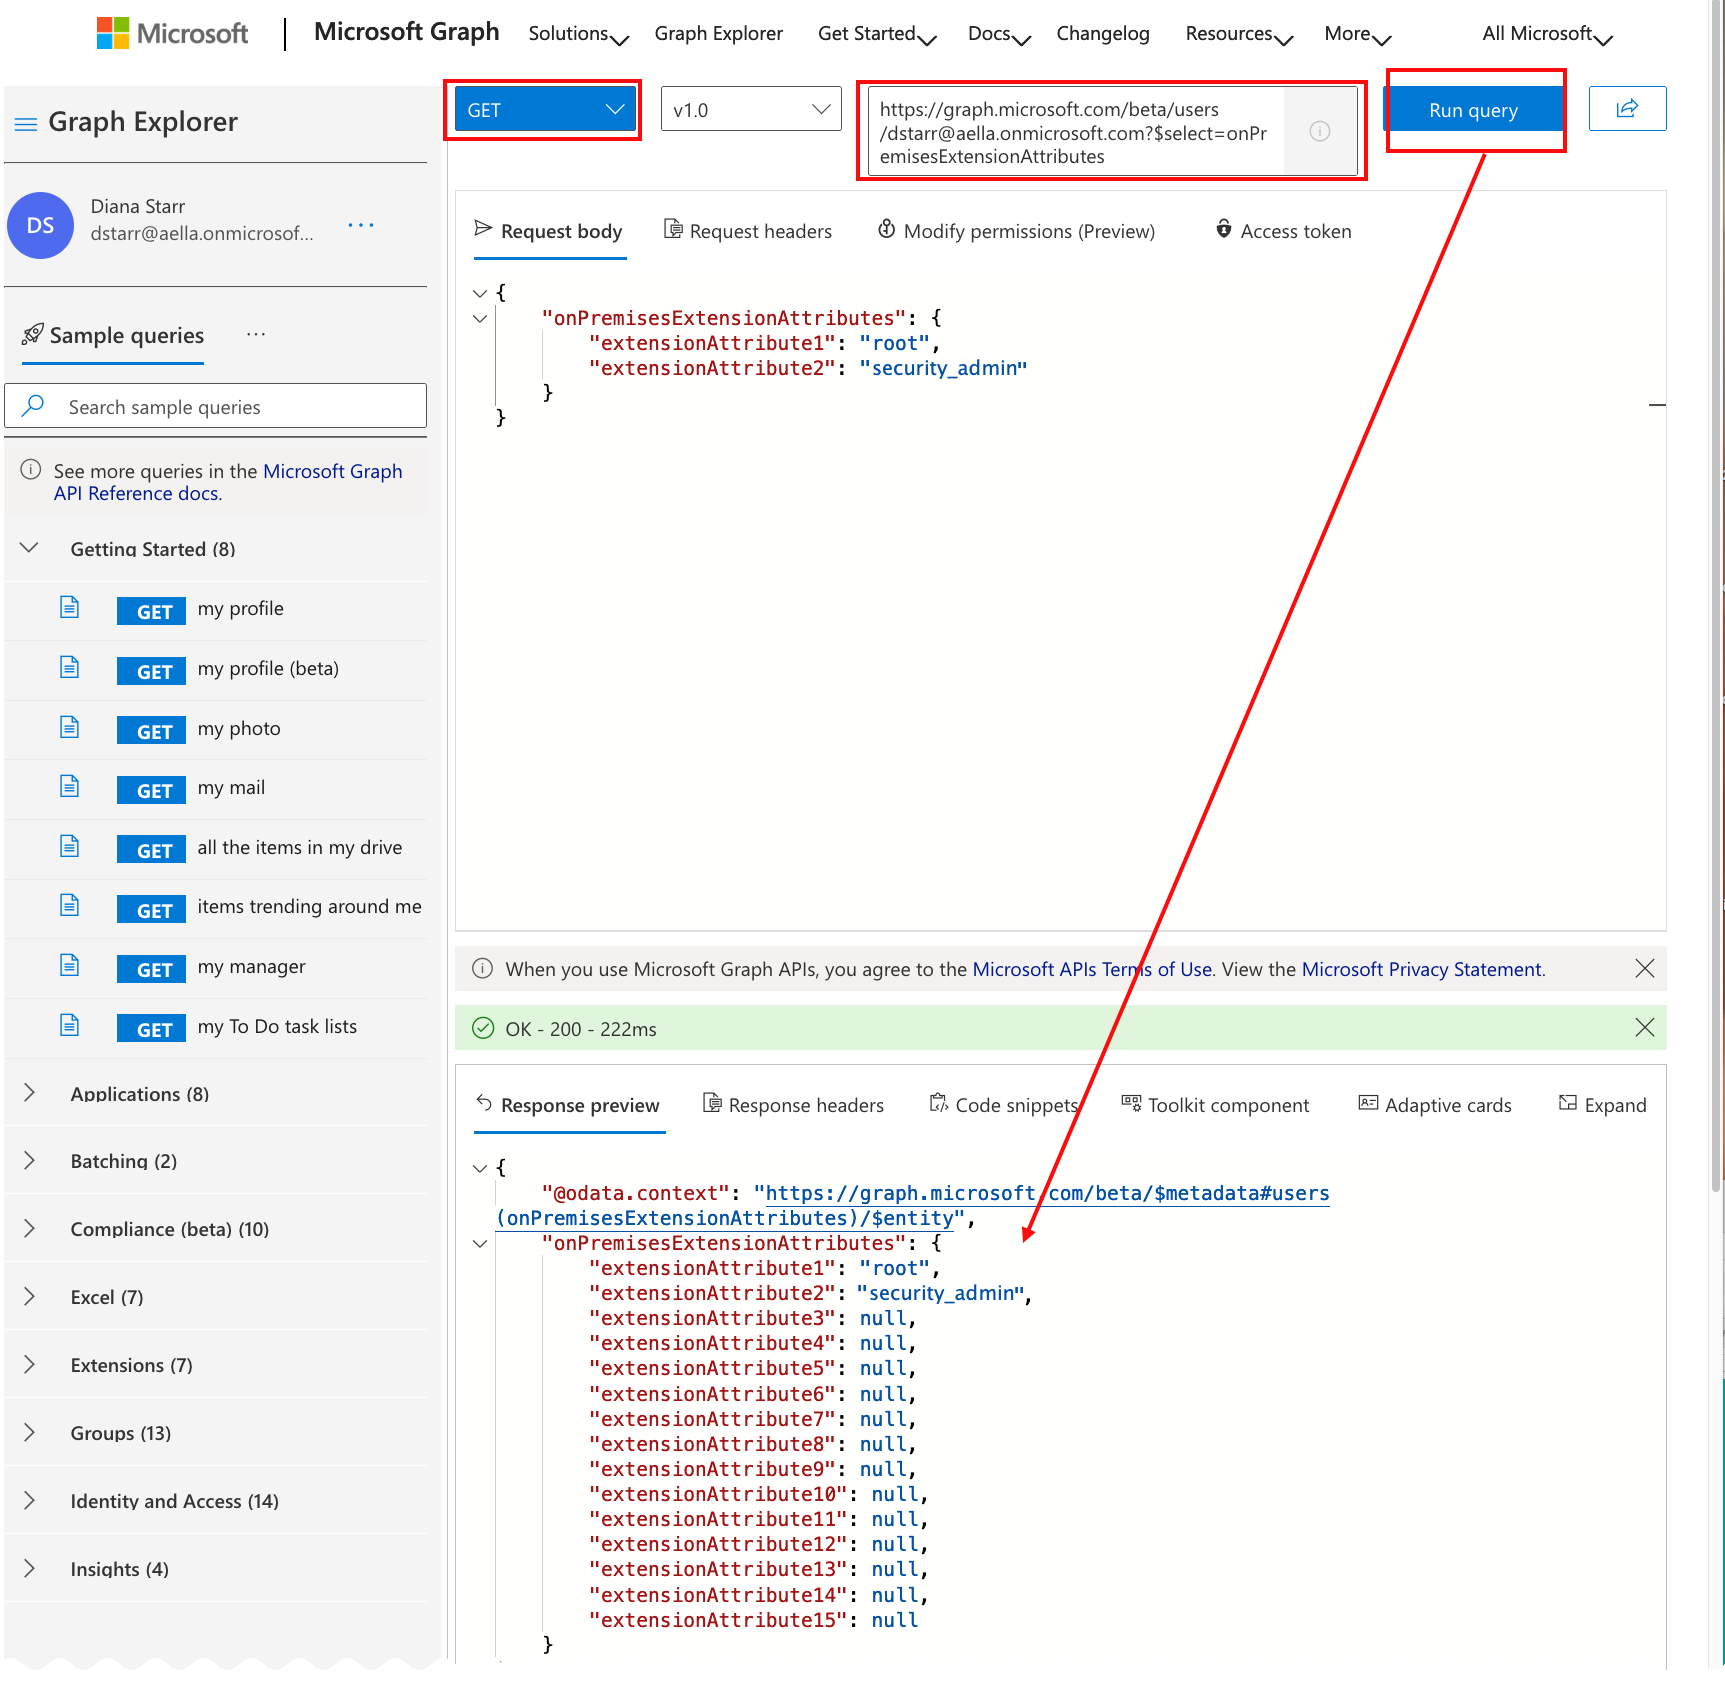
Assign Values to Stellar Cyber Fields (Graph Explorer Method)
-
To set the attribute values, retrieve the list of User Principal Names you saved above.
-
Open Microsoft Graph and log in with your administrator
-
In the query pane, change the GET action menu to PATCH.
-
Now enter this query URL, replacing the <user principal name> below with a User Principal Name you saved earlier.
https://graph.microsoft.com/beta/users/<user principal name>
-
Enter the following content as the Request Body, replacing the attribute values with one of the supported values in the table above:
Take care when entering the required attributes and values. Typos in either mean that users are not authenticated and cannot log in. Typos in the optional attributes and values mean that users are not assigned to the appropriate Stellar Cyber tenant or tenant group (but are authenticated).
{ "onPremisesExtensionAttributes": { "extensionAttribute1": "root", "extensionAttribute2": "security_admin" } } -
Click Run Query to set the values.
-
To verify the values were set correctly, change the query type back to GET.
-
Now enter this query URL, replacing the <user principal name> below with the same User Principal Name (
https://graph.microsoft.com/beta/users/<user principal name>?$select=onPremisesExtensionAttributes
-
Click Run Query and review the list of extensionAttributes to verify the values were set.
Assign Values to Stellar Cyber Fields (PowerShell Method)
-
For Authentication Only SSO: All users must first be added manually in the data processor (DP). Subsequent to that manual entry, the user can log in with SSO.
-
For Authentication & Authorization SSO: All users are configured through the IdP.
-
You enable SSO for all users except the root admin user. The root admin user must always use local authentication (
https://Stellar Cyber DP address/login). -
For Local access (bypass) when SSO is enabled: If Stellar Cyber loses connectivity with your IdP, users configured for SSO cannot log in. As a preventive bypass method, manually create a new user in the DP with
rootscope and with a valid email address that has "+admin" appended to a valid user name, as follows:<user>+admin@yourorganization.com(joe+admin@yourorganization.com). The user you create must be able to receive a password reset email at<user>@yourorganization.com. This process an email alias for that valid user that Stellar Cyber uses to permit bypass of an SSO for local login. After you create this separate manual user account, that user can log in two ways:-
an SSO user with
<user>@yourorganization.com -
or as a local user at
https://Stellar Cyber DP address/login)using<user>+admin@yourorganization.com
If SSO is configured, it is recommended to keep an active administrative account in Stellar Cyber's user management.
-
As an alternative to the Microsoft Graph Explorer method, you can use PowerShell to set the attribute values. The commands in this section can also be automated in PowerShell.
-
Open PowerShell from your Windows system as an administrative user.
-
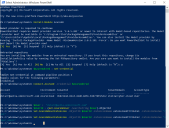
From the PowerShell command line, run the bolded commands and replace $User value with the login you used above. The last two lines illustrate assigning values to the stellar_scope and stellar_privilege attributes. If you used all four attributes, add commands for those and specify the Tenant ID and Tenant Group ID exactly as they are listed in Stellar Cyber.
Be sure that you assign the correct value to the correct extension number. In this example extensionAttribute1 is for stellar_scope, which is being given root; extensionAttribute2 is for stellar_privilege and is being assigned security_admin. Review your list of extension attributes carefully before running these commands.
PS C:\WINDOWS\system32> Install-Module AzureAD Untrusted repository You are installing the modules from an untrusted repository. If you trust this repository, change its InstallationPolicy value by running the Set-PSRepository cmdlet. Are you sure you want to install the modules from 'PSGallery'? [Y] Yes [A] Yes to All [N] No [L] No to All [S] Suspend [?] Help (default is "N"): Y PS C:\WINDOWS\system32> $AzureAdCred = Get-Credential Enter your Azure admin user and password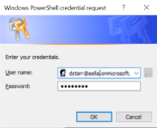 PS C:\WINDOWS\system32> Connect-AzureAD -Credential $AzureAdCred
PS C:\WINDOWS\system32> $User = "dstarr@aella.onmicrosoft.com"
PS C:\WINDOWS\system32> $UserId = (Get-AzureADUser -Searchstring $User).ObjectId
PS C:\WINDOWS\system32>
PS C:\WINDOWS\system32> Set-AzureADUserExtension -ObjectID $UserId -ExtensionName extensionAttribute1 -ExtensionValue "root"
PS C:\WINDOWS\system32> Set-AzureADUserExtension -ObjectId $UserId -ExtensionName extensionAttribute2 -ExtensionValue "security_admin"
PS C:\WINDOWS\system32> exit
PS C:\WINDOWS\system32> Connect-AzureAD -Credential $AzureAdCred
PS C:\WINDOWS\system32> $User = "dstarr@aella.onmicrosoft.com"
PS C:\WINDOWS\system32> $UserId = (Get-AzureADUser -Searchstring $User).ObjectId
PS C:\WINDOWS\system32>
PS C:\WINDOWS\system32> Set-AzureADUserExtension -ObjectID $UserId -ExtensionName extensionAttribute1 -ExtensionValue "root"
PS C:\WINDOWS\system32> Set-AzureADUserExtension -ObjectId $UserId -ExtensionName extensionAttribute2 -ExtensionValue "security_admin"
PS C:\WINDOWS\system32> exit
Following is an example of this sequence:


Configure Multi-Factor Authentication Support (Optional)
Azure AD and Stellar Cyber support use of multi-factor authentication. If you intend to set up Stellar Cyber access with 2FA, you must enable a Conditional Policy in Azure AD that supports the nature of access suitable for your deployment. This section provides an example of the Azure AD process.
Configuration of multi-factor authentication in Azure AD is independent of whether you enable 2FA in Stellar Cyber. It is possible for you require your users to authenticate with MFA in Azure AD and again with 2FA in Stellar Cyber
-
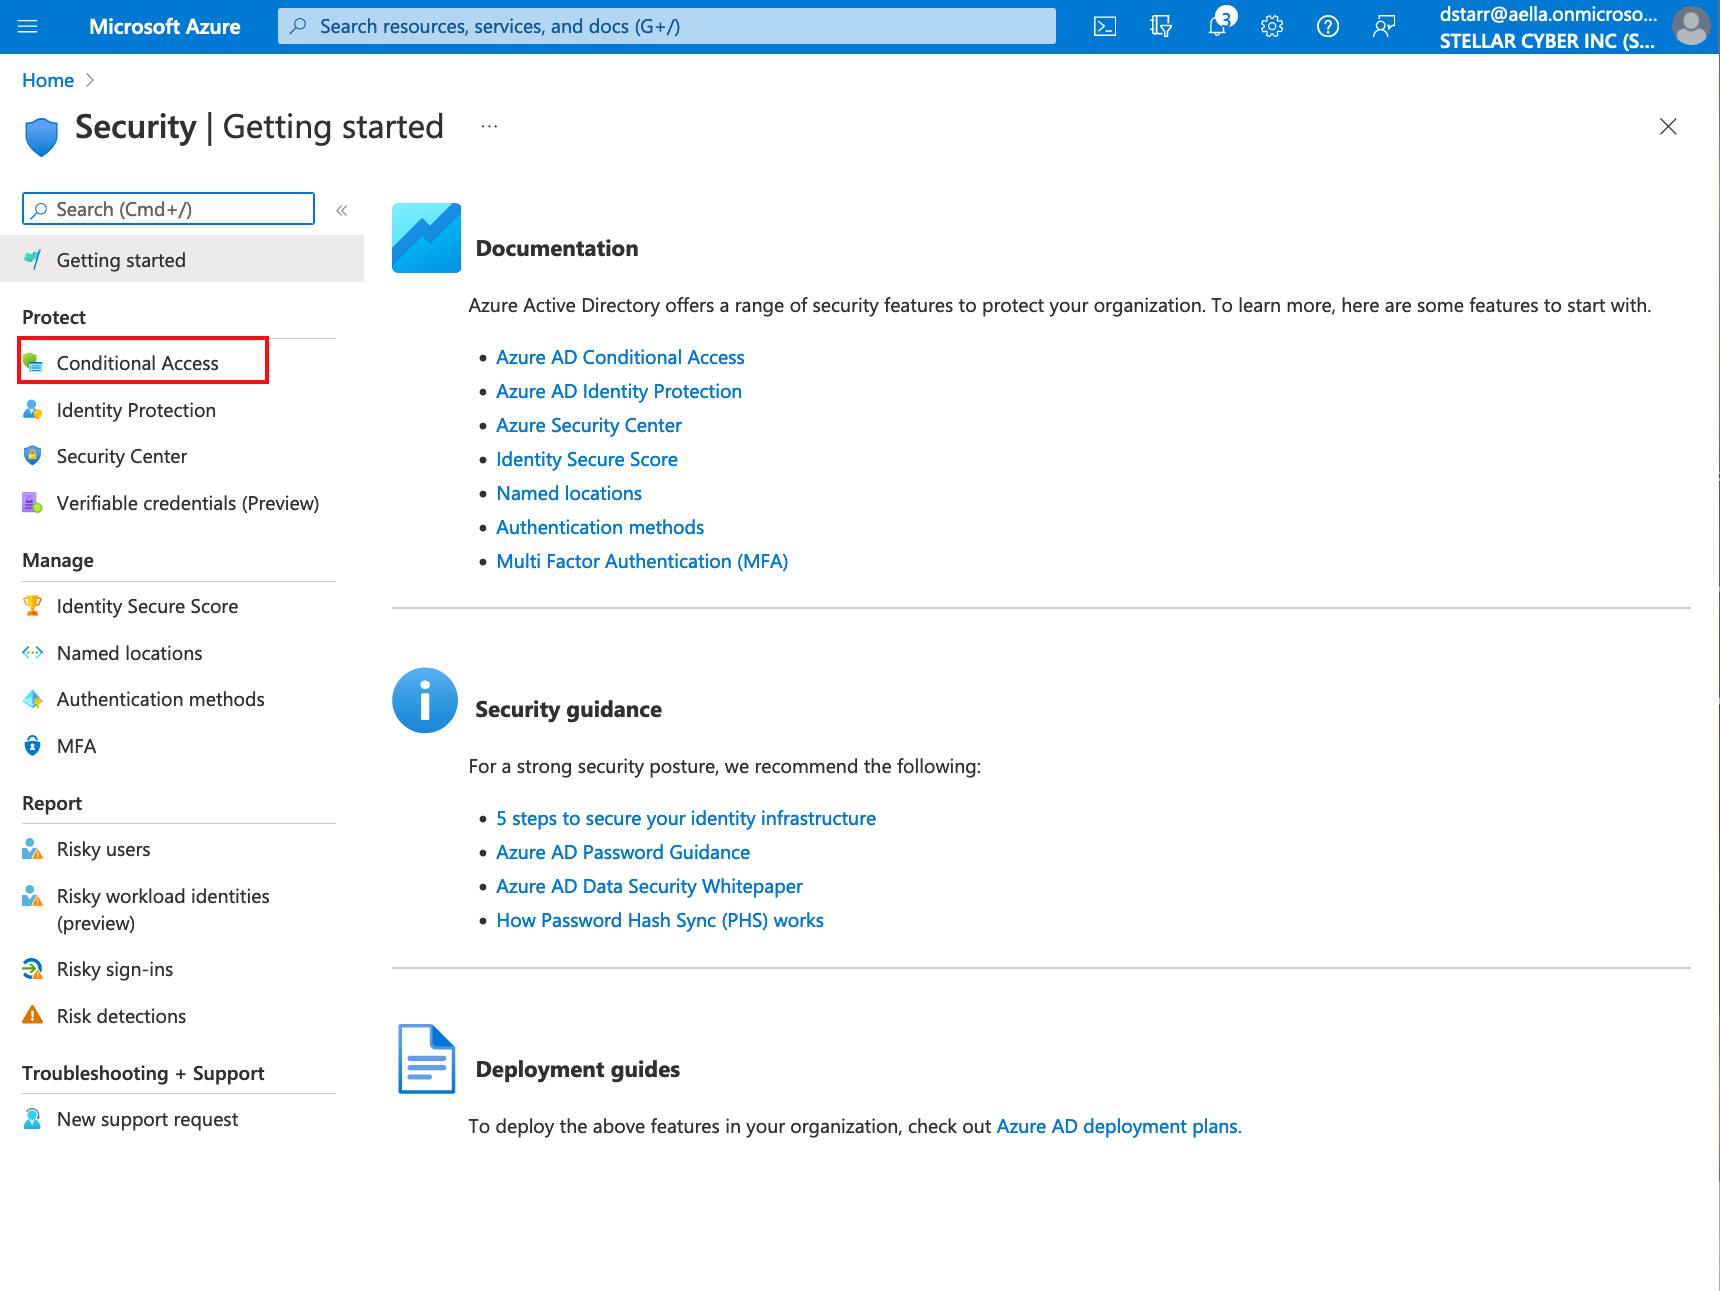
Navigate to your organization's Azure AD > Security pane.
-
Select the navigation menu item for Conditional Access.
-
Click New policy and select the menu option to Create new policy.
-
Name the policy.
-
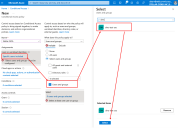
Click the link for Users or workload identities selected, then click Specific users included.
-
Select the Users and groups that you specified to be members of the Stellar Cyber Azure AD application created above.
-
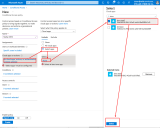
After adding the users, click the link in the Cloud apps or actions section.
-
Select Cloud apps, then select Include > Select apps.
-
When the selection pane opens, locate the Stellar Cyber Azure AD application you created above, then click Select.
-
In the Grant section, click the link 0 controls selected.
-
In the pane that opens, check the radio button to Grant access, then check the box to Require multi-factor authentication.
-
Click Select.
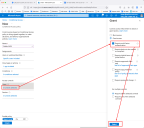
-
At the bottom of the page, change the Enable policy toggle from Report-only to On.
-
Click Create. The policy is created and the Conditional Access Policy page is redisplayed to include the new policy.


Collect Azure AD Access Details
At this stage, you should have collected all your user information and have set up the Azure AD application for Stellar Cyber SSO access. Your certificate and access details are now ready to copy/download. Use this procedure to ensure you have all the noted information before you proceed to the next section.
If you are configuring Authorization, you must perform that procedure (see previous section) prior to downloading the certificate in this section.
-
If you have navigated away from the application page, click the Home button on the portal and navigate back your organization's list of Enterprise applications.
-
Locate and display the application you created above.
-
Select Single sign-on from the left side navigation, or click the tile labeled Set up single sign on.
-
From the Single sign-on page, click the tile labeled SAML.
-
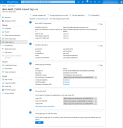
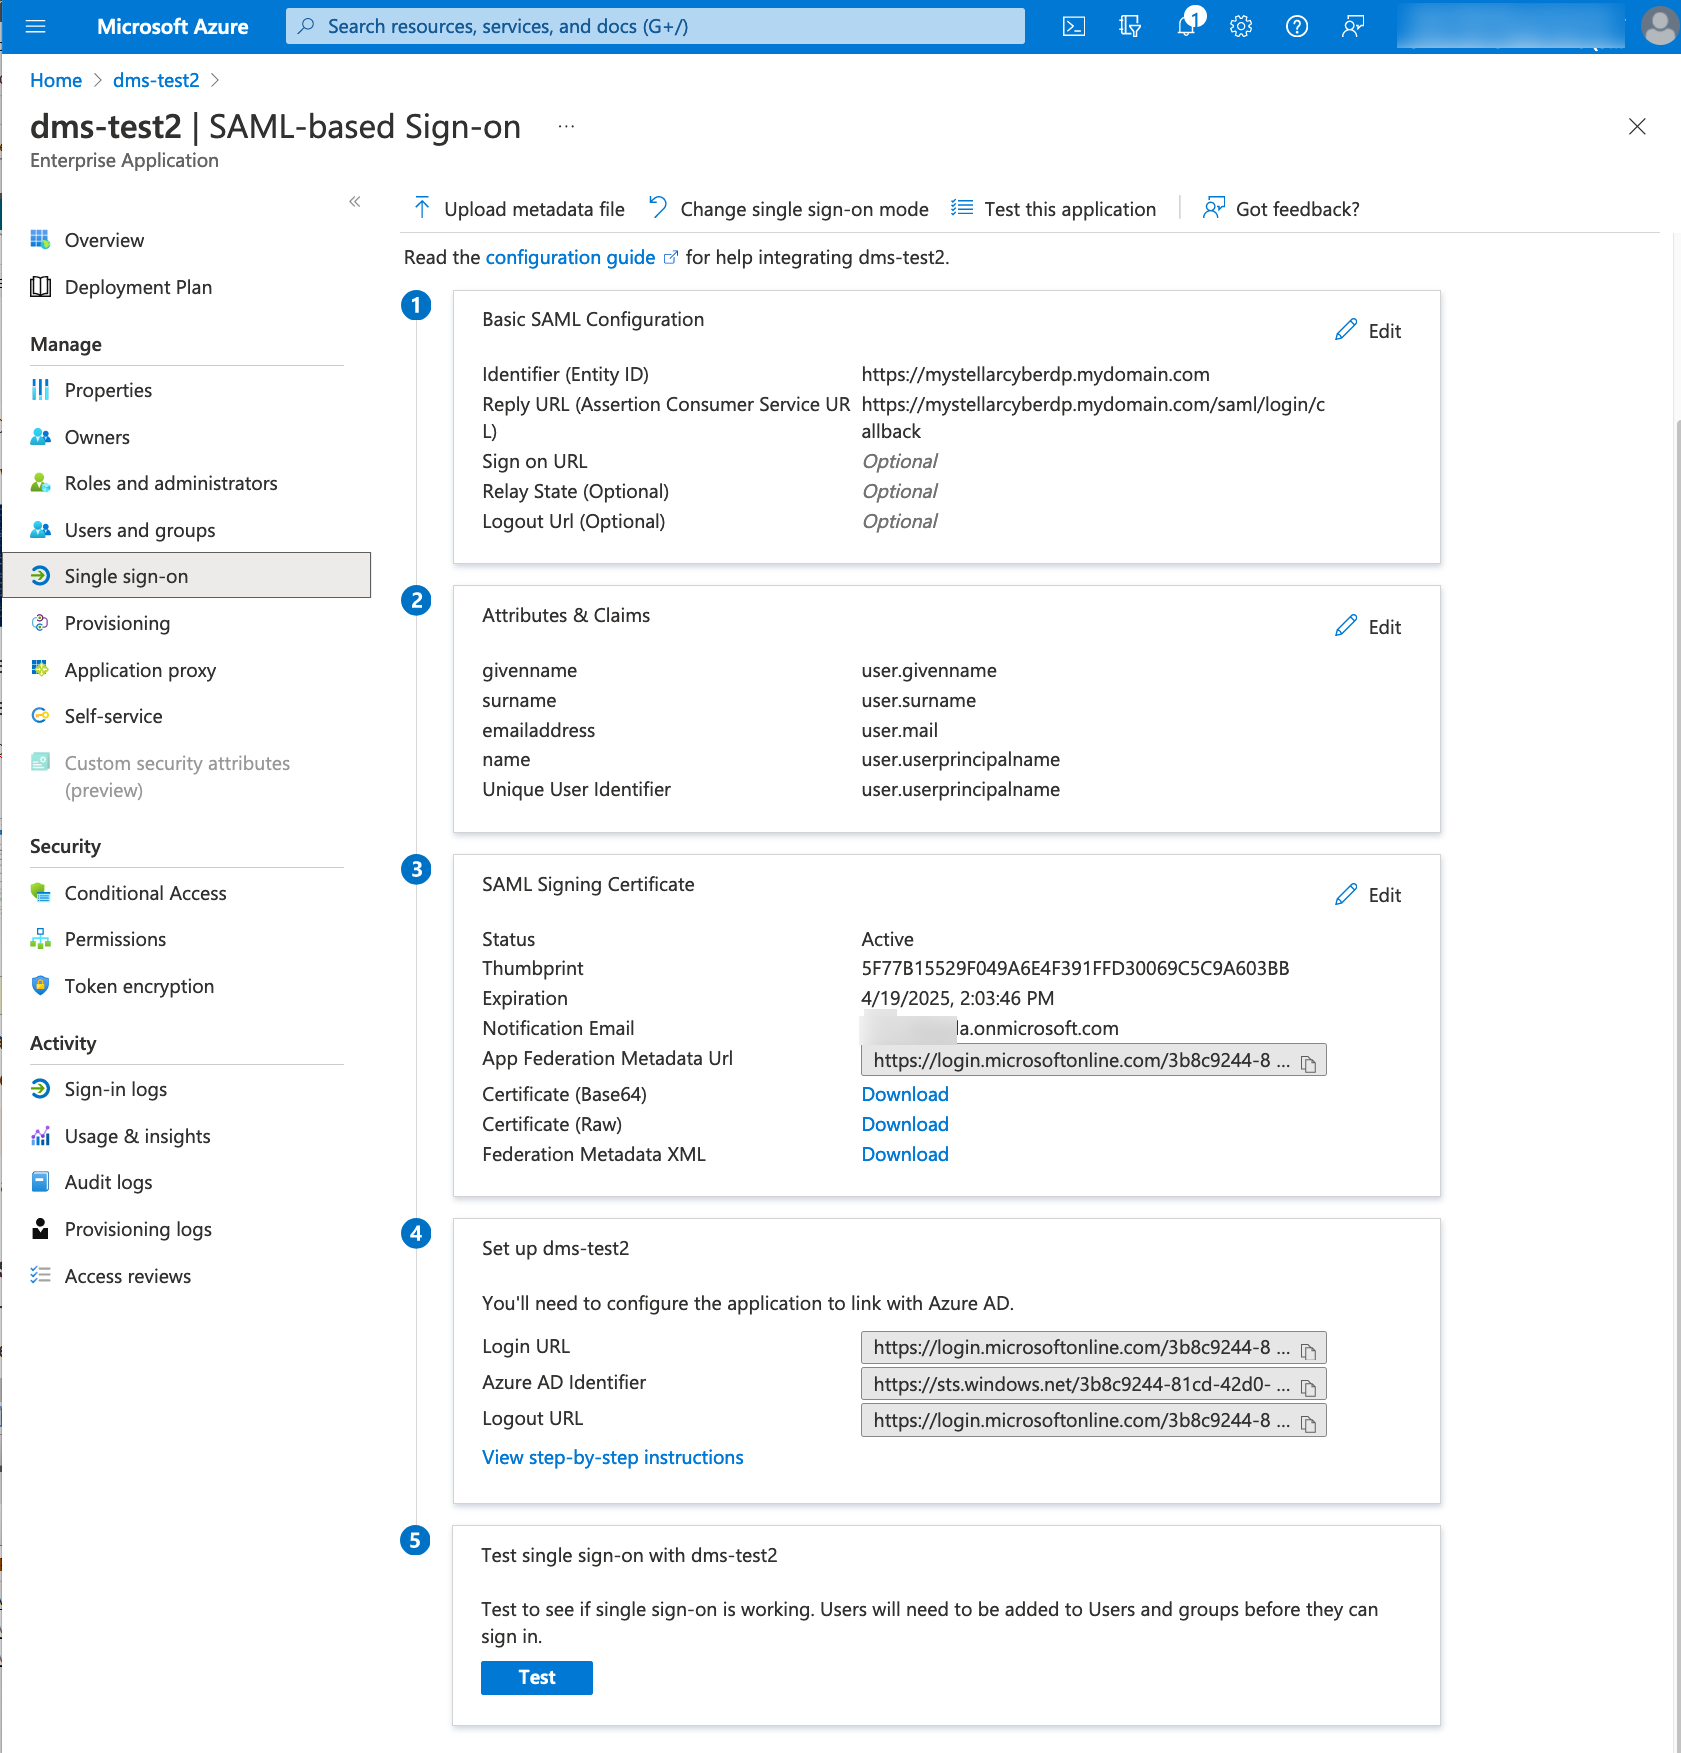
With the SAML-based Sign-on panel displayed, download or copy (as appropriate) the items below for use when you set up SSO in Stellar Cyber:
- From Block 1: Basic SAML Configuration
Identifier (Entity ID) - This is used for Issuer URL field when you configure Authentication in Stellar Cyber)
-
From Block 2: Claims (Applicable only if you configured Authorization)
User.extensionattributeX values for all the Stellar Cyber claim names you added
- From Block 3: SAML Signing Certificate:
Certificate (base 64) - You upload this as the IdP Certificate in Stellar Cyber
- From Block 4:
Login URL - This is used for the EntryPoint URL field in Stellar Cyber, to link with Azure Active Directory.
- From Block 1: Basic SAML Configuration
In addition to the above details, you should have previously noted all of the User Principal Names (email addresses) for all users that will use Azure AD SSO with Stellar Cyber.
Configure Authentication in Stellar Cyber
With all your details collected, you are now ready to configure SSO Authentication in Stellar Cyber. The steps below are generally applicable for use for global configuration or per-tenant configuration.
Prepare for Users
-
For Authentication Only SSO: All users must first be added manually in the data processor (DP). Subsequent to that manual entry, the user can log in with SSO.
-
For Authentication & Authorization SSO: All users are configured through the IdP.
-
You enable SSO for all users except the root admin user. The root admin user must always use local authentication (
https://Stellar Cyber DP address/login). -
For Local access (bypass) when SSO is enabled: If Stellar Cyber loses connectivity with your IdP, users configured for SSO cannot log in. As a preventive bypass method, manually create a new user in the DP with
rootscope and with a valid email address that has "+admin" appended to a valid user name, as follows:<user>+admin@yourorganization.com(joe+admin@yourorganization.com). The user you create must be able to receive a password reset email at<user>@yourorganization.com. This process an email alias for that valid user that Stellar Cyber uses to permit bypass of an SSO for local login. After you create this separate manual user account, that user can log in two ways:-
an SSO user with
<user>@yourorganization.com -
or as a local user at
https://Stellar Cyber DP address/login)using<user>+admin@yourorganization.com
If SSO is configured, it is recommended to keep an active administrative account in Stellar Cyber's user management.
-
Enable SSO
-
Log in to Stellar Cyber.
-
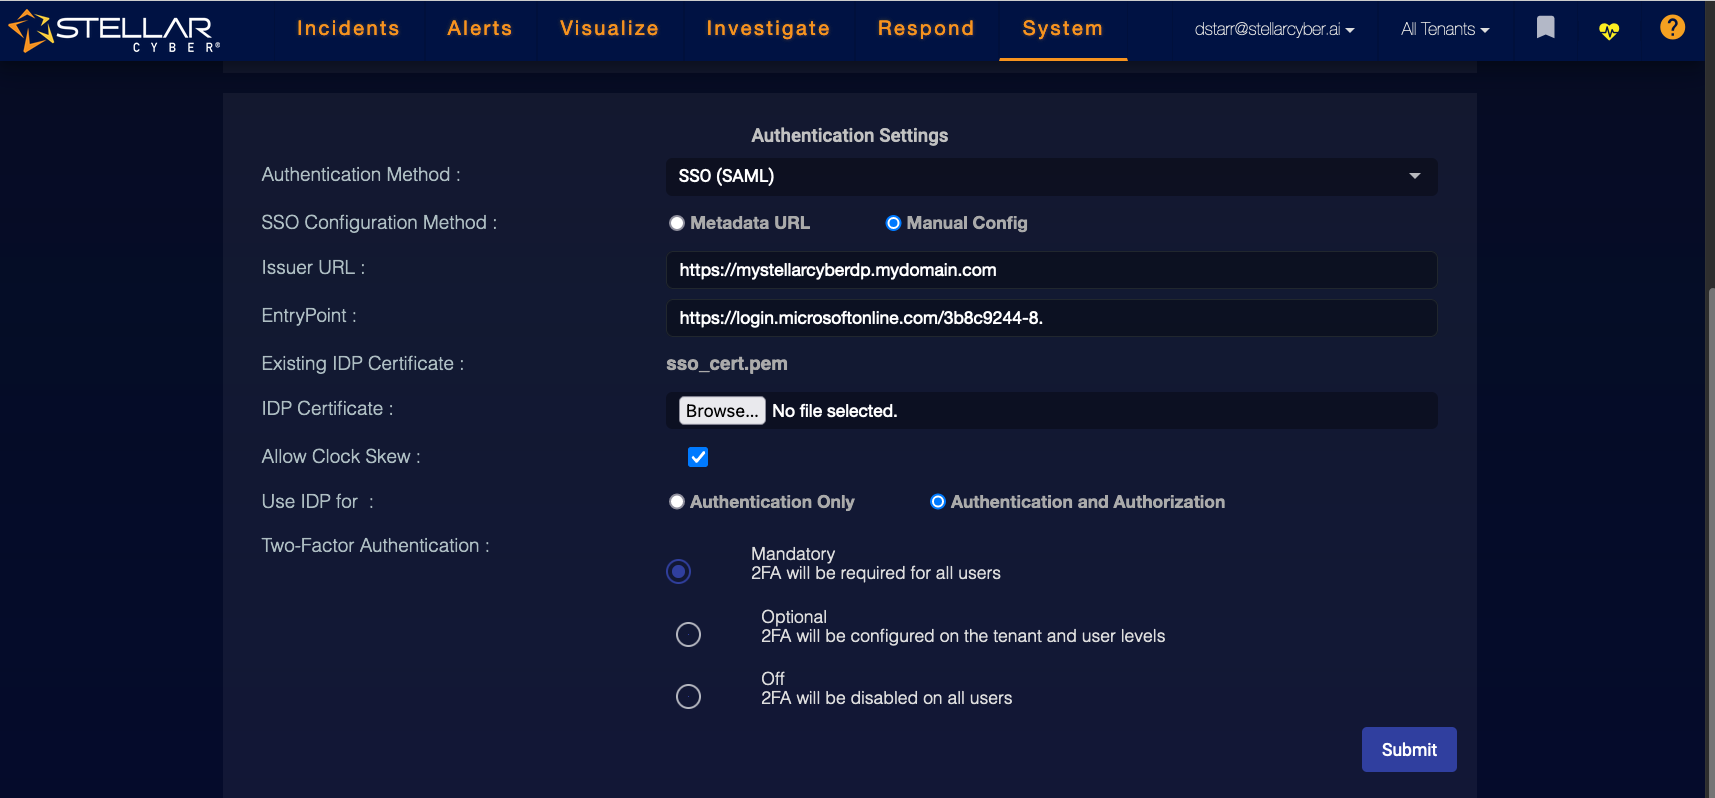
Click System | Administration | Settings.
-
Scroll down to the Authentication Settings.
-
Choose SSO (SAML) in the Authentication Method drop-down.
-
Choose Metadata URL or Manual Config:
-
If you selected Manual Config:
-
Enter the Issuer URL. This is your Stellar Cyber IP address or FQDN. You must include http:// or https:// in the Issuer URL field.
-
Enter the Entry Point. This is the URL you noted during your IDP setup steps. For example:
In
In OKTA, it's the Identity Provider Single Sign-On URL
-
Upload the IDP Certificate you obtained during your IDP setup steps.
-
-
If you selected Metadata URL enter the Metadata URL from your IDP provider.
-
-
Select Allow Clock Skew to allow for system time differences between Stellar Cyber and your IdP. Authentication messages have an expiration. If the system times on Stellar Cyber and your IdP are not synchronized, the messages might expire before they even get to Stellar Cyber. The result is that users cannot log in, because they cannot authenticate.
-
Choose your IdP setting: Authentication Only or Authentication and Authorization. (Global configurations only, not applicable to Tenant-specific configuration). Note the following:
-
A Global selection of Authentication and Authorization applies to all users, so the option to change authentication method for a specific tenant is not applicable when the Global method is set to Authentication and Authorization. You can not log in to Tenant SSO when Global SSO is set to Authentication and Authorization. If you want to use SSO but also allow local users and tenant override, you must set the Global authentication method either to Local or to use the IdP with Authentication Only.
-
Although you can customize SSO configuration on a per-tenant basis, the Authorization capability is only supported at the global level. Overrides you make at the tenant level are for Authentication only, so the toggle for Authentication and Authorization is not offered in the Tenant editor.
-
The Root Tenant must be configured to use either Default (same method as the Global authentication), or Local. It is not supported for configuration with an independent SSO.
-
Choose Authentication Only for Stellar Cyber to authenticate users from your IdP, but manage scope and privilege locally. If you choose this, you must create the user in Stellar Cyber before adding them to your IdP.
-
Choose Authentication and Authorization for Stellar Cyber to authenticate users from your IdP, along with their scope and level of privilege. You must configure authorization on your IdP before enabling this, otherwise users cannot log in. If you choose this, you do not need to create the user in Stellar Cyber. Stellar Cyber creates the user and assigns scope and privilege based on the information passed from the IdP.
When Global Settings is configured for BOTH Authentication & Authorization, the option to Create new users manually is hidden because new users MUST come from the IdP source.
-
-
Choose a Two-Factor Authentication to the option that matches your IdP configuration:
-
Off: If you choose this option, Stellar Cyber user accounts are not offered a 2FA option.
-
Mandatory: If you choose this option, all users for every tenant are required to use 2FA when logging in to Stellar Cyber.
-
Optional: If you choose this option:
-
The 2FA option can be customized for individual tenants under System | Administration | Tenants
-
Individual users can choose to enable 2FA under their User Profile, accessed from the top menu of the Stellar Cyber UI.
-
You can enforce 2FA for specific users under System | Administration | Users when adding or editing a user
-
The overall Global Settings for 2FA affect tenant-specific authentication. For example, if 2FA is Mandatory, all users must use 2FA.
-
Enabling 2FA here is independent of what you have configured on your SSO service. Enabling it here causes a separate 2FA prompt to be displayed upon logging in to Stellar Cyber.
-
The 2FA page from Stellar Cyber refers to use of Google Authenticator, but other authenticator applications also work.
-
-
-
Review your settings, then click Submit.