Azure AD B2C SSO: Prepare / Configure Users
If you stop and return to any of the procedures in this configuration process, ensure that you switch to the correct directory before you continue so that you are working on the correct Azure AD B2C Tenant container.
The order in which you perform certain steps matters. Perform the steps in exactly the order shown.
Create or Select Azure AD B2C Users
-
Navigate to Azure AD B2C > Manage > Users view.
-
When the list of users is displayed, click the name of each user you want to integrate with Stellar Cyber.
-
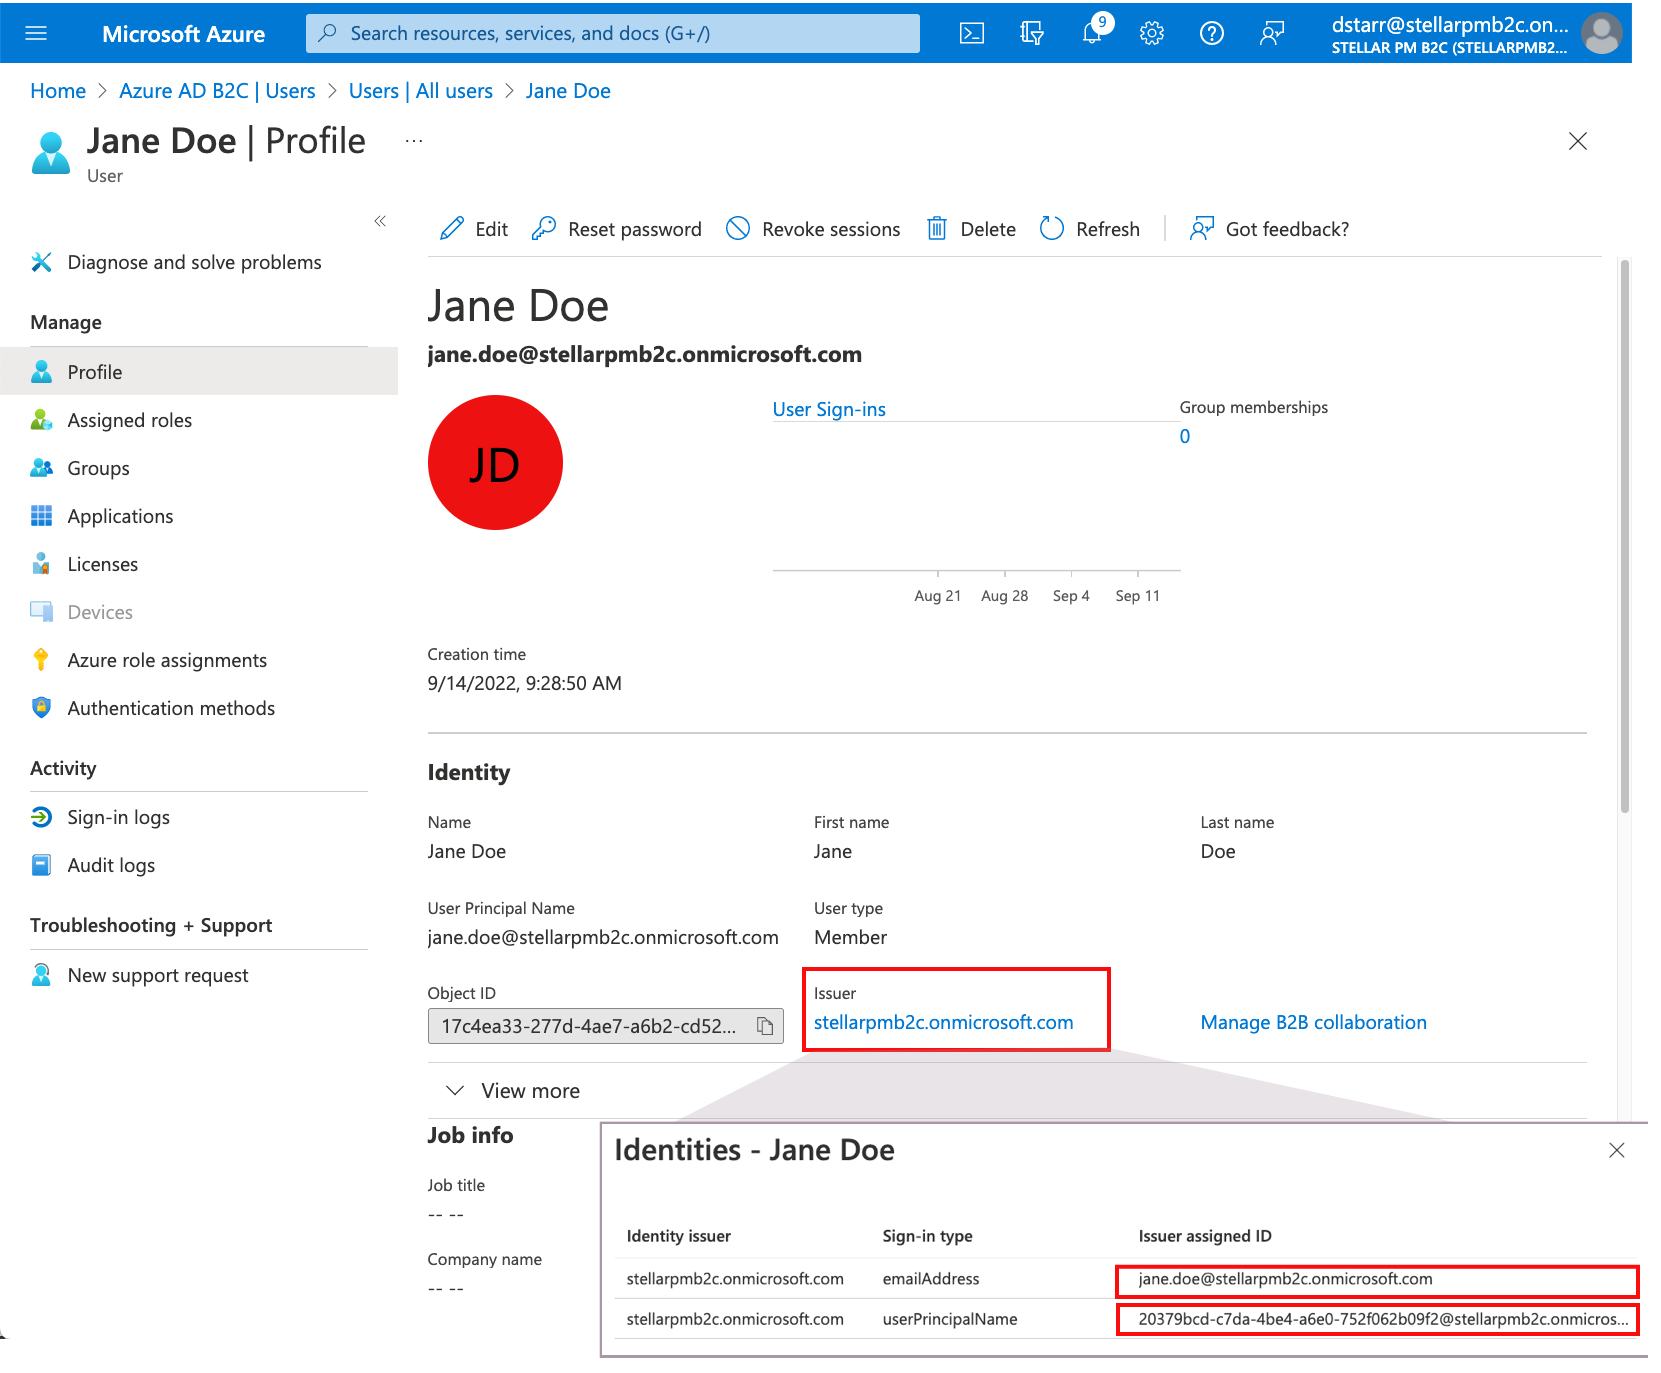
Depending how the user account was created, and whether you are also configuring Authorization, you may need to note two pieces of information in the worksheet. To ensure you note all the required information, click the link for Issuer.
-
In the dialog that opens, you will see either one or two rows. If the user was created using the Create Azure AD B2C wizard, you will see a row with an email address and a row with a unique ID for userPrincipalName. Make note of both values. If the user was not created this way, then the email address and userPrincipalName are the same. You only need note the one value in that case.
Note:
-
The email address is required to configure the user in Stellar Cyber when you are configuring Authentication Only or configuring per-tenant SSO.
-
The userPrincipalName is required as the ID when you use Microsoft Graph to assign values to the Authorization Attributes for each user.
-
These fields are case-sensitive.
-
If you need guidance adding users, refer to Microsoft documentation.
Configure Azure AD B2C for Multi-factor Authentication (Optional)
If you will be enabling 2FA for SSO in Stellar Cyber, take a moment to review whether your Azure AD B2C deployment is configured to support this. Configuration of this capability on the Stellar Cyber server is covered later.
If you are configuring per-tenant SSO, and the overall Global Settings for the Stellar Cyber DP are configured to make 2FA mandatory, then all users on the server are required to have 2FA enabled.
Refer to the following Microsoft documentation for guidance, if needed, to enable MFA. If you need to enable this feature, ensure you do it AFTER you have configured and uploaded the policies since MFA is applied to the sign-in policy.
Configure Authorization Attributes (Optional)
If you plan to have Az ure AD B2C control both Authentication and Authorization, follow the steps in this procedure. If you are using it for Authentication only, or you are configuring per-tenant SSO, skip this section.
Set Up Stellar Cyber Attributes in Azure AD B2C
-
Prepare the server for the custom attributes that you want to use for authorization, if you are using this feature in Stellar Cyber.
Custom Attribute Name
Values (set later) Global SSO Tenant-specific SSO
stellar_scoperootpartnertenantRequired for Authorization
Not applicable
stellar_privilegesuper_adminplatform_adminsecurity_adminuserRequired for Authorization
stellar_tenantID number for configured tenant (Optional) Specify an individual tenant ID, not name. The ID is available on the Tenants List page.
stellar_tenant_groupID number for any configured tenant group (Optional) Specify a tenant group ID, not name. This is typically available for use by MSSP users with the Partner role. The Tenant Group ID is displayed on the Tenant Groups page.
-
Values in these fields are case sensitive and syntax matters. Use the exact indicated syntax and verify that you have made no typos
-
If you have created a custom privilege with spaces or dashes, use an underscore instead. Example: A custom privilege of STML-Super Admin must be entered as
STML_Super_Admin.
-
-
Navigate to the Azure AD B2C > Overview page.
-
Select User attributes, and then select Add.
-
For each of the attributes you want to manage, add the Name and set the Data Type to String, then click Create.
-
For Authorization to work, you must add an attribute for both
stellar_scopeandstellar_privilege. The other two settings are optional.Syntax and case matters for these names.
Assign Values for Stellar Cyber Attributes in Azure AD B2C
-
Add values to these attributes for every user that will be accessing the Stellar Cyber DP.
-
To set the attribute values, retrieve the list of User Principal Names you saved above.
-
Open Microsoft Graph and log in with your administrator
-
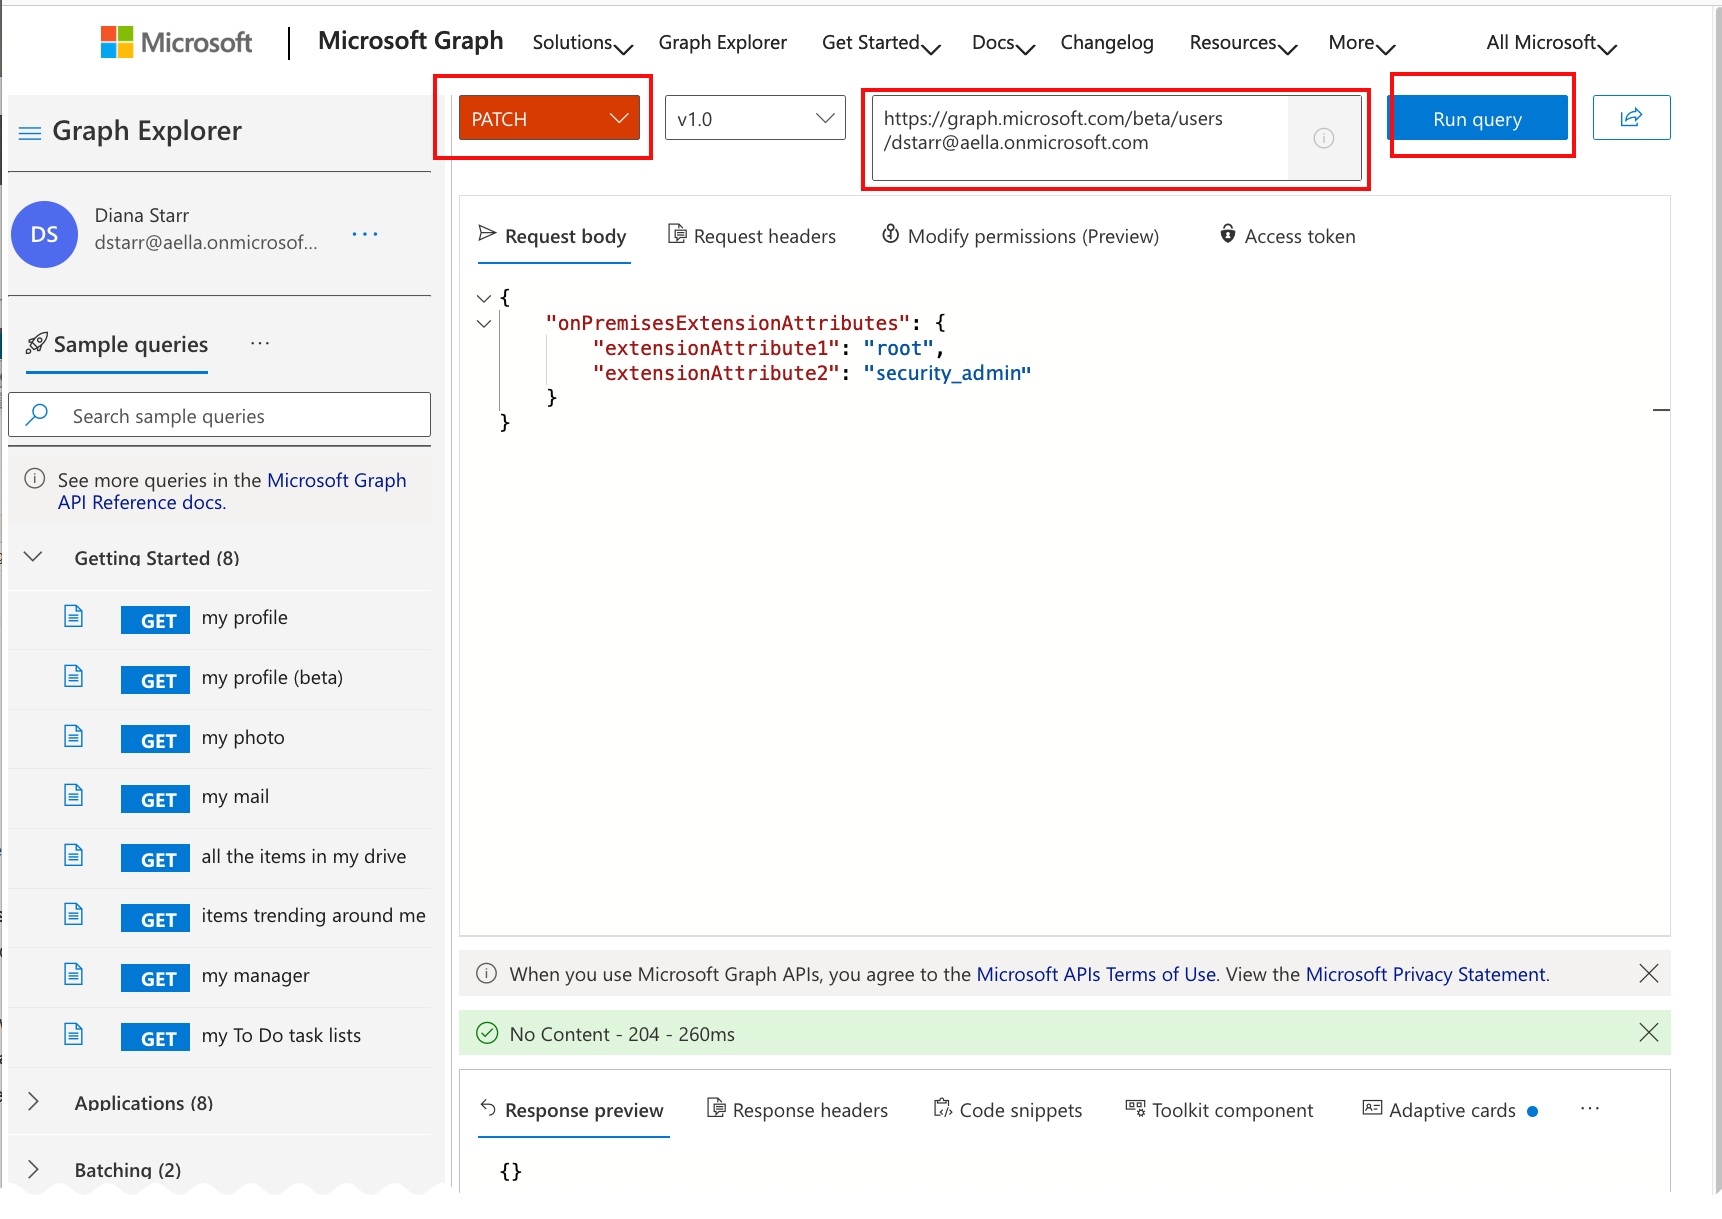
In the query pane, change the GET action menu to PATCH.
-
Now enter this query URL, replacing the <user principal name> below with a User Principal Name you saved earlier.
https://graph.microsoft.com/beta/users/<user principal name>
-
Enter the following content as the Request Body, replacing the attribute values with one of the supported values in the table above:
Take care when entering the required attributes and values. Typos in either mean that users are not authenticated and cannot log in. Typos in the optional attributes and values mean that users are not assigned to the appropriate Stellar Cyber tenant or tenant group (but are authenticated).
For Azure AD B2C, you assign permissions to the application the user has access to, with the following syntax. Use the Application ID you obtained earlier and noted on your worksheet, but remove the hyphens. (example: 0c0abe38-79ab-45d3-99fe-9378eec7b16f ). The Syntax is:
extension_<Azure AD B2C extensions app Application ID without hyphens>_<custom attribute>: < custom attribute value>"extension_0c0abe3879ab45d399fe9378eec7b16f_stellar_scope": "root", "extension_0c0abe3879ab45d399fe9378eec7b16f_stellar_privilege": "security_admin" } -
Click Run Query to set the values.
-
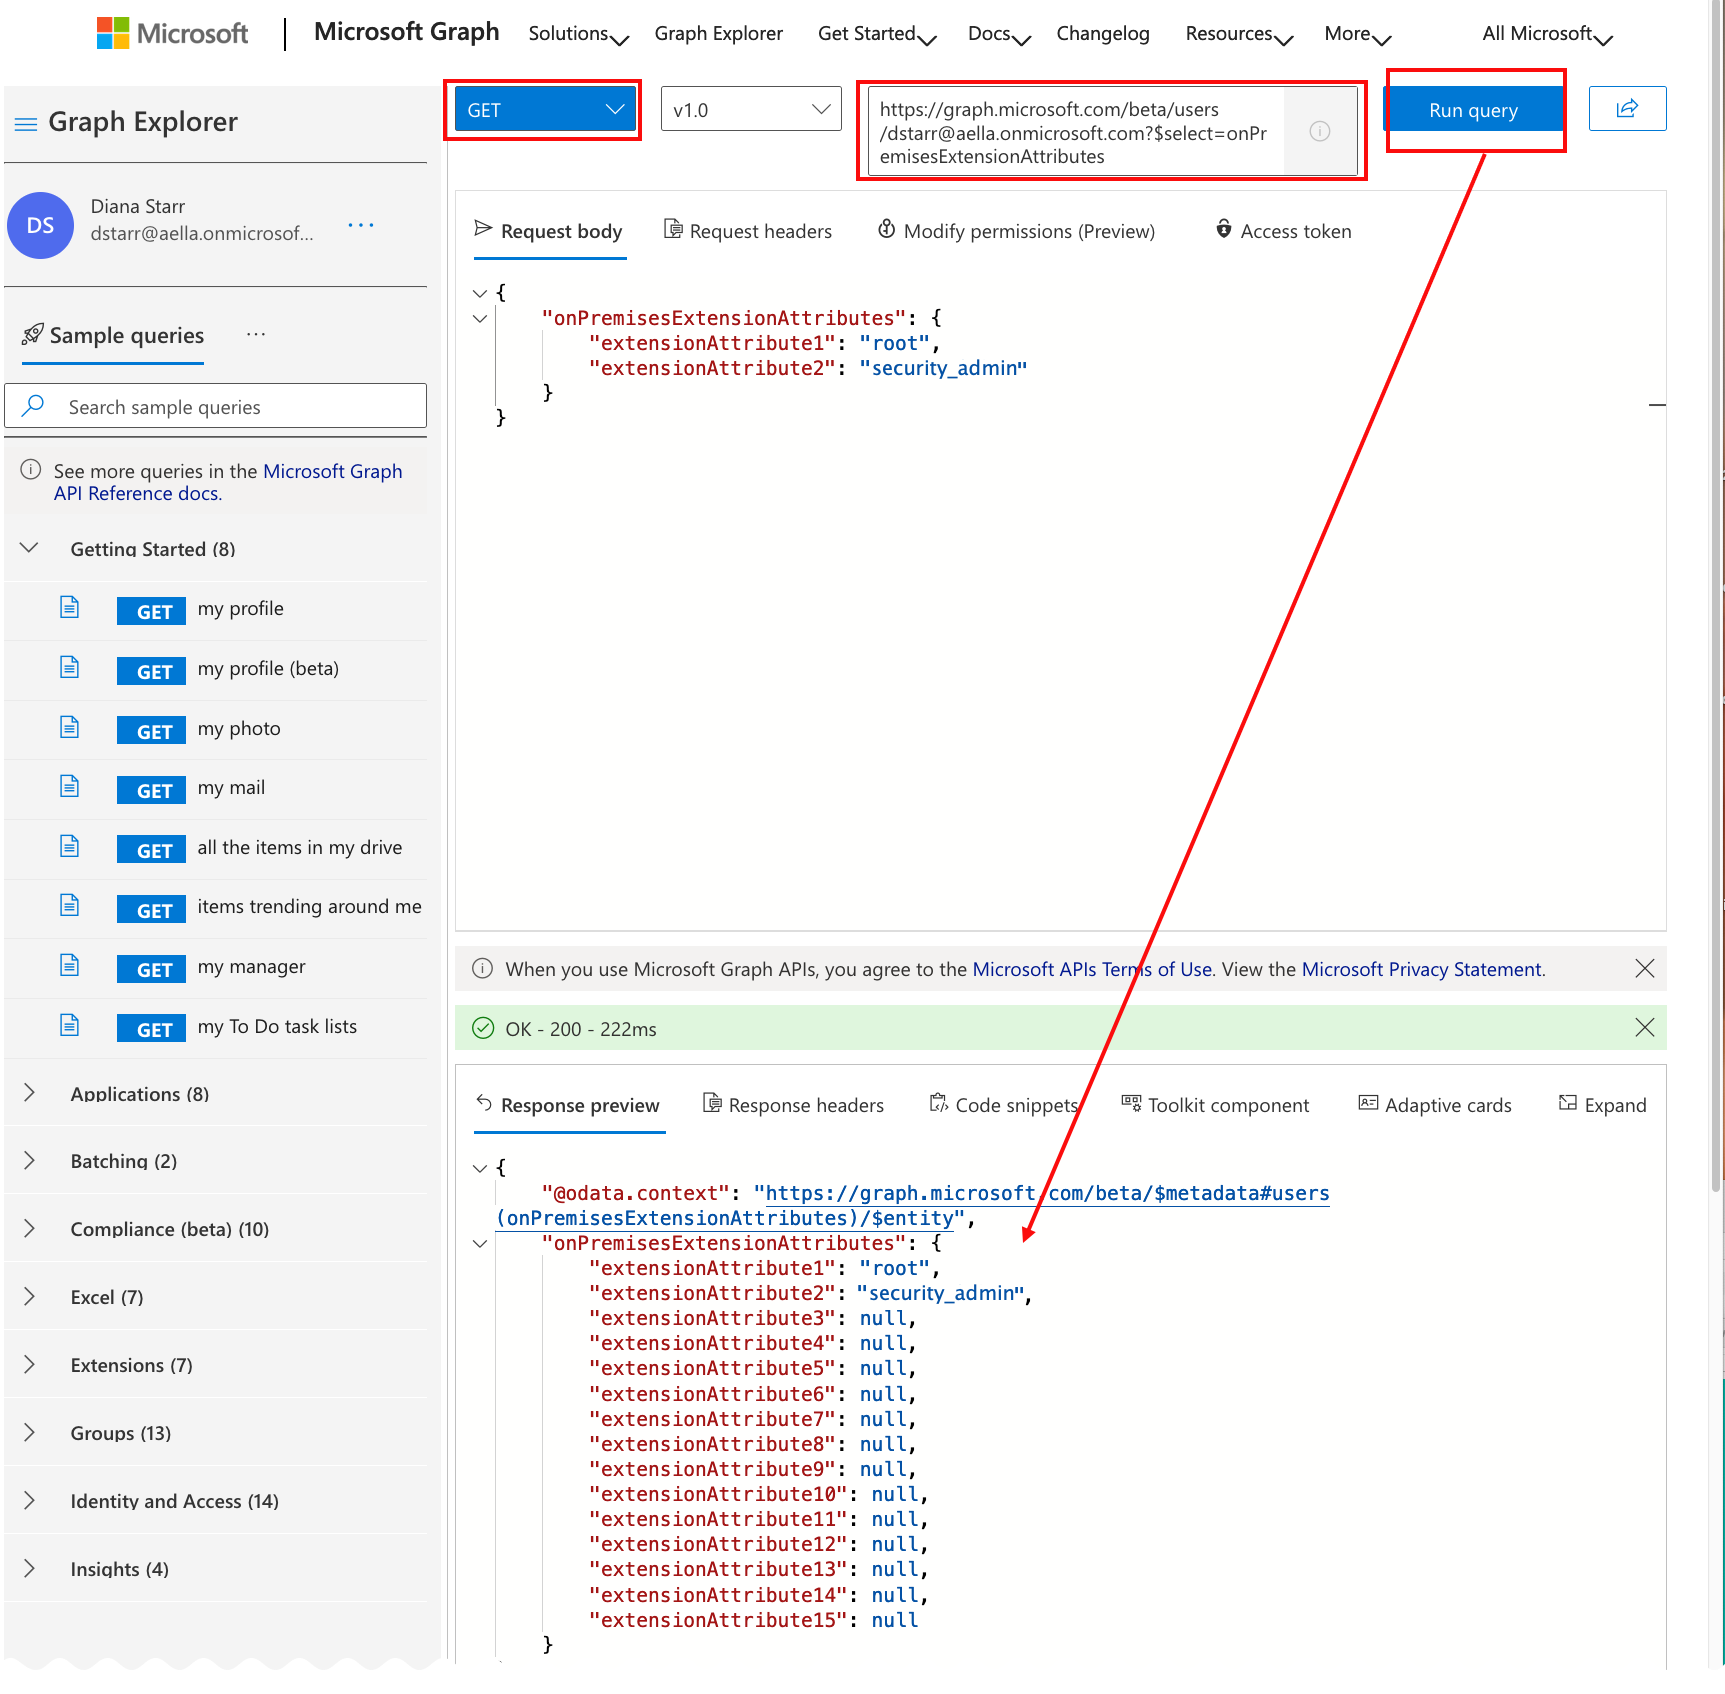
To verify the values were set correctly, change the query type back to GET.
-
Now enter this query URL, replacing the <user principal name> below with the same User Principal Name (
https://graph.microsoft.com/beta/users/<user principal name>?$select=onPremisesExtensionAttributes
-
Click Run Query and review the list of extensionAttributes to verify the values were set.
-
