Azure AD B2C SSO: Complete Configurations on Stellar Cyber
After you have configured your Azure AD B2C server, use the information from your configuration steps to complete setup on your Stellar Cyber server.
Upload Certificates
If the Stellar Cyber certificate and key file you obtained initially are not already loaded into the Stellar Cyber, load them now.
-
Locate the pem and key file you obtained as the first step of this process.
-
Log into Stellar Cyber as an administrative user.
-
Access System | Certificates.
-
Click the Upload button.
-
In the dialog that opens, specify a Name to help you identify the certificate is associated with your Azure AD B2C SSO.
-
Select the option for Server Certificate.
-
In the field for Certificate, browse to and select the pem file associated with the pfx you uploaded to Azure AD B2C in the previous section.
-
In the field for Private Key, browse to and select the key file you received that matches this pem file.
-
Click Submit.
-
Now, associate the certificate to the Data Processor. Access System | Settings | Data Processor Settings.
-
In the Server Certificate section, select the certificate you uploaded above.
-
Click Submit.
Configure Users
If you have configured SSO with Authentication and Authorization, skip this section. For all other cases, including for tenant-specific SSO Authentication, you must add the user accounts to Stellar Cyber, using the User Principal Names you obtained in the previous section as both the user name and email address.
Follow guidance in Managing Users to add users, if they are not already in Stellar Cyber with matching User Principal Names.
User Principal Names and email addresses in Azure AD B2C are case sensitive.
Complete SSO Configuration
The steps to complete SSO configuration are slightly different when you are configuring it for the whole Stellar Cyber DP or just a specific tenant. Complete the steps in the applicable section.
Azure AD B2C Final SSO Steps for Global DP
-
Log into Stellar Cyber as an administrative user.
-
Access System | Settings
-
Locate the section for Authentication.
-
For Authentication Method, select SSO (SAML).
-
For SSO Configuration Method, select Metadata URL.
Manual configuration is supported, but this example procedure is specifically for use with the metadata URL workflow.
-
For Issuer URL: Enter the URL for your Stellar Cyber DP (for example,
https://testdp.stellarcyber.ai). You must include http:// or https:// in the Issuer URL field. -
For Metadata URL: Enter the URL Enter the URL you copied to your worksheet when you completed uploading the policies (example:
https://stellarpmb2c.b2clogin.com/stellarpmb2c.onmicrosoft.com/B2C_1A_signup_signin_saml/samlp/metadata) -
For Use IDP for, set this to the method you prepared Azure AD B2C to support, either Authentication only or Authentication and Authorization.
-
Select Allow Clock Skew to allow for system time differences between Stellar Cyber and Azure AD B2C. Authentication messages have an expiration. If the system times on Stellar Cyber and Azure AD B2C are not synchronized, the messages might expire before they even get to Stellar Cyber. The result is that users cannot log in, because they cannot authenticate.
-
Set the Two-Factor Authentication strategy.
-
The overall Global Settings for 2FA affect tenant-specific authentication. For example, if 2FA is Mandatory, all users must use 2FA.
-
Enabling 2FA here is independent of what you have configured on your SSO service. Enabling it here causes a separate 2FA prompt to be displayed upon logging in to Stellar Cyber.
-
The 2FA page from Stellar Cyber refers to use of Google Authenticator, but other authenticator applications also work.
-
-
Click Submit.
Azure AD B2C Final SSO Steps for a Specific Tenant
Use this set of steps if you are configuring SSO authentication only for a specific Tenant.
-
Navigate to the System | Administration | Tenants page.
-
Locate the tenant you want to configure for SSO then click the edit button.
-
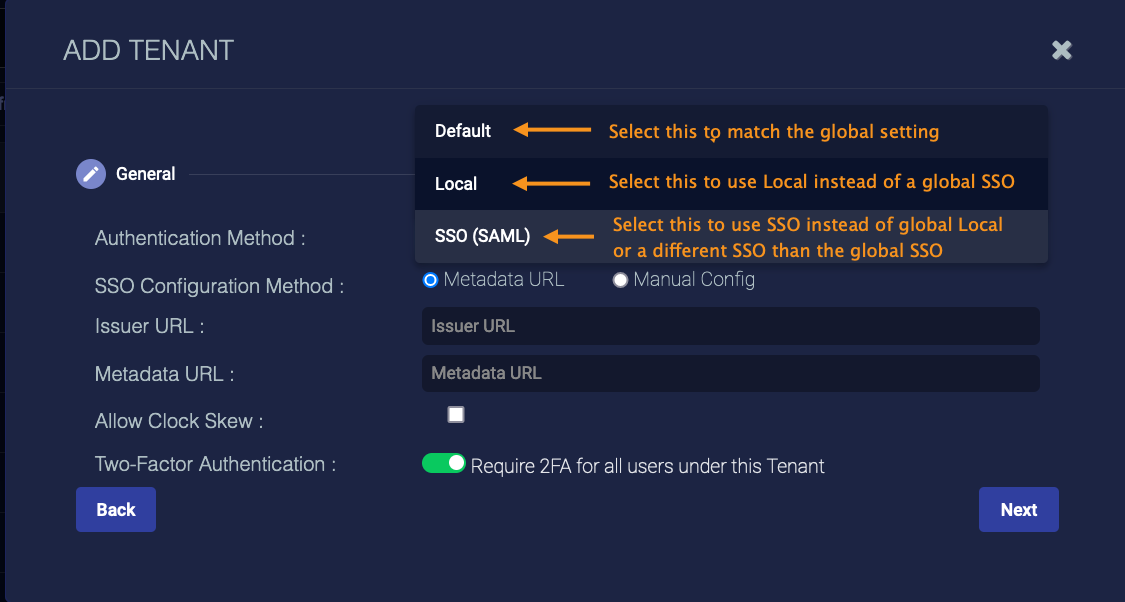
In the dialog that displays, click the Next button to display the Authentication page of the Edit Tenant dialog.
This screen enables you to configure tenant-specific overrides to the global authentication strategy.
-
Select the SSO (SAML) as the Authentication Method.
-
A Global selection of Authentication and Authorization applies to all users (root, partner, and tenant), so the option to change authentication method for a specific tenant is not applicable when the Global method is set to Authentication and Authorization. You can not log in to Tenant SSO when Global SSO is set to Authentication and Authorization. If you want to use SSO but also allow local users and tenant override, you must set the Global authentication method either to Local or to use the IdP with Authentication Only.
-
Although you can customize SSO configuration on a per-tenant basis, the Authorization capability is only supported at the global level. Overrides you make at the tenant level are for Authentication only, so the toggle for Authentication and Authorization is not offered in the Tenant editor.
-
The authentication method for partners is the same as that for root users. Any authentication overrides for tenant-level users in a tenant group have no effect on the authentication method for the partners who manage the group.
-
-
Choose Metadata URL as the configuration method.
Manual configuration is supported, but this example procedure is specifically for use with the metadata URL workflow.
-
For Issuer URL: Enter the URL for your Stellar Cyber DP (example
https://testdp.stellarcyber.ai) -
For Metadata URL: Enter the URL Enter the URL you copied to your worksheet when you completed uploading the policies (example:
https://stellarpmb2c.b2clogin.com/stellarpmb2c.onmicrosoft.com/B2C_1A_signup_signin_saml/samlp/metadata) -
Select Allow Clock Skew to allow for system time differences between Stellar Cyber and Azure AD B2C. Authentication messages have an expiration. If the system times on Stellar Cyber and Azure AD B2C are not synchronized, the messages might expire before they even get to Stellar Cyber. The result is that users cannot log in, because they cannot authenticate.
-
Set the Two-Factor Authentication for the users of this tenant.
-
The overall Global Settings for 2FA affect tenant-specific authentication. For example, if 2FA is Mandatory, all users must use 2FA.
-
Enabling 2FA here is independent of what you have configured on your SSO service. Enabling it here causes a separate 2FA prompt to be displayed upon logging in to Stellar Cyber.
-
The 2FA page from Stellar Cyber refers to use of Google Authenticator, but other authenticator applications also work.
-
-
Click Submit to save the tenant changes.
