Working with Case Details 
The Case Detail view provides an interactive, dynamically updated workspace for assessing, investigating, and responding to cases generated by Stellar Cyber. You can drill to the Case Detail view using any of the following techniques:
-
Clicking a case's name in the Case table.
-
Clicking a case listed in the Top Cases panel in the XDR Kill Chain Page .
-
Clicking an Associated Case in the Event Details display for an alert.
In response, the Case Detail view for the selected incident appears.
The Case Detail view has the following main components:
-
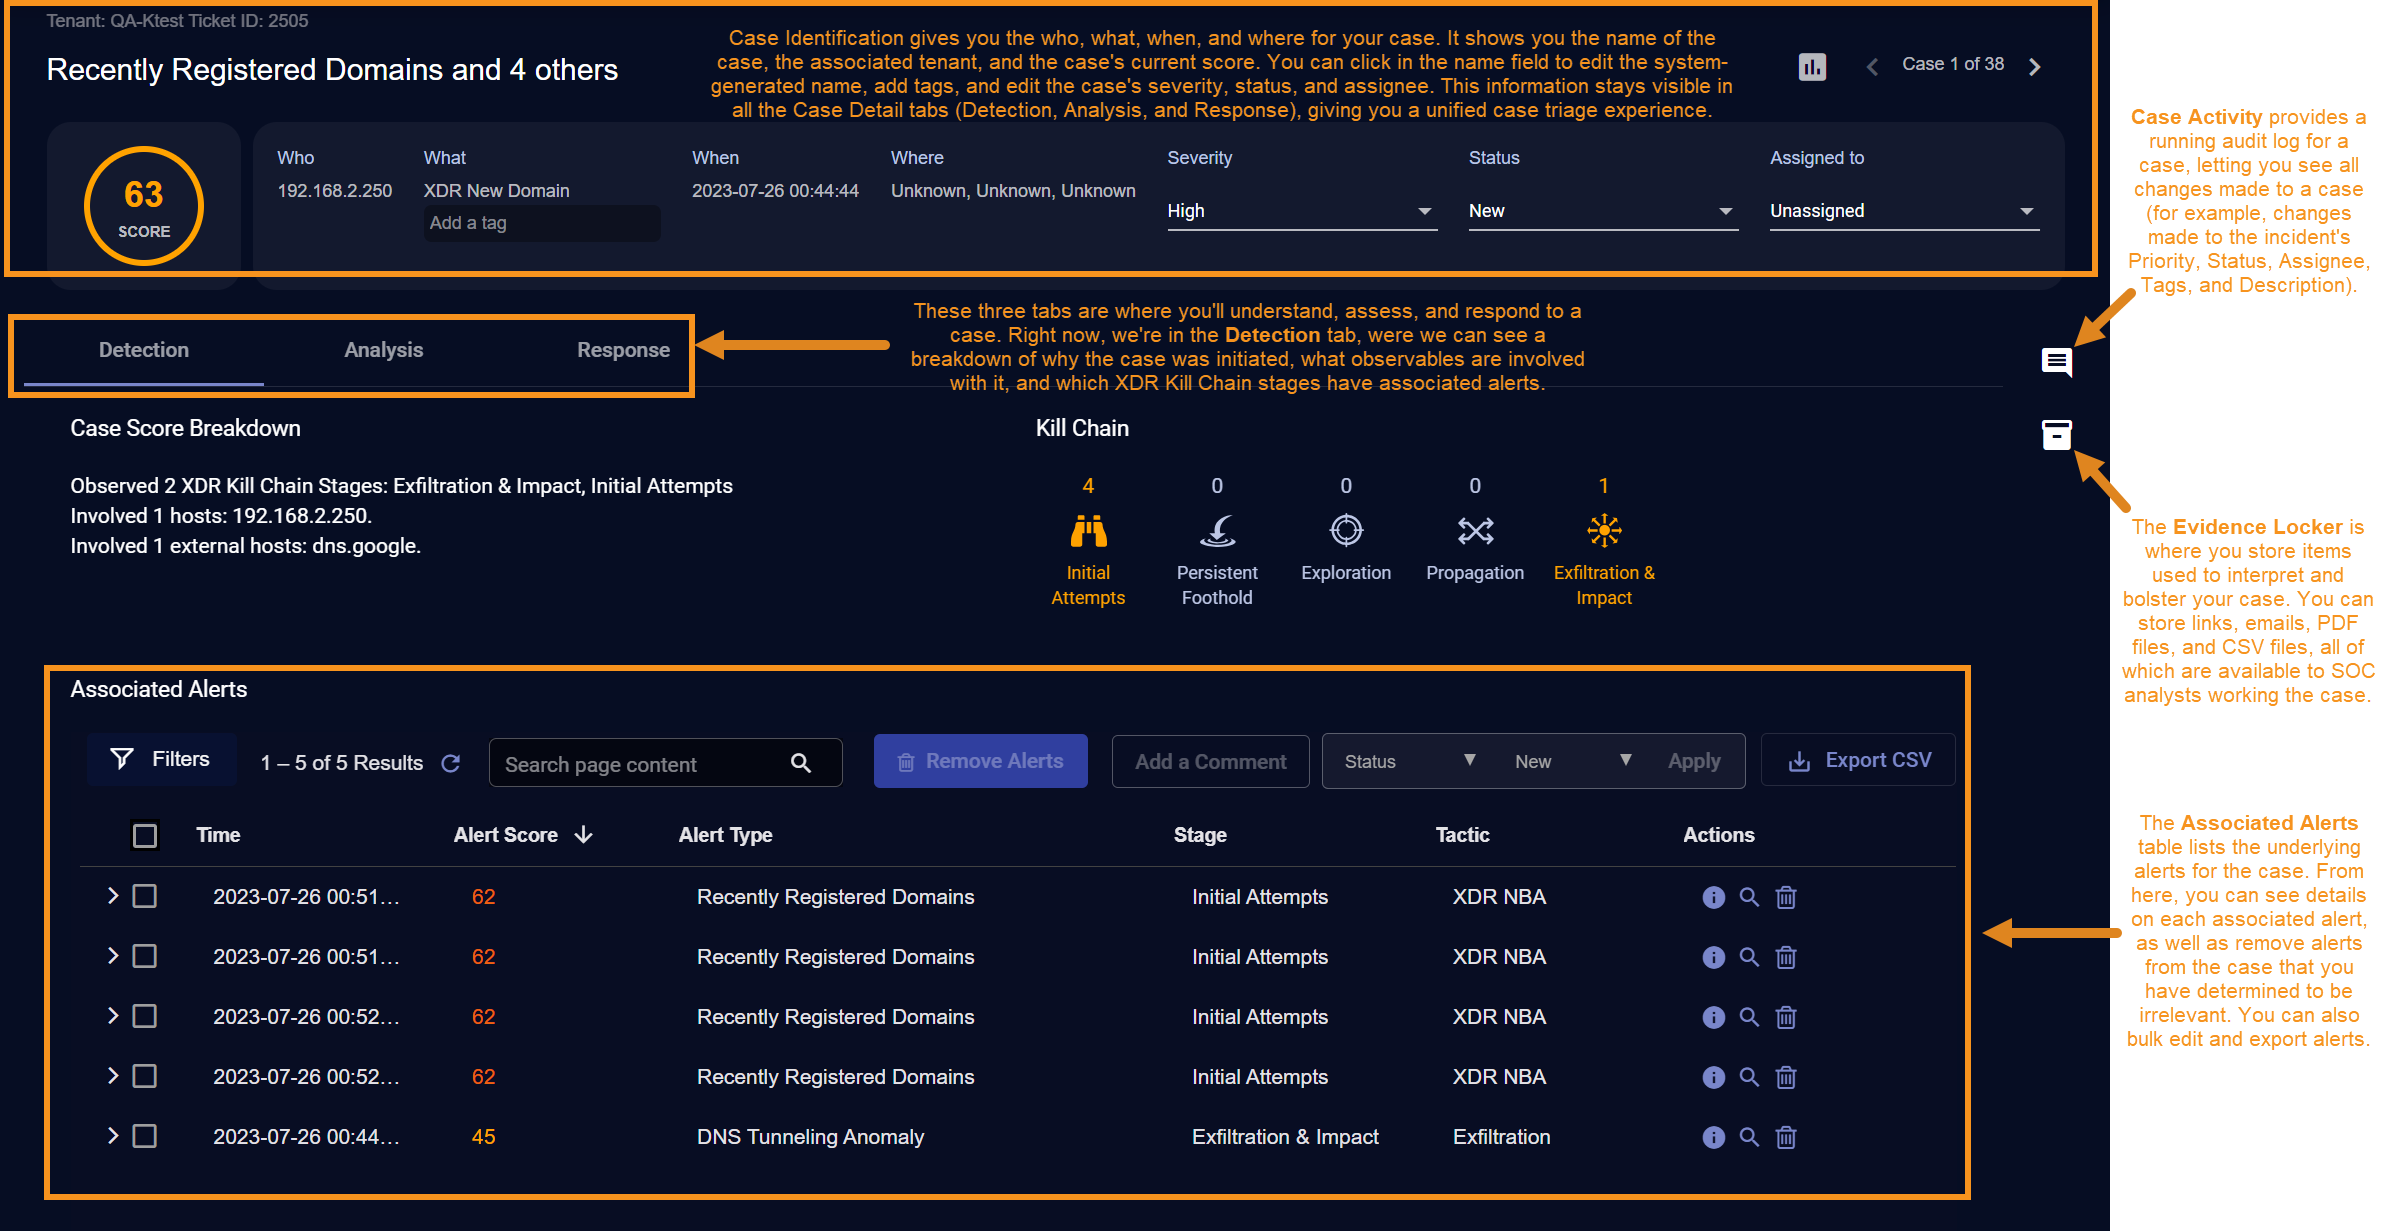
Case Identification – The Case Identification panel is at the top of the page and stays visible throughout all Case Detail views. It gives you the who, what, when and where for a case, including the case name, the associated tenant, the system-generated Case ID, and the case's score, color-coded to indicate its severity. Names for system-generated cases start out with a summary of the underlying alerts and date. You can click in the name cell to edit the system-generated name.
From here, you can also associate tags, edit the status and priority of cases, as well as assign resources, or export the case to share it with others outside the Stellar Cyber platform. The Case Identification panel is described in detail later on in this topic.

-
Case Workspace – The Case Workspace is where you identify, assess, triage, and respond to cases. The Case Workspace provides the tabs summarized below. Click on any of the tabs listed below to see a detailed description of the corresponding tab.
-
Detection Tab – The Detection tab provides a high-level summary of the case, including a breakdown of what Stellar Cyber has seen and why it is scoring the case the way it is. You can also see a summary of the XDR Kill Chain stages involved, and a table of Associated Alerts.
-
Analysis Tab – The Analysis tab is where you investigate the case. You can rearrange the associated entities, click them to drill to further details, and hover your mouse over links to see contextual pop-ups. Separate Observables and Timeline panels at the right of the tab let you view either a summary of the entities associated with the case or a sortable timeline showing the elapsed time between each of the case's events. Both views let you drill to further details on the underlying evidence for the case.
-
Response Tab – The Response tab is where you take action on the case. Stellar Cyber automatically suggests appropriate actions based on the alerts involved and the response actions available for the associated connectors, from blocking an IP address to disabling a user or disconnecting a host.
The figure below shows the Case Workspace with its default Detection tab, including the Associated Alerts table.

-
-
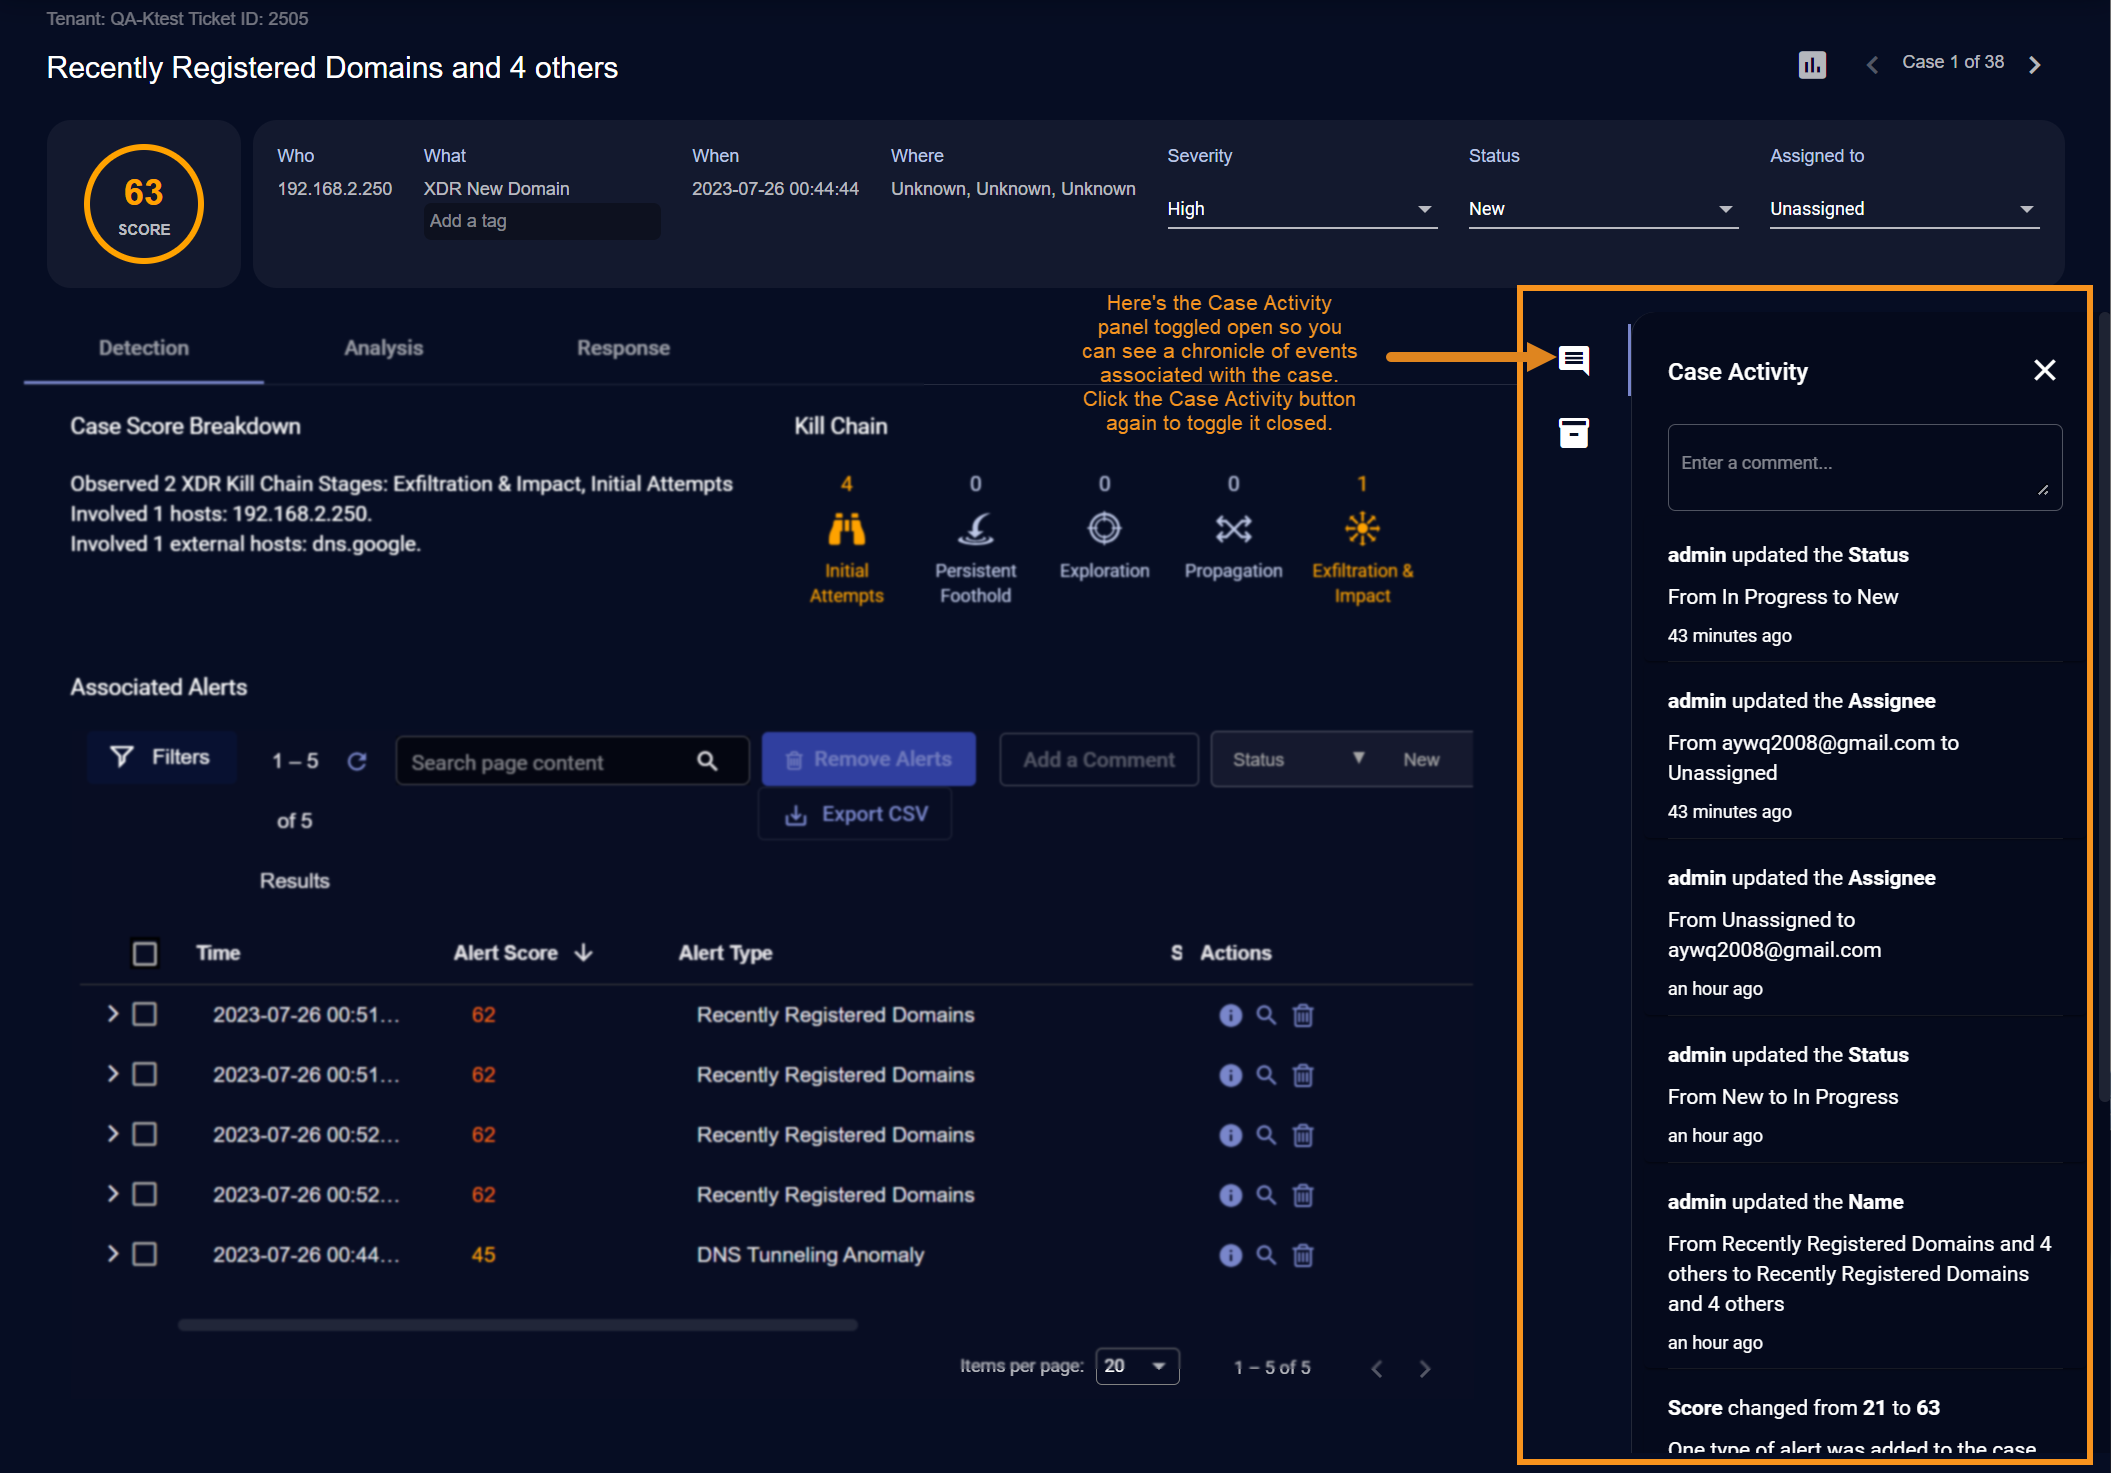
Case Activity – The Case Activity panel provides an audit trail for the case, chronicling any changes made to the case's associated alerts, Score, Status, Priority, Assignee, Tags, or Description. You can also add your own comments to the Case Activity panel, helping you annotate changes made during a case's investigation. Comments are viewable by all users, but can only be edited or deleted by the user who created them.
Open the Case Activity panel by clicking its button
 at the far right of the Case Detail view. The Case Activity panel is available in all Case Detail views, regardless of the currently displayed tab.
-
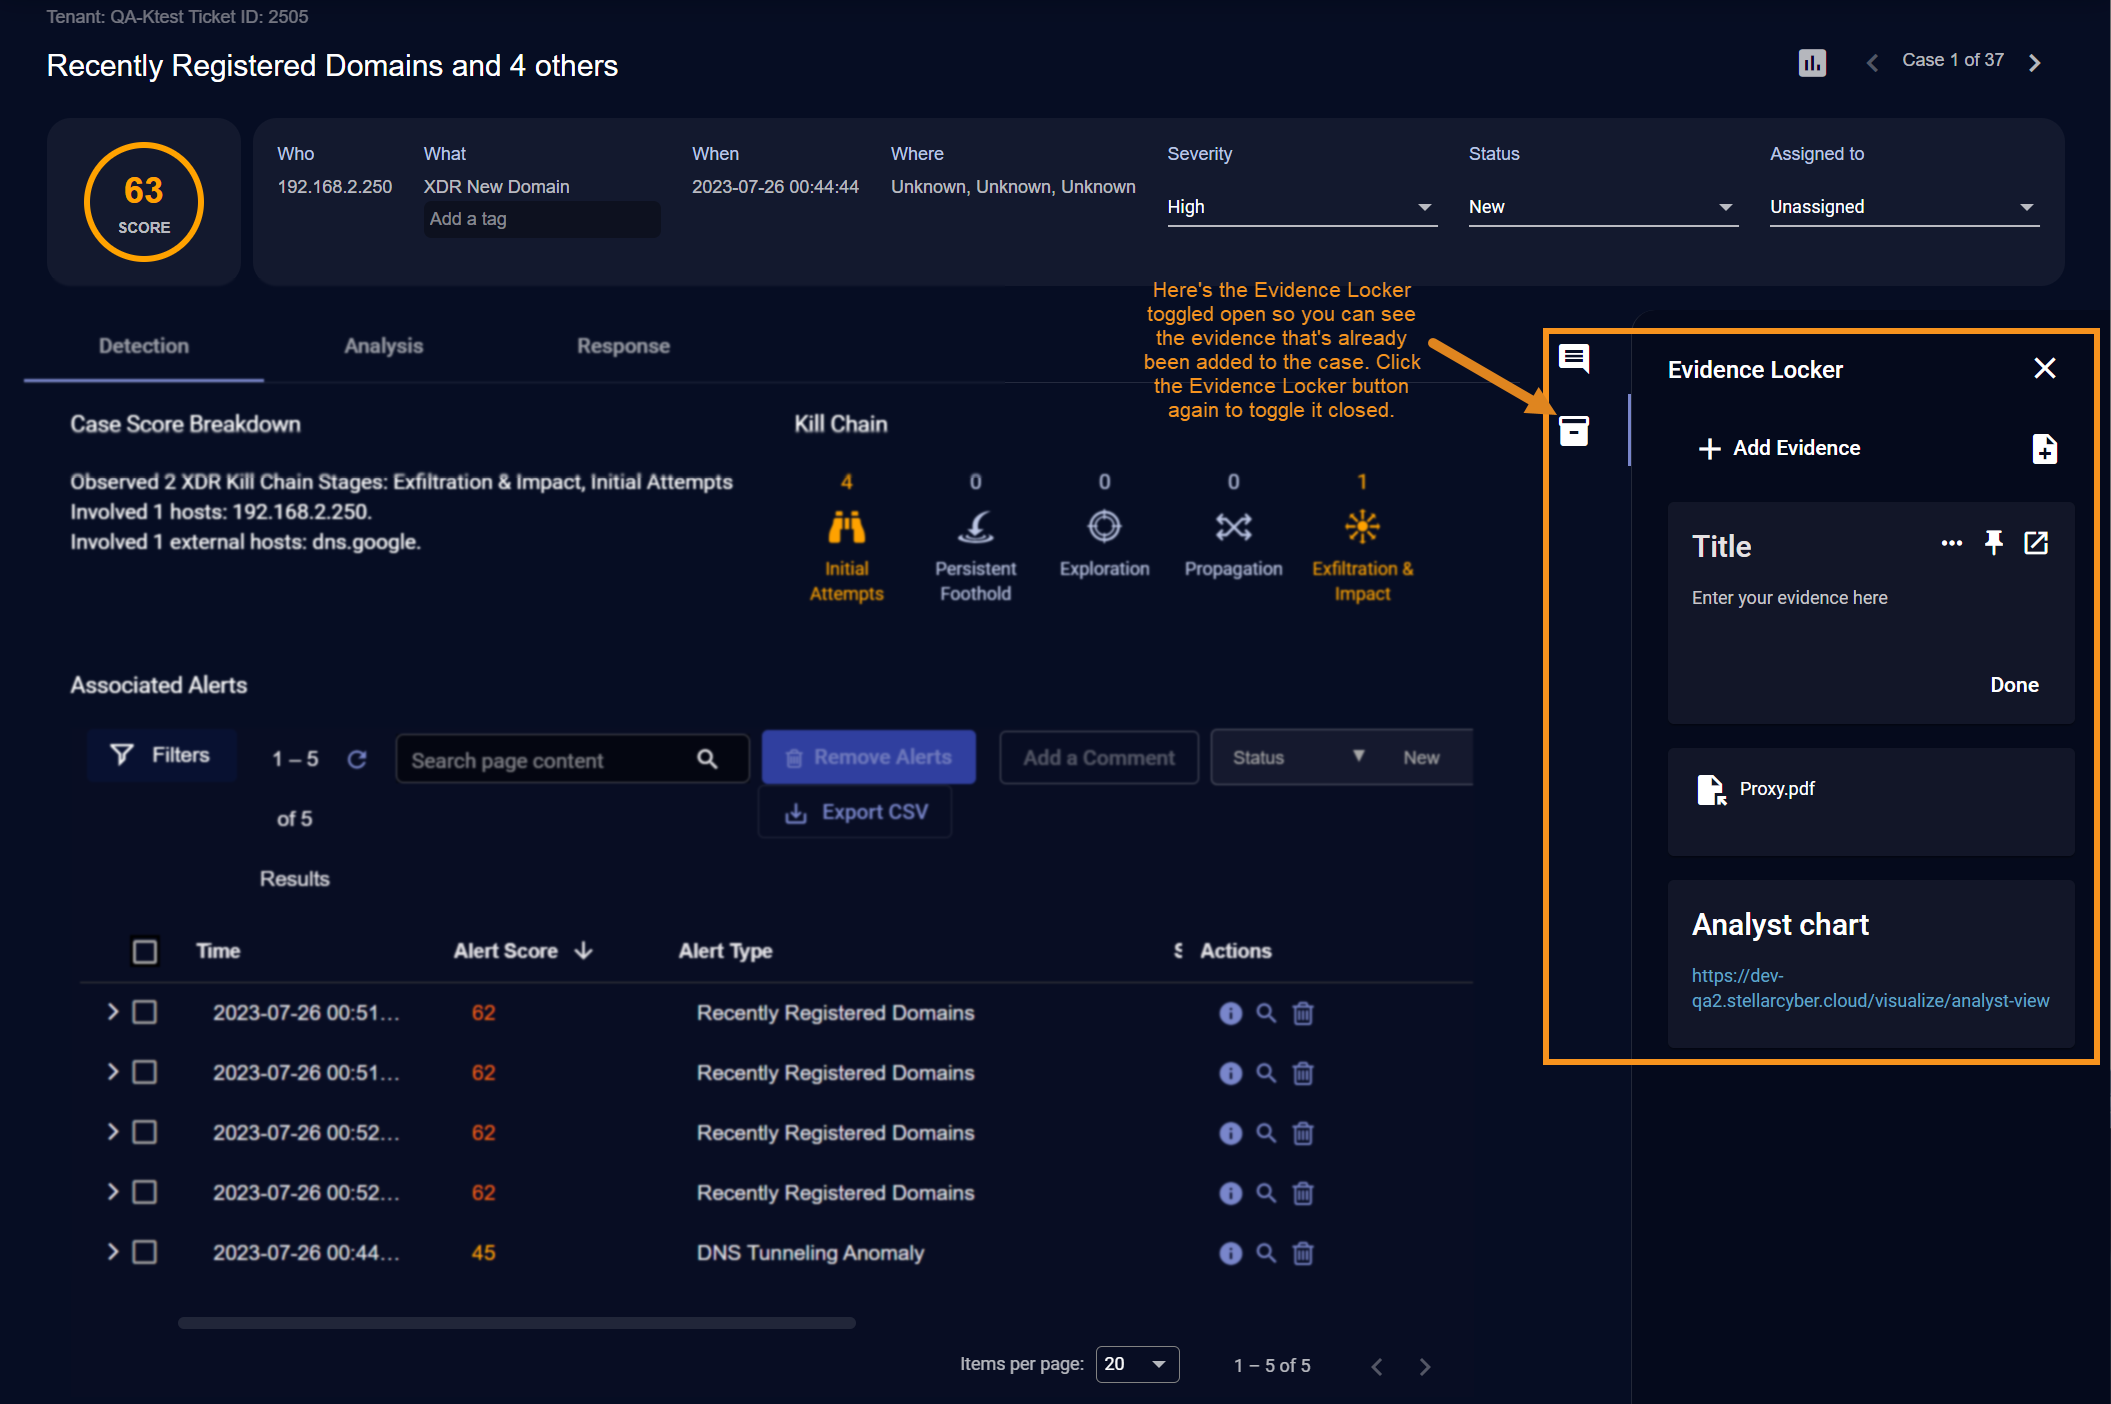
Evidence Locker – The Evidence Locker (described in detail below) provides a handy spot for you to store and share items that help your team bolster its case, including emails, PDF files, CSV files, and links to other locations in the Stellar Cyber platform.
Open the Evidence Locker by clicking its button
 at the far right of the Case Detail view. Similar to the Case Activity panel, the Evidence Locker is available in all Case Detail views, regardless of the currently displayed tab.


Using the Case Identification Panel
The Case Identification panel is available at the top of all Case Detail views. The Case Identification panel provides the following information on the case:
-
Case Name – Stellar Cyber automatically assigns a name to each case it reports. You can either accept the default name or supply your own.
-
Score – Stellar Cyber assigns scores to cases based on how critical they are. A case's score updates in real time as events and entities are added to or removed from the incident. Scores are color-coded to indicate the seriousness of the case.
-
Who – The user(s) and/or host(s) associated with the case. You can find details on the observables for the case in the Analysis tab.
-
What – The Tactic or Technique for the alert with the highest severity associated with this case.
-
Tags – Use this field to assign custom tags to an incident that are meaningful to you (for example, AWS or Internal). You can use Tags as filters in the Case table, giving you a way to group cases based on criteria that are meaningful to your network.
-
-
When – The time at which the case was first created.
-
Where – The geographic locations associated with the case, if known. You can drill down on the observables listed in the Analysis tab to see which entities were seen where.
-
Severity– The severity of the case (Critical, High, Medium, or Low). Severity automatically changes with a case's score until it is changed manually here. Once you manually edit a case's severity, it no longer updates automatically based on the case's score. Severity indicators are color-coded to direct your attention to more serious cases.
-
Status – All cases start out with a Status of New. You can use this field to measure your progress as you address the case, changing the Status to In Progress, Resolved, or Cancelled. Filters in the Case table let you view just those cases of a particular status, giving you a handy way to maintain visibility on case status across the enterprise.
All changes to the Status field are logged to the Case Activity panel.
Once a case's status has been changed to either Resolved or Cancelled, Stellar Cyber no longer associates new alerts with the resolved or cancelled case. Instead, new alerts are either used to create a new case or associated with a different open case. In addition, you have the following options for resolved or cancelled incidents:
-
Set a comment for the case's resolution.
-
Update the case's associated alerts to Closed (for Resolved cases) or Ignored (for Cancelled cases).
Note that cancelling a case does not remove the incident from the list. Cancelled cases remain in the list with their graphs, names, and scores intact so you continue to have visibility on them.
-
-
Assigned To – All cases start out as Unassigned. You can use this field to assign a case to any user currently defined in the Stellar Cyber system, providing a degree of traceability. You can sort the Case table by assignee, as well as use the Assignee filters to see different filtered views of cases by assignee.
The users available for assignment depend on the scope of the account you are logged in with. For example, If you are logged in as a user with Tenant scope, you can only assign a case to users associated with the same tenant. Similarly, a user with Partner scope can assign cases to any user associated with a tenant belonging to that partner.
All changes to the Assignee field are logged to the Case Activity panel.
About Case IDs in the Case Views
The Case IDs you see in the Case views are unique for a given tenant – a given tenant will never have multiple cases with the same visible Case ID. Behind the scenes, however, Case IDs are composed of a Tenant ID and a Case ID. Because of this, if you have privileges that let you see cases from multiple tenants, you may notice that the visible Case IDs can repeat for different tenants. That happens because the Case ID portion of the total Case ID is not visible in the Case pages – only the Case ID portion is.
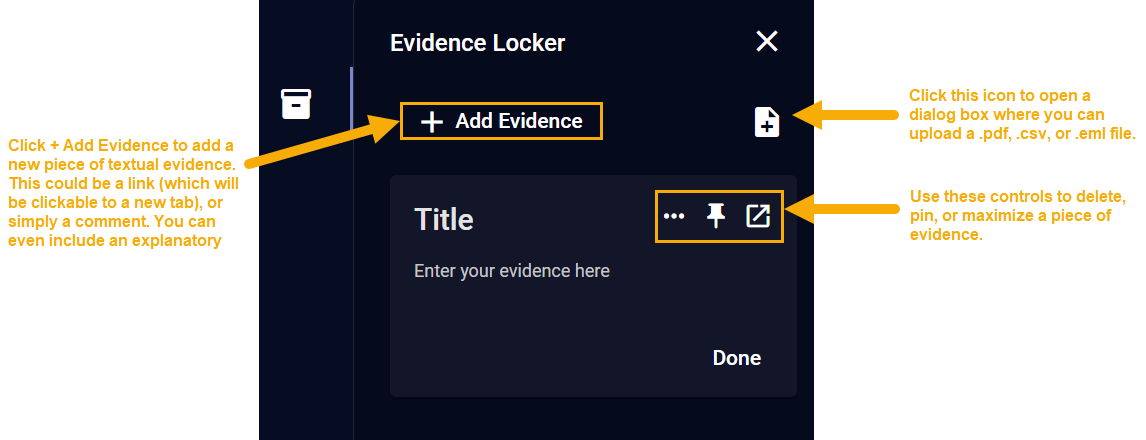
Using the Evidence Locker
The Evidence Locker lets you store items that help your team bolster its case. You can store any of the following:
-
Text – No limit on quantity. If you find yourself adding long text messages, use the maximize button
 for easier reading later on.
 -
Emails – Must be in .eml format. Maximum file size is 1 MB.
-
PDF files – Maximum file size is 1 MB.
-
CSV files – For use in spreadsheets. Maximum file size is 1 MB.
-
Links – Links can be to other locations in the Stellar Cyber platform or external links as well. Clicking a link stored in the Evidence Locker opens a new browser tab for the link.

Open the Evidence Locker by clicking its button  at the far right of the Case Detail view. Then, use the panel controls to add your evidence as illustrated below:
Keep in mind the following guidance when using the Evidence Locker:
-
URLs added as text to the Evidence Locker can be clicked to new browser tabs.
-
Use the pin button
 to pin a particular piece of evidence to the top of the Evidence Locker's list. Once evidence has been pinned, its pin icon changes color. Click the pin button again to unpin the piece of evidence. Pinned evidence is sorted by the time at which it was pinned, with the most recently pinned evidence at the top.
 -
Unpinned evidence is sorted by modification date.
-
There is no limit on the number of entries that can be added to the Evidence Locker.
-
Evidence can be opened and downloaded, making it easy to share evidence across multiple team members.
-
Changes to the Evidence Locker are logged to the Case Activity panel.
-
The Evidence Locker does not support drag and drop.

