Using the System Action Center 
You use the System | Administration | System Action Center to create and manage rules that specify when system notifications are triggered and where they are sent. Triggered notifications always appear in the Notification Center, available under the  icon in the main toolbar. You can also configure notifications to send emails to specified recipients, including both those defined in the System | Configurations | Recipients page and emails you specify on demand.
System notifications help you keep tabs on important system events in the following categories:
-
Case Management – Get notifications when cases are assigned, closed, escalated, created, updated, or have a score that meets or exceeds a specified threshold.
-
Cluster Health – Find out proactively when either the Data Analyzer (DA) or Data Lake (DL) cluster's health is in the red state.
-
Connector Monitoring – Get notifications when specified connectors haven't sent data over a given time interval so you can address issues in real time.
-
Data Storage Capacity – Find out when your data storage is reaching either its soft or hard cap.
-
Disk Capacity – Get notified when root disk usage is reaching its limit.
-
NFS Data Sink Capacity – Get notifications when an NFS Data Sink's storage is reaching either its soft or hard cap.
Refer to Best Practices for the System Action Center for guidance on ways you can use the System Action Center effectively in your organization.
See the following sections for details on working with the System Action Center:
Required Privileges
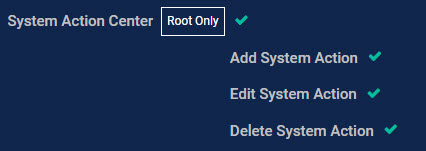
The System Action Center is only available to accounts with both Root scope and the System | Administration | System Action Center privilege assigned to their profile in theSystem | Role-Based Access Control page. By default, this includes only the Super Admin role. The necessary privileges in the Role-Based Access Control page are shown below:
Working with the System Action Center Page
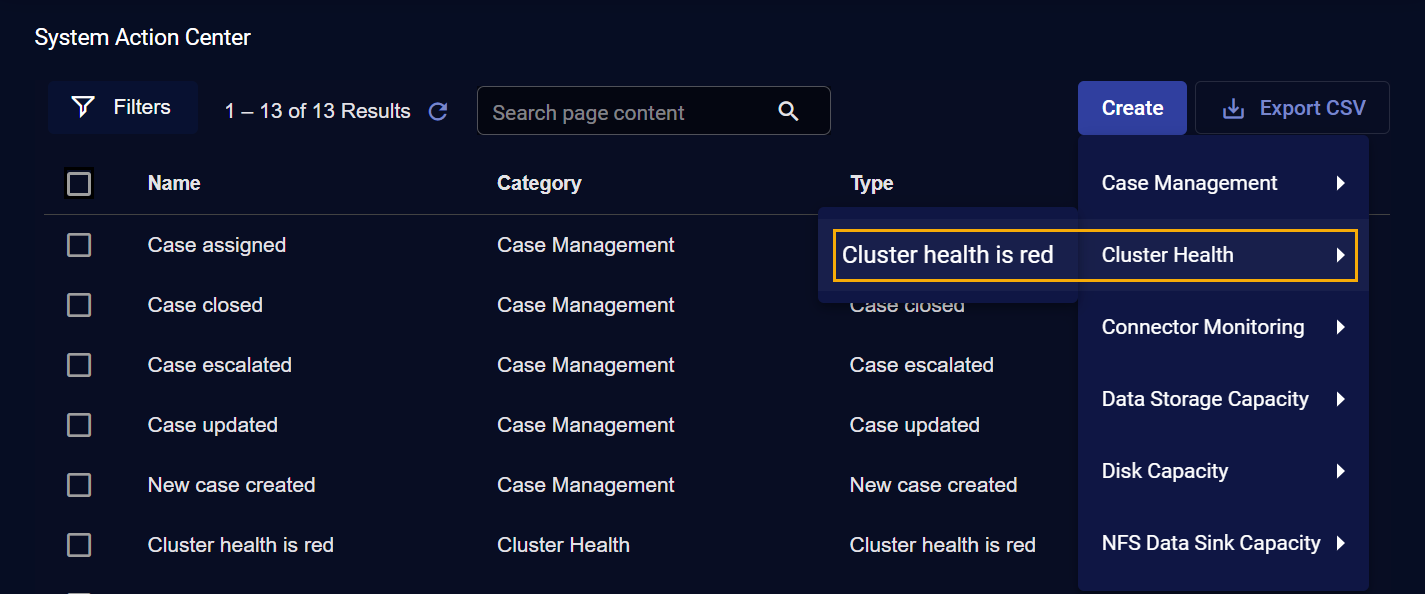
The System Action Center lists each of the defined system action rules in a standard Stellar Cyber table, as shown below.
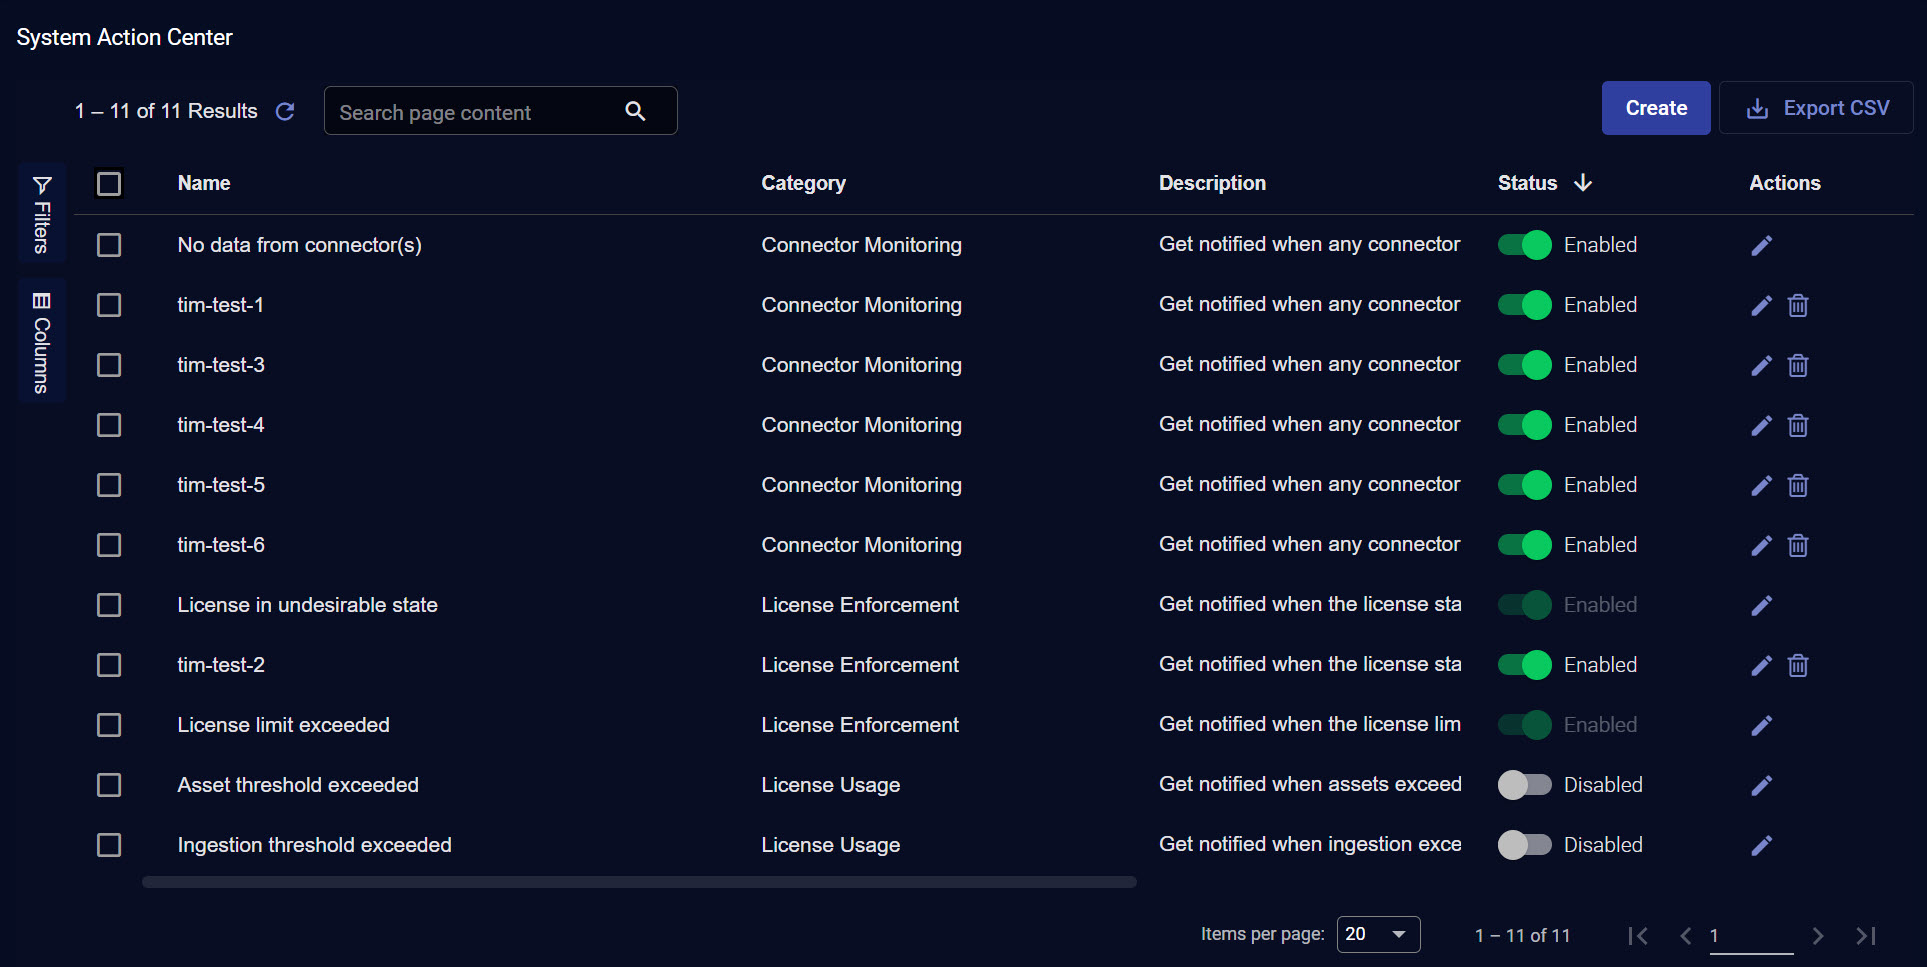
The rules listed in the System Action Center are not affected by the Tenants filter in the main toolbar at the top of the display. All rules are shown.
System Action Center Fields
The System Action Center lists the defined notification rules with the following information:
-
Name – The name assigned to the rule when it was created.
-
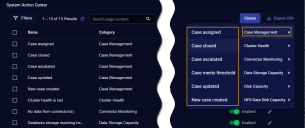
Category – Rules are available in the following categories – Case Management,
-
Type – Each category of rule has multiple rule types available.
-
Description – Either the standard description of the rule provided by Stellar Cyber, or the description provided when the rule was created.
-
Creator – The user account that created the rule.
-
Status – Rules can be either Enabled or Disabled using the toggle in this column.
Changes to a rule's status require a few minutes to take effect. During this time, for example, you may still receive notifications for a rule you have disabled.
-
Edit and Delete icons.
-
Clone – When you check a rule's box, a new Clone button appears that lets you make a copy of the selected rule for editing. This is useful when you want to create a new rule that is very similar to an existing rule.
When you clone a Case Management rule, Stellar Cyber automatically disables the Send to case assignee option to help prevent duplicate emails.
In addition, the System Action Center supports standard Stellar Cyber table functionality:
-
Sort on column headers.
-
Click the "hamburger" menu available in a column header to add/remove columns or search a column.
-
Export the table in CSV format.
Creating New System Notification Rules
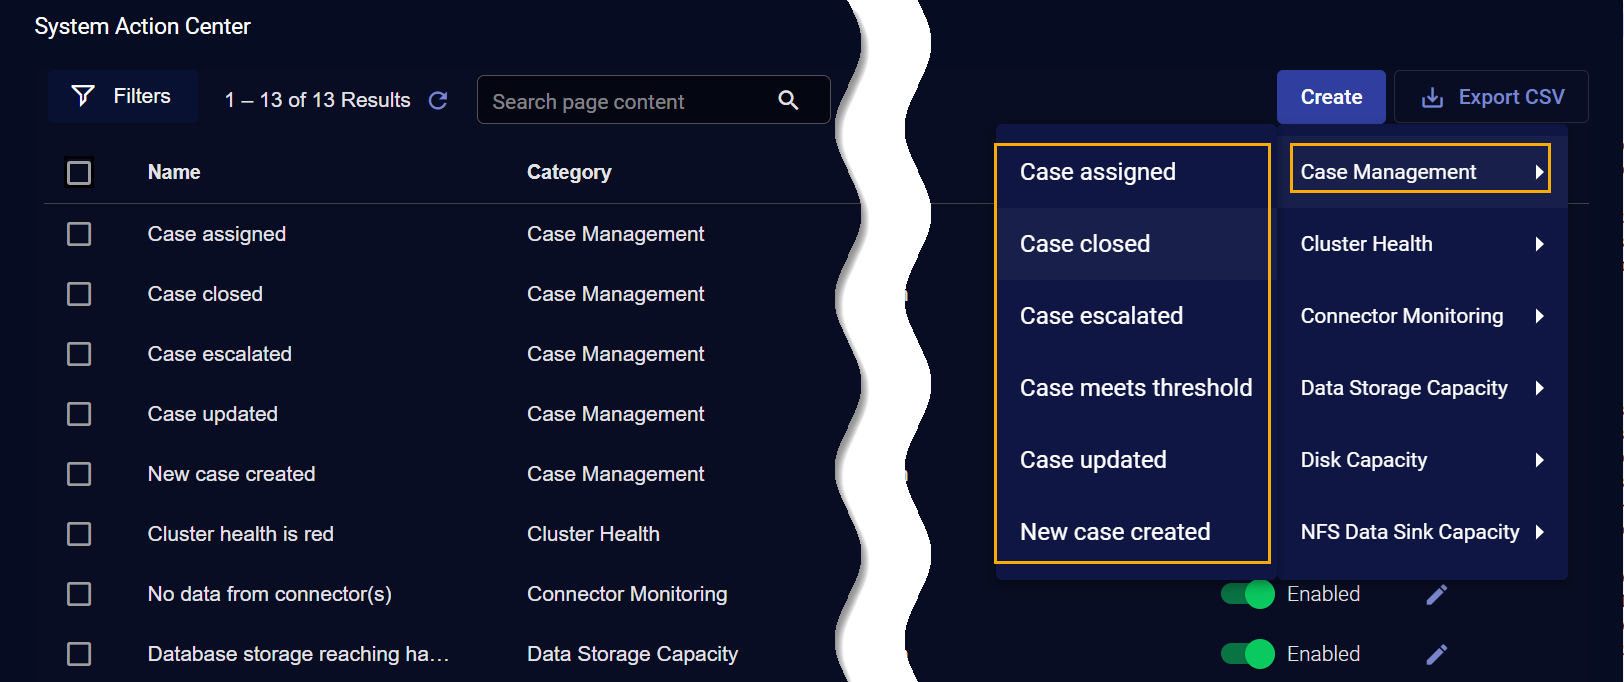
You create a new system notification rule by clicking the Create button at the top of the System Action Center, selecting the category and type of rule you want to create from the menu that appears, and following the wizard's prompts. Alternatively, if you want to use an existing rule as a template for a new one, you can check the box for the source rule in the list and click the Clone button to create an editable copy.
Click the headings below for specific instructions on the type of rule you want to create:
Creating a Case Management Notification Rule
Case Management rules notify you when specified case-related events take place. You can create rules that notify you when the following events related to cases take place:
-
Case assigned
-
Case closed
-
Case escalated
-
Case meets threshold
-
Case updated
-
New case created
The mechanics for creating a case management notification rule are mostly the same regardless of the specific type of rule you are creating. The differences are summarized in the procedure below:
-
Click the Create button at the top of the System Action Center and select Case Management from the dropdown that appears.
-
Select the type of Case Management notification rule you want to create.
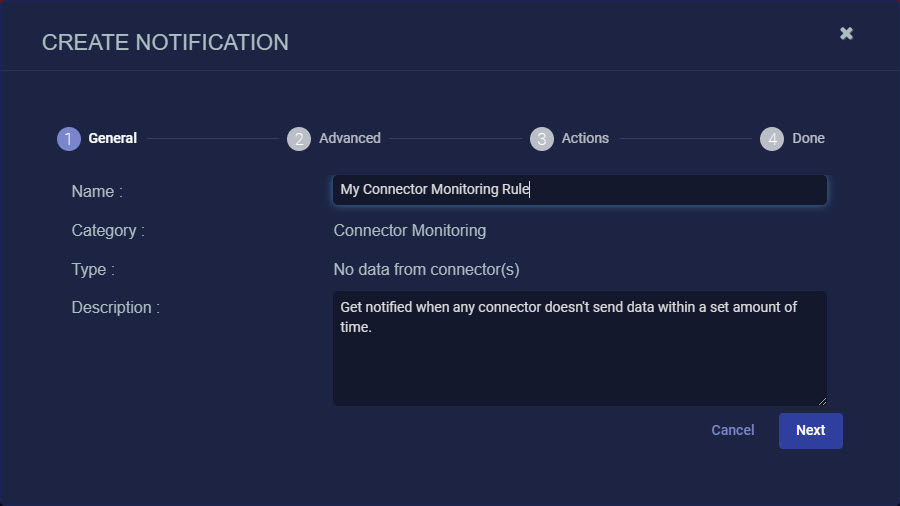
The Create Notification wizard starts with the Category set to Case Management and the Type set to the rule type you selected.
-
Supply a name for your notification rule in the Name field.
-
Select the Tenant to which the rule applies. By default, All Tenants are selected. Click anywhere in the Tenant field to display a pick list including all tenants available on the system where you can select the tenant to which this rule applies.
-
You can either accept the system-provided Description or supply your own. The description supplied here appears in the System Action Center's table of rules.
-
Click Next.
-
Use the Advanced step to specify details related to the type of case management rule you selected. The options are different for each rule type and are summarized in the table below:
Case Management Rule Type Description
Configuration Options Case assigned Generates a notification when a case's Assigned to field in the Case Details page changes.
Check the Send to case assignee box to send an email notification to the case's assignee in addition to any other email addresses you specify in the Actions step. Case closed Generates a notification when a case's Status is changed to Resolved in the in the Case Details page.
Case escalated Generates a notification when a case's Status is changed to Escalatedin the in the Case Details page.
Case meets threshold Generates a notification when a case's score meets a threshold you specify.
Use the Score Threshold option to specify the case score at which this notification is generated. Case updated Generates a notification any time an update is made to a case.
Check the Send to case assignee box to send an email notification to the case's assignee in addition to any other email addresses you specify in the Actions step. New case created Generates a notification when a new case is created.
Use the Score Threshold option to set a minimum score threshold at which new case notifications generate notifications. This lets you tune the noise level for the rule; a higher minimum threshold generates fewer notifications. -
Click Next when you are ready to continue.
-
Use the Actions step to specify how this rule notifies you when it is triggered:
-
All rules have In Platform enabled so that triggered instances appear in the Notification Center.
-
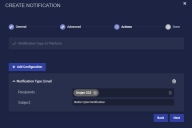
You can also enable email notifications in the Notification Type: Email field.
-
Use the Recipients field to specify who will receive a notification email when the rule is triggered. Click to display a pick list containing all email recipients configured in the System | Configurations | Recipients page. If you want to send an email to someone who is not already configured in the Recipients page, you can type addresses in manually.
-
Use the Subject field to specify the subject line of the email. If you want to use different subject lines for different recipients, you can click the Add Configuration button and add a second Email notification with a different subject line and set of addressees.
The figure below shows a configured email notification:
-
-
-
Click Next and review the settings for your notification rule. Use the Back button to go back and correct anything that's not quite right. When you are satisfied, click Submit to add your rule to the list.
The rule appears in the System Action Center's list and is automatically Enabled.

Links in Case Notification Emails
Notification emails sent from the System Action Center for Case Management events include a link to the case in the user interface. Refer to Ensuring that Links In System Action Center Emails Work Correctly for important configuration instructions to ensure that these links work correctly.
Preventing Duplicate Case Notification Emails
If you configure multiple Case assigned rules, you can prevent duplicate emails by make sure that only one of them has the Send to case assignee option enabled. Stellar Cyber helps you with this by disabling the option in cloned Case Management rules.
 Creating a Cluster Health Notification Rule
Cluster Health Notification rules notify you when the health for either the DA or DL cluster enters the red warning state.
You can keep track of Cluster health in the Visualize | Predefined | System Status page.
Use the following procedure to create a Cluster Health Notification rule:
-
Click the Create button at the top of the System Action Center and select Cluster Health | Cluster health is red from the dropdown that appears.
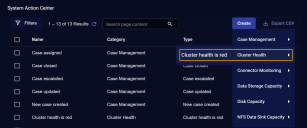
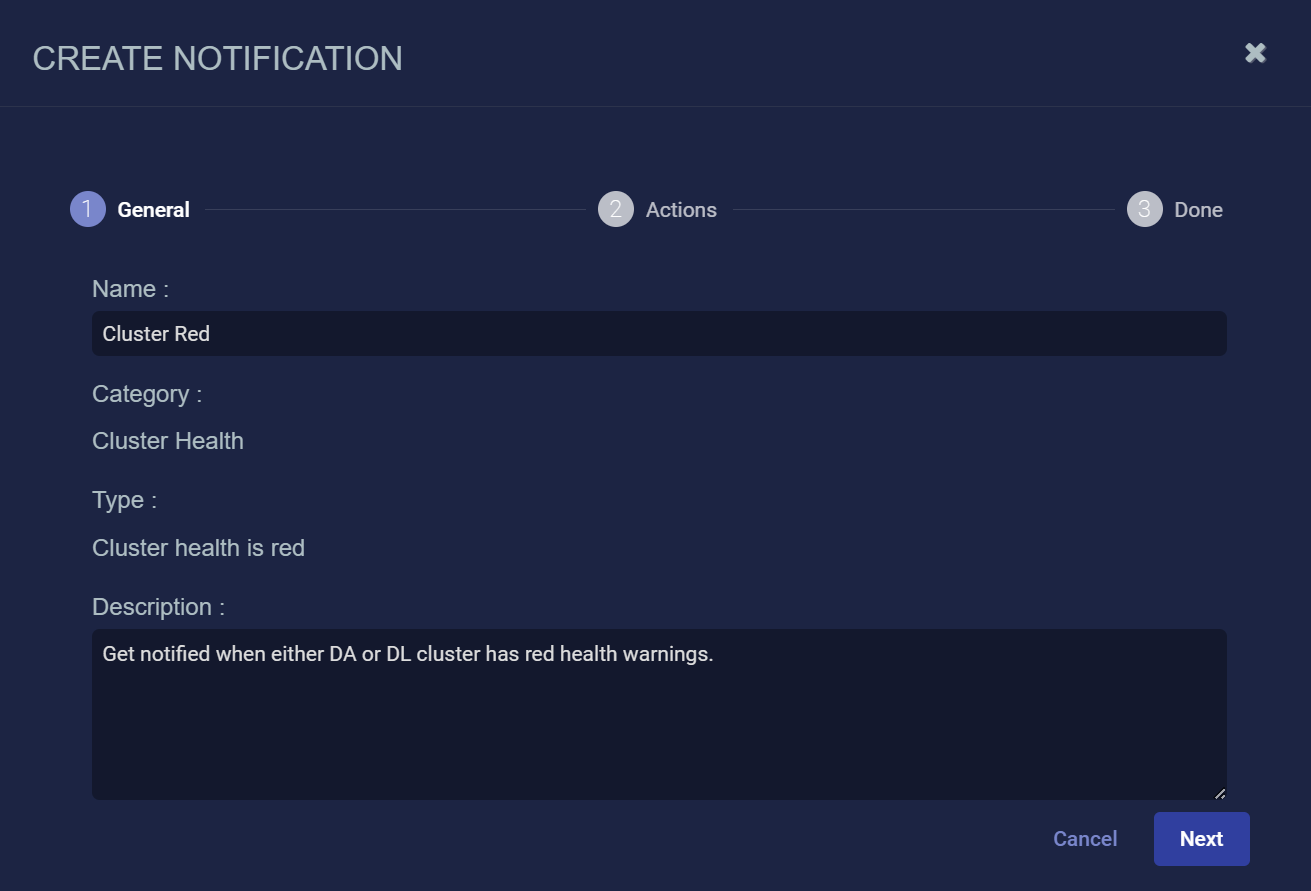
The Create Notification wizard starts with the Category set to Cluster Health and the Type set to Cluster health is red.
-
Supply a name for your notification rule in the Name field.
-
Select the Tenant to which the rule applies. By default, All Tenants are selected. Click anywhere in the Tenant field to display a pick list including all tenants available on the system where you can select the tenant to which this rule applies.
-
You can either accept the system-provided Description or supply your own. The description supplied here appears in the System Action Center's table of rules.

-
Click Next.
-
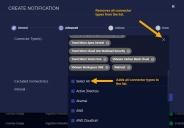
Use the Actions step to specify how this rule notifies you when it is triggered:
-
All rules have In Platform enabled so that triggered instances appear in the Notification Center.
-
You can also enable email notifications in the Notification Type: Email field.
-
Use the Recipients field to specify who will receive a notification email when the rule is triggered. Click to display a pick list containing all email recipients configured in the System | Configurations | Recipients page. If you want to send an email to someone who is not already configured in the Recipients page, you can type addresses in manually.
-
Use the Subject field to specify the subject line of the email. If you want to use different subject lines for different recipients, you can click the Add Configuration button and add a second Email notification with a different subject line and set of addressees.
The figure below shows a configured email notification:
-
-
-
Click Next and review the settings for your notification rule. Use the Back button to go back and correct anything that's not quite right. When you are satisfied, click Submit to add your rule to the list.
The rule appears in the System Action Center's list and is automatically Enabled.
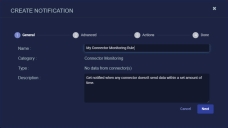
Connector Monitoring rules notify you when specified connectors have not sent traffic over the time interval you configure. Use the following procedure to create a Connector Monitoring rule:
-
Click the Create button at the top of the System Action Center and select Connector Monitoring | No data from connector(s) from the dropdown that appears.

The Create Notification wizard starts with the Category set to Connector Monitoring and the Type set to No data from connector.
-
Supply a name for your notification rule in the Name field.
-
Select the Tenant to which the rule applies. By default, All Tenants are selected. Click anywhere in the Tenant field to display a pick list including all tenants available on the system where you can select the tenant to which this rule applies.
-
You can either accept the system-provided Description or supply your own. The description supplied here appears in the System Action Center's table of rules.
-
Click Next.
-
Use the Connector Type(s) field to specify the types of connectors for which this rule will report inactivity.
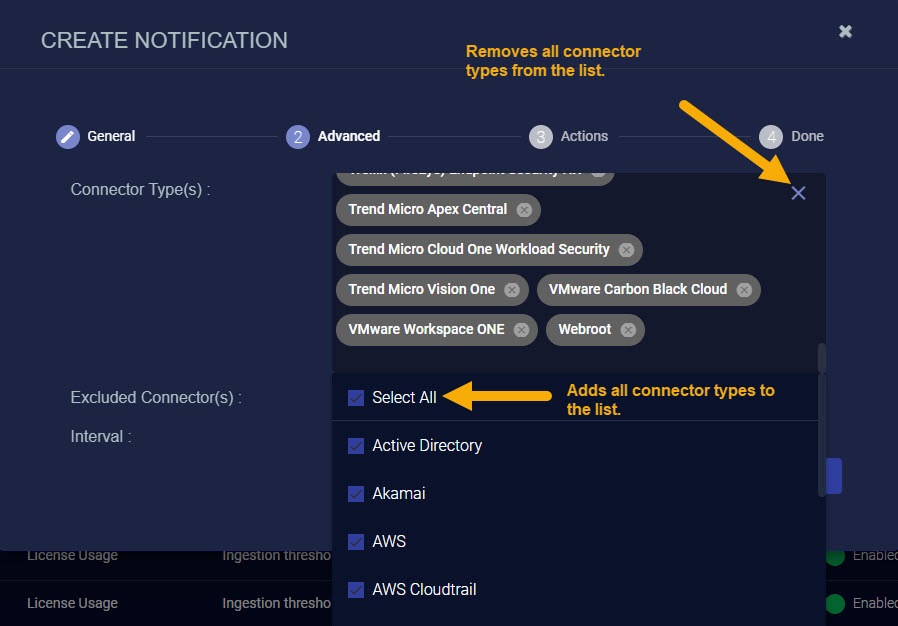
By default, all connector types are selected. You can remove a specific connector type by clicking the x in its entry in the field. You can also click anywhere in the field to display a pick list (shown below) that lets you check the boxes for the connector types you want to include in the rule. The pick list also includes a Select All option that lets you add all connector types back to the list if, for example, you removed all of them using the x at the upper right of the Connector Type(s) field.
-
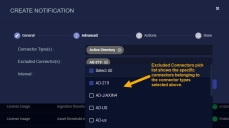
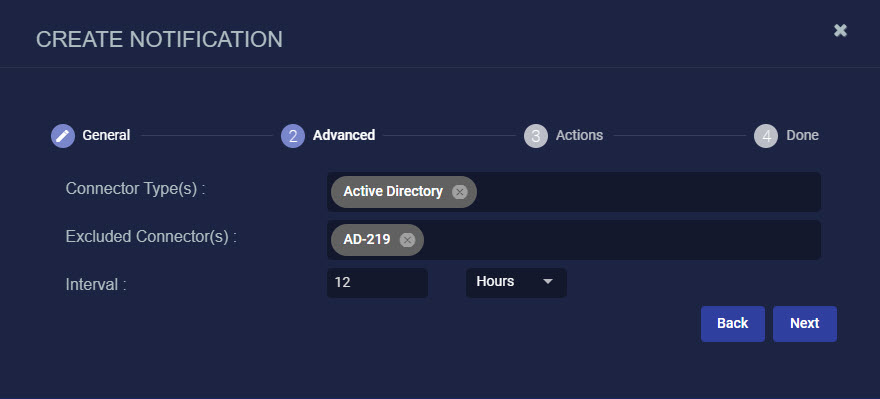
The entries in the Connector Type(s) field are broad types of connectors and not specific connectors themselves. You use the Excluded Connector(s) field to exclude specific connectors from the types selected in the Connector Type(s) field from the inactivity rule. The Excluded Connector(s) pick list shows you just the specific connectors belonging to the Types that are part of the rule you are creating.
For example, in the figure below, we have only selected the Active Directory connector type. As you can see, the Excluded Connector(s) pick list shows us all of the specific Active Directory connectors defined on the system. You can use the pick list to check the boxes of any specific connectors you want to exclude from inactivity notifications in this rule.
-
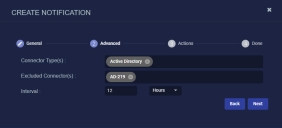
Use the Interval fields to specify the time window for the rule. You may be concerned if some connectors have not sent data in a manner of minutes, while others may not give you cause for concern over a period of days. The Interval controls let you specify both the units (Minutes, Hours, or Days) and the size of the time window. For example, we have specified an interval of two hours in the figure below:
-
Click Next when you are ready to continue.
-
Use the Actions step to specify how this rule notifies you when it is triggered:
-
All rules have In Platform enabled so that triggered instances appear in the Notification Center.
-
You can also enable email notifications in the Notification Type: Email field.
-
Use the Recipients field to specify who will receive a notification email when the rule is triggered. Click to display a pick list containing all email recipients configured in the System | Configurations | Recipients page. If you want to send an email to someone who is not already configured in the Recipients page, you can type addresses in manually.
-
Use the Subject field to specify the subject line of the email. If you want to use different subject lines for different recipients, you can click the Add Configuration button and add a second Email notification with a different subject line and set of addressees.
The figure below shows a configured email notification:
-
-
-
Click Next and review the settings for your notification rule. Use the Back button to go back and correct anything that's not quite right. When you are satisfied, click Submit to add your rule to the list.
The rule appears in the System Action Center's list and is automatically Enabled.


Creating a Data Storage Capacity Notification Rule
Data Storage Capacity rules notify you when the percentage of database storage used reaches either the soft cap (80% used) or the hard cap (90%), measured over a five-minute interval.
You can keep track of Data Lake health in the Data Lake panel of the Visualize | Predefined | System Status page.
Use the following procedure to create a Data Storage Capacity notification rule:
-
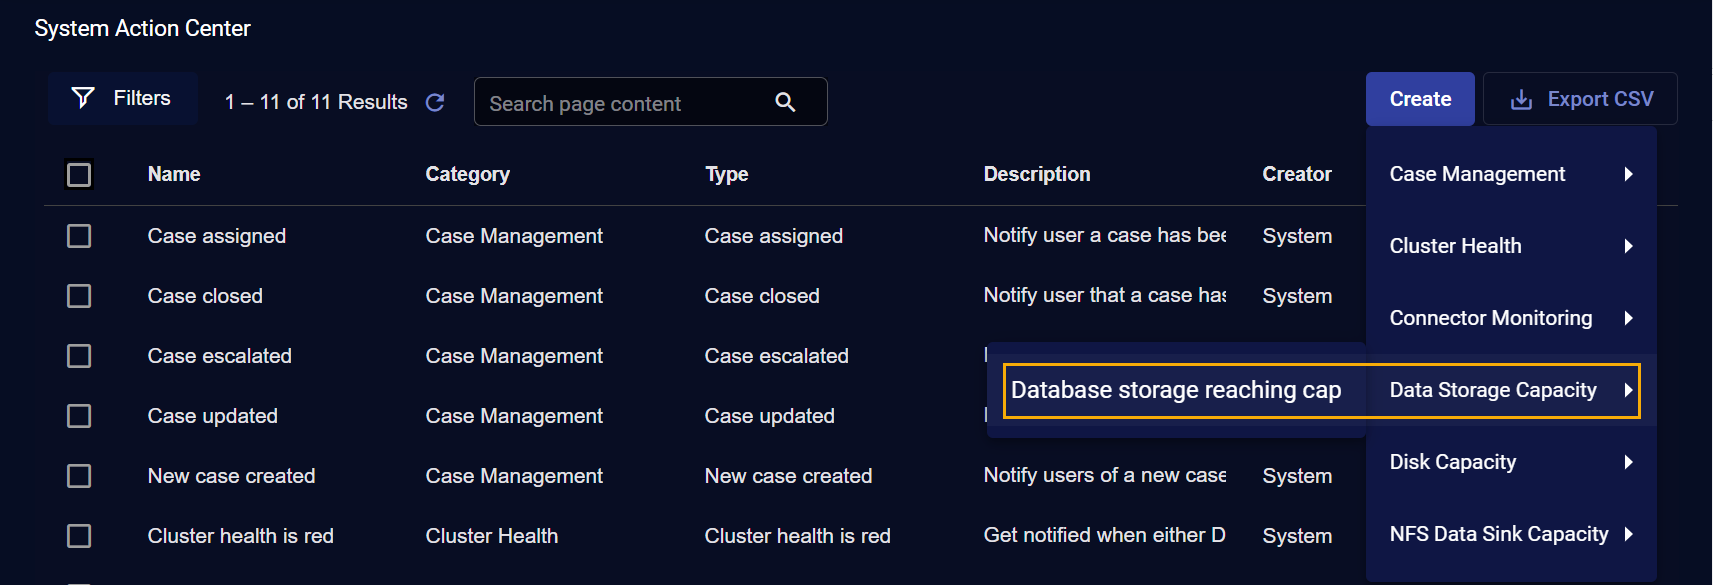
Click the Create button at the top of the System Action Center and select Data Storage Capacity | Database storage reaching cap from the dropdown that appears.

The Create Notification wizard starts with the Category set to Data Storage Capacity and the Type set to Database storage reaching cap.
-
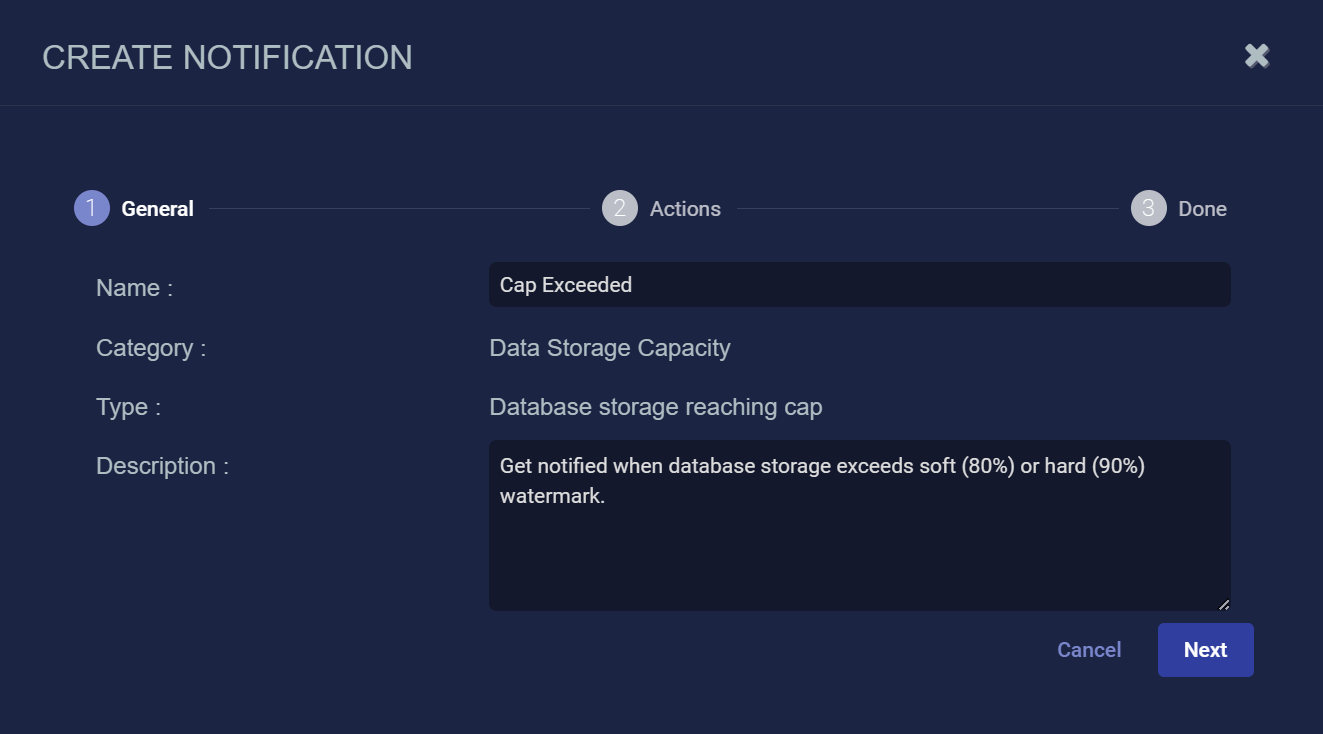
Supply a name for your notification rule in the Name field.
-
You can either accept the system-provided Description or supply your own. The description supplied here appears in the System Action Center's table of rules.

-
Click Next.
-
Use the Actions step to specify how this rule notifies you when it is triggered:
-
All rules have In Platform enabled so that triggered instances appear in the Notification Center.
-
You can also enable email notifications in the Notification Type: Email field.
-
Use the Recipients field to specify who will receive a notification email when the rule is triggered. Click to display a pick list containing all email recipients configured in the System | Configurations | Recipients page. If you want to send an email to someone who is not already configured in the Recipients page, you can type addresses in manually.
-
Use the Subject field to specify the subject line of the email. If you want to use different subject lines for different recipients, you can click the Add Configuration button and add a second Email notification with a different subject line and set of addressees.
The figure below shows a configured email notification:
-
-
-
Click Next and review the settings for your notification rule. Use the Back button to go back and correct anything that's not quite right. When you are satisfied, click Submit to add your rule to the list.
The rule appears in the System Action Center's list and is automatically Enabled.
Creating a Disk Capacity Notification Rule
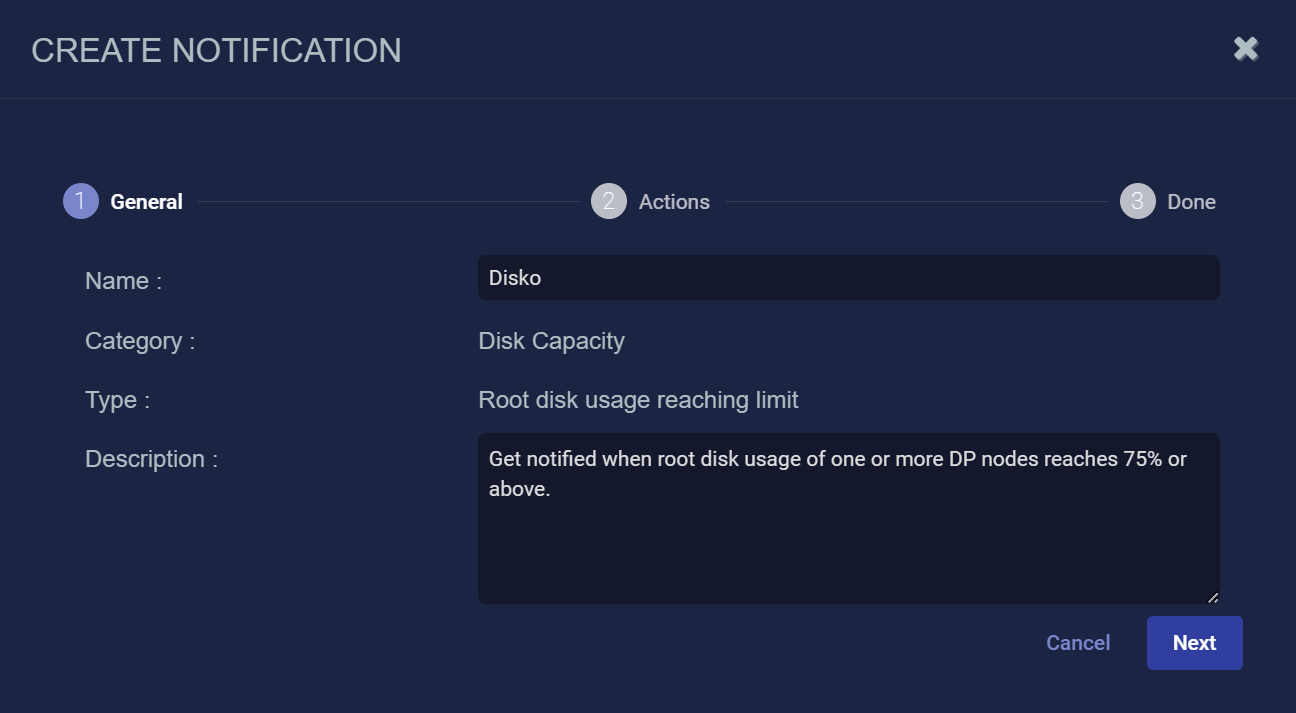
Disk Capacity rules notify you when the disk usage of one or more DP nodes has reached 75% of the available total, measured over a five-minute interval.
You can keep track of disk usage in the Data Analyzer and Data Lake panels of the Visualize | Predefined | System Status page.
Use the following procedure to create a Disk Capacity Notification rule:
-
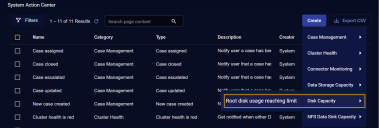
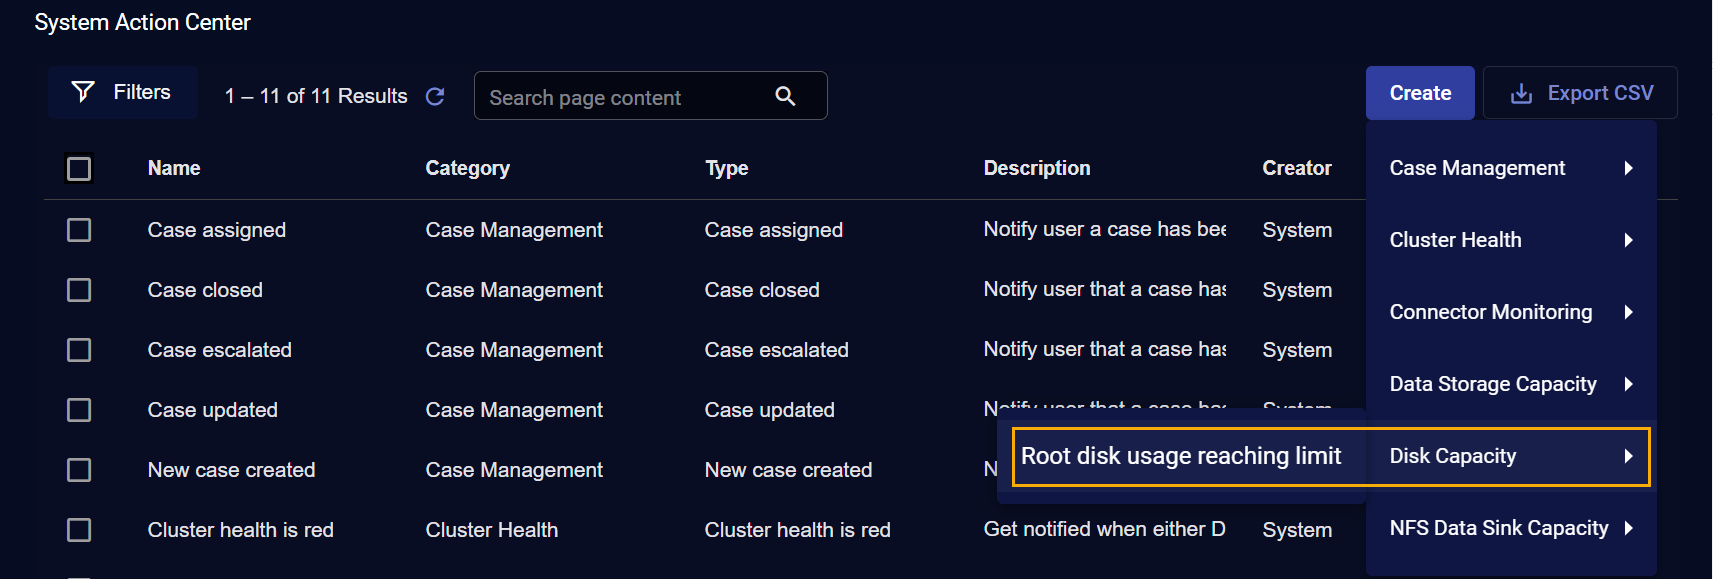
Click the Create button at the top of the System Action Center and select Disk Capacity | Root disk usage reaching limit from the dropdown that appears.
-
The Create Notification wizard starts with the Category set to Disk Capacity and the Type set to Root disk usage reaching limit.
-
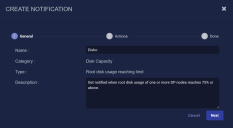
Supply a name for your notification rule in the Name field.
-
You can either accept the system-provided Description or supply your own. The description supplied here appears in the System Action Center's table of rules.
-
Click Next.
-
Use the Actions step to specify how this rule notifies you when it is triggered:
-
All rules have In Platform enabled so that triggered instances appear in the Notification Center.
-
You can also enable email notifications in the Notification Type: Email field.
-
Use the Recipients field to specify who will receive a notification email when the rule is triggered. Click to display a pick list containing all email recipients configured in the System | Configurations | Recipients page. If you want to send an email to someone who is not already configured in the Recipients page, you can type addresses in manually.
-
Use the Subject field to specify the subject line of the email. If you want to use different subject lines for different recipients, you can click the Add Configuration button and add a second Email notification with a different subject line and set of addressees.
The figure below shows a configured email notification:
-
-
-
Click Next and review the settings for your notification rule. Use the Back button to go back and correct anything that's not quite right. When you are satisfied, click Submit to add your rule to the list.
The rule appears in the System Action Center's list and is automatically Enabled.
Creating an NFS Data Sink Capacity Notification Rule
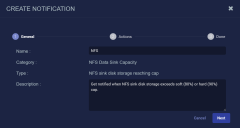
NFS Data Sink Capacity Notification rules notify you when the percentage of NFS Data Sink capacity used reaches either the soft cap (80% used) or the hard cap (90%), measured over a five-minute interval.
Refer to Adding an NFS Data Sink for more information on NFS data sinks and the System | Data Processor | Data Sinks page for an overview of their health.
Use the following procedure to create an NFS Data Sink Capacity Notification rule:
-
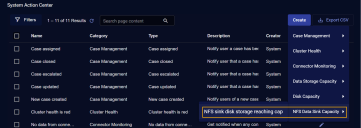
Click the Create button at the top of the System Action Center and select NFS Data Sink Capacity | NFS sink disk storage reaching cap from the dropdown that appears.
-
The Create Notification wizard starts with the Category set to NFS Data Sink Capacity and the Type set to NFS sink disk storage reaching cap.
-
Supply a name for your notification rule in the Name field.
-
You can either accept the system-provided Description or supply your own. The description supplied here appears in the System Action Center's table of rules.
-
Click Next.
-
Use the Actions step to specify how this rule notifies you when it is triggered:
-
All rules have In Platform enabled so that triggered instances appear in the Notification Center.
-
You can also enable email notifications in the Notification Type: Email field.
-
Use the Recipients field to specify who will receive a notification email when the rule is triggered. Click to display a pick list containing all email recipients configured in the System | Configurations | Recipients page. If you want to send an email to someone who is not already configured in the Recipients page, you can type addresses in manually.
-
Use the Subject field to specify the subject line of the email. If you want to use different subject lines for different recipients, you can click the Add Configuration button and add a second Email notification with a different subject line and set of addressees.
The figure below shows a configured email notification:
-
-
-
Click Next and review the settings for your notification rule. Use the Back button to go back and correct anything that's not quite right. When you are satisfied, click Submit to add your rule to the list.
The rule appears in the System Action Center's list and is automatically Enabled.


Ensuring that Links In System Action Center Emails Work Correctly
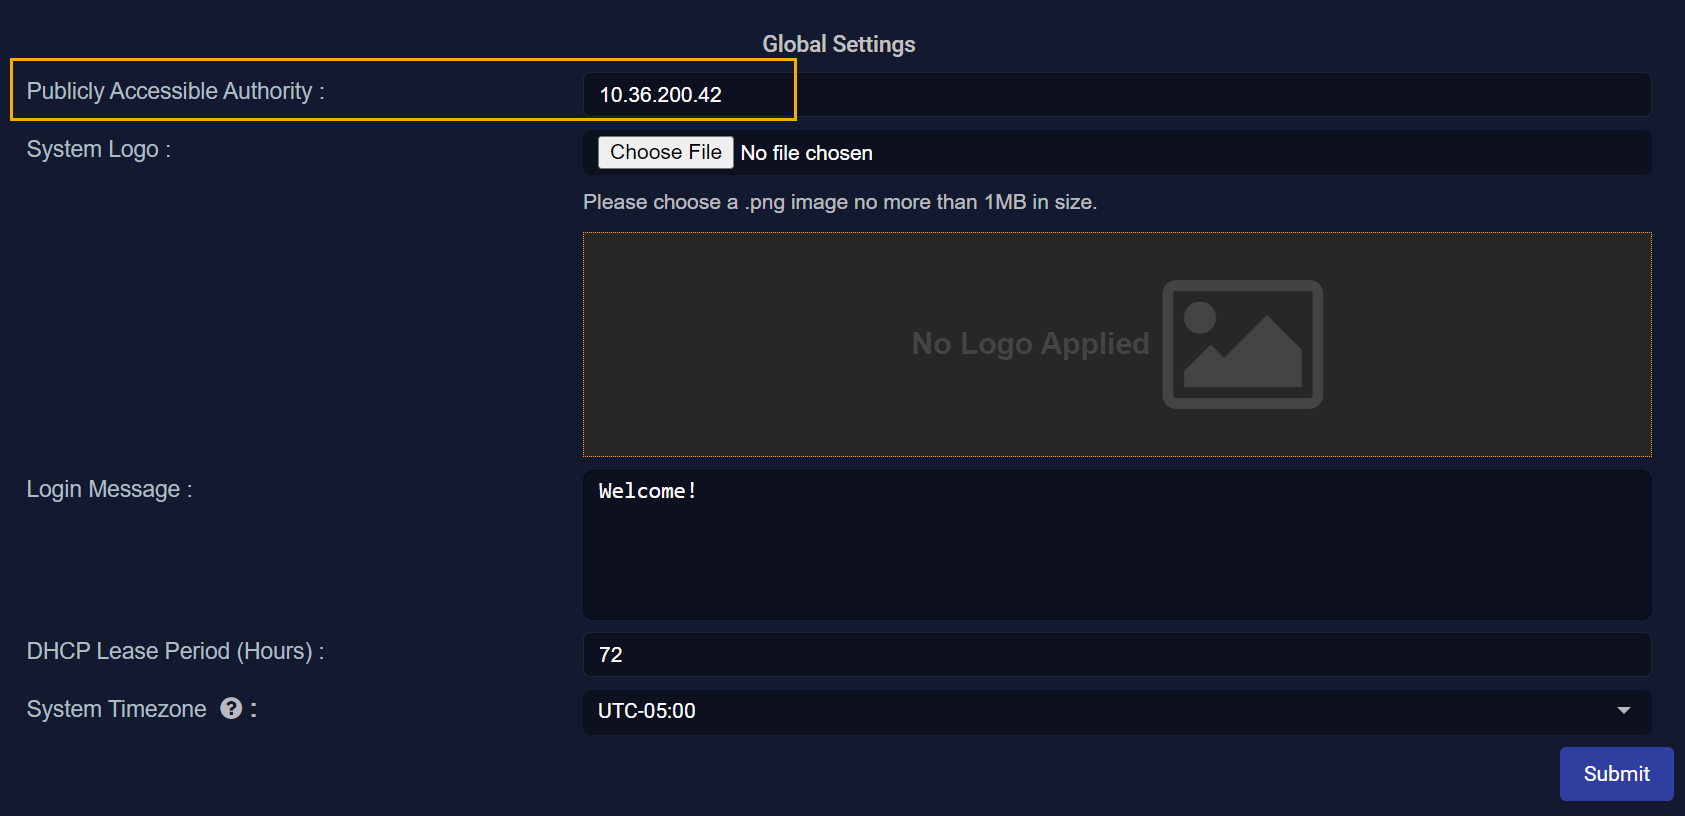
Notification emails sent from the System Action Center for Case Management events include a link to the corresponding case in the user interface. In order for these links to work correctly, you must specify the Stellar Cyber DP's publicly accessible IP address using the Publicly Accessible Authority option in the Global Settings section of the System | Settings page.
Using the System | Settings Page
-
Navigate to the System | Settings page and scroll down to Global Settings.
-
Enter the public IP address of the Stellar Cyber DP in the Publicly Accessible Authority field. This is the same IP address users enter in their browser to access the Stellar Cyber user interface. You only need to enter the IP address. For example:

-
Click Submit to apply your settings.