Using the Alerts Page 
This page allows you to view observed alerts organized by the XDR Kill Chain and analyzed with machine learning. From here, you can also access alert details and create custom alert types. Stellar Cyber generates alerts by using machine-learning algorithms to search for specific security-related events. You can get to the Alerts page by:
-
Selecting the Alerts menu option
-
Clicking a stage in the XDR Kill Chain loop
-
See Machine Learning and Analytics Overview for an introduction to Stellar Cyber's machine-learning technology and links to individual alert descriptions organized by index and XDR Kill Chain stage.
-
See Machine Learning Alert Type Details for details on the available alert types and the actions you should take when one is triggered.
-
Stellar Cyber also provides an interactive tool that lets you look up alert types by data source, alert name, event type, or source index.
The Alerts page lists the available alert types according to the filters set in both the
You can always see which display filters are applied to the Alerts page by examining the checked boxes in the Filters panel at the left of the display.
Alerts Page Components
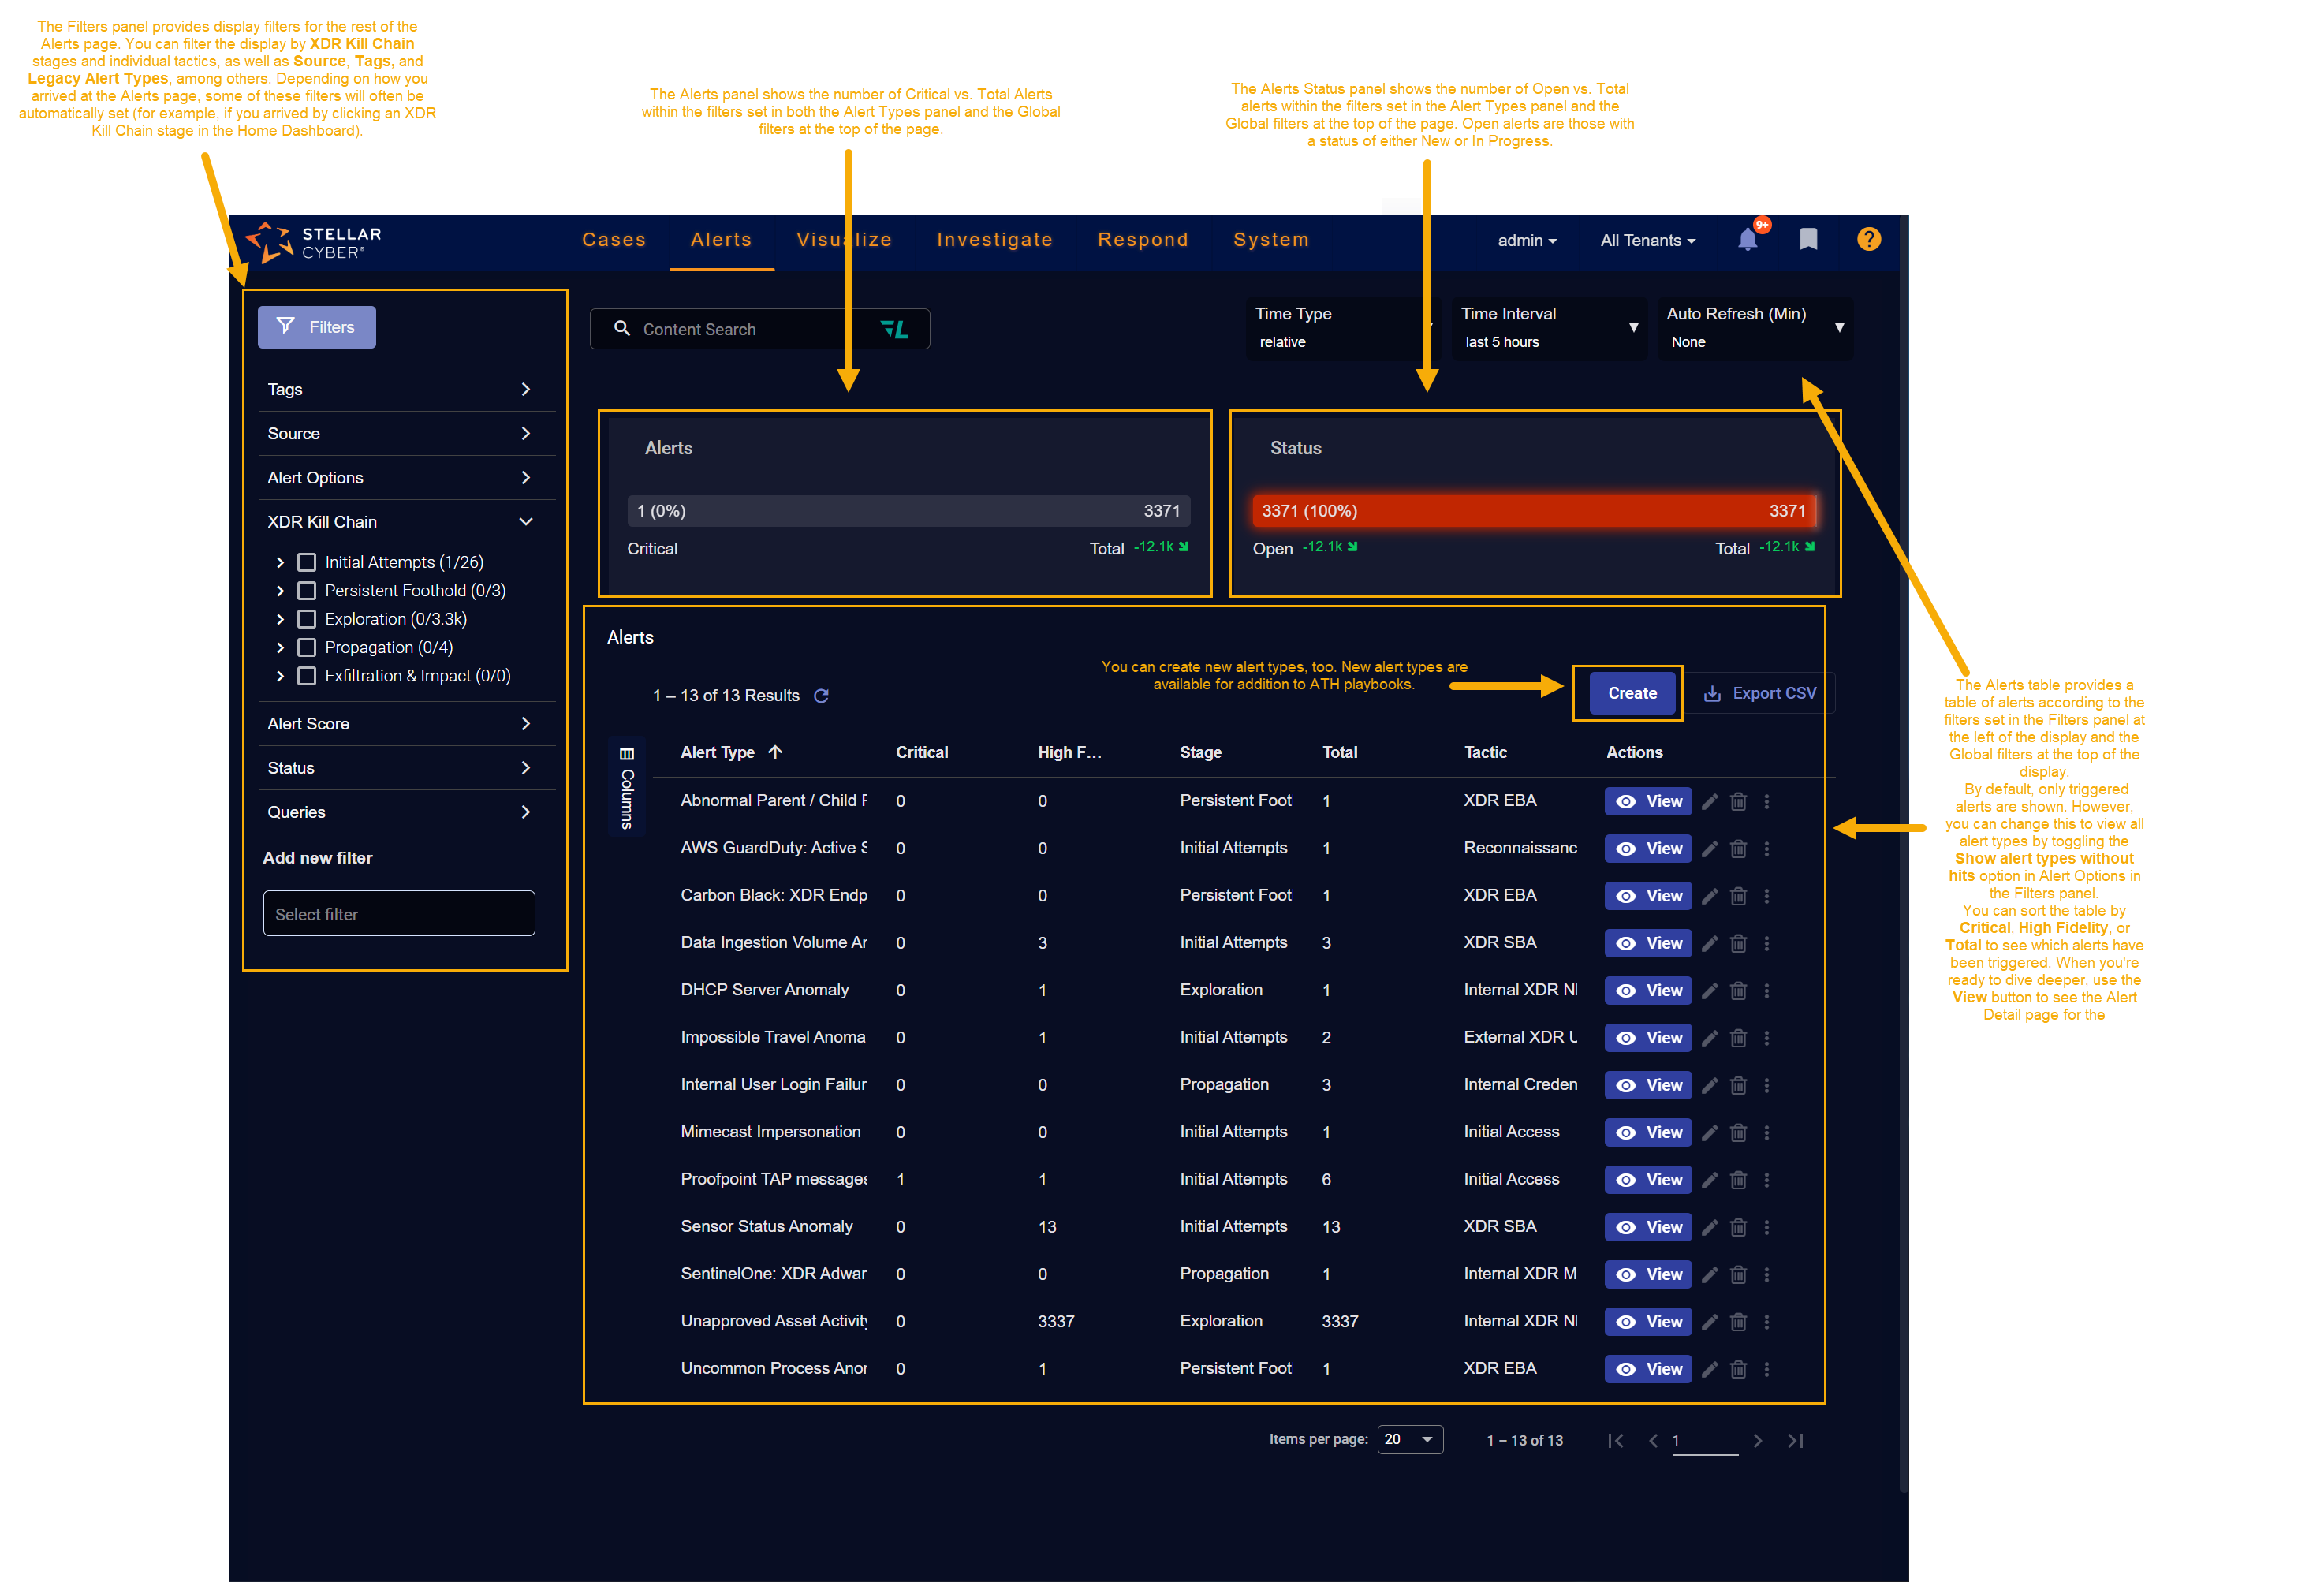
As shown in the figure below, the Alerts page consists of the following main components:
-
Alerts and Status panels – Provides at-a-glance status graphs for Critical vs. Total and Open vs. Total alerts, including trend information.
-
Filters panel – Provides display filters for the Alertspage using XDR Kill Chain stages and tactics, Source, Tags, and Legacy Event Types, among others. Filters applied here automatically affect the counts shown in the Alerts and Status panels described below.
-
Alerts table – Provides a sortable table listing the alert types available according to the current filters set in both the Filters panel and the Global Filters at the top of the page.
-
The table includes a Create button that takes you to the standard workflow for creating a new alert type.
-
The visible alerts are restricted to those accessible to the currently active tenant. Refer to "Which Custom Alert Types Can I See?," below, for information on which customer alert types are visible to you, depending on how you are logged in. The columns for Tenants and Tenant Group are displayed only for Partner users and Root users.
Understanding the Alerts and Status Cards
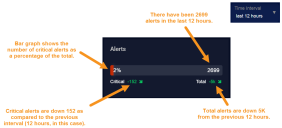
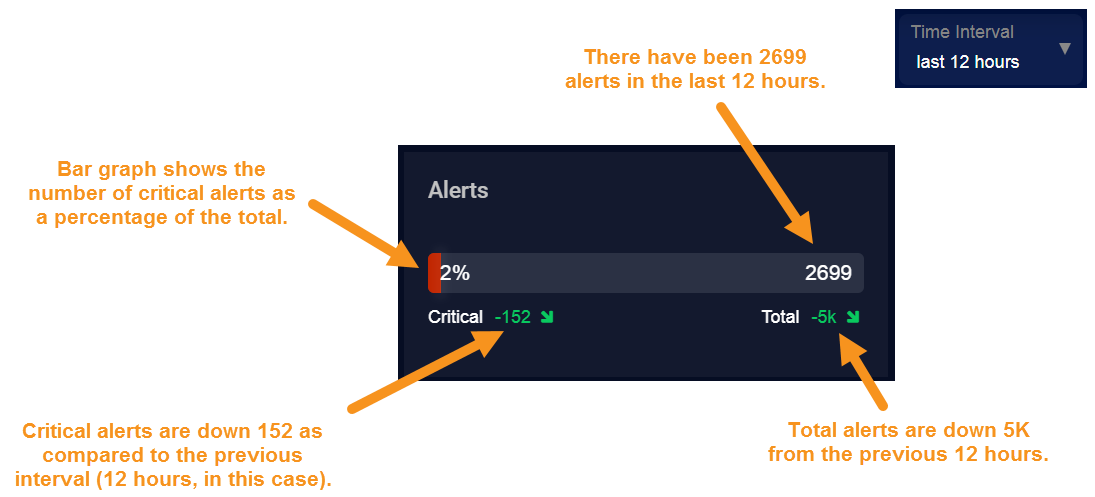
The Alerts and Status cards appear immediately above the Alerts table as illustrated below:

-
Alerts Card– Use this card to assess the number of Critical versus Total alerts for the selected Time Interval and filters.
-
The bar graph shows the number of critical alerts compared to the total number of alerts that match the selected filters. Critical alerts are those with an Alert Score of 75 or greater.
-
The Critical indicator shows you the trend in critical alert generation, comparing the net increase or drop in critical alerts to the previous Time Interval of the same size.
-
The Total indicator shows you the trend in total alerts, comparing the net increase or drop in total alerts generated to the previous Time Interval of the same size.
-
-
Status Card – Shows the number of Open alerts versus Total alerts for the selected Time Interval and filters. Open alerts are shown both as a count and a percentage of the total. You can also see trend information for both Open and Total alerts over the selected time interval below the graph.
-
The Open indicator shows you the trend in alert closure, comparing the net increase or drop in open alerts to the previous Time Interval of the same size.
-
The Total indicator shows you the trend in total alerts, comparing the net increase or drop in total alerts generated to the previous Time Interval of the same size.
Open alerts are those with a status of either Open or In progress.
-
Using Filters in the Filters Panel
The Filters panel provides a collapsible set of display filters that can be applied to the Alerts page. Click the Filters button at the top left of the display to toggle the Filters panel open and closed.

The counters in the Alerts and Status cards and the alert types listed in the Alerts table are all subject to the display filters set in the Filters panel. For example, suppose you clicked the XDR Kill Chain > Initial Attempts entry in Filters panel:
-
The Alerts table updates to reflect just those alert types available at the Initial Attempts XDR Kill Chain stage.
-
The Alerts and Status cards update to reflect just those alerts triggered at the Initial Attempts XDR Kill Chain stage.
Showing Alert Types Without Hits
The Filters panel also includes an Alert Options | Show Alert types without hits option. Enable this option and sort the table by Stage or Tactic to see the alert types available at a particular XDR Kill Chain stage or using a particular tactic (or, alternatively, set a filter for the stage/tactic in the Filters panel).
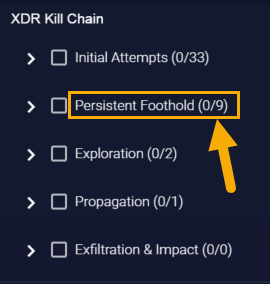
About the XDR Kill Chain Counters in the Filters Panel
The XDR Kill Chain entries in the Filters panel also show you Critical/Total alert counters subject to the global filters at the top of the display. For example, in the figure below, you can see that there are nine total alerts at the Persistent Foothold stage in the selected Time Interval, none of which are critical:
Automatically Configured Filters
Depending on how you arrived at the Alerts page, some of the display filters may already be set for you. For example, if you drilled to Alerts by clicking an XDR Kill Chain stage in the home dashboard, the corresponding stage is already selected as a filter. You can set the following types of filters in the Filters panel:
-
Tags – You can set display filters on both predefined and custom tags.
-
Source – You can set display filters that include or exclude both the Built-in alert types (those provided with Stellar Cyber) and any Custom alert types available to your tenancy.
-
XDR Kill Chain – You can set display filters on each XDR Kill Chain stage, as well as their individual associated tactics. Within a stage, tactics are organized from least to most severe.
-
Alert Score – You can limit the display to just those alerts within a specified range of scores. Click Alert Score and use the slider to specify the range.
-
Status – You can set display filters that include or exclude alerts based on their status (All Open, Any, New, In Progress, Ignored, or Closed).
-
Queries – you can use a configured query as a display filter.
You can also use the Add new filter field to add a new filter to the Filters panel. Click in the Add new filter field to see the list of available filters.
Working with the Alerts Table
The Alerts table lists the alerts available within the filters set in the Filters panel and the global filters at the top of the page. Depending on how you set the Show alert types without hits toggle, you can view only triggered alerts (the default) or all alerts (Show alert types without hits enabled)
You can use this table to understand the alert types available at different XDR Kill Chain stages and using different tactics, as well as to see the triggered alerts. You work with the Alerts table in the same way you do any Stellar Cyber table. Keep in mind the following techniques that are particularly useful when working with the Alerts table:
-
Leave the Show alert types without hits option disabled to focus on triggered alerts.
-
Sort the table using the Critical , High Fidelity, or Total columns to bring triggered alerts to the top of the table for investigation.
-
Enable the Show alert types without hits option and sort the table by Stage or Tactic to see the alert types available at a particular XDR Kill Chain stage or using a particular tactic (or, alternatively, set a filter for the stage/tactic in the Alert Types panel).
-
Use the Change Columns feature to add the Legacy Category and Legacy Type fields if you want to understand how XDR Kill Chain alert types map to the legacy model.
-
Each alert type in the table includes a View button that you can use to drill to a detail display of all the alerts triggered for that type.
-
The Tenants and Tenant Group columns help you understand which tenants have access to specific custom alert types.
-
The Playbooks column lets you see how many ATH Playbooks a given alert type has been assigned to. You can click the entry in this column to drill to a filtered view of the Respond | Automation page showing just those playbooks to which the corresponding alert type has been assigned.
-
Custom alert types are listed with standard Edit and Delete icons. Keep in mind that you can only delete a custom alert type if it's not assigned to any playbooks. The Playbooks column gives you an easy way to determine if it is. If you still want to delete the custom alert type, you must either remove it from any assigned playbooks or delete its assigned playbooks entirely.
Common Search and Filter Techniques
Stellar Cyber provides a variety of tools that help you find the data you need. Use the following summary of common search scenarios to help you perform your own searches, either globally, or in specific tables. The examples below are in the Alert Detail view, which you can display by clicking the View button for an alert in the Alerts table.
Searching for a Specific Interflow Key and Value
You can search for Interflow keys with specific values in a table in several ways:
-
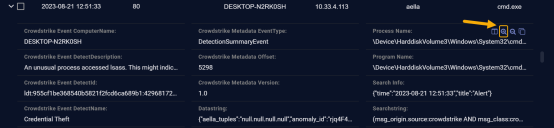
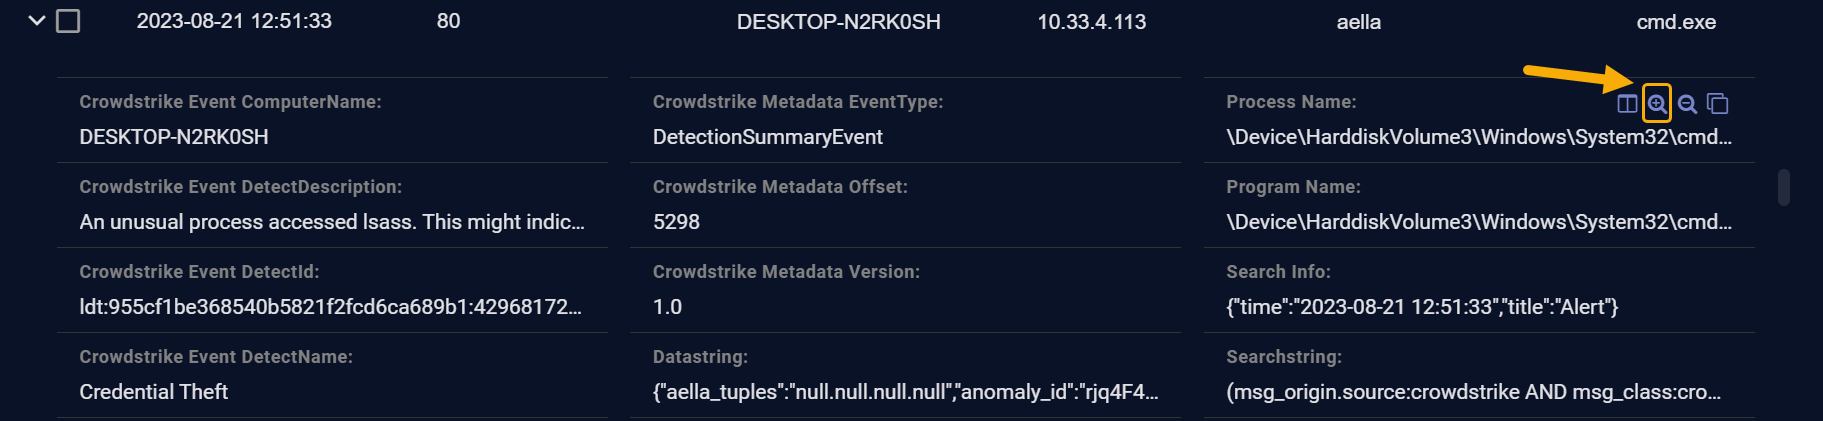
Find the key and value in a table and use the Filter For button to search for matching records. Once you add a term as a filter in this way, it automatically appears in the Filter Panel at the left of the display, too. For example, in the figure below, we're searching for Process Names matching the displayed value.
-
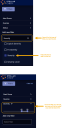
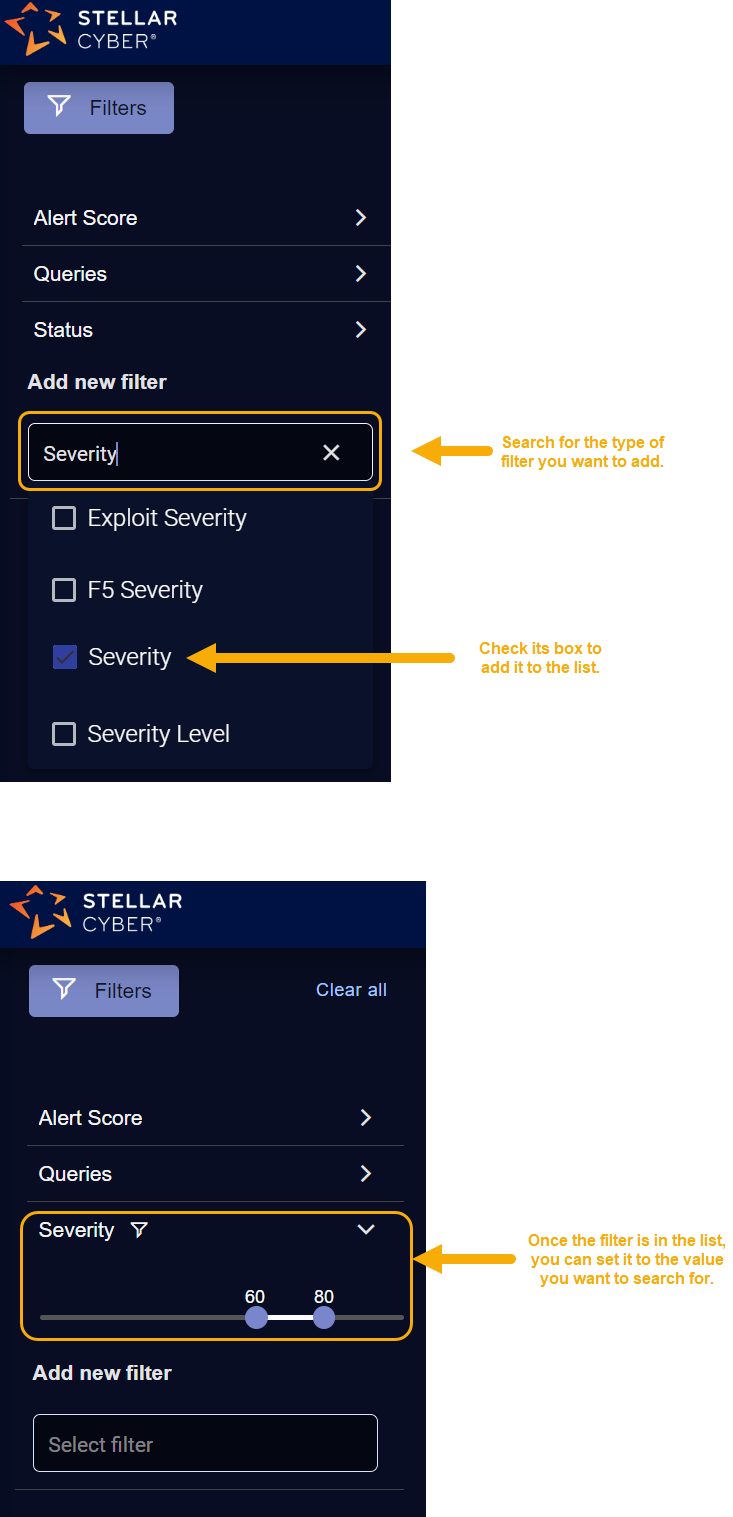
Add the Interflow key directly in the Filter Panel. If the attribute you want to search for is not already listed in the panel, you can use the Add new filter functionality to add it. Then, supply the value in the field. For example:
Searching for a Value Without a Key
If you know the value you want to search for but aren't certain of the Interflow key (for example, a number), your best route is the global search bar at the top of all Stellar Cyber pages. Take advantage of the full Lucene syntax to search for partial matches, fuzzy matches, and so on.
Excluding Values from a Table
Sometimes, it can be useful to narrow a search by temporarily excluding all records with a certain Interflow key value. This is the perfect time to use the Filter Out button in a table cell. For example, in the figure below, we're excluding all records matching the selected Host Name:

Removing Some Filter Criteria
You can remove individual filter criteria from the current search by clicking their standard delete (X) icons in the filter panel. For example:

Removing All Filter Criteria
You can remove all filter criteria by clicking the handy Clear all button at the top of the filter panel. For example:
![]()
Searching for a Specific Alert Type
You can search the Alerts table for all alerts of a specific type using either the global search bar or a table filter in the Alert Type column:
-
Use the global search bar to search the Alerts table for all alerts of a specific type by including the Interflow key of xdr_event.display_name followed by the name of the Alert Type you want to search for in quotation marks. For example, to search for the Recently Registered Domains alert type, you would enter the following in the search bar:


-
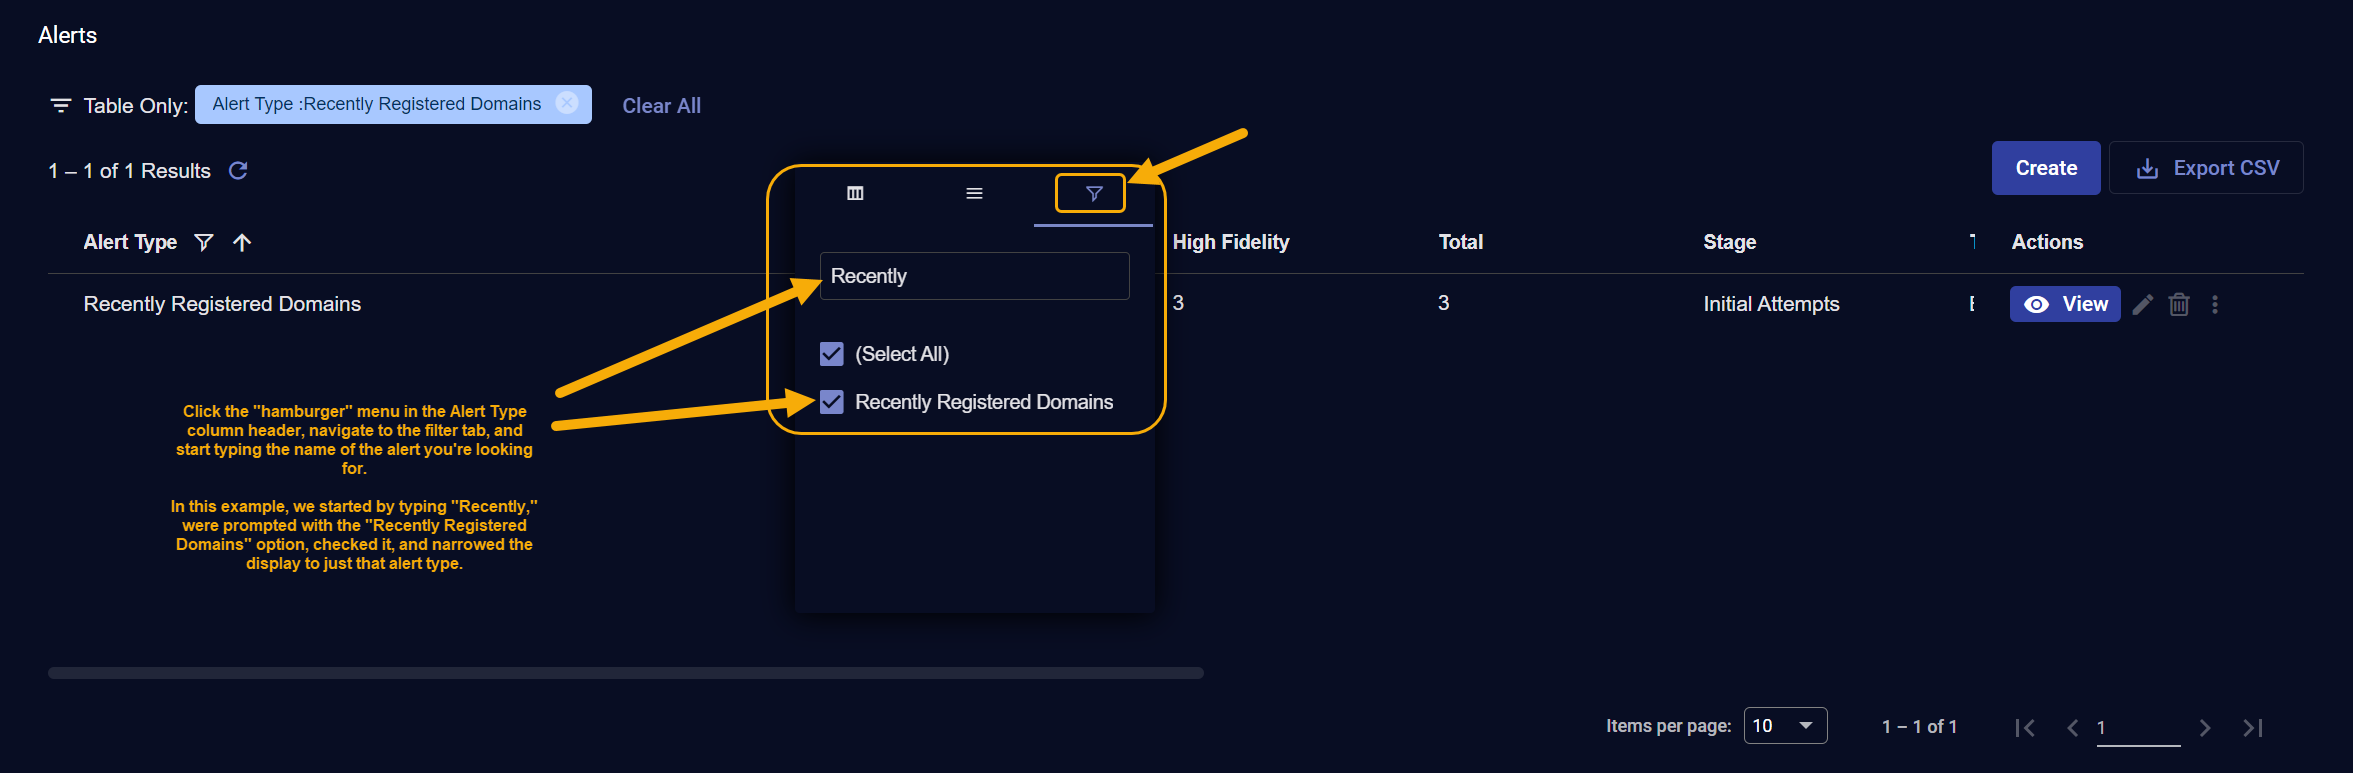
Use a table filter in the Alert Type column as follows:
-
Click the "hamburger" menu in the Alert Type column header.
-
Navigate to the Filter tab in the context menu that appears.
-
Start typing the name of the alert type for which you want to search in the text box.
-
When the matching alert type appears, click its box to apply the filter.
The filter appears at the top of the table, as in the figure below:

-
Search Tips
-
When using table data as a filter, be aware of whether the data includes multiple values. For example, the figure below shows values of both modular_sensor and Linux_agent for the data_sources Interflow key. Rather than using the Filter For button to add this entire term as a search filter, try manually supplying one or the other in the Filters panel at the left of the display.


Creating a New Alert Type
In addition to the alert types provided by Stellar Cyber, you can create your own custom alert types. Once you've created a custom alert type, you can add it to an automated threat hunting playbook.
-
Display the Stellar CyberAlerts page.
-
Click the Create button.

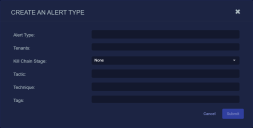
The Create an Alert Type dialog box appears:
-
Supply the following information in the Create an Alert Type dialog box
-
Alert Type – Required. Supply a unique, alphanumeric name for the custom alert type.
-
Tenants – Required. Either set to All Tenants or select the tenant groups and tenants that will have access to this custom alert type. Refer to Which Custom Alert Types Can I See and Act Upon? for information on how your tenancy determines which alert types you can see.
-
Kill Chain Stage – Select the XDR Kill Chain stage to which the custom alert type belongs from the dropdown.
-
Tactic – Select the tactic for the custom alert type from the dropdown. The available tactics are filtered according to the selected Kill Chain Stage.
-
Technique – Select the technique for the custom alert type from the dropdown. The available techniques are filtered according to the selected Kill Chain Stage and Tactic.
If you set a value for any one of the Kill Chain Stage, Tactic, or Technique fields, you are required to set all three. The dialog box will not let you select an invalid combination of these values.
-
Tags – Select tags for the custom alert type from the dropdown.
Tags are required if you do not set values for the Kill Chain Stage, Tactic, and Technique fields.
-
-
Click Submit to add the custom alert type to the list.


Your custom alert type will only appear in the list right away if the Show alert types without hits option is enabled at the top of the table. Because you just created the alert type, it likely won't have any hits yet.
Adding the Custom Alert Type to a Playbook
Once you've created a custom alert type you can add it to an Automated Threat Hunting playbook. You can either do this directly from the Respond | Automation page, or you can drill to a pre-filled template for a new playbook using the custom alert type as follows:
-
Create the custom alert type using the procedure in the previous section.
-
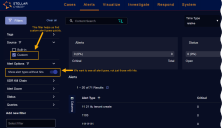
Ensure that the Alert options | Show alert types without hits option in the Filters panel is enabled and locate your new custom alert type in the Alerts table.
You can make it easier to find custom alert types by setting the Source filter in the Alert Types panel to Custom as in the figure below.
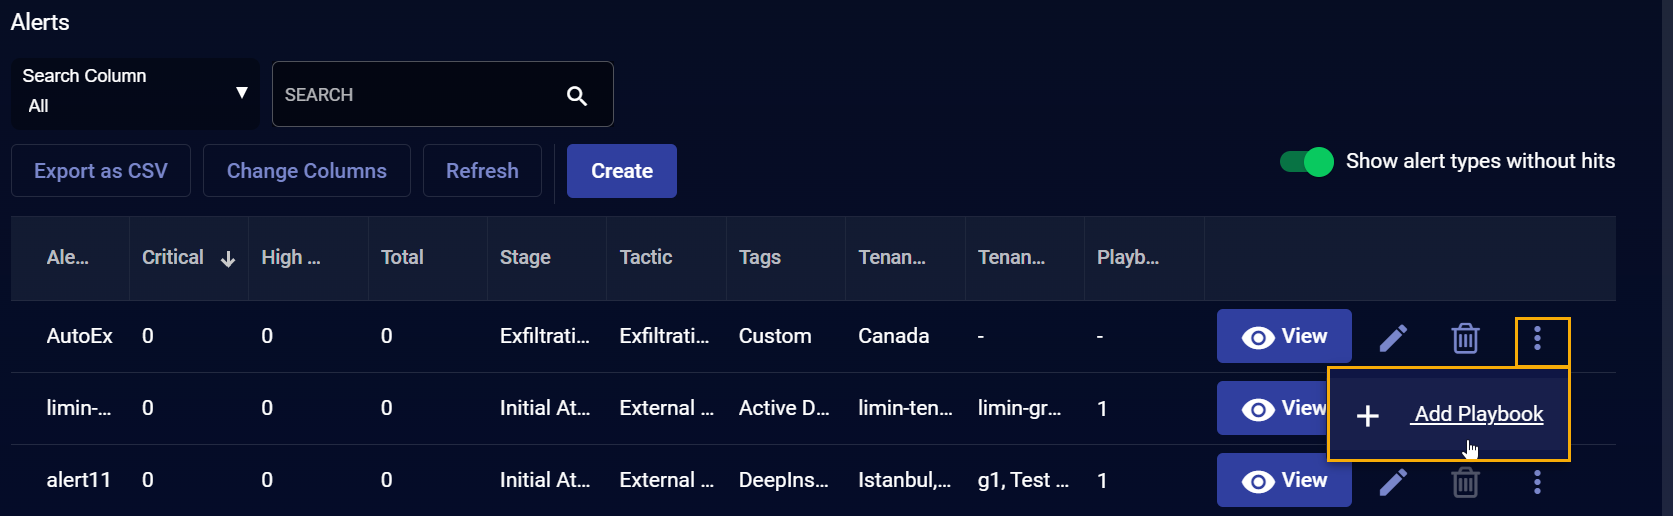
-
We just created the custom alert type named AutoEx. Now we can click its three-dot menu
 and use the + Add Playbook option to launch the standard ATH Playbook workflow with the template pre-filled to use our custom alert type.

When you start a playbook using this technique, the template is automatically pre-filled with the Actions section populated based on the alert type's settings:
-
Type is set to Create Alert
-
Alert Type is set to the selected alert type.
-
Kill Chain Stage, Tactic, Technique, and Tags are all pre-filled based on the custom alert type's settings.
Editing Custom Alert Types
You can edit a custom alert type using its standard Edit button at the right of its entry in the Alerts table. Keep in mind, however, that once a custom alert type is assigned to a playbook, you cannot delete its assigned Tenants or Tenant Groups.
Which Custom Alert Types Can I See and Act Upon?
Stellar Cyber's policy is to restrict access to different objects based on ownership and tenancy. In general, you can only see and act upon custom alert types that were created by or assigned to a tenant or tenant group to which you are logged in as. Start by checking your Tenancy at the upper right of the display. For example, the user below is logged in with the STML tenant.

You can always see alert types set to All Tenants. From their, your tenancy determines which custom alert types you can see and act upon, as follows:
-
If you are logged in with a tenant and the tenant owns the alert type.
-
If you are logged in with a tenant and the alert type's tenant list includes the tenant.
-
If you are logged in with a tenant and a tenant group in the alert type's tenant group list contains the tenant.
-
If you are logged in with a tenant group and the alert type's tenant group list includes the tenant group.
-
If you are logged in with a tenant group and a tenant in the tenant group owns the alert type.
-
If you are logged in with a tenant group and a tenant in the alert type’s tenant list is in the tenant group.
About Deduplication for Custom Alerts
To reduce noise and focus attention, Stellar Cyber automatically deduplicates multiple instances of the same custom alert that fire within a small window of time (five minutes, by default). Stellar Cyber performs this deduplication by discarding fields that are always different between separate alerts, calculating a hash, and monitoring future events for matches.
You can override the default settings for deduplication of alerts created as part of an ATH Playbook and specify your own time window. Refer to Create Alert Action . ![]()
Certain fields are always different between two Interflow records, even if those records represent multiple iterations of the same alert. Because of this, they are discarded before the hash used to identify duplicate alerts is calculated. For that reason, the following fields are not considered when calculating the hash used for deduplication:
Exact matches between:
-
stellar_index_id
-
stellar_uuid
-
timestamp
-
timestamp_utc
-
write_time
-
xdr_event
-
index
-
id
-
type
Fields containing the following substrings:
-
stellar
-
time
-
date
-
index
